

Starting a new hobby like sewing can feel both exciting and intimidating. You have a brand-new sewing machine, a head full of ideas, but one big question remains: where do you actually begin? The key to building lasting confidence is to start with projects that are enjoyable, manageable, and yield a beautiful, functional item you can be proud of. This guide is designed to be your roadmap, offering a curated collection of sewing project ideas for beginners that will teach you essential skills one stitch at a time.
This article serves as a comprehensive how-to guide, showcasing tangible examples that you can replicate. For each project, you will find a clear description, the skills you'll learn, estimated difficulty, a detailed materials list, and a step-by-step outline. We also include common pitfalls to avoid and fun variations to inspire your next creation. This structured approach ensures you’re not just following instructions, but genuinely building a solid foundation of sewing knowledge.
At B-Sew Inn, we're committed to empowering crafters through our custom sewing machine designs and extensive support. Our goal is to guide you from threading your first needle to completing complex projects with confidence. Through our online classes, training, and extensive resources, we provide the support you need to succeed. This guide is your first step in that partnership. Let's explore these simple yet rewarding projects and unlock the potential of your sewing machine.
1. Simple Tote Bags
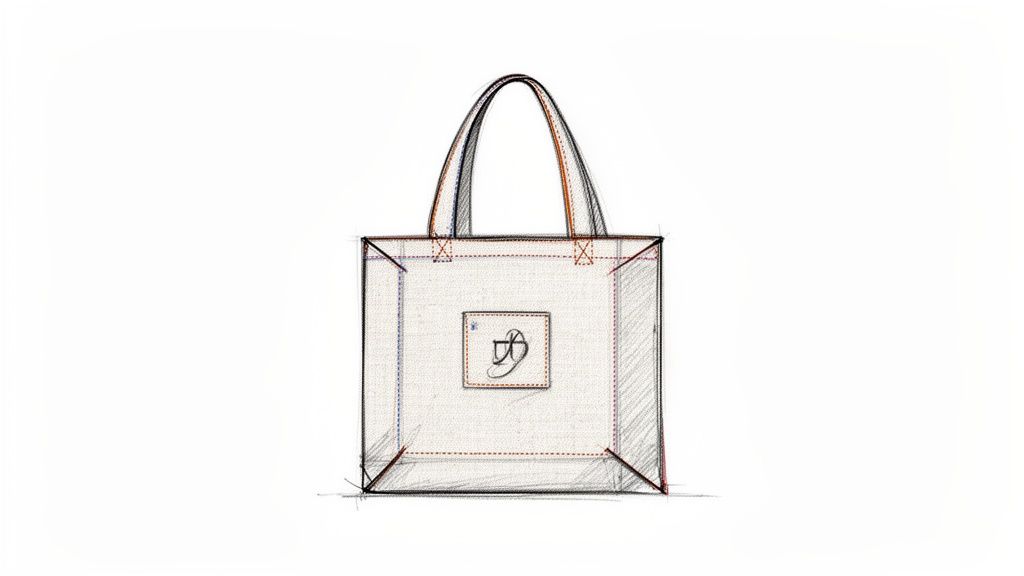
The simple tote bag is a quintessential first project for anyone new to sewing. It’s a practical, functional item built from just a few rectangular pieces of fabric, making it one of the most rewarding sewing project ideas for beginners. This project teaches fundamental skills like sewing straight seams, pivoting at corners, and creating handles, all while producing something you can use immediately.
The confidence boost from completing a usable tote bag is immense and sets a solid foundation for more complex projects. If you're just getting started on your sewing journey, understanding the basics is key; our guide on how to start sewing covers essential machine setup and first stitches.
Why It’s a Great Beginner Project
A basic tote bag has a simple construction: two main body pieces and two strap pieces. This simplicity allows you to focus on mastering core techniques without getting overwhelmed by complicated patterns or techniques like installing zippers.
The forgiving nature of sturdy fabrics like canvas or quilting cotton makes them easy to handle, cut, and sew. You’ll practice essential skills that are transferable to almost every future sewing project.
Project Breakdown
- Skills Learned: Sewing straight lines, backstitching, pressing seams, topstitching, and attaching handles.
- Time to Complete: 1-2 hours
- Difficulty: 1/5 (Very Beginner)
Materials & Notions
- Fabric: 1/2 to 1 yard of sturdy fabric like canvas, denim, or quilting cotton.
- Thread: All-purpose polyester sewing thread that matches your fabric.
- Tools: A sewing machine, fabric scissors, pins or clips, an iron, and a ruler or measuring tape.
Quick Steps to Success
- Cut Fabric: Cut two identical rectangles for the bag body and two long, thin rectangles for the straps.
- Create Straps: Fold and press the strap pieces, then topstitch along the edges to create durable handles.
- Attach Straps: Pin the straps to the right side of each body piece.
- Sew Body: Place the body pieces right-sides together and sew along the sides and bottom.
- Finish & Turn: Press your seams open, turn the bag right-side out, and give it a final press.
Tips for a Perfect Tote
- Use a Walking Foot: If sewing with thick layers (like canvas), a walking foot helps feed the fabric evenly.
- Reinforce Handles: Sew a small "X" in a box pattern where the handles attach to the bag for extra strength.
- Add a Lining: For a more professional finish, create a second, slightly smaller bag from lining fabric and sew it inside the main bag.
- Get Inspired: Before you start, it can be helpful to browse various tote bag designs to see different shapes, pocket placements, and handle styles.
2. Pillowcases and Decorative Pillows
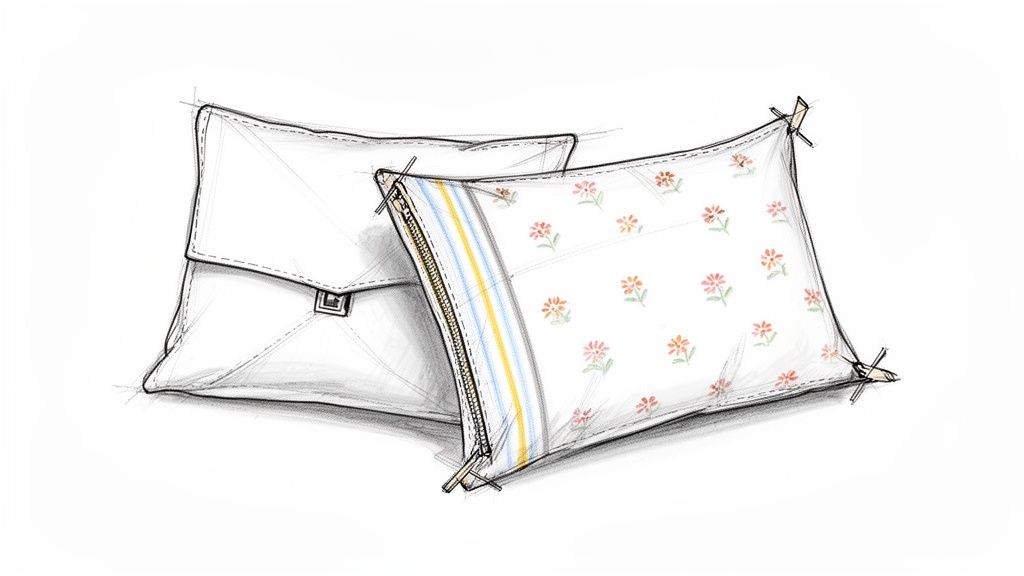
Creating custom pillowcases is another fantastic entry point into the world of sewing. As one of the most satisfying sewing project ideas for beginners, this project allows you to instantly personalize your living space while mastering essential skills. It focuses on sewing straight lines and simple hemming, making it an excellent way to build confidence with your machine.
Whether you're making a simple envelope-style cover or a standard pillowcase, the process is straightforward and the result is both beautiful and functional. You can transform the look of a room in under an hour, making this a highly rewarding first or second project.
Why It’s a Great Beginner Project
Pillowcases are typically made from rectangular pieces of fabric, eliminating the need for complex pattern cutting. This project is perfect for practicing precise measurements and clean finishes. You'll learn how to create an "envelope closure," a clever and simple way to secure a pillow insert without needing zippers or buttons.
The project is also incredibly versatile. You can start with basic cotton and, as you gain skills, experiment with different textures and embellishments. Once you've mastered the basics, you might explore different fabric types and their unique benefits, such as durable and soft bamboo pillowcases.
Project Breakdown
- Skills Learned: Measuring and cutting accurately, sewing straight seams, hemming edges, creating an envelope closure, and turning corners.
- Time to Complete: 30-60 minutes
- Difficulty: 1/5 (Very Beginner)
Materials & Notions
- Fabric: 1 yard of soft, breathable fabric like quilting cotton, flannel, or linen.
- Thread: All-purpose polyester sewing thread that coordinates with your fabric choice.
- Tools: A sewing machine, fabric scissors or a rotary cutter and mat, pins, an iron, and a ruler or measuring tape.
- Pillow Insert: A standard or decorative pillow form to fit your finished cover.
Quick Steps to Success
- Cut Fabric: Cut one large rectangle of fabric according to the size of your pillow insert, adding allowances for seams and the envelope overlap.
- Hem the Ends: Create a clean, double-folded hem on each of the two short ends of your fabric rectangle and stitch them down.
- Fold the Body: With the right side facing up, fold the hemmed ends inward so they overlap in the center. This creates the envelope opening.
- Sew the Sides: Pin the raw edges along the top and bottom and sew these two side seams.
- Finish & Turn: Clip the corners to reduce bulk, turn the pillowcase right-side out, and press for a crisp, professional finish.
Tips for a Perfect Pillowcase
- Press Everything: Iron your fabric before cutting and press your seams as you sew. This is the key to a professional-looking result.
- Clip Corners: Before turning your pillowcase right-side out, carefully snip the corners at a 45-degree angle (without cutting the stitches) for sharp, pointed corners.
- Add Embellishments: Once you're comfortable with the basics, try adding trim, a contrasting fabric band, or simple embroidery for a personalized touch.
3. Simple Skirts and Pants with Elastic Waistbands
Moving from accessories to apparel can feel intimidating, but simple skirts and pants with elastic waistbands are the perfect gateway into garment making. These are fantastic sewing project ideas for beginners because they eliminate complex closures like zippers or buttons. This project introduces fundamental garment construction skills, such as reading a pattern, understanding fabric grain, and creating a casing for elastic.
The satisfaction of sewing your first wearable piece of clothing is a huge motivator. You'll create a comfortable, custom-fit item like pajama pants or a flowy skirt, building the confidence needed to tackle more advanced patterns.
Why It’s a Great Beginner Project
The beauty of an elastic waistband is its simplicity and forgiveness. It doesn't require precise fitting techniques, making it easy to achieve a comfortable and wearable result on the first try. Projects like these often use simple shapes and straight seams, allowing you to focus on the basics of putting a garment together.
You'll learn how to work with larger pieces of fabric and see how a flat pattern transforms into a three-dimensional garment, a truly magical part of the sewing process.
Project Breakdown
- Skills Learned: Reading a simple pattern, cutting fabric on the grain, sewing long seams, creating an elastic casing, and hemming.
- Time to Complete: 2-4 hours
- Difficulty: 2/5 (Easy Beginner)
Materials & Notions
- Fabric: 1-2 yards of lightweight woven fabric like cotton, rayon, or linen. For pajama pants, a soft cotton flannel or knit is an excellent choice.
- Thread: All-purpose polyester sewing thread that complements your fabric.
- Elastic: 1-inch wide elastic, measured to your waist size.
- Tools: A sewing machine, fabric scissors, pins, a safety pin or bodkin to thread the elastic, and a ruler or measuring tape.
Quick Steps to Success
- Cut Fabric: Lay out your pattern pieces on the fabric, paying close attention to the grainline, and cut them out.
- Sew Seams: Pin and sew the main leg or skirt seams, following the pattern instructions.
- Create Casing: Fold over the top edge of the waist to create a channel (casing) for the elastic, leaving a small opening.
- Insert Elastic: Attach a safety pin to one end of the elastic and thread it through the casing. Sew the ends of the elastic together and close the opening.
- Hem Garment: Try on the garment to determine the perfect length. For guidance on getting a clean finish, review our tutorial on how to hem pants.
Tips for a Perfect Fit
- Pre-Wash Your Fabric: Always pre-wash and dry your fabric before cutting to prevent your finished garment from shrinking.
- Finish Your Seams: Use a zigzag stitch or a serger on the raw edges of your seams to prevent fraying and increase durability.
- Use a Stretch Needle: If you choose a knit fabric for joggers or comfy pants, switch to a stretch or ballpoint needle to avoid skipped stitches.
- Check the Fit: Before sewing the final seams, pin the garment together and try it on to check for any major fit adjustments.
4. Beginner Quilts with Pre-cut Fabric Strips
Diving into quilting can seem intimidating, but using pre-cut fabric collections is a game-changer. These bundles, often called jelly rolls (strips), charm packs (squares), or layer cakes (larger squares), remove the most daunting step for a new quilter: cutting dozens of pieces accurately. This makes quilting one of the most accessible and impressive sewing project ideas for beginners.
This approach allows you to focus on the core joys of quilting: piecing, pressing, and watching a beautiful design come to life. By starting with perfectly coordinated, pre-cut fabric, you can create stunning baby quilts or lap throws with confidence. For a complete overview of the process, our guide on quilting for beginners provides a step-by-step walkthrough.
Why It’s a Great Beginner Project
The biggest advantage of pre-cuts is consistency. All pieces are cut with precision, which helps you achieve sharp points and flat blocks from your very first try. You get to skip the rotary cutter learning curve and jump straight into sewing.
These fabric bundles are also curated by designers, ensuring your finished quilt will have a beautiful, cohesive color palette without the stress of choosing individual fabrics. This makes the project fun and rewarding, not frustrating.
Project Breakdown
- Skills Learned: 1/4" seam allowance, chain piecing, pressing seams, simple quilting, and binding.
- Time to Complete: 8-15 hours
- Difficulty: 2/5 (Confident Beginner)
Materials & Notions
- Fabric: One pre-cut bundle (like a jelly roll or charm pack) and coordinating fabric for backing and binding.
- Thread: High-quality cotton quilting thread.
- Batting: A piece of cotton or cotton-blend batting sized for your quilt.
- Tools: A sewing machine with a 1/4" foot, a rotary cutter, mat, and ruler, pins or clips, and an iron. Find all the essential quilting notions here.
Quick Steps to Success
- Arrange Pieces: Lay out your pre-cut pieces on a flat surface to plan your design.
- Piece the Top: Sew the pieces together in rows using a consistent 1/4" seam allowance.
- Press Seams: Press the seams in each row in alternating directions to help them nest together neatly.
- Assemble Quilt Sandwich: Layer your quilt back (wrong side up), batting, and quilt top (right side up). Baste the layers together.
- Quilt & Bind: Quilt through all three layers using simple straight lines, then trim the edges and attach the binding.
Tips for a Perfect First Quilt
- Use a 1/4" Foot: This specialty presser foot has a guide that makes sewing a perfect quarter-inch seam almost effortless.
- Chain Piece: Save time and thread by sewing your pieces one after another without cutting the thread in between.
- Press, Don't Iron: When pressing seams, lift and press the iron. Avoid dragging it back and forth, which can distort your fabric.
- Start Small: A baby or lap-sized quilt is a much more manageable first project than a bed-sized one.
5. Drawstring Bags and Pouches
Drawstring bags are a fantastic step up from basic rectangular projects, introducing new skills without a steep learning curve. These versatile pouches teach you how to create a casing (a channel for the drawstring) and offer a neat, functional closure. They are one of the most practical sewing project ideas for beginners, perfect for creating gift bags, travel pouches, or simple storage solutions.
Completing a drawstring bag is incredibly satisfying because it involves a clever bit of sewing engineering that comes together beautifully. It’s a project that looks more complicated than it is, giving you a major confidence boost and a useful item you can customize endlessly.
Why It’s a Great Beginner Project
The magic of a drawstring bag is in the casing. This single technique opens the door to many other projects, like elastic-waist pants or hooded sweatshirts. The construction is still based on simple rectangles, but it adds a crucial new skill.
This project allows you to practice precise sewing, folding, and topstitching in a small, manageable format. You can make one in under an hour, making it an ideal project for instant gratification and practicing new techniques.
Project Breakdown
- Skills Learned: Sewing straight seams, creating a casing, topstitching, and inserting a drawstring.
- Time to Complete: 30-60 minutes
- Difficulty: 2/5 (Easy Beginner)
Materials & Notions
- Fabric: 1/4 to 1/2 yard of light to medium-weight fabric like quilting cotton or linen.
- Thread: All-purpose polyester sewing thread to match your fabric.
- Drawstring: Ribbon, cord, or a self-made fabric tube.
- Tools: A sewing machine, fabric scissors, pins or clips, an iron, a safety pin, and a ruler.
Quick Steps to Success
- Cut Fabric: Cut one or two rectangular pieces of fabric, depending on your chosen construction method.
- Sew Body: With right sides together, sew the side and bottom seams, leaving the top edge open.
- Create Casing: Fold the top edge down twice toward the inside and press. Topstitch along the bottom folded edge to create the casing, leaving the ends open.
- Insert Drawstring: Attach a safety pin to the end of your cord or ribbon and guide it through the casing.
- Finish & Secure: Tie the ends of the drawstring together and turn your bag right-side out.
Tips for a Perfect Pouch
- Easy Threading: Use a safety pin or a bodkin to easily guide the drawstring through the casing.
- Reinforce the Casing: Fuse a thin strip of interfacing along the top edge of the fabric before sewing to add durability to the casing area.
- Use French Seams: For a beautiful, professional-looking interior with no raw edges, use French seams on the bag's body.
- Mark Your Lines: Use a fabric pencil to mark your folding and stitching lines for the casing to ensure it's perfectly straight and even.
6. Simple Aprons and Chef's Wear
A simple apron is an excellent gateway into the world of garment sewing without the stress of complex fitting. This practical project combines straight seams, gentle curves for the bib, and pocket application, making it one of the most versatile sewing project ideas for beginners. Creating a functional apron builds confidence and teaches you how to handle larger pieces of fabric.
The satisfaction of sewing something you can wear in the kitchen or workshop is immediate and rewarding. Aprons are also fantastic handmade gifts, easily personalized with embroidery or fabric choices. They offer a perfect opportunity to practice skills that are directly transferable to more advanced clothing projects.
Why It’s a Great Beginner Project
Aprons don't require precise sizing, which removes one of the biggest hurdles for new sewists. The construction is straightforward: a main body panel, a bib, pockets, and ties. This allows you to focus on techniques like attaching pockets evenly and creating clean, finished edges with topstitching.
You can start with a simple, no-frills design and later advance to more decorative styles with ruffles or contrasting fabrics. This scalability makes the apron an ideal project to return to as your skills grow.
Project Breakdown
- Skills Learned: Sewing straight and curved seams, attaching pockets, hemming, creating straps/ties, and topstitching.
- Time to Complete: 2-3 hours
- Difficulty: 2/5 (Easy Beginner)
Materials & Notions
- Fabric: 1 to 1.5 yards of durable fabric like canvas, denim, or quilting cotton.
- Thread: All-purpose polyester sewing thread to match your fabric.
- Tools: A sewing machine, fabric scissors or a rotary cutter, pins, an iron, and a ruler or measuring tape.
- Optional: Bias tape for finishing edges, D-rings for an adjustable neck strap.
Quick Steps to Success
- Cut Fabric Pieces: Cut out the main apron body, bib (if separate), pocket(s), and long rectangles for the waist and neck ties.
- Prepare Pockets: Fold and press the top edge of the pocket, then topstitch it. Press the other three sides under.
- Attach Pockets: Pin the prepared pocket onto the apron front and topstitch it in place, reinforcing the top corners.
- Create and Attach Ties: Fold, press, and sew the long rectangles to create the ties. Attach them to the waist and neck of the apron body.
- Hem Edges: Finish the apron by folding, pressing, and sewing a clean hem around all the raw edges.
Tips for a Perfect Apron
- Reinforce Pockets: Stitch a small triangle or a square with an "X" at the top corners of your pockets to prevent them from tearing with use.
- Use Bias Tape: For a professional-looking finish on curved edges like armholes, use pre-made or self-made bias tape.
- Topstitch for Durability: Topstitching not only looks great but also adds strength to your seams, which is essential for a well-used apron.
- Pre-Wash Your Fabric: Always pre-wash and dry your fabric before cutting to prevent the finished apron from shrinking or warping.
7. Cloth Napkins and Table Linens
Creating your own cloth napkins and table linens is a sophisticated yet simple way to practice essential finishing techniques. This is one of the best sewing project ideas for beginners because it focuses on precision and detail, like creating perfect corners and elegant hems, on a small and manageable scale. The project is highly practical, producing beautiful items for your home or as personalized gifts.
Sewing a set of napkins builds your confidence in handling fabric, cutting accurately, and achieving a professional finish. These skills are the bedrock of garment making and quilting, making this a valuable and rewarding starting point.
Why It’s a Great Beginner Project
The beauty of sewing napkins lies in its repetition. By making a set of four, six, or eight, you get to practice the same skills over and over, reinforcing muscle memory for techniques like mitering corners and sewing a straight hem. The project is low-stakes; a slightly crooked stitch on a napkin is far less noticeable than on a piece of clothing.
You can use a wide variety of fabrics, from basic cotton to luxurious linen, allowing you to experiment with how different materials behave under the needle. This is an excellent way to learn about fabric properties without committing to a large or expensive project.
Project Breakdown
- Skills Learned: Sewing straight lines, precise cutting, pressing, hemming techniques (double-fold hem, mitered corners), and decorative topstitching.
- Time to Complete: 1-2 hours for a set of four napkins.
- Difficulty: 1/5 (Very Beginner)
Materials & Notions
- Fabric: 1 yard of woven fabric like cotton, linen, or a cotton-linen blend will yield several napkins.
- Thread: All-purpose polyester sewing thread that either matches or contrasts with your fabric for a decorative touch.
- Tools: A sewing machine, rotary cutter and mat, fabric scissors, pins, an iron, and a clear ruler or measuring tape.
Quick Steps to Success
- Cut Fabric: Pre-wash, dry, and press your fabric. Carefully cut squares to your desired size (e.g., 18" x 18" for dinner napkins).
- Press Hems: On each side of a square, fold the raw edge in by 1/4 inch and press. Fold it over another 1/4 inch to enclose the raw edge and press again to create a double-fold hem.
- Miter Corners (Optional): For a professional finish, unfold the corners, make a few strategic snips and folds to create a mitered corner, and press.
- Sew Hems: Topstitch close to the inner folded edge all the way around the napkin, pivoting at each corner.
- Final Press: Give your finished napkin a final press with steam for a crisp, clean look.
Tips for Perfect Table Linens
- Starch is Your Friend: Applying starch before cutting and pressing makes cotton and linen fabrics crisp and much easier to handle for precise results.
- Use a Walking Foot: For larger items like tablecloths or runners, a walking foot ensures all layers of fabric feed through the machine evenly, preventing puckering.
- Practice Topstitching: Test your stitch length and tension on a scrap piece of fabric first to ensure your topstitching looks exactly how you want it.
- Add a Monogram: Use an embroidery machine to add an initial for a touch of custom elegance. This is a great way to explore machine embroidery on a simple project.
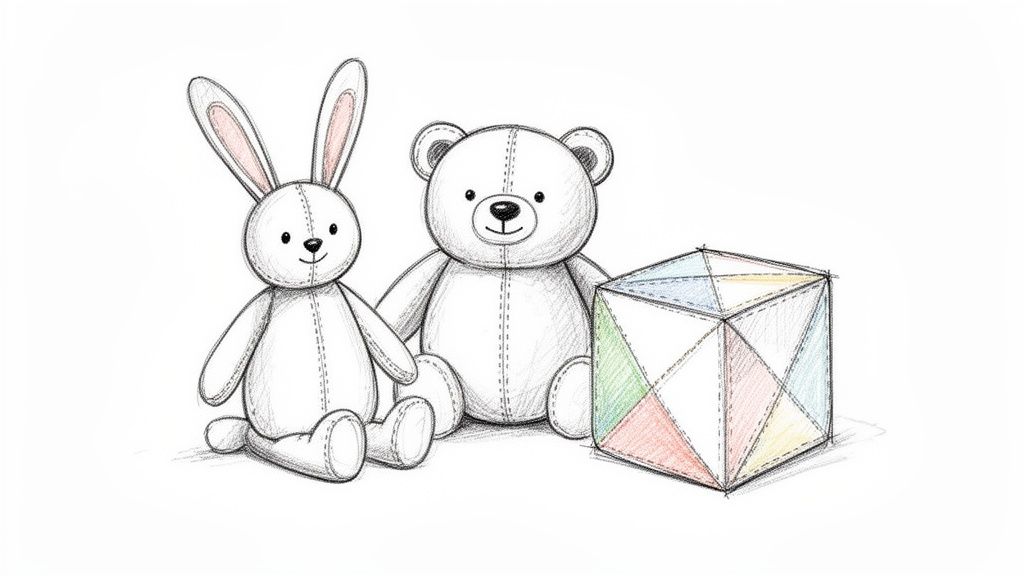
8. Stuffed Toys and Soft Dolls
Creating a simple stuffed animal or soft doll is a deeply rewarding project that teaches valuable skills in a fun, creative way. This project moves beyond flat, two-dimensional sewing and introduces beginners to working with curves, reading patterns, and creating three-dimensional shapes. It's one of the most charming sewing project ideas for beginners because the final product is something to be treasured.
Making a soft toy builds confidence in handling smaller pieces and sewing non-linear seams. It’s a wonderful opportunity to practice precision and patience, resulting in a handmade friend or a heartfelt gift. Our workshops often feature projects like these, as they offer tangible skill-building in an engaging format.
Why It’s a Great Beginner Project
Stuffed toys are fantastic for learning how to sew curves, pivot accurately, and clip seams for a smooth finish. Unlike a straight-seamed tote, this project requires more careful fabric manipulation. You’ll also learn how to transfer pattern markings to fabric and master hand-sewing techniques for closing the toy invisibly.
The project is easily scalable; you can start with a simple geometric shape like a stuffed cube or ball and gradually move to more complex animal or doll patterns.
Project Breakdown
- Skills Learned: Sewing curves, clipping and notching seams, turning small pieces, stuffing techniques, and hand-sewing a ladder stitch for closure.
- Time to Complete: 2-4 hours
- Difficulty: 2/5 (Easy)
Materials & Notions
- Fabric: 1/4 to 1/2 yard of soft yet sturdy fabric like quilting cotton or fleece.
- Thread: All-purpose polyester sewing thread. Embroidery floss for facial features.
- Tools: A sewing machine, fabric scissors, pins or clips, a turning tool (like a chopstick), and other essential sewing notions.
- Stuffing: Polyester fiberfill.
Quick Steps to Success
- Cut Pattern: Trace and cut your pattern pieces from the fabric.
- Sew Features: If adding embroidered eyes or a nose, do this now before sewing the pieces together.
- Assemble Toy: Pin the main body pieces right-sides together and sew around the perimeter, leaving a small opening for turning and stuffing.
- Clip & Turn: Clip the curves and corners, then turn the toy right-side out. Use a turning tool to gently push out all the seams.
- Stuff & Close: Fill the toy firmly with fiberfill, then use a ladder stitch to hand-sew the opening closed.
Tips for a Perfect Toy
- Secure Seams: Use a shorter stitch length (around 2.0mm) for stronger seams that can withstand stuffing.
- Child-Safe First: If making a toy for a young child, always embroider facial features instead of using buttons or plastic eyes, which can be choking hazards.
- Stuff Evenly: Add fiberfill in small clumps to avoid lumps, making sure to push it firmly into all corners and limbs.
- Press Before Stuffing: Once you've turned the toy right-side out, give it a quick press to create crisp seams before you begin stuffing.
8 Beginner Sewing Projects — Quick Comparison
| Project | 🔄 Implementation complexity | Resources required | ⚡ Speed / Efficiency | ⭐ Expected outcomes / 📊 Impact | 💡 Ideal use cases & key advantages |
|---|---|---|---|---|---|
| Simple Tote Bags | Low — straight seams, basic corner work | Minimal: small fabric, basic machine, thread, handles | Fast (1–3 hrs) | ⭐⭐ Practical, wearable; excellent stitch practice | Great beginner project, low-cost gifts, easy to iterate |
| Pillowcases & Decorative Pillows | Low–Medium — turning and optional zipper work | Low: fabric, zipper (optional), zipper foot recommended | Fast (30 min–2 hrs) | ⭐⭐⭐ Professional-looking décor; giftable | Learn turning/closures; ideal for home décor and gifts |
| Simple Skirts & Pants (Elastic) | Medium — pattern reading, cutting, fitting adjustments | Medium: larger fabric, pattern, elastic, serger optional | Moderate (several hrs) | ⭐⭐⭐ Wearable garments; builds fitting and layout skills | Transition to garment sewing; customizable and confidence-building |
| Beginner Quilts (Pre-cut Strips) | Medium — piecing, pressing, quilting sequence | Medium–High: pre-cuts, batting, backing, walking/long-arm tools | Slower (multiple sessions) | ⭐⭐⭐ High-impact finished projects; strong skill development | Efficient quilt learning, reduced cutting, coordinated results |
| Drawstring Bags & Pouches | Low — small scale, simple closures | Minimal: small fabric pieces, basic machine, cord | Very fast (30–60 min) | ⭐⭐ Practical, gift-quality; finishing practice | Scrap-friendly, quick projects to boost confidence and sell |
| Simple Aprons & Chef's Wear | Low–Medium — straight seams, pocket insertion | Low: medium-weight fabric, bias tape optional, basic machine | Fast–Moderate | ⭐⭐⭐ Wearable, marketable; teaches pocket reinforcement | Great for gifts/resale; no complex fitting, teaches topstitching |
| Cloth Napkins & Table Linens | Low–Medium — precise hems and topstitching | Low: fabric, rolled-hem/walking foot, pressing tools | Fast–Moderate | ⭐⭐ Professional-looking linens; strong hemming skills | Forgiving practice, ideal for gifts and embroidery monograms |
| Stuffed Toys & Soft Dolls | Medium — curved seams, hand closures, safety finish | Low–Medium: fabric, stuffing, embroidery/thread, small tools | Moderate (varies by detail) | ⭐⭐⭐ Emotionally valued items; curved-seam and embroidery practice | Creative gifts/collectibles, introduces hand-finishing and safety techniques |
Your Sewing Journey Starts Now: Let's Create Together
You've just explored a fantastic collection of sewing project ideas for beginners, each one a doorway into the rewarding world of creating with fabric and thread. From the practical utility of a simple tote bag to the cozy charm of a handmade pillowcase, these projects are more than just items to make; they are your foundational lessons in a lifelong skill. Completing even one of these marks a significant milestone. You've successfully navigated setting up your machine, reading a pattern, cutting fabric, and sewing a straight seam. These are the core mechanics that every sewist, from hobbyist to professional, relies on every single day.
Remember that each project we've discussed, whether it was the simple geometry of a beginner quilt or the functional design of an apron, was carefully chosen to build your confidence and competence. You didn't just make a thing; you practiced a specific technique. The drawstring bag taught you about creating casings, the elastic waistband pants introduced you to garment construction, and the soft toy demystified sewing curves. These are not isolated skills; they are interlocking pieces of a much larger puzzle.
From Beginner Projects to Creative Freedom
The true value of mastering these beginner-friendly projects lies in the creative freedom they unlock. Think of each completed item as a new tool in your creative toolkit.
- Pillowcases and Napkins: Mastered these? You now understand how to create clean, finished edges and perfect corners, skills essential for everything from high-end table linens to tailored shirt collars.
- Simple Tote Bags: Once you can construct a basic tote, you're only a few steps away from adding interior pockets, magnetic snaps, or even leather handles to create custom, high-end bags.
- Elastic Waistband Skirts: This project is your gateway to the world of apparel. The principles of measuring, cutting garment pieces, and creating a comfortable fit will directly apply when you decide to tackle more complex patterns like dresses, blouses, or structured trousers.
- Beginner Quilts: Piecing together pre-cut strips has taught you the importance of a consistent quarter-inch seam allowance. This precision is the bedrock of all quilting, allowing you to move on to intricate blocks and complex, heirloom-quality designs.
The journey from beginner to expert is paved with these small, successful steps. Resisting the urge to jump to an overly complex project is crucial. By building your skills incrementally with these foundational sewing project ideas for beginners, you prevent frustration and ensure that your passion for sewing continues to grow. Each straight stitch, every neatly turned corner, and each successfully sewn curve builds the muscle memory and understanding you need for future success.
Your Partner in Creativity
At B-Sew Inn, we understand that your sewing journey is a personal and exciting adventure. Our mission is to be more than just a place to buy a sewing machine; we aim to be your trusted partner, providing the tools, education, and support you need at every stage. We are committed to empowering crafters through our custom sewing machine designs and the extensive support we offer.
This is why we've built an ecosystem designed to help you succeed. Our online classes and comprehensive training resources are specifically designed to demystify techniques and help you get the most out of your machine. When you feel ready to move beyond these initial projects, our B-Creative membership offers exclusive access to tutorials, custom designs, and a vibrant community of fellow creators who are always ready to share advice and inspiration. Every expert was once a beginner, and we are here to support you on that incredible transformation. Your next amazing creation is just a stitch away.
Are you ready to turn these ideas into reality? Find the perfect machine, high-quality accessories, and expert-led educational resources to start your creative journey at B-Sew Inn. Let us provide the tools and support you need to bring all your amazing sewing project ideas for beginners to life. Explore our offerings and join our community today at B-Sew Inn.

