When you bring the world of automated stitching into the rich tradition of quilting, something truly special happens. An embroidery machine for quilting is so much more than a tool for adding a quick monogram. Think of it as your secret weapon for creating unbelievably intricate quilt blocks, gorgeous surface details, and jaw-dropping all-over patterns with perfect, repeatable precision.
How an Embroidery Machine Can Totally Change Your Quilting Game
Imagine moving beyond the straight lines of your walking foot to create flawless, complex designs that would take ages—or be nearly impossible—to get right by hand. Using an embroidery machine closes the gap between old-school quilting techniques and modern tech, helping you make heirloom-quality work in a fraction of the time.
This isn't about letting a machine take over the artistry. It's about empowering it. The machine takes on the heavy lifting—the repetitive, technical stitching of complex patterns—which frees you up to focus on what you love: the design, the colors, and the overall composition. It’s the perfect team-up between your vision and the machine’s flawless execution.
It's clear we're not the only ones excited about this. The global sewing and quilting market was valued at around USD 5.8 billion in 2024 and is only expected to grow, thanks to a huge resurgence in home crafting. You can dig into the quilting machine market trends yourself to see just how much technology is shaking things up.
Here at bsewinn.com, our mission is to empower crafters like you. We believe that with the right tools, custom sewing machine designs, and supportive guidance, anyone can create breathtaking quilts. This comprehensive how-to guide is your starting point, showcasing tangible examples you can replicate.
What You'll Learn in This Guide
To get you started, we're going to cover a few key areas to build your confidence and skills. We want to give you a clear roadmap from the basics all the way to creative freedom.
- Essential Machine Features: We’ll break down the absolute must-have features your machine needs for serious quilting work.
- Project Preparation: Learn the secrets to setting up your quilt sandwich and materials for stitching that looks professionally done.
- Core Quilting Techniques: We’ll get you comfortable with popular methods like "quilt-in-the-hoop" and edge-to-edge quilting, with examples you can follow.
- Troubleshooting Common Issues: Get the know-how to tackle frequent headaches like fabric puckering or frustrating thread breaks.
At bsewinn.com, we are committed to empowering your craft through our custom sewing machine designs and the extensive support we offer. Through our online classes, training, and resources, we're here to give you the support you need to turn those big ideas into beautiful, finished quilts. Consider this guide your first step in transforming a beloved craft into a true art form.
What to Look For in an Embroidery Machine for Quilting
Picking out an embroidery machine for quilting feels a lot like choosing a new car. You know you need one that will get you from A to B, but the right features can make the entire journey smoother, faster, and way more fun. Not every embroidery machine is built for the unique demands of quilting, but the ones that are can feel like a dream to work with.
Think of the features below as your personal checklist. They’re the non-negotiables that separate a standard machine from a true quilter's powerhouse. Getting a machine with these capabilities right from the start will save you a world of headaches and frustration later on.
This breakdown shows just how much a well-equipped machine can do for your craft, from boosting your speed and quality to unlocking creative doors you didn't even know were there.
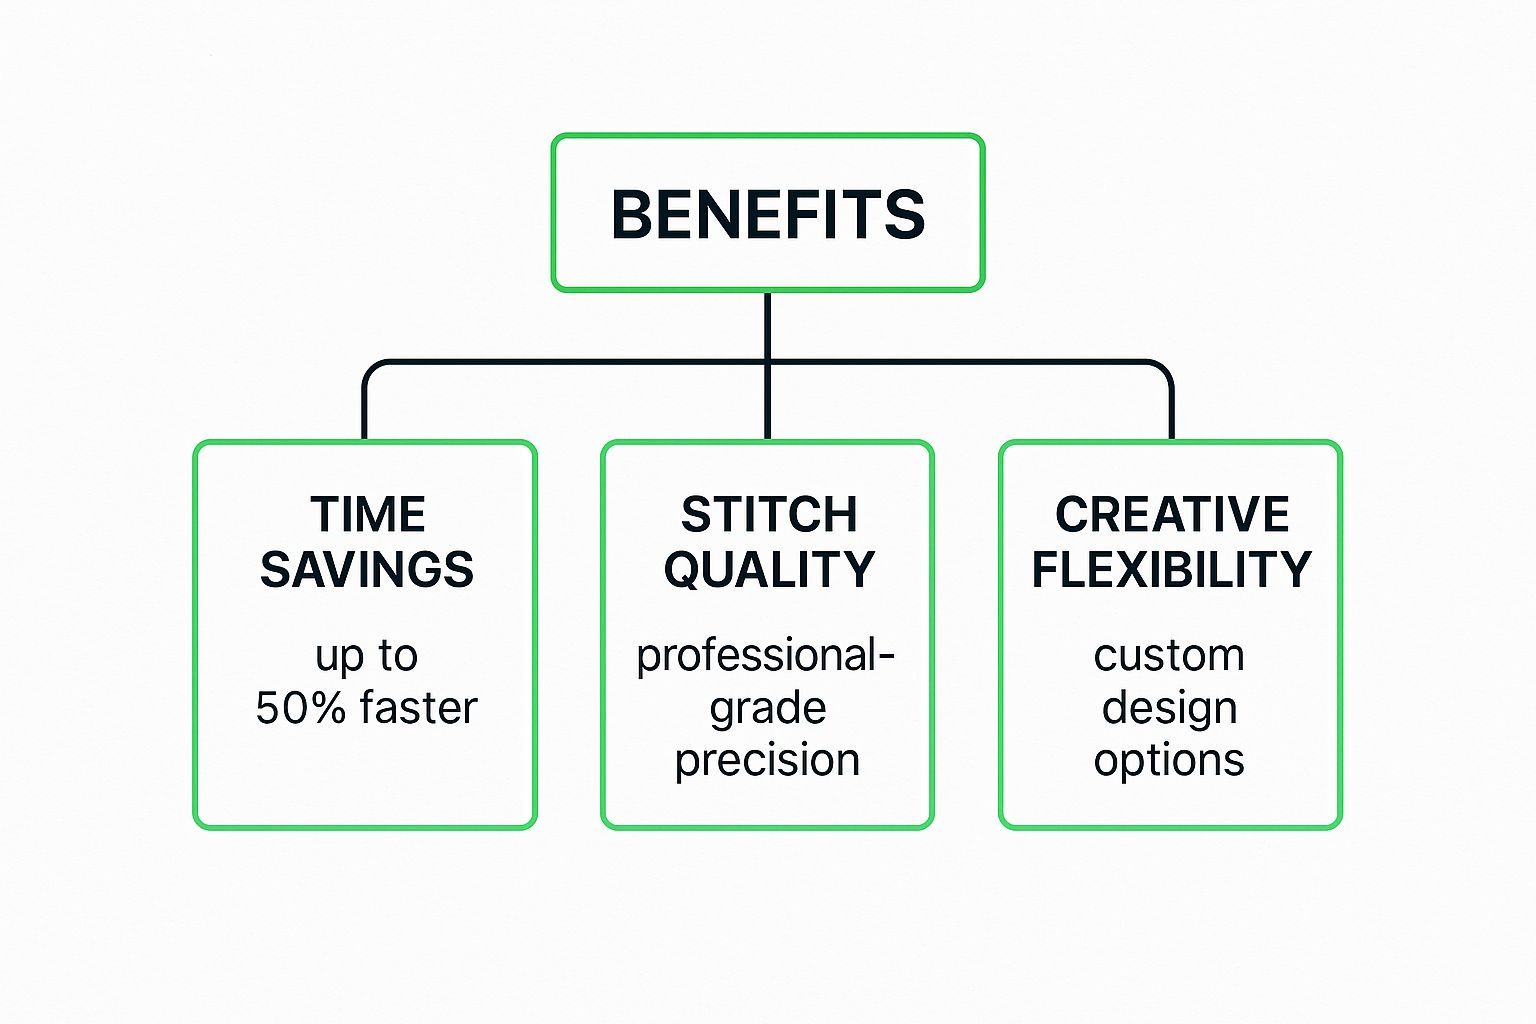
As you can see, the right tools for the job can cut your project time by up to 50%. Beyond just speed, you gain professional-level precision and a playground of design flexibility.
Hoop Size and Throat Space
First up, and this one's a biggie: large hoop area. A bigger hoop is a game-changer. It lets you stitch out larger quilt blocks in one go, which means less time spent meticulously re-hooping your project. Anyone who's wrestled with re-hooping knows it’s a prime time for patterns to get misaligned. Look for a hoop that’s at least 5x7 inches, but honestly, the bigger, the better.
Just as critical is a generous throat space—that’s the distance from the needle to the main body of the machine. Wrestling a queen-sized quilt through a tiny opening is no one's idea of a good time; it leads to bunched fabric, skipped stitches, and uneven tension. Ample throat space makes maneuvering those bulky layers feel effortless.
A larger throat space isn't just about convenience. It directly impacts the quality of your finished quilt by allowing the fabric to lie flat and feed through smoothly while the machine works its magic.
To help you sort through what's essential versus what's a nice-to-have, we've put together a quick comparison table.
Key Embroidery Machine Features for Quilting
| Feature | Why It's Important for Quilting | Impact on Projects |
|---|---|---|
| Large Hoop Area (Essential) | Allows for stitching larger quilt blocks in a single pass. Reduces the need to re-hoop, which can cause misalignment. | Create bigger, more complex designs with fewer interruptions. Significantly improves workflow and accuracy on large quilts. |
| Large Throat Space (Essential) | Provides room to maneuver bulky quilt sandwiches without bunching or struggling. | Reduces fabric drag and distortion, leading to more even stitches and a higher-quality finish, especially on bed-sized quilts. |
| High Stitch Precision (Essential) | Ensures consistent, clean stitches for both dense fills and delicate, decorative patterns like stippling. | Gives your quilting a crisp, professional look. Prevents frustrating thread nests and uneven pattern execution. |
| Built-in Quilting Designs (Beneficial) | Offers a library of ready-to-use patterns like stippling, feathers, and geometric shapes, saving design time. | Speeds up the quilting process and provides inspiration. Great for quilters who want to get started without creating their own designs. |
| Automatic Thread Cutter (Beneficial) | Automatically snips the top and bobbin threads between color changes or at the end of a sequence. | A huge time-saver! Minimizes manual trimming and keeps your project tidy as you go, letting you stay in the creative flow. |
| Advanced Sensor Technology (Luxury) | Includes features like automatic thread tension adjustment and upper/lower thread sensors. | The machine does the thinking for you, preventing common issues like thread breaks or running out of bobbin thread mid-pattern. |
| Laser/LED Positioning (Luxury) | Projects a light or laser crosshair onto the fabric to show the exact needle drop point for perfect design placement. | Offers unparalleled accuracy for positioning designs, especially when connecting patterns or quilting in specific areas. |
This table should give you a clearer picture of how different features contribute to the quilting process. While you can certainly get by with the essentials, the beneficial and luxury features are what truly elevate the experience and the final result.
Stitch Precision and Versatility
Beyond the physical size of the machine, rock-solid stitch precision is an absolute must. You need a machine that lays down perfect, consistent stitches every single time, whether it's a dense satin stitch or a delicate, swirling stipple. This is what makes your designs pop and look truly professional.
Finally, think about thread. Quilters are an experimental bunch! We love playing with everything from traditional cotton to vibrant metallics and rayons. Your machine needs to be able to handle various thread types without throwing a fit, jamming, or constantly breaking. This versatility is key to creative freedom. Of course, the right stabilizer is just as important as the thread. For a deep dive, bsewinn.com has a fantastic guide on choosing the right stabilizer that we highly recommend.
Don't overlook the "smart" features, either. Things like an automatic thread cutter and a reliable needle threader might sound like small perks, but they shave off so much time and keep you from getting pulled out of your creative zone.
How to Get Your Project Ready for Quilting Success
A beautiful quilt doesn't just magically appear when you hit "start" on your machine. The real magic happens before you even thread the needle. Taking the time to prep your project is what separates a quilt you're proud of from one riddled with puckers and wonky stitches. Following these steps will help you replicate professional results.
Think of it like baking a layered cake. Every single layer has to be just right and put together carefully for the whole thing to turn out delicious. In quilting, this is our "quilt sandwich," and getting it right is the foundation for everything that follows.
How to Assemble the Perfect Quilt Sandwich
The quilt sandwich is just what it sounds like: three layers that need to play nicely together. Nail this part, and you're already halfway to a flawless finish.
- The Backing Fabric: This is your foundation. Press it until it's perfectly smooth, and make sure it's several inches bigger on all sides than your quilt top. That little bit of extra fabric (we call it "overage") is a lifesaver when it comes to hooping. It keeps your edges from getting sucked in and distorted.
- The Batting: This is the cozy, fluffy middle that gives your quilt its warmth and dimension. The type of batting matters! For machine embroidery, a low-loft cotton batting works beautifully because it's less likely to get squished down unevenly by the presser foot.
- The Quilt Top: Your masterpiece! This is the pieced, decorative layer you've poured so much love into. The most important prep step here is making sure all your seams are pressed nice and flat. This creates a smooth runway for your machine's needle.
Once you have your layers stacked, you have to baste them together. This is just a temporary hold to stop anything from shifting while you're quilting. You can use curved safety pins, a temporary spray adhesive made for fabric, or even long, loose hand stitches. If you want a more detailed look at this crucial first step, our guide on the 4 easy steps to start quilting is a great resource.
Stabilizers, Needles, and Hooping
With your quilt sandwich basted and ready, it's time to talk about the support system. This is where a lot of quilters get tripped up, but it’s simpler than you think. The stabilizer is your project's best friend—it's the unsung hero that stops the fabric from stretching and puckering under all those dense embroidery stitches.
The right stabilizer provides temporary rigidity to your quilt sandwich, ensuring every stitch is placed perfectly without puckering the surrounding fabric. It's the secret to achieving crisp, clean embroidery lines.
For most quilting projects, a tear-away stabilizer is a great choice. It gives you the support you need while you're stitching, and then you can just gently tear it away when you're done. For really delicate fabrics or super intricate designs, a wash-away stabilizer is fantastic because it dissolves completely in water, leaving zero trace behind.
Finally, don't forget the small stuff: your needle and your hooping technique. Always start a new project with a fresh embroidery needle. A size 80/12 is a great, versatile place to start. When you hoop your quilt sandwich, you're aiming for the "tight as a drum" feel—taut, but not so tight that you're stretching the fabric. Get this right, and your embroidery machine for quilting will glide over the surface, creating the gorgeous, professional results you’ve been dreaming of.
How to Create Stunning Designs: Quilting Techniques to Master
Alright, this is where all that prep work really starts to pay off and your creativity can shine. Using an embroidery machine for quilting completely opens up your world to new techniques that add amazing texture, spot-on precision, and a truly professional finish to your quilts. We're moving way beyond simple straight lines here. You can pull off complex patterns that look like they were made on a huge, expensive longarm system.
Here at bsewinn.com, we're all about empowering crafters like you. Our custom sewing machine designs, supported by online classes and extensive resources, are designed to help you get the hang of these exact techniques. We want to help you turn that creative vision in your head into a beautiful quilt you can be proud of for years to come.
Let's walk through some of the quilting methods that will make the biggest impact.
How to Use the Quilt-in-the-Hoop Method
Imagine piecing and quilting an entire quilt block in one single, seamless step. That’s the absolute magic of the quilt-in-the-hoop (QITH) technique. Your machine literally stitches placement lines for your fabric pieces right onto your hooped stabilizer and batting. It's like having a perfect guide showing you exactly where to put everything to assemble the block.
Then, before you even take it out of the hoop, the machine quilts the finished block with whatever intricate design you've chosen. This method pretty much guarantees flawless accuracy, super sharp points, and perfectly consistent quilting across every single block. It’s no wonder it's a favorite for both total beginners and seasoned quilters.
How to Achieve Edge-to-Edge and Custom Quilting
If you're chasing that gorgeous, cohesive look you see from professional longarm quilters, edge-to-edge quilting is what you're looking for. This technique uses continuous, interlocking designs that flow across the entire quilt top, completely ignoring the pieced blocks underneath. The result is a beautiful, unified texture that works just as well on modern quilts as it does on traditional ones.
On the other hand, custom quilting lets you be the artist. You can place individual embroidery motifs exactly where you want them to highlight specific parts of your piecing. For a tangible example, you could add a delicate floral design inside a star block or stitch elegant feathers all along a sashing strip. It adds so much depth and really draws the eye to your favorite parts of the quilt.
Once you get the hang of a few key techniques, you can start adding stunning textures like stippling and echo quilting to your projects. These are the little details that take a simple quilt and turn it into a cherished heirloom, really showing off your skill and creative flair.
The growing excitement around these more advanced features is pushing the whole industry forward. The global market for embroidery machines, which of course includes quilting models, was valued at USD 5.71 billion in 2024 and is expected to hit USD 7.88 billion by 2034. A huge part of that growth is coming from new tech like AI, which can automate tricky adjustments like thread tension and stitch density, making it easier for hobbyists and pros alike to get precise results. You can read more about the growth of the embroidery machine market and see what's on the horizon.
Getting these textures and patterns just right often comes down to a good grasp of the basics. If you're looking to really polish your work, you might want to check out our guide on the top tips for beautiful decorative stitches. Our training and custom designs over at bsewinn.com are packed with real-world examples to help you achieve these kinds of stunning results.
Troubleshooting Common Quilting Challenges
It happens to all of us. You're in the zone, your pattern is stitching out beautifully, and then… a snag. Even the most experienced quilter hits these little roadblocks, but thankfully, most of them have surprisingly simple fixes. Knowing what to look for can turn a moment of frustration into a quick fix, getting you right back to your project.
When your embroidery machine for quilting starts giving you trouble, take a deep breath. Instead of getting overwhelmed, it’s best to just work through a quick mental checklist. Nine times out of ten, you’ll pinpoint the problem in just a minute or two.
How to Fix Thread Breaks and Nests
Let’s be honest, the most common headaches are thread-related. A top thread that keeps snapping or, worse, that dreaded tangled mess on the back of your fabric—what we affectionately call a "bird's nest"—can stop you in your tracks. Usually, both these problems point to the same thing: something is off with how the thread is feeding through the machine.
Before you start twisting knobs and changing settings, just stop the machine and run through these simple checks. It's almost always one of these culprits.
-
Check the Needle: A dull or bent needle is the number one cause of thread trouble. Seriously. Make it a habit to start every new quilt with a fresh embroidery needle. A size 80/12 or 90/14 is usually the sweet spot for quilting, sharp enough to get through all those layers without a fight.
-
Re-thread Everything: Yes, everything. Take the top thread completely out. Pop out the bobbin. Now, re-thread the whole machine from the beginning, making sure the presser foot is up so the thread seats properly in the tension discs.
-
Adjust Tension: If you’ve got a bird’s nest on the bottom, your top tension is probably too loose. If the loops and tangles are on top of your quilt, the bobbin tension might be too tight. Tweak the top tension first, making small adjustments until your stitches look even on both sides.
-
Evaluate Your Stabilizer: Sometimes the problem isn’t the thread, it’s the foundation. If your stabilizer is too flimsy for a dense design, the fabric will pull and pucker, which can easily lead to thread breaks. If you think this is the issue, try adding a layer of heavier tear-away stabilizer to your hooped quilt sandwich.
How to Manage Quilt Bulk and Alignment
As your quilts get bigger, a whole new set of challenges pops up. You’re not just managing the design anymore; you’re wrestling with the sheer weight and bulk of the project itself. Keeping things aligned when you have to re-hoop can also feel a bit daunting.
The secret is to support the quilt’s weight. Never, ever let it just hang off the side of your table. That drag is enough to pull your hoop out of alignment and distort your stitches. The easiest solution is to roll up the extra fabric and use quilt clips to keep it contained. An extension table is also a game-changer, giving you a big, flat surface to work on.
Getting your alignment perfect when you move the hoop is what separates a good quilt from a great one. This is where your machine’s positioning features really shine. Use that little camera or laser guide to line up the very next stitch. It takes all the guesswork out of it and makes your patterns connect seamlessly.
Here at bsewinn.com, we know that seeing is believing. Our commitment to empowering crafters includes offering extensive support through online classes and training videos packed with tangible examples. We want you to feel confident enough to tackle any little hiccup your machine throws at you, so nothing gets in the way of your creativity.
Got Questions About Quilting With an Embroidery Machine?
Diving into a new technique always brings up a few questions, and that's a good thing! It means you're really thinking about how to make it work for you. Let's tackle some of the most common things quilters ask when they're first starting to use an embroidery machine for their projects.
At bsewinn.com, we are committed to empowering your craft. Our custom sewing machine designs, extensive online classes, and training resources are here to provide the support and know-how you need. So, let's get into it.
So, Can I Use Just Any Embroidery Machine for Quilting?
You could, technically, but you might end up more frustrated than finished. For the best experience, you really want a machine with a few key features. The absolute non-negotiable is a large hoop area. I’d say a 5x7 inch hoop is the minimum, but honestly, bigger is always better here. It just means less time spent re-hooping your quilt sandwich over and over.
The other big one is throat space—that's the room to the right of the needle. When you're wrestling with the bulk of a quilt, you'll be so grateful for every extra inch. A solidly built machine with good stitch control and automatic tension will also be your best friend, keeping those stitches looking perfect and preventing dreaded fabric puckers.
How Is This Different From Using a Longarm?
This is a great question, and it really comes down to what's moving. With a longarm machine, the needle is stationary, and you, the quilter, move the fabric around under it. It’s like drawing with a pencil, giving you that wonderful, free-flowing motion for big, swooping designs.
An embroidery machine flips that script completely. Your fabric is held tight in a hoop, and the machine moves the hoop around under the needle. This is where the magic of automation comes in. It gives you incredible precision for detailed, repeatable patterns, quilt-in-the-hoop blocks, and placing a single, perfect motif exactly where you want it. It shines at tasks that are incredibly tough to do by hand or even on a longarm.
"I never regretted the purchase of my first embroidery machine... Machine embroidery is fantastic, and I love that I can personalize ANYTHING and make it unique. I can make anything that I can dream up!" - Elaine Theriault, Quilting Expert
What Kinds of Designs Should I Start With?
When you're just getting your feet wet, stick with simple, low-density designs. Think of it like learning to walk before you run! Look for patterns that were specifically created for quilting with an embroidery machine. Here are a few great places to start:
- Stippling Files: These give you that classic, beautifully textured look without being too heavy.
- Light-Fill Motifs: Think simple leaves, swirls, or basic shapes that add a little something special.
- Basic Geometric Patterns: Grids and simple lines are fantastic for getting the hang of aligning designs from one hooping to the next.
I’d steer clear of really dense, satin-stitch designs at first. They can make your quilt feel stiff and are a lot less forgiving if your tension isn't just right. A fantastic starting point is a "quilt-in-the-hoop" block project. These guide you step-by-step, combining the piecing and quilting all in one go. For a tangible example you can replicate, try a table runner or a set of placemats. They’re the perfect way to build your skills before you tackle that king-sized masterpiece.
Ready to see what you can create? The right machine really does make all the difference. Come explore our collection of sewing and embroidery machines at bsewinn.com and find the perfect partner for your quilting adventures. Visit us today at https://www.bsewinn.com to get started.

