Let's get this out of the way first: the secret to sewing with stretch fabrics isn't some complicated, hard-to-learn technique. It’s actually pretty simple. You just need to use the right stitch and the right tools—like a ballpoint or stretch needle—so your seams can move and flex with the fabric. Get that right, and you'll avoid the dreaded popped seams and wavy edges that drive so many sewists crazy.
Your Guide to Taming Stretch Fabrics
If you've ever felt a little intimidated by knits, jerseys, or spandex, you're definitely not alone. Many sewists hit a wall with these materials at first, but this guide is here to turn that frustration into confidence. With the right techniques, you can easily replicate professional-looking designs, like creating a comfy knit t-shirt or a pair of custom-fit leggings.
Here at bsewinn.com, we're committed to empowering crafters not just with custom sewing machine designs but with real, practical knowledge. We do this through our extensive support, including online classes, training, and a wealth of resources, and this guide is no different. It’s packed with the same practical spirit to walk you through the essentials of creating your own stretch fabric projects.
Why Mastering Stretch Fabrics Matters
Let’s be honest, stretch fabrics are everywhere. Just look at the boom in athleisure and activewear. The global stretch fabric market was valued at around $20 billion in 2022 and is expected to hit nearly $28 billion by 2027. This isn't just a fleeting trend; it’s a fundamental shift in what people want to wear. If you want to learn more, you can read about the growth of the global stretch fabric market. That's exactly why learning to handle these materials is such a game-changer for your sewing skills.
This guide will cover everything you need to know, from putting together your toolkit to getting your machine settings just right. By the end, you'll be ready to sew comfortable, professional-looking clothes that you'll actually be proud to wear.
A common mistake I see all the time is treating stretch fabrics like woven ones. The real secret is to work with their natural elasticity, not against it. A flexible stitch is your new best friend.
Building Your Essential Toolkit
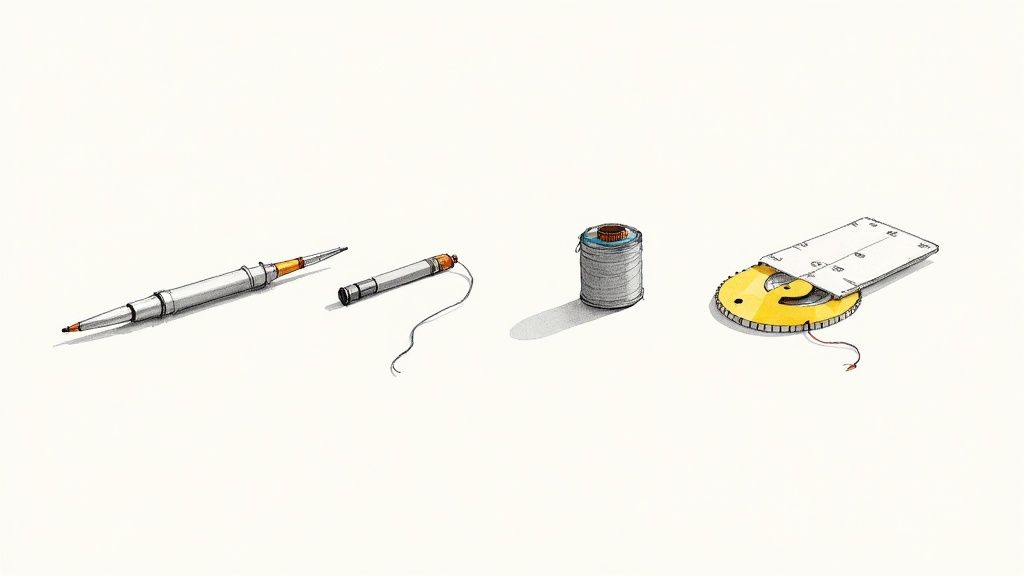
Before you even sit down at your machine, setting yourself up with a few specific tools will make a world of difference. These aren't fancy, expensive gadgets—just simple items designed to handle the unique properties of knits and prevent common headaches like skipped stitches or, even worse, holes in your fabric.
This table breaks down the non-negotiables for your sewing kit. Think of these as your foundational tools for success.
| Tool | Why It's Essential |
|---|---|
| Ballpoint or Stretch Needles | These needles have rounded tips that gently push the fabric fibers apart instead of piercing and breaking them. This prevents snags and holes. |
| Polyester Thread | Unlike cotton, polyester thread has a little bit of natural stretch. It’s crucial for seams that need to give and move with the fabric. |
| Rotary Cutter and Mat | These let you cut your pattern pieces with precision, without lifting or distorting the fabric. Clean, accurate cuts are the first step to a pro finish. |
| Walking Foot | This attachment is a lifesaver. It feeds both the top and bottom layers of fabric through your machine at the same pace, which stops them from shifting and creating those infamous wavy seams. |
Having these items on hand seriously reduces the learning curve. They do a lot of the heavy lifting for you, letting you focus on the fun part—the actual sewing!
With these tools and a bit of guidance, you're already well on your way to conquering any stretchy project you can dream up.
Preparing Your Fabric and Machine for Success
A flawless finish with stretch fabrics starts long before you ever sit down at your machine. Proper prep is the real secret weapon, turning what could be a frustrating experience into a smooth, successful project. For example, when making a knit dress, getting this first stage right truly sets the foundation for a garment that drapes beautifully.
Your journey begins the moment you bring the fabric home. Pre-washing is absolutely non-negotiable. I can’t tell you how many times I’ve seen beautiful knits, especially those with natural fibers like cotton, shrink up a shocking amount in that first wash. If you skip this, your perfectly fitting garment could end up a size too small after its first trip through the laundry.
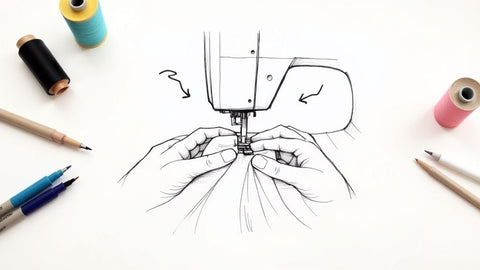
Cutting and Handling Knits
Once your fabric is washed and dried, the next challenge is getting a clean cut. Stretch fabrics are notorious for shifting, sliding, and curling right when you’re trying to be precise. This is where a rotary cutter and a self-healing mat become your best friends. They let you cut the fabric while it’s lying perfectly flat, something you just can’t do with scissors that lift the material and cause distortion.
If you’re fighting with those super curly edges, particularly on jersey knits, here’s a little trick: a light mist of spray starch along the cut lines can work wonders. Just give them a quick press with a cool iron, and they’ll behave so much better.
This infographic is a great visual for how to align your pattern pieces to make sure the fabric's stretch goes in the right direction—usually across the body.
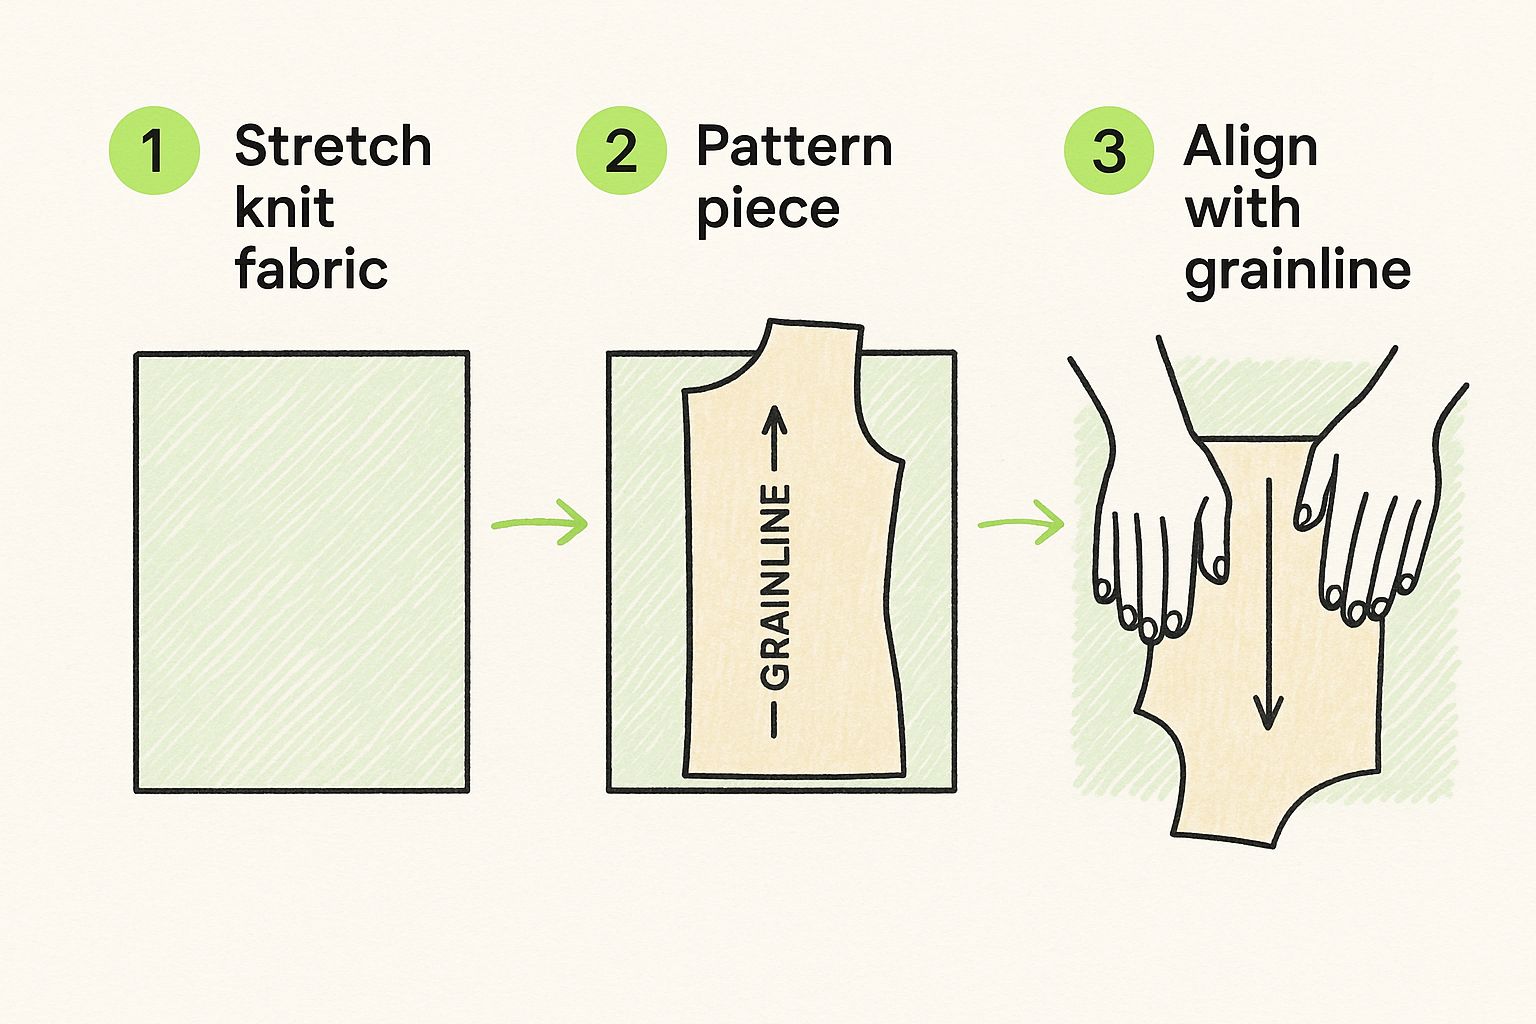
Getting that grainline right is key. It’s what ensures your finished garment stretches comfortably with you, not against you.
Setting Up Your Sewing Machine
With your fabric all prepped, it's time to get your machine ready for action. This is where a lot of sewists run into trouble, but honestly, the right setup makes all the difference. The single most important change you can make is swapping out your needle.
You absolutely must use a needle designed specifically for knits. A ballpoint needle has a rounded tip that gently pushes the fabric fibers aside instead of piercing them. For super-stretchy stuff with spandex, a stretch needle is even better. Using a standard sharp needle will shred the fibers, leading to skipped stitches, runs, and tiny holes.
If you want to get really nerdy about it, we have a whole guide on choosing the right needle for every project. Trust me, this small detail has a massive impact on your final result.
Next up, check your thread. Polyester thread is what you want here. It has a little bit of natural give, so it can flex with the seam. Cotton thread has zero stretch and is pretty much guaranteed to snap the first time you pull your garment on.
Finally, you need to pick the right stitch. A standard straight stitch will break the moment the fabric stretches. Instead, you’ll want to choose one of these settings on your machine:
- A narrow zigzag stitch: This is my go-to on any machine. Set your stitch length short (around 1.5) and the width very narrow (around 0.5-1.0). It creates a seam that looks straight but has hidden stretch.
- A dedicated stretch stitch: Many modern machines have a built-in "lightning" or triple stretch stitch. These are fantastic. Dig out your manual and see what your model offers—it’s worth it.
By taking the time to prep both your fabric and your machine, you're basically creating an environment for success. These aren’t just fussy extra steps; they are the foundation for strong, flexible, and professional-looking seams.
Choosing the Right Stitches for Flexible Seams
Here’s a hard truth: the lifespan of your stretchy garments comes down to the stitches you use. If you go in with a standard straight stitch, I can practically guarantee it’ll snap the first time you pull the garment on. To get those strong, flexible seams, you've got to explore the other stitch options on your machine.
This is where the magic really happens when you're learning to sew stretch fabrics. Picking a stitch that can move and flex with the material is what makes your handmade clothes last. Here at bsewinn.com, we empower you with the knowledge to get the most out of your sewing machine’s custom designs, and our extensive online classes and training resources are here to support you every step of the way.
Your Go-To Stitches for Construction
When you're sewing the main seams of a garment, like the side seams or setting in sleeves, you need a stitch that offers both strength and elasticity. While many machines have a whole menu of decorative options, a few stand out as reliable workhorses for construction.
The most common and accessible option is the good old zigzag stitch. It's on virtually every sewing machine out there and is surprisingly effective. The secret, however, is in the settings. For a construction seam, you don’t want a wide, decorative zigzag.
Instead, a narrow zigzag stitch works like a charm. The back-and-forth motion builds stretch right into the seam. For most medium-weight knits, I find a stitch width of about 1.5–3 mm and a length of 0.75–2 mm is the sweet spot that lets the seam stretch without popping. If you want to dive deeper, you can learn about the technical aspects of performance fabrics to understand why this matters.
Another fantastic choice found on many modern machines is the lightning stitch. It looks like a tiny, angled zigzag and creates an incredibly strong, stretchy seam that almost passes for a straight stitch from a distance. It’s my personal favorite for sewing activewear.
The triple straight stitch is another powerhouse. The machine stitches forward twice and back once for each stitch, making it super durable. But be warned: it is an absolute beast to unpick! I save this one for high-stress areas, like the crotch seams on leggings, where you need maximum durability.
Topstitching and Finishing Your Seams
Once your garment is pieced together, finishing the raw edges is what gives your project that clean, professional look and prevents fraying. An overlocker or serger is brilliant for this, as it trims and encloses the seam allowance in one quick pass.
But you absolutely do not need one to get a beautiful finish. A wider zigzag stitch run along the raw edge of your seam allowance works perfectly well. After stitching, just trim the excess fabric close to the stitches for a tidy result.
For topstitching things like necklines, hems, or cuffs, you still need a stitch with some give. Here are a couple of my favorite techniques:
- Twin Needle: This is a game-changer. It creates two perfect, parallel rows of straight stitches on top and a zigzag on the bottom, giving you that ready-to-wear look with built-in stretch.
- Lengthened Zigzag: A very long, narrow zigzag can also do the trick for topstitching. From a distance, it looks almost straight but still has the flexibility knits need.
Getting a handle on these stitches is what separates frustrating projects from successful ones. It’s this kind of practical knowledge, supported by our online classes and resources, that helps sewers create garments they can truly be proud of.
Techniques for Perfect Hems and Necklines
You’ve pieced together the body of your garment, and things are looking good. Now it's time for the finishes that take your project from "homemade" to "handmade." Hems and necklines are where so many sewists get tripped up, especially with knits that just love to get wavy and stretched out. But I promise, getting a flat, stable, and professional-looking edge is totally doable.
This is the part of the process where all your work really comes together into a piece you'll be proud to wear. At bsewinn.com, we are dedicated to empowering crafters with the skills for every single step, and our custom machine designs and extensive training resources are built to support you in creating beautiful finished projects.
Mastering the Twin Needle Hem
One of my absolute favorite tools for hemming stretch fabrics is a twin needle. It’s a game-changer. This little guy fits right into your standard sewing machine and creates two perfect, parallel rows of stitching on the outside. Underneath, the bobbin thread zigzags between the two needle threads, which is what builds that crucial stretch right into the seam.
It’s the best way to mimic that coverstitch look you see on store-bought clothes, giving you a super professional finish—perfect for projects like a custom-fit jersey top that you can replicate again and again.
To get a great result with a twin needle, here are a few tips I've learned along the way:
- Always press your hem into place first. I sometimes use a fusible hem tape to add a bit of stability. It’s a huge help in stopping the edge from curling or stretching out while you sew.
- Lengthen your stitch to around a 3.0 or 3.5. A longer stitch helps prevent that annoying "tunneling" effect where the fabric puckers up between the stitches.
- Take it slow and steady. Sew from the right side of the fabric and just gently guide it through the machine. No pushing or pulling!
Other Ways to Finish Your Edges
A twin needle is fantastic, but it's definitely not the only option. Sometimes a different approach works better for a specific fabric or the style you're going for. A simple turned-and-stitched hem using a narrow zigzag or a dedicated stretch stitch can look beautiful and get the job done.
For an even cleaner edge, a lot of sewists swear by their serger. You certainly don't need one to sew knits, but it's worth learning more about what a serger machine is and how it helps if you're curious. It trims the raw edge and wraps it in thread all in one go, which is pretty slick.
Another great trick, especially for things like sleeves and leggings, is to finish with a cuff or a band. Just attach a separate, folded piece of fabric to the raw edge. It's a fantastic way to add a pop of coordinating color and completely skip the hemming process.
Here's a little secret for those super slippery or lightweight knits that just won't behave: try placing a layer of tissue paper under the fabric as you sew. It adds just enough stability to keep things from shifting, and you can easily tear it away when you're done.
Handling Those Really Unstable Knits
Some fabrics, like slinky rayon jersey or lightweight modals, need a little extra love and attention. They have a tendency to slide all over the place and get distorted under the presser foot.
For these tricky situations, a walking foot is your best friend. It has its own set of feed dogs that grip the top layer of fabric, moving it through the machine at the exact same speed as the bottom layer. This seriously cuts down on stretching and shifting, making the whole process way less frustrating.
Troubleshooting Common Sewing Problems
Even when you do everything right, stretch fabrics have a mind of their own and can throw a wrench in your plans. Think of this section as your personal sewing helpline. We’ll walk through the most common hiccups you'll face, turning those moments of frustration into skills you'll use forever. At bsewinn.com, our commitment to empowering crafters includes providing support through our extensive resources, like online classes and training, to help you solve any challenge.
The number one complaint I hear? Skipped stitches. You're sewing along, and suddenly, your machine just isn't catching the thread. It's maddening, but the culprit is almost always your needle. This little drama happens when the needle can't quite grab the bobbin thread, usually because it’s dull, bent, or just the wrong type for that slinky fabric you’re using.
Another classic headache is the dreaded "lettuce edge," where your perfectly straight seam ends up wavy and stretched out. This is typically your presser foot being a little too aggressive and stretching the fabric as it goes. Don’t panic—it's an easy fix.
Diagnosing and Fixing Common Issues
Alright, let's get these problems sorted so you can get back to sewing.
- For Skipped Stitches: Stop right away. Swap out your needle for a fresh ballpoint or stretch needle. Double-check that it's inserted all the way up into the clamp and facing the right direction. A new, correct needle solves this problem 90% of the time. Seriously.
- For Wavy Seams: First, see if your machine has adjustable presser foot pressure. If it does, try lowering it a bit. This eases up on the fabric. If your machine doesn't have that feature, a walking foot is a game-changing investment that feeds the fabric through evenly.
Puckered seams are another regular offender. This is a dead giveaway that your thread tension is in a tug-of-war. The top and bobbin threads are pulling too tightly against each other, causing the fabric to bunch up.
Fixing puckering is all about finding that tension sweet spot. We actually have a super detailed guide that will help you become a pro at tension adjustment on your sewing machine—it’s a skill every sewist needs in their back pocket.
Sometimes, a quick visual guide is the best way to figure out what's going wrong. I've put together this little cheat sheet for the issues I see most often.
Common Sewing Issues and Quick Fixes
| Problem | Likely Cause | Solution |
|---|---|---|
| Skipped Stitches | Wrong, dull, or damaged needle. | Replace with a new ballpoint or stretch needle. Ensure it's inserted correctly. |
| Wavy or Stretched Seams | Presser foot is stretching the fabric. | Reduce presser foot pressure. Use a walking foot for even feeding. |
| Puckered Seams | Thread tension is too tight. | Loosen the upper thread tension slightly. Test on a scrap piece of fabric. |
| Thread Breaking | Poor quality thread or incorrect needle size. | Switch to a high-quality polyester thread. Make sure needle size matches fabric weight. |
Hopefully, this table helps you quickly diagnose the problem and get back to your project without too much of a headache!
The Bigger Picture in Performance Apparel
Getting good at troubleshooting these little issues isn't just about making your sewing life easier; it taps into a huge industry trend. The global market for performance fabrics—think polyester and spandex blends—was pegged at a massive $80.7 billion in 2024 and is still climbing. A big reason for this growth is that sewing techniques for these fabrics have gotten so much better.
You can learn more about the booming stretch fabric market and where it's headed. By mastering these skills, you're not just sewing a t-shirt; you're building expertise that’s incredibly relevant in modern fashion and apparel.
Still Have a Few Questions?
Diving into the world of stretch fabrics can feel a little intimidating at first, and it's totally normal to have questions pop up. I get asked these all the time, so I've put together some quick answers to the most common puzzles sewists run into. Think of this as the kind of straightforward advice you'd get in one of our bsewinn.com online classes.
Do I Absolutely Need a Serger to Sew Stretch Fabrics?
Let's clear this one up right away: No, you absolutely do not need a serger to get beautiful, sturdy results with stretch fabrics!
Don't get me wrong, a serger is an amazing machine that creates a professional finish in a flash. But your trusty home sewing machine is more than capable of handling knits. The real secret is using a stitch that can stretch with the fabric. A narrow zigzag stitch is my go-to for construction seams, but many machines also have dedicated stretch stitches that work wonders.
To keep the raw edges from fraying, just run a wider zigzag stitch along the seam allowance. It works beautifully.
Pro-tip: One of the best tools for giving your knit garments that store-bought look is a twin needle. It creates two perfect, parallel rows of stitches on top with a zigzag on the bottom—ideal for hemming T-shirts and leggings with plenty of give.
Why Are My Seams Wavy When I Sew Knits?
Ah, the dreaded wavy, "lettuce-edge" seam. We've all been there! This almost always happens because the fabric is getting stretched out as you're sewing it.
First thing to check is your presser foot pressure. If it’s cranked up too high, it can literally push and stretch the fabric as it feeds under the needle. If your machine lets you adjust it, try turning it down a notch. It’s also so important to let the machine do the work—your only job is to guide the fabric, not push or pull it.
A walking foot is a game-changer for this very problem. It has its own little feed dogs on top that work in sync with the machine's feed dogs, gently and evenly moving both layers of fabric through together. For really slinky, unstable knits, you can even tuck some stabilizing tape or a strip of tissue paper under the seam as you sew.
What Is the Best Type of Thread for Stretch Fabrics?
For pretty much any project with stretch, polyester thread is your best friend. Cotton thread is a big no-no; it has zero elasticity and will just snap the first time the seam is stretched.
Polyester thread, on the other hand, has a natural bit of give and is incredibly strong. This lets your seams flex and move with the garment, so you don't have to worry about popped stitches.
If you’re sewing something that needs maximum stretch and recovery—think activewear or swimsuits—you might want to try woolly nylon thread. It’s exceptionally soft and stretchy, which makes it a fantastic choice for the loopers on a serger or even wound onto the bobbin of your sewing machine.
How Do I Stop the Edges of My Knit Fabric from Curling?
That relentless curling, especially with jersey knits, can make you want to pull your hair out. It can be a real headache!
Here’s a trick that works like a charm: give the edges a light mist of spray starch or a liquid fabric stabilizer, then press them flat with your iron before you even think about cutting.
When it's time to cut, grab a rotary cutter, a mat, and a handful of pattern weights. This setup lets you cut your pieces without ever lifting the fabric from the table, which is often what triggers the curling in the first place. I also recommend using clips instead of pins to hold your seams together. Some sewists I know even swear by a water-soluble glue stick to temporarily tack the seam allowances together before stitching.
Ready to put these tips into practice? At B-Sew Inn, we have the machines, accessories, and expert training to help you tackle any sewing challenge with confidence. Come explore our collection and find the perfect tools to bring your creative vision to life.