

If you're looking for a rewarding first project, a simple pattern for quilted pot holders is one of the best ways to dip your toes into the craft. At B-Sew Inn, we're committed to empowering crafters by showcasing tangible examples you can replicate at home. This guide will help you turn a few fabric scraps into a piece of beautiful, functional art for your kitchen and get a huge dose of satisfaction along the way. Honestly, it’s the perfect entry point for learning skills you'll use for years to come.
Why Pot Holders Are the Perfect First Quilting Project
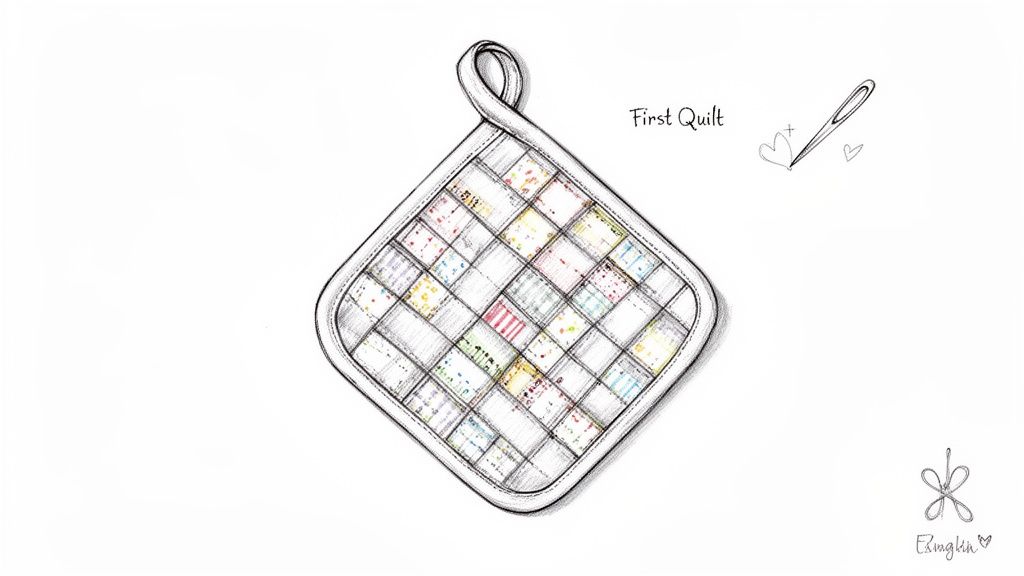
Before you even touch your fabric, it helps to know why this little project is so beloved by beginners and seasoned quilters alike. A pot holder isn't just a kitchen tool; it's a miniature quilt that teaches you the core techniques in a low-stakes, completely manageable format.
For anyone new to quilting, this is your chance to get a real feel for the fundamentals. You’ll get hands-on experience with:
- Layering: Assembling the classic "quilt sandwich"—your pretty top fabric, the batting in the middle, and the backing.
- Quilting: Stitching through all three layers to create that beautiful texture and add durability.
- Binding: Finishing the raw edges for a clean, professional look that’s built to last.
A Gateway to Bigger Things
This project isn’t just for newbies, though. Many experienced quilters come back to making pot holders as a quick, creative fix. They're a fantastic way to test out new quilting designs, bust through a precious scrap pile, or finally nail that tricky mitered corner technique. It’s one of those deeply satisfying projects you can start and finish in a single afternoon.
With so many of us cooking more at home, handmade kitchen items have become more special than ever. Kitchen linens are actually part of a booming USD 12.2 billion global market! And with polls showing that 42% of beginner sewists start with pot holders to practice skills like free-motion quilting, it’s clear this little project is a cornerstone of the craft. (Grandview Research has some fascinating insights on the kitchen linen market if you're curious).
Building Confidence with Every Stitch
Here at B-Sew Inn, we believe that successful projects build lasting confidence. When you create something that's both beautiful and genuinely useful, like a sturdy pot holder, it gives you an incredible sense of accomplishment. Our custom sewing machine designs and extensive resources are tailored to be your launchpad into the wider world of quilting.
This project is the ideal introduction to quilting because it's small enough to complete quickly, yet it incorporates all the essential steps of making a larger quilt. It's a true skill-builder.
We’re here to support you on your creative journey, right from that very first stitch. Through our online classes, training, and a range of beginner-friendly Baby Lock machines, you'll have everything you need to succeed. When you're ready to dive in a little deeper, you might find our guide on the four easy steps to start quilting helpful.
Getting Your Supplies in Order
Before you even think about threading your needle, let's talk about setting up for success. Getting all your tools and materials ready beforehand makes the entire creative process so much more enjoyable. It’s not just about ticking items off a list; it’s about laying the groundwork for a project you’ll be proud of—and one that’s safe to use in the kitchen.
Think of it as your mise en place for sewing. When everything is within arm's reach, you can get into the creative flow without any interruptions.
The Right Stuff: A Quick Checklist
To make things easy, here’s a rundown of everything you'll need. We've included not just what you need, but why it's the best choice for this particular project. Having the right supplies makes all the difference between a pot holder that just looks good and one that actually works well.
| Item | Recommended Specification | Why It's Important |
|---|---|---|
| Cotton Fabric | 100% Cotton (quilting weight) | Synthetics like polyester can melt under high heat. Cotton is a natural fiber that can take the heat from a hot pan without melting. |
| Cotton Thread | 100% Cotton (all-purpose) | Just like the fabric, polyester thread can melt, causing your seams to fail over time. Cotton thread ensures your pot holder stays together. |
| Thermal Batting | Insul-Bright or similar | This is your heat shield. Its metallic layer reflects heat away from your hands, providing crucial protection. |
| Cotton Batting | 100% Cotton Batting | This adds that soft, "quilty" feel, provides extra insulation, and helps absorb any condensation. |
| Sewing Machine | A reliable machine with a walking foot | A walking foot is a lifesaver for quilting! It grips the top and bottom layers of fabric, feeding them through evenly to prevent puckers. |
| Cutting Tools | Rotary cutter, self-healing mat, quilting ruler | This trio is the secret to perfectly straight, accurate cuts. Precision here leads to a much more professional-looking finished product. |
Gathering these essentials before you start means you can focus on the fun part—the actual sewing!
Fabric and Thread: Your First Line of Defense
When you’re making something that’s going to get up close and personal with a hot oven, safety is everything. This is why 100% cotton is non-negotiable for both your fabric and your thread.
- Cotton Fabric: Unlike polyester or other synthetic blends, cotton won’t melt. It’s a sturdy, natural fiber that can handle the heat. This is also where the fun begins! Picking out fun cotton prints for your pattern for quilted pot holders is how you give this little project a big dose of personality.
- Cotton Thread: The same logic applies here. If you use polyester thread, your seams could literally melt and your pot holder could fall apart right when you need it most. Stick with a good quality, all-purpose cotton thread.
The Heart of the Pot Holder: Layering Your Batting
What's inside your pot holder is what really does the heavy lifting. The magic comes from combining two different types of batting to create the perfect blend of heat resistance and that classic, squishy quilted feel.
The secret to a truly effective pot holder is layering a thermal batting with a natural cotton batting. This duo works together to reflect heat and provide necessary insulation.
For the best protection, you'll want to create a "sandwich" with these two layers:
- Insul-Bright: This stuff is the star of the show when it comes to heat resistance. It has a special metallic layer inside that reflects heat back where it came from. Just a heads-up: because of those metal fibers, never, ever put anything made with Insul-Bright in the microwave.
- 100% Cotton Batting: This is what gives your pot holder that satisfying, cushioned feel. It also adds an extra layer of natural insulation and can absorb a bit of moisture.
The Tools That Make It Easy
You could technically cut everything out with a basic pair of scissors, but if you want clean lines and perfect squares, a few key tools will be your best friends. These are staples in any quilter’s toolkit for a reason—they make everything faster, easier, and way more accurate.
If you're just starting to build your toolkit, we have a great guide on the top sewing tools for beginners that covers all the must-haves.
The combination of a rotary cutter, a self-healing mat, and a clear quilting ruler is your ticket to perfect cuts every single time. And when your pieces are cut perfectly, everything else just falls into place.
Of course, the centerpiece is your sewing machine. At B-Sew Inn, we empower crafters with custom sewing machine designs perfect for quilting projects like this. A feature like a walking foot is an absolute game-changer. It helps feed all the layers of your "quilt sandwich" through the machine evenly, which means no more frustrating puckers or shifted fabric. Having a little extra throat space also makes it so much easier to maneuver your project, even a small one like this.
How to Cut and Prepare Your Fabric Layers
The secret to a beautiful pot holder isn't just in the sewing—it’s all in the prep work. When you take the time to cut everything precisely, you're setting yourself up for a project that looks perfectly square and professional. Let’s walk through how to cut your fabric and build that all-important "quilt sandwich."
Your rotary cutter and self-healing mat are going to be your best friends here. Scissors, even sharp ones, can shift the fabric just enough to throw things off. A rotary cutter, on the other hand, gives you those clean, perfectly straight edges every single time. We're aiming for a standard 8-inch finished pot holder, so we'll cut the pieces a little larger to give us some wiggle room for quilting and trimming.
Your Cutting Checklist
First things first, give your fabric a good press to get rid of any wrinkles. This tiny step makes a huge difference and prevents your cuts from getting distorted. For one pot holder, you'll need these exact measurements:
- Top Fabric: Cut one 9-inch square. This is your chance to show off a fun, decorative print!
- Backing Fabric: Cut one 9-inch square.
- Cotton Batting: Cut one 9-inch square. This layer adds that classic quilted softness and some extra insulation.
- Insul-Bright: Cut one 9-inch square. This is the non-negotiable layer for heat protection.
This little diagram is a great visual for how all your core supplies come together before you even sit down at your machine.
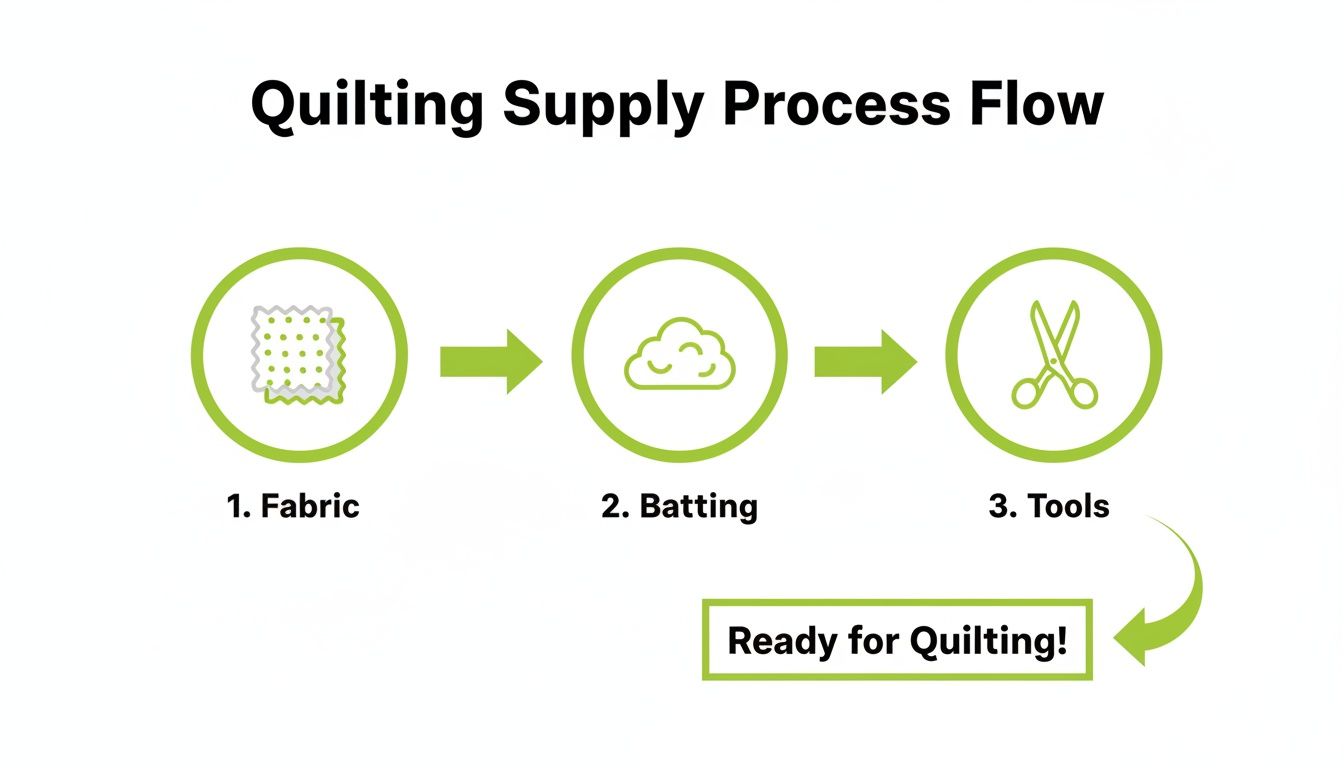
It’s a simple flow: get your fabrics and batting picked out, grab your tools, and you're ready to create something wonderful.
Assembling the Quilt Sandwich
Alright, it's time to layer everything up into what we quilters call a "quilt sandwich." The order you stack these layers in is absolutely critical. Getting it wrong can lead to a lumpy finish or, even worse, a pot holder that doesn't actually protect your hands from the heat.
Lay your pieces out on a flat table in this specific order:
- Start with the backing fabric, wrong side facing up.
- Next, lay down the Insul-Bright. The metallic, shiny side needs to face down, toward the backing fabric.
- Then, add the cotton batting right on top of the Insul-Bright.
- Finally, place your pretty top fabric on top of the whole stack, right side up.
Your stack should be a neat 9-inch square with all the edges lined up.
Getting your layers perfectly smooth and secure at this stage is the key to avoiding puckers and fabric shifting while you quilt. Take your time here—it pays off later.
Keeping It All Together
Once your sandwich is assembled, you have to make sure those layers don't go anywhere while you're quilting. Trust me, even the best walking foot can't save a project if the layers aren't basted properly. You've got a couple of great options here.
Basting Spray
For a small project like this, basting spray is my go-to. It’s a temporary adhesive that lightly tacks the layers together. It’s fast, super effective, and washes out later. Just lift each layer, give it a light, even spray, and smooth it back down. Just be sure to work in a well-ventilated area and put some newspaper down to protect your table.
Quilting Pins
If you'd rather not use an aerosol spray, curved safety pins made for quilting are the classic choice. That little curve makes them so much easier to insert and close than standard safety pins. Place a pin every few inches across the entire pot holder, making sure you catch all four layers.
With your layers cut and securely basted, you’ve built the perfect foundation. This carefully prepared quilt sandwich is now ready for the fun part—adding those quilting stitches that will bring your unique pattern for quilted pot holders to life.
Bringing Your Pot Holder to Life with Quilting
Now for the fun part! With your quilt sandwich all basted and ready, it's time to add the stitches that give your pot holder its unique personality. The quilting isn't just for looks; it's what fuses the layers together, turning your fabric stack into a sturdy, heat-resistant kitchen tool.
Don't get hung up on perfection here. Think of this small project as your personal playground for building quilting confidence.
Let's start with the most straightforward method out there: classic straight lines. This technique is clean, modern, and incredibly forgiving for beginners.
Your absolute best friend for this is a walking foot. Seriously, this attachment is a game-changer. It grips all three layers of your quilt sandwich at once and pulls them through the machine evenly. The result? Gorgeous, pucker-free stitches every single time.
Dialing in Your Machine Settings
Before you put pedal to the metal, a few small tweaks to your machine settings will make all the difference. This is the secret sauce for getting that professional, polished look.
- Stitch Length: Go ahead and lengthen your stitch to around 3.0mm. A slightly longer stitch just looks better on quilted projects and helps everything feed through smoothly.
- Tension: For now, just stick with your machine's default tension setting. If you start sewing and see little loops on the top or bottom of your fabric, you can make tiny adjustments from there.
- Needle Position: If your machine has a needle-down function, use it! Many Baby Lock models have this feature, and it’s a lifesaver. It keeps the needle buried in the fabric when you pause, which is perfect for pivoting at corners without losing your spot.
If you have a quilting guide bar, attach it to your walking foot to sew perfectly parallel lines spaced about 1-inch apart. This creates that classic grid pattern that always looks fantastic on a pot holder.
Getting Creative with Your Quilting
Feeling a little more adventurous? A pot holder is the perfect canvas to dip your toes into basic free-motion quilting (FMQ). To do this, you'll swap your walking foot for a darning or free-motion foot and lower your machine's feed dogs. With FMQ, you're the one in control, essentially drawing with thread and needle.
A simple meandering or "stipple" stitch—which looks a bit like puzzle pieces—is a great place to start. The beauty of this design is that there are no straight lines to stress over! Your main goal is to keep your hands moving at a steady pace while maintaining even pressure on the foot pedal. Features like speed control, found on many B-Sew Inn custom machine designs, can be a huge help here, preventing you from accidentally flooring it while you get the hang of the movement.
Quilting is your chance to add a signature touch. Whether you choose clean, straight lines or a playful free-motion design, the stitches you add are what transform your fabric pieces into a finished, functional item.
This growing interest in custom quilting is part of a larger trend. The global quilt market, which includes everything from a pattern for quilted pot holders to huge, intricate designs, was valued at USD 5.61 billion in 2025 and is projected to hit USD 9.67 billion by 2035. For B-Sew Inn, this points to a strong demand for machines that are built for precision stitching, like the Baby Lock models that can speed up quilting by up to 40% compared to hand-sewing.
Once you get comfortable quilting pot holders, you might feel inspired to tackle bigger projects. Many of the same skills apply to items like these when you explore a range of quilted play mats. Your pot holder is just the beginning
Finishing with a Clean and Professional Binding
A beautiful binding is what separates a homemade project from a truly handmade one. It’s the final frame for your miniature work of art, neatly encasing all the raw edges and giving your pot holder a durable, polished finish that’s ready for years of use in the kitchen.
This final step might seem intimidating if you're new to it, but I promise it's incredibly satisfying once you get the hang of it. We'll walk through creating your own continuous binding, mastering those crisp mitered corners, and seamlessly adding a practical hanging loop.
Preparing Your Binding Strips
First things first, let's get that binding ready. From your chosen binding fabric, you'll need to cut strips that are 2.25 inches wide. Cut enough to go all the way around your pot holder, plus about 6-8 inches extra. This little bit of overhang is crucial for joining the ends neatly later on.
Sew your strips together end-to-end on a diagonal to reduce bulk where they meet, then press the seams open. Once you have one long, continuous strip, fold it in half lengthwise with the wrong sides together and give it a good press. Just like that, you have a perfect double-fold binding strip ready to attach!
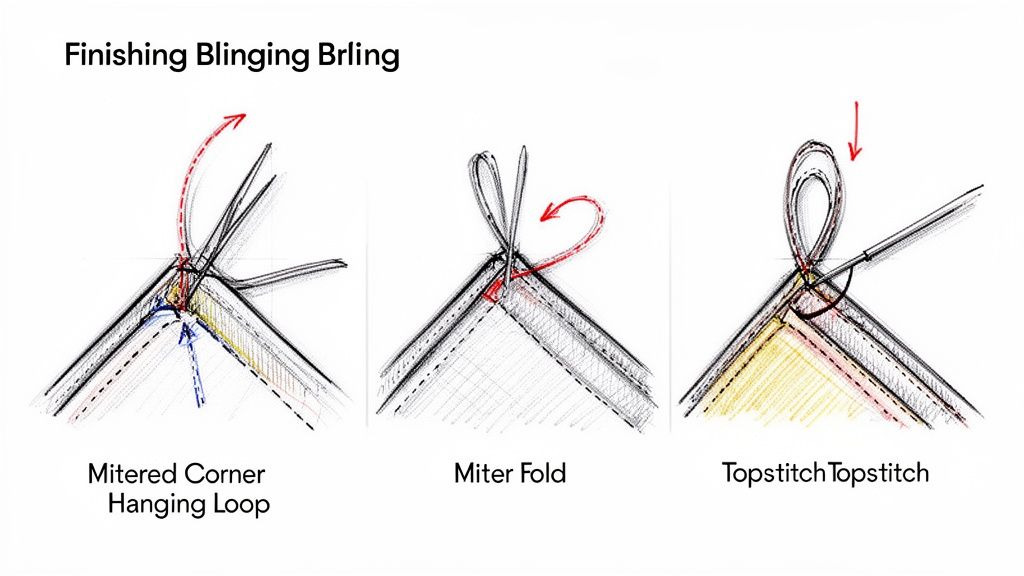
Attaching the Binding and Creating Mitered Corners
Okay, let's get this binding on. Start somewhere in the middle of one side and align the raw edges of your folded binding strip with the raw edge of your quilted pot holder. Make sure to leave a "tail" of about 4-5 inches of binding loose at the beginning—we’ll come back to this to join the ends.
Begin sewing the binding to the pot holder using a 1/4-inch seam allowance. As you approach a corner, slow down and stop sewing 1/4 inch from the edge, then backstitch to secure your stitches.
Mastering the mitered corner is a quilting rite of passage. It's a simple fold-and-pivot technique that creates that sharp, professional 90-degree angle you see on high-quality quilts.
To make the miter, take the pot holder off your machine. Fold the binding strip straight up, away from the pot holder, which creates a 45-degree angle. Now, fold the strip back down on itself, making sure the raw edge is perfectly aligned with the next side of the pot holder. This creates a neat little pleat at the corner. You'll start sewing again right from the very edge of this new side.
Repeat this process for all four corners. When you get back to where you started, join the two binding tails together, trim any excess fabric, and finish sewing the last little bit of the binding down.
Adding a Hanging Loop and Finishing Touches
Before you finish the binding, let's make the hanging loop. Take an 8-inch piece of your leftover binding strip. Fold it in half lengthwise and press. Then open it up, fold the raw edges in to meet that center crease, and fold it in half one more time. Topstitch right along the open edge to create a sturdy strap.
Fold this strap in half to form a loop. Tuck the raw ends of your loop under the binding on one of the corners before you fold it over to the back. This is a great trick because when you stitch the binding down, you’ll secure the loop at the same time. Smart, right?
Finally, fold the binding over to the back of the pot holder and secure it all the way around with binding clips. You have two options here: you can either stitch in the ditch from the front for a quick finish, or hand-stitch the binding to the back for a beautiful, invisible seam.
For an in-depth look at this crucial step, check out our full guide on how to bind a quilt. Your pot holder is now complete
A Few Common Pot Holder Questions
Even with a simple and fun project like this, a few questions always pop up. When you're trying out a new pattern for quilted pot holders, it's helpful to have some pro tips ready to go. Think of this as your go-to guide for clearing those common hurdles and getting a beautiful, functional result.
Let's dive into some of the questions I hear most often.
What’s the Best Batting for Pot Holders That Are Actually Heat-Resistant?
This is probably the most important question, because safety comes first! For real heat protection that you can trust, you’ll want to double up with two different types of batting. It's a game-changer.
- Layer 1: Insul-Bright: This is non-negotiable for pot holders. It’s a special thermal batting with a metallic layer inside that reflects heat back toward the source (and away from your hand!).
- Layer 2: 100% Cotton Batting: This layer gives your pot holder that lovely, soft, quilted feel. More importantly, it adds another layer of insulation and helps absorb any condensation from a hot dish.
Whatever you do, don't use polyester batting. It can actually melt when it gets too hot, which is the last thing you want. And a huge safety reminder: never, ever put anything made with Insul-Bright in the microwave. Those metallic fibers are a big no-no for microwaves.
Can I Just Toss My Handmade Pot Holders in the Washing Machine?
You bet! The key is to prep your fabrics before you even start cutting. I always recommend pre-washing and drying your cotton fabrics to get any shrinkage out of the way first.
Once your pot holder is all stitched up, you can machine wash it on a gentle cycle using cold water. Tumble dry on low, or just lay it flat to air dry. Taking care of them this way will keep your pot holders looking bright and doing their job for years to come.
Help! My Quilting Stitches Look Wavy and Uneven.
Ah, the dreaded wavy stitches. We’ve all been there! This is one of the most common frustrations for new quilters, but luckily, the fix is pretty simple. Your best friend here is a walking foot for your sewing machine.
A walking foot has its own set of feed dogs that grip the top layers of your quilt sandwich, moving them along at the exact same speed as the machine’s feed dogs are moving the bottom layer. It’s a simple attachment that ensures everything feeds through evenly. I also find that lengthening my stitch to about 3.0mm helps create smoother lines. And of course, double-check that your machine tension is set correctly!
It's no surprise that small, useful projects like these are so popular. The global quilt market is seeing steady growth, and quick makes like pot holders are a huge part of that. In fact, residential applications make up 72% of quilt demand, and pot holders are a favorite because you can whip one up in an afternoon. If you're a numbers person, you can dig into more quilt market research to see the full picture.
Here at B-Sew Inn, we love empowering your creativity with the right tools and know-how. Whether you're eyeing an advanced Baby Lock machine or want to sharpen your skills in our online classes, we're here to support you on your sewing journey. Visit us online to discover the perfect machine and supplies for your next project.

