For a beginner, the best sewing machine for quilting boils down to a few key things: you want a reliable workhorse with plenty of space to the right of the needle (what we call throat space), a rock-solid straight stitch, and the ability to pop on a walking foot. Nailing these features gives you a smooth, frustration-free start and leaves you with a machine you can grow with. This guide will walk you through exactly what to look for, so you can feel confident in your choice.
Your First Step into Quilting
Welcome to the wonderful, creative world of quilting! I know choosing your first machine can feel like a massive decision, but it really doesn't have to be overwhelming. At its heart, quilting is just about stitching layers of fabric together to create something beautiful. Your sewing machine is your partner in this, the main tool that brings your vision to life. The real goal is to find one that feels like an extension of your hands, not another technical puzzle to solve.
The quilting world is buzzing with new energy, and so many people are picking up the craft for the first time. In fact, data shows that out of 9 to 11 million active quilters globally, about 18% are newcomers—that's a big jump from 11% just a few years ago. It’s exciting! This shared passion for making things is what it's all about, and getting started with the right tools makes all the difference.
What Really Matters for Your First Machine
To keep things simple, just think about balancing four key areas. A great beginner machine gives you a solid foundation in each without bogging you down with a hundred fancy stitches or features you might not touch for years.
Here at bsewinn.com, our commitment is to empower you as a crafter. We don't just ship you a box and wish you luck. Our custom sewing machine designs are backed by a complete support system of online classes, hands-on training, and extensive resources made specifically for our models. That way, from the moment you open the box, you have a clear path to creating beautiful projects.
A sewing machine isn't just a purchase; it's an investment in your creativity. Choosing a brand that has your back means you'll have a partner for the whole journey, from your first simple block to a masterpiece quilt.
Once you’ve got your machine, our guide on the 4 easy steps to start quilting is the perfect place to begin. Think of this first decision as your launchpad. As we dig into the details below, you’ll get the clarity you need to pick a machine that not only works for you today but also gets you excited about all the quilts you’ll make tomorrow.
To give you a quick overview, this table breaks down the core factors we’re about to dive into.
Key Decision Factors for Your First Quilting Machine
| Factor | Why It Matters for Beginners | What to Look For |
|---|---|---|
| Throat Space | The bigger the space, the less you have to wrestle your quilt through the machine. This reduces frustration, especially on larger projects. | 5-8 inches is a great starting point. Anything more is a fantastic bonus! |
| Stitch Quality | You'll be using a straight stitch 99% of the time. It needs to be consistent and strong to hold your quilt together for years. | Look for a machine known for a reliable, even straight stitch. Fancy decorative stitches are nice, but not essential at first. |
| Walking Foot Compatibility | A walking foot evenly feeds all three layers of your quilt sandwich, preventing puckering and shifting. It's a game-changer. | Check that the machine either comes with a walking foot or that a compatible one is readily available and easy to attach. |
| Brand Support & Resources | When you hit a snag (and you will!), having access to classes, tutorials, and extensive resources is invaluable. | Look for brands with strong educational resources (like our online classes and training videos) and active user communities. |
This table is just a starting point, of course. Now, let's get into the nitty-gritty of what each of these factors really means for you and your quilting.
Essential Features for Beginner Quilters
Shopping for your first machine can feel like learning a new language. You hear words like "throat space," "feed dogs," and "free-motion" thrown around, and it's easy to wonder what truly matters. Let's cut through the jargon and focus on the features that will actually make your quilting journey smoother and way more fun from day one.
Think of it this way: you don't need a souped-up race car to learn how to drive. You need a reliable ride with good visibility and smooth handling. The same logic applies here. We're going to focus on the practical, must-have functions before getting lost in all the fancy extras.
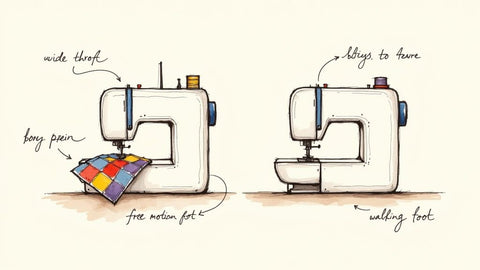
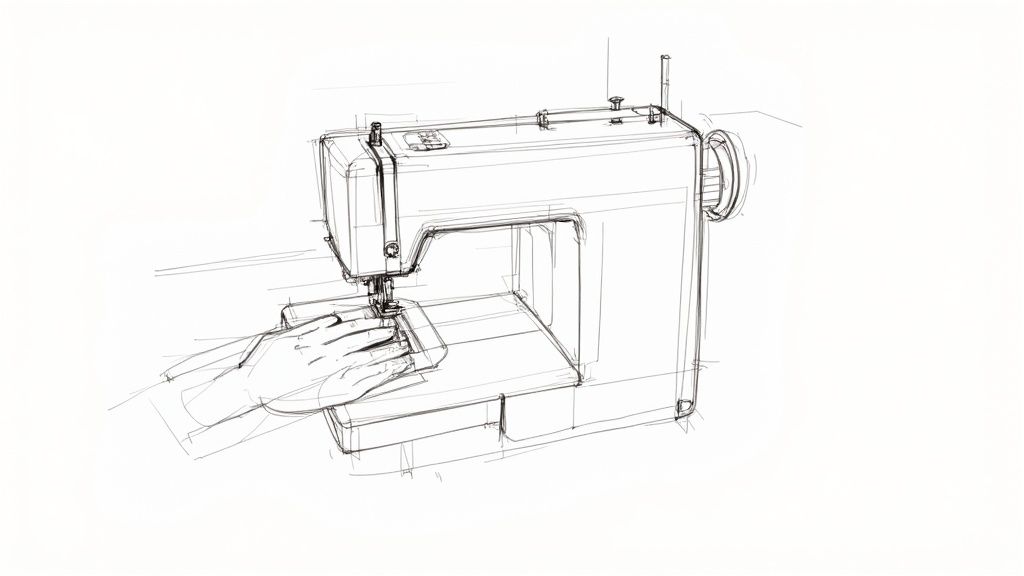
The All-Important Throat Space
First up is throat space, sometimes called the harp. This is just the open area to the right of your needle, and it’s a bigger deal than you might think. Imagine trying to paint a huge canvas on a tiny little desk—you'd constantly be fighting to keep your masterpiece from falling off the edge. That's what quilting with a small throat space feels like.
The more room you have here, the easier it is to maneuver your quilt as you stitch. When you're working on a larger project, the bulk of the fabric gets rolled up and has to pass through this space. A cramped throat means you'll be squishing and wrestling with your quilt the whole time, which is a recipe for frustration and wonky stitches. For a beginner, a machine with at least 5 to 8 inches of throat space is a fantastic place to start.
Your Best Friend: The Walking Foot
If there's one accessory you absolutely, positively need for quilting, it's a walking foot. This special presser foot is a game-changer. It has its own set of feed dogs on top that work in sync with the little metal teeth under your needle (the machine's feed dogs) that pull the fabric through.
So why is this so critical? A quilt is a three-layer sandwich: your pretty top, the fluffy batting in the middle, and the backing fabric. A standard presser foot only pulls from the bottom, which often causes the top layers to shift, pucker, or stretch out of shape. A walking foot, however, grips and moves all three layers together at the exact same speed. This guarantees your quilt sandwich feeds through evenly, giving you beautifully flat, pucker-free quilting lines.
Think of a walking foot as giving your sewing machine all-wheel drive. Instead of just the back wheels pushing (the bottom feed dogs), you now have the front wheels pulling at the same time. This gives you perfect traction over the bulky, hilly terrain of a quilt.
Unlocking Creativity with Free-Motion Quilting
Once you get the hang of straight-line quilting, you'll probably want to try free-motion quilting (FMQ). This is where you get to "draw" with your needle, creating swooping curves, stipples, and all kinds of decorative patterns. To do this, your machine needs two things:
- The ability to lower the feed dogs: This disengages those little teeth that pull the fabric, freeing you up to move the quilt in any direction you want.
- A darning or free-motion foot: This specialized foot hovers just over the fabric, keeping it from hopping up and down with the needle as you stitch.
Most modern machines have a simple switch or button to drop the feed dogs. This feature is absolutely essential if you want to explore the more artistic side of quilting, so it's a key function to look for in a machine you want to grow with.
Other Helpful Features for Quilters
Beyond those big three, a few other features can make a huge difference in your day-to-day quilting life. While not strictly essential for your very first stitch, they really smooth out the learning curve.
- Needle Up/Down Function: This lets you set the needle to always stop in the down position, buried in your fabric. It’s a lifesaver for pivoting at corners without losing your spot.
- Speed Control Slider: Let's be honest, quilting is about precision, not speed. A speed control slider lets you cap the maximum speed, so you can floor the foot pedal and still sew at a slow, controlled pace. It's like putting your machine in cruise control.
- A Solid Straight Stitch: You will use the straight stitch for nearly everything in quilting, from piecing blocks to binding the edges. Look for a machine known for its consistent, high-quality straight stitch. While dozens of decorative stitches look fun, a perfect straight stitch is non-negotiable.
Deciding between all these options can lead you to another big question: mechanical or computerized? For a deeper dive, check out our guide on the differences between computerized and mechanical sewing machines to see which style fits you best. Knowing what these core features do empowers you to pick a machine that will be a creative partner, not a source of frustration.
Setting a Realistic Budget for Your First Machine
Okay, let's talk about the big question that comes up before you even start looking at fancy features: how much should you actually spend on your first quilting machine? The price range is massive, and it's easy to get sticker shock or, on the flip side, feel tempted to just grab the cheapest machine you can find. But trust me, finding the right machine is all about matching your budget to what you realistically want to do.
Think of it like buying your first car. You need something reliable for daily errands (simple patchwork), but you also want a machine that won't give up on you if you decide to take a longer road trip (tackling your first big quilt). Nailing down a realistic budget is the first step to buying a machine you'll love for years, not just a few months.
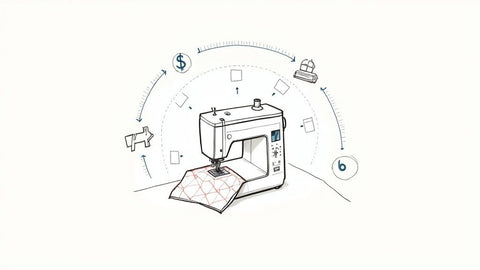
This image does a great job of showing how price, features (like how many different stitches you get), and the machine's build quality (which you can often feel in its weight) all relate to each other in beginner models.
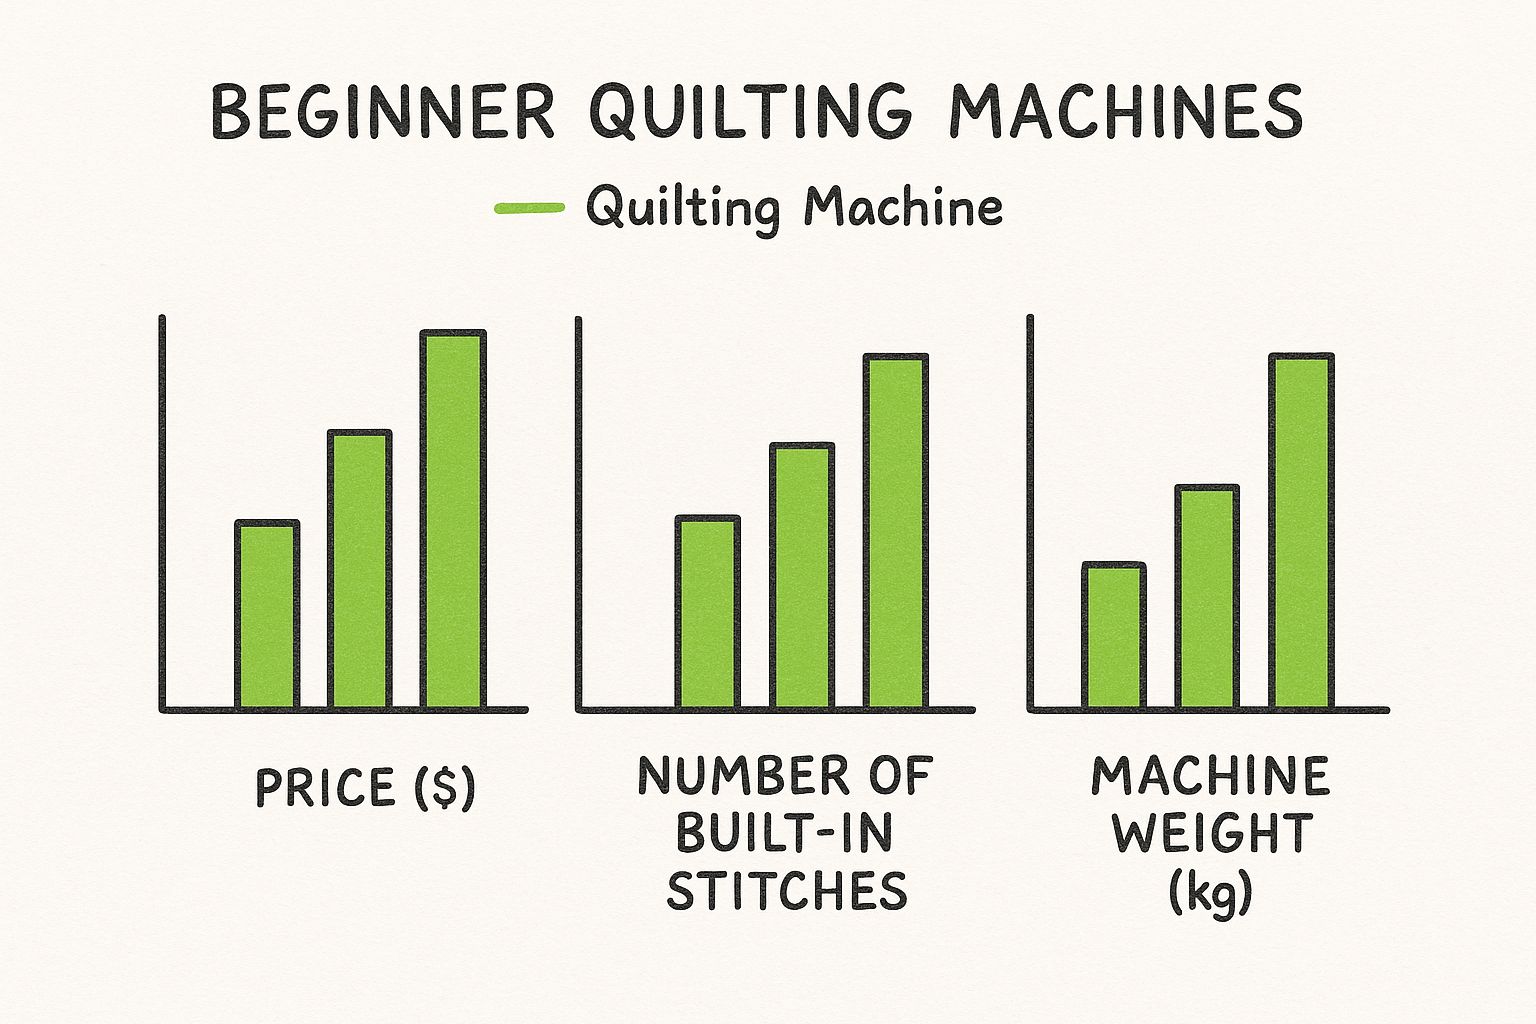
As you can see, there’s a clear trade-off. More expensive machines usually give you more stitch options and a heavier, more stable frame, while the entry-level ones are lighter and more basic.
Breaking Down the Budget Tiers
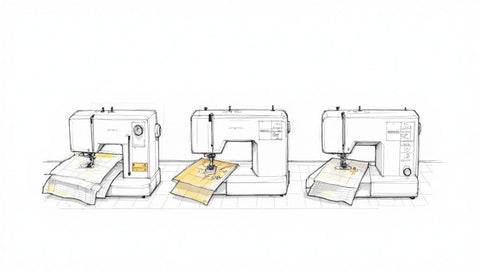
To make this a little less overwhelming, let's break down beginner-friendly quilting machines into three general price buckets. Each one offers a different experience in terms of performance, durability, and features, and they're all geared toward different quilting ambitions.
- Entry-Level (Under $300): These are your most basic machines. They’re often mechanical (with knobs and dials instead of screens), super lightweight, and stick to the essential stitches. They'll get you through simple piecing just fine, but they might groan a bit when you try to quilt through a full quilt sandwich and usually have very little space to the right of the needle.
- Mid-Range ($300 - $800): For a lot of new quilters, this is the sweet spot. Machines in this range are typically computerized and come with game-changing features like a needle up/down button, speed control, and a much better variety of stitches. They're built tougher and can handle bigger projects without a fight.
- Long-Term Investment ($800+): When you get to this price point, you’re paying for power, durability, and most importantly, space. These machines have a much larger throat space, stitch way faster, and are built like tanks. They’re designed to be your quilting partner for the long haul, supporting you as you grow from simple blocks to fancy free-motion work.
The Value of a Supportive Brand
Here’s something a lot of beginners overlook: you're not just buying the machine; you're buying into the company that made it. This is where investing in a well-known, supportive brand like bsewinn.com really pays off. A cheaper, no-name machine can quickly become a source of frustration, with expensive repairs and projects that just get abandoned.
A great sewing machine is a partnership. When you choose a brand that provides robust support, online classes, and accessible training, you're not just buying a tool—you're gaining a reliable partner committed to your creative growth.
At bsewinn.com, we design our custom machines and resources to help you succeed. Our huge library of tutorials and online classes means you have guidance right at your fingertips for every challenge, from winding your first bobbin to mastering a new quilting technique. That kind of long-term support turns your purchase from a one-time transaction into a creative partnership that lasts.
Figuring out which tier fits your goals is the key. This little table should help you see where your quilting dreams line up with your budget.
Quilting Machine Budget Tiers and Expected Features
| Budget Tier | Typical Price Range | Key Features You Can Expect | Best For |
|---|---|---|---|
| Entry-Level | Under $300 | Basic stitches, smaller throat space (4-5"), mechanical controls, lightweight plastic body. | Hobbyists unsure of their commitment or those focused solely on small projects like placemats or wall hangings. |
| Mid-Range | $300 - $800 | Computerized controls, needle up/down, speed control slider, walking foot included, good throat space (5-8"). | The dedicated beginner who wants a reliable machine with room to grow into lap quilts and larger projects. |
| Long-Term Investment | $800+ | Large throat space (8"+), automatic thread cutter, durable metal frame, high stitching speed, advanced features. | Ambitious beginners who know they love quilting and want a machine that can handle any project without limitation. |
Ultimately, choosing a machine that has the features you need now—and a few you can grow into—is the smartest way to invest your money and keep your quilting journey fun and frustration-free.
The Importance of Brand Support and Resources
A sewing machine is so much more than just a tool; it's your creative partner. And when you're just starting out, that partnership is everything. This is where brand support becomes one of the most critical, yet often overlooked, factors in choosing the best sewing machine for quilting beginners.
Let's be real: at some point, you will face a challenge. It could be a tangled bobbin that absolutely refuses to cooperate, a confusing moment trying to figure out which presser foot to use, or that first brave attempt at free-motion stitching.
In those moments, the brand you chose can either be a silent bystander or an invaluable guide. This commitment to your success is a huge part of what we do at bsewinn.com. We truly believe that having the right resources at your fingertips can turn a moment of total frustration into a valuable learning experience.
Beyond the Box Support
The moment you unbox your new machine is just the beginning of your journey. A great brand doesn't just leave you there; it provides a clear path forward, making sure you feel confident from your very first stitch. This support system is what elevates a good machine to a great one.
Here’s what that tangible support actually looks like:
- Online Classes and Training: Structured lessons designed for your specific model can shrink the learning curve dramatically. Instead of guessing, you get expert-led guidance for everything from basic setup to advanced quilting.
- Extensive Video Tutorials: Sometimes you just need to see it done. Clear, concise videos you can pause and re-watch are perfect for mastering skills like threading the needle, cleaning the bobbin case, or attaching that all-important walking foot.
- Responsive Customer Service: Having access to knowledgeable people who can answer your specific questions is a game-changer. It’s the difference between abandoning a project in defeat and successfully troubleshooting your way to a finished quilt.
Your sewing machine purchase should be the start of a relationship. The ongoing support, education, and community offered by a brand are what will truly help you grow as a quilter long after the initial sale.
This need for reliability is something many beginners are looking for. The global sewing machine market, which includes all these wonderful quilting machines, was valued at around USD 4.65 billion and is expected to keep growing. Quilters and sewists prioritize dependable brands they can trust for the long haul.
From Unboxing to Your First Quilt
Imagine this: you're so excited to start quilting your very first project. You’ve basted all your layers together, but when you begin stitching, the fabric starts to pucker. Ugh.
With a supportive brand, you don't have to fall down a rabbit hole of random online searches. Instead, you can pull up a specific tutorial on using a walking foot that came right with your machine. Problem solved.
This direct access to information is core to our mission here. We design our custom machines and craft our extensive resources to work together seamlessly. For instance, our detailed guide on the Baby Lock Joy Sewing Machine is packed with practical insights that help new owners understand exactly how to get the most from its features.
Ultimately, choosing a machine from a brand that's committed to your growth ensures you’re not just buying a product. You're investing in a support system that will stand by you as your skills and creativity take off.
Getting Started with Your New Quilting Machine
Unboxing your first real quilting machine is one of those moments you’ll remember. After all that research and debating, it's finally sitting there on your table, ready to turn those beautiful fabric stacks into something amazing. This is where the fun begins, and this guide serves as a comprehensive "how-to" to walk you through it, from that first giddy moment to your first confident stitch.
We're going to break down the initial setup into simple, bite-sized steps. The goal here is to make it feel totally doable, not like you're trying to assemble a rocket ship. With our bsewinn.com machines and online training, we’ve made sure you have a clear path to follow, so you can get sewing right away.
From Box to Bobbin: Your First Three Skills
Before you can even think about sewing your first seam, there are three little tasks you’ll need to get comfortable with: winding a bobbin, threading the machine, and changing the needle. Think of these as your "pre-flight check" before any quilting session. Honestly, getting these three things down will save you from about 90% of the common frustrations quilters run into.
First up is winding a bobbin. All this means is getting the thread from that big spool onto the little one that lives underneath your needle. A bobbin that's wound nice and evenly is the secret sauce for a beautiful, balanced stitch.
Next, you'll thread the machine. Most modern machines, thankfully, have numbers or little diagrams printed right on them to show you exactly where the thread needs to go. Following that path correctly is what lets the machine create the perfect tension for a strong seam. It looks a little wild at first, but I promise after a few times, you'll do it without even thinking.
Finally, get into the habit of changing the needle. This is such a simple thing, but it makes a huge difference. Needles get dull after about 8-10 hours of sewing, and a dull needle is a recipe for skipped stitches, snagged fabric, and a whole lot of unnecessary grumbling.
A Simple Setup Checklist
Alright, let's walk through this together. The whole point of the user-friendly design on bsewinn.com machines is to make this feel intuitive, but we also have online videos if you're a visual learner and want to see it done first.
- Change the Needle: Always start with a fresh one! Even a brand-new machine might have been test-driven at the factory. Just loosen the little screw on the needle clamp, slide out the old needle, and pop in the new one—make sure the flat side faces the back. Then tighten that screw back up.
- Wind the Bobbin: Pop your thread spool onto the pin. Your machine's diagram will show you how to loop the thread through the tension disc and onto the empty bobbin. Click the bobbin onto its winder, disengage the needle (so it doesn't bounce up and down!), and gently press your foot pedal. It'll stop automatically or just stop when it looks full.
- Thread the Machine: Follow the numbered path right on your machine, starting from the spool and working your way down to the needle. A key tip: make sure your presser foot is UP while you do this! That opens up the tension discs so the thread can slip in where it belongs. If you have an automatic needle threader, use it. It's a game-changer.
- Insert the Bobbin: Open the bobbin case cover. Drop your freshly wound bobbin in (your manual will show which way the thread should be unwinding) and guide the thread tail through the little slit in the case.
- Bring Up the Bobbin Thread: This is the magic part. Hold the top thread loosely with one hand and turn the handwheel toward you for one full rotation. You'll see the top thread dip down and loop around the bobbin thread, pulling it up through the needle plate. Grab both threads and sweep them to the back.
And just like that, you're ready to sew! Getting this five-step routine down is the foundation for everything else. Once it becomes muscle memory, you can stop worrying about the machine and start focusing on the fun part—the actual quilting.
Your First Project: A Classic Nine-Patch Block
Okay, your machine is threaded and humming. Now what? The best way to build confidence is to make something right away. We're showcasing a tangible example that crafters can replicate: a classic nine-patch block. It’s perfect because it only requires you to do two things: sew straight lines and match up a few seams. These are the two most fundamental skills in all of quilting.
All you need are nine fabric squares of the same size. You'll sew them into three little rows of three, press your seams, and then sew the rows together. Boom—a perfect little quilt block. It’s a small win that feels great and gives you an immediate, satisfying result. From here, you're ready for anything, and with the support of bsewinn.com's online classes, you'll be tackling a full quilt top before you know it.
Common Questions About Quilting Machines
Even after you’ve done all the research, a few questions almost always pop up. I get it! Let's clear up those last-minute doubts so you can feel totally confident and excited to get started.
Quilting vs. Regular Sewing Machines: What Is the Real Difference?
This is a big one. You're probably wondering if you really need a special machine just for quilting. It's a great question, and the short answer is no—you can absolutely quilt on a standard sewing machine. Many people do!
However, a machine designed with quilters in mind comes with a few key advantages that make the whole process a lot smoother and way more fun.
The biggest game-changer is the throat space. That’s the open area to the right of your needle. Quilting machines have a much bigger workspace, which is a lifesaver when you're wrangling the bulk of a quilt. Think of it like trying to paint a giant mural on a tiny sketchpad versus a big easel—more room means more freedom and a lot less frustration.
Quilting-focused machines also tend to come with essential accessories you'd have to buy separately otherwise. We're talking about a walking foot (for perfectly even stitches through your quilt sandwich) and a free-motion foot to let your creativity run wild. Plus, they often have handy features like a needle up/down button for sharp pivots and faster stitch speeds for when you really get in the groove.
Do I Need a Computerized Machine to Start Quilting?
Not at all! For generations, quilters created breathtaking masterpieces on purely mechanical machines. A solid mechanical workhorse will give you a beautiful, sturdy stitch and will serve you well for years. If a mechanical model fits your budget, you can absolutely start your quilting journey there and make amazing things.
But, if you can stretch your budget a bit, a computerized machine offers some incredible convenience features that can really shorten the learning curve. These aren't just flashy bells and whistles; they are practical tools that solve common frustrations for beginners.
Think of a computerized machine as having a helpful co-pilot. Things like push-button stitch selection, an automatic needle threader, and speed control take the guesswork out of the setup. It lets you focus on your creativity, not the machine's mechanics.
For example, that needle up/down function makes pivoting at corners a total breeze. A speed control slider lets you sew at a consistent, comfortable pace, even if you have a lead foot on the pedal. These little assists build confidence fast, making the whole process feel more intuitive and a lot less intimidating.
How Important Is Machine Maintenance for a Beginner?
This is huge. Machine maintenance is crucial for every sewist, but it’s especially important when you're just starting out. A well-cared-for machine is a reliable machine, and reliability is everything when you want to avoid those frustrating issues—like skipped stitches or tangled thread nests—that can make you want to throw in the towel.
The good news is that basic maintenance isn't complicated. It’s really just about building a few simple habits that will keep your machine humming along happily.
- Clean Out the Lint: Quilting creates a ton of lint from fabric and batting. Get in the habit of using a little brush to clean out the bobbin area regularly to prevent jams.
- Change Your Needle: This is the easiest, most effective thing you can do. A needle gets dull after about 8-10 hours of sewing, and a dull needle is the culprit behind so many sewing problems.
- Follow the Schedule: Just like your car needs a tune-up, your sewing machine will benefit from a professional servicing. Check the manufacturer's recommendations to keep it in top shape for years to come.
Here at bsewinn.com, we know that learning these habits is part of the fun. Our website is packed with clear, step-by-step tutorials to walk you through these simple but vital maintenance tasks. We want to empower you not just to sew, but to confidently care for your new creative partner. Our goal is to make sure you spend less time troubleshooting and more time actually quilting.
Your quilting journey is an exciting new chapter, and having the right machine and support makes all the difference. At bsewinn.com, we're here to provide not just the best sewing machines for quilting beginners, but also the community and education you need to succeed. Explore our custom machine designs and find your perfect creative partner today at https://www.bsewinn.com.