Here's a breakdown of the best stabilizer for your embroidery project, right off the bat: use a cut-away stabilizer for stretchy knits like t-shirts, a tear-away for stable wovens like denim, and a wash-away for anything sheer or delicate where you don't want any backing left behind.
Think of it as picking the right foundation for your specific project. Get that part right, and you'll sidestep puckering and get a beautiful, professional finish every time. At bsewinn.com, we are committed to empowering you on this journey by providing custom sewing machine designs and extensive resources to help you master these skills.
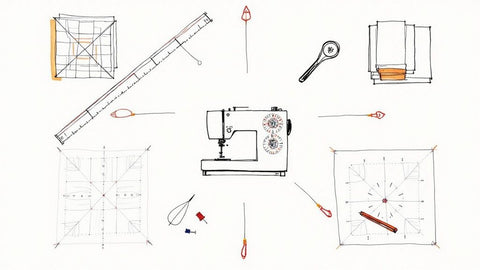
Your Foundation for Flawless Embroidery
Let's use an analogy: embroidery stabilizer is like the foundation of a house. If you build on a weak or incorrect foundation, the whole structure—your beautiful design—is at risk of shifting, puckering, and getting all distorted. Stabilizer is the unsung hero that holds your fabric firm, stopping it from stretching and wriggling around under the fast-paced motion of the embroidery needle.
Choosing the right stabilizer is genuinely the most critical first step you can take. So many of those frustrating embroidery issues, like stitches not lining up or fabric that looks wrinkled and pulled, can be traced straight back to using the wrong stabilizer. Nail this one decision, and you're setting yourself up for success before you even thread your machine.
Understanding the Core Stabilizer Categories
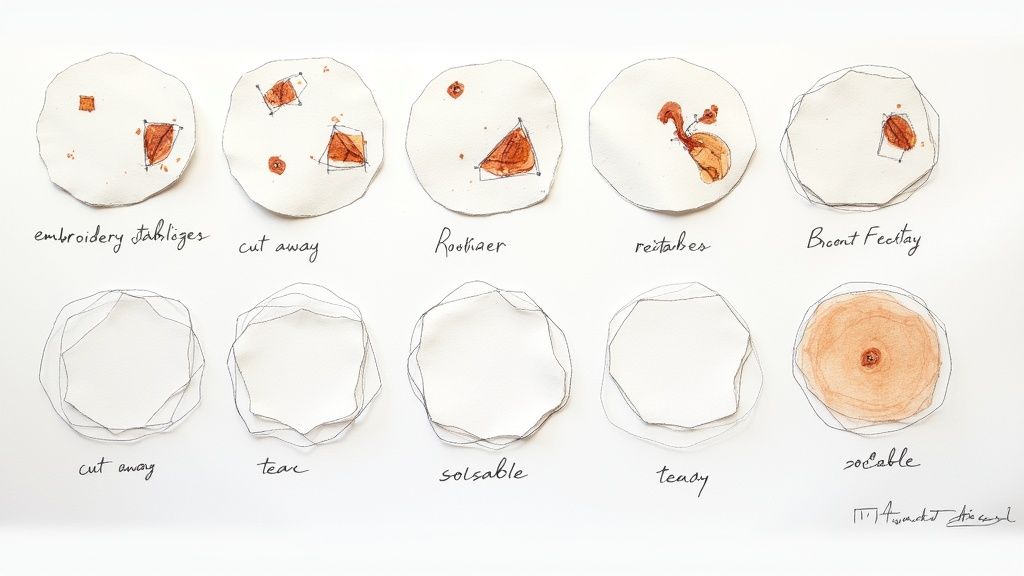
When you get down to it, the whole world of stabilizers really revolves around three main types. The difference between them is simple: how you get rid of it once the stitching is done. Once you get these three categories down, you'll have the confidence to tackle almost any project that comes your way.
-
Cut-Away Stabilizer: This is a permanent backing that stays with the fabric. After embroidering, you just trim the excess away from your design. It's the absolute best choice for unstable, stretchy fabrics like jersey knits and fleece because it keeps supporting the stitches even after a bunch of washes.
-
Tear-Away Stabilizer: Just like the name suggests, this type is designed to be easily torn away from the back of your project when you're finished. It's the perfect partner for stable, non-stretchy woven fabrics—think cotton, denim, and sturdy canvas.
-
Wash-Away Stabilizer: This stuff is pure magic. It completely dissolves in water, leaving absolutely no trace behind. It’s the go-to solution for super delicate fabrics like organza and tulle, or for creating freestanding lace where you want the stitches to be the star of the show.
With this foundation, you’re in a much better spot to pick the perfect support for whatever you're making. Here at B-Sew Inn, we’re all about empowering you not just with custom sewing machine designs, but also with tons of resources, online classes, and training to help you every step of the way. If you're looking for a great way to get your hands on a variety of types to experiment with, a comprehensive set like the Baby Lock Stabilizer Ultimate Kit is a fantastic place to start.
The goal is to match the stabilizer's properties to the fabric's needs. A sturdy cut-away on a delicate sheer fabric would be too stiff, while a lightweight tear-away on a stretchy sweatshirt would offer almost no support, leading to a puckered mess.
This guide is here to cut through the confusion and help you move from guessing to knowing. By understanding when and why to use each type of stabilizer, you'll build the confidence to create flawless embroidery, turning your creative ideas into beautiful, tangible art.
Decoding the Three Main Stabilizer Types
If you really want to find the best stabilizer for embroidery, you have to get to know the 'Big Three' categories. Think of them as essential tools in your toolbox—each one built for a different kind of job. Getting a feel for how they work is a huge part of your embroidery journey, and it's a skill we really focus on in our online classes and training at bsewinn.com.
The biggest difference between them comes down to one simple thing: how you get rid of it when the stitching is done. That single factor changes everything and will guide your choice for projects as different as a stretchy t-shirt or a delicate piece of lace. Let’s walk through each one, so you can pick your next stabilizer with total confidence.
Cut-Away: The Permanent Support System
Picture this: you're embroidering a design on a classic polo shirt. That fabric is a knit, which means it has a natural tendency to stretch and pull with every single stitch. This is where a Cut-Away stabilizer comes in to save the day. It’s a non-woven fabric that stays with your garment permanently, giving it the support it needs long after the machine has stopped.
Because it doesn't go anywhere, it keeps your beautiful design from warping, stretching out of shape, or puckering—even after it's been through the wash a dozen times. That makes it the absolute go-to for pretty much any fabric with stretch.
You'll want to grab a Cut-Away stabilizer for:
- Stretchy Knits: Think t-shirts, sweatshirts, cozy fleece, and baby onesies. They all need that lasting backup.
- Unstable Wovens: Looser fabrics like sweater knits can really benefit from the extra stability.
- Designs with High Stitch-Counts: When a logo is packed with thread, it puts a lot of tension on the fabric. Cut-away keeps it looking crisp and flat.
Once the embroidery is finished, you just grab a small, sharp pair of scissors and carefully trim the excess stabilizer away, leaving a little border of about 1/4-inch around your design.
Tear-Away: The Clean and Crisp Solution
Now, let's switch gears and think about a sturdy denim jacket or a crisp cotton tote bag. These fabrics are solid. They're stable. They don't have a lot of give. They don't need a permanent friend; they just need a temporary scaffold to keep the stitches looking clean while you’re embroidering. This is the perfect job for a Tear-Away stabilizer.
Tear-Away almost feels like a stiff, fibrous piece of paper. As soon as your design is stitched out, you can gently tear the extra material away from the back. It’s fast, simple, and leaves a really clean finish, which is great for items where the back of the embroidery might be seen.
Pro Tip: When you're removing tear-away, always hold the stitches down with one hand while you tear with the other. Make sure you pull the stabilizer away from the stitches, not up toward them—this little trick prevents any accidental pulling or distortion.
While tear-away is incredibly popular, it's not the right tool for every project. Market research in the apparel industry shows that these three categories have very distinct roles. Tear-away stabilizers are the favorite for firm fabrics, making up about 40-50% of all stabilizer used. Cut-aways are the top pick for knits, accounting for 30-35% of the market, while the more specialized wash-aways hold about 10-15%. You can dive deeper into these embroidery market trends and their impact on material selection.
Wash-Away: The Vanishing Act
Finally, imagine you're making something like freestanding lace earrings or adding a monogram to a whisper-thin piece of organza. For these projects, you can't have any trace of the stabilizer left behind. That's when you bring in the Wash-Away stabilizer—the true magic wand of embroidery.
This type of stabilizer is usually a thin, clear film or a fibrous mesh that completely dissolves when it hits the water. It gives your stitches the support they need to form perfectly, then simply vanishes after a quick rinse, leaving nothing but your gorgeous thread work. It’s the only choice for projects where both sides of the embroidery will be on display or for sheer fabrics where a normal backing would stick out like a sore thumb.
Wash-Away stabilizer is perfect for:
- Freestanding Lace (FSL): This is how you create those intricate lace designs that aren't attached to any fabric at all.
- Sheer and Delicate Fabrics: Organza, tulle, chiffon, and batiste are all ideal candidates.
- Topping for Plush Fabrics: When you lay it on top of fabrics like terry cloth or fleece, it acts as a barrier to stop the stitches from getting lost in the fluffy pile.
By understanding the unique jobs of cut-away, tear-away, and wash-away, you’re no longer just guessing. You’re making smart, informed decisions that will directly boost the quality of your finished work—a core principle behind the custom designs and expert resources we provide at bsewinn.com.
How to Match Stabilizer to Your Fabric
Alright, we’ve covered the "what" and "why" behind the main types of stabilizers. Now it’s time to bring that knowledge to your sewing table and put it into practice. This is the fun part! Choosing the right stabilizer isn't just about memorizing categories; it's about developing an instinct for pairing the perfect foundation with your specific fabric and design.
Think of it like being a chef who just knows which spice will make a dish sing. This skill is the secret ingredient behind every crisp logo, smooth monogram, and flawless floral design you've ever admired. It's what stops fabric from puckering and ensures your work looks polished and professional, even after a dozen washes. The goal is simple: give your machine a stable canvas to work on without ruining the feel of the finished item.
The Three Key Factors in Your Decision
When you're standing in front of your supplies, wondering which stabilizer to pull out, your decision almost always boils down to three simple questions about your project. Answer these, and you'll know exactly what you need.
- Fabric Stability: How much stretch does your fabric have? A t-shirt knit is going to behave very differently than a sturdy piece of denim. Stretchy fabrics need the permanent support of a cut-away, while stable wovens often do just fine with a temporary tear-away.
- Fabric Weight: Are you working with something delicate and light, like organza, or something heavy-duty, like canvas? A sheer fabric needs a stabilizer that won't overpower it—often a wash-away—while a heavy fabric can handle a much thicker, more robust stabilizer.
- Stitch Density: Take a look at your design. Is it light and airy with lots of open space, or is it a dense, thread-heavy logo? The more stitches you pack into one area, the more support your fabric needs to keep from distorting.
This decision-making process becomes second nature with a little practice. It's a core skill we really focus on in the online classes and training at bsewinn.com. Our whole philosophy is about giving crafters the confidence to make these choices instinctively.
This decision tree helps visualize how you can narrow down your options, starting with your fabric and ending with the perfect stabilizer.
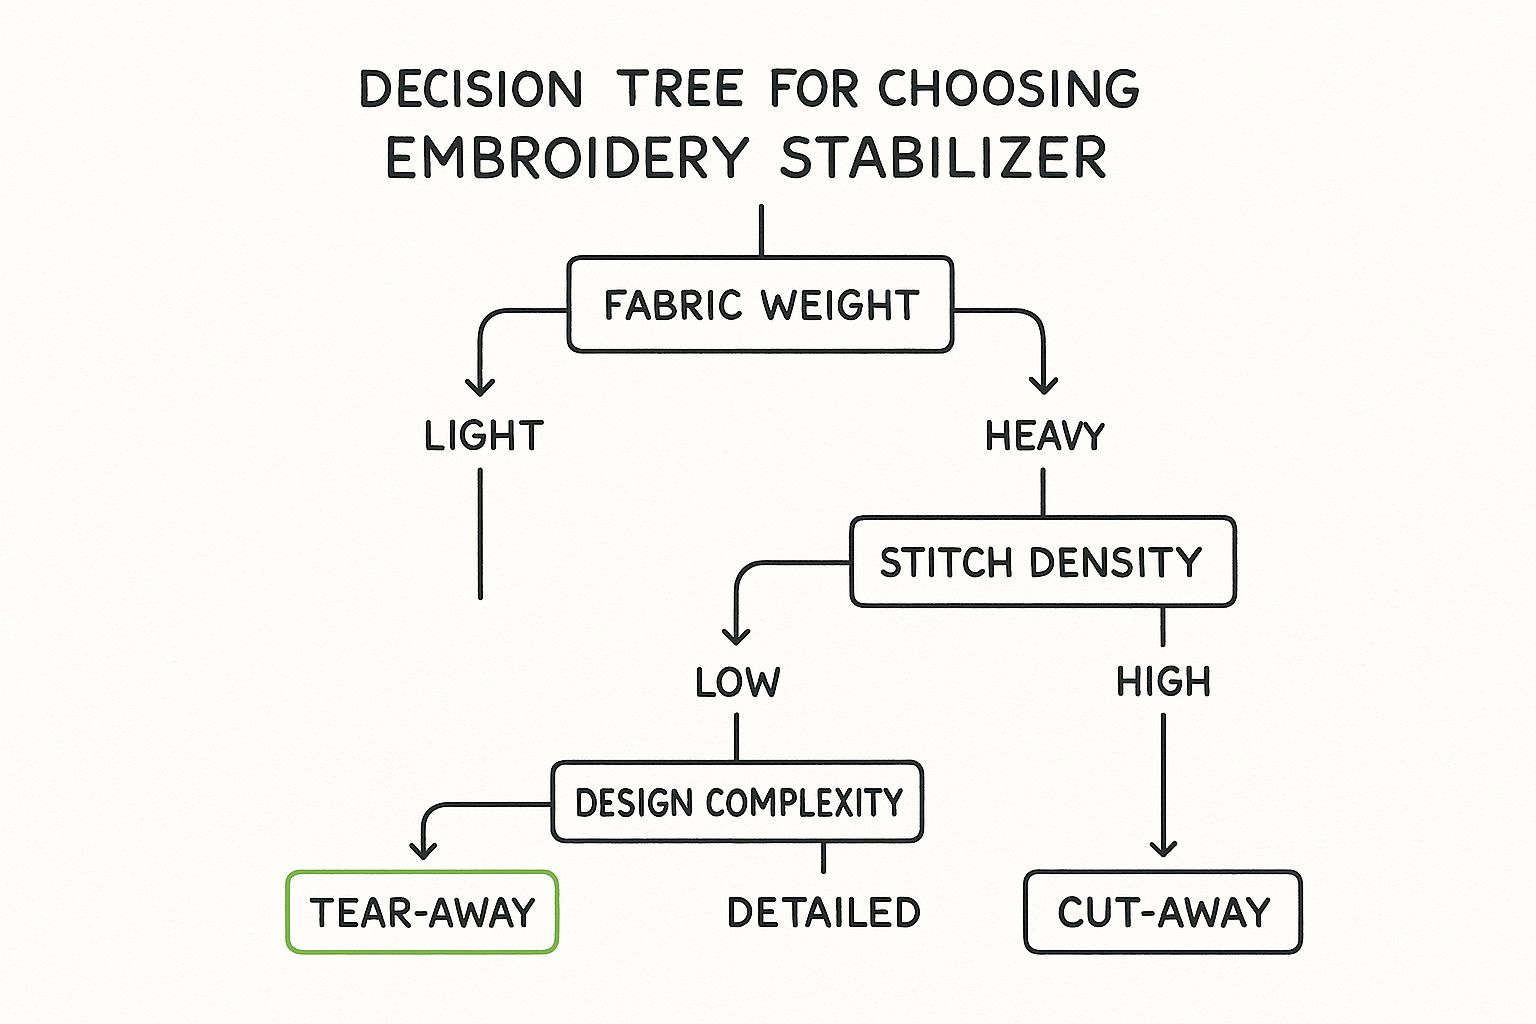
As you can see, the path always starts with your fabric's stretch and weight. From there, your design's complexity helps you make the final call.
Real-World Project Scenarios
Let's walk through a couple of tangible examples to see how this works in the real world. First up, a custom baby onesie—a favorite for so many of us! The fabric is a soft, stretchy knit, and it's going to be right up against a baby's sensitive skin.
For this, you’ll want a soft, no-show mesh cut-away stabilizer. This type is light and flexible, giving that stretchy knit the permanent support it desperately needs without adding any stiff, uncomfortable bulk. After embroidering, you just trim it close to the design, and the soft mesh that’s left behind won't irritate the skin.
Now, let's pivot to a project you can replicate: stitching a dense company logo onto the front of a structured baseball cap. Here, the fabric is a sturdy, non-stretch twill, and the design has a really high stitch count.
In this situation, a heavy-duty tear-away stabilizer is your best friend. It provides the firm, rigid support needed to keep those thousands of tiny stitches crisp and perfectly formed on the stable fabric. When you’re done, the excess just tears away cleanly, leaving a sharp, professional logo with no leftover backing inside the hat.
At bsewinn.com, we feature tons of custom sewing machine designs that are perfect, tangible examples of these principles. Seeing a beautifully stitched flower on a polo shirt, held perfectly in place by the right cut-away, shows you exactly what’s possible—way better than words ever could.
Fabric and Stabilizer Pairing Guide
To make things even easier, I've put together a quick-reference chart. Think of it as your cheat sheet for matching common fabrics with the right stabilizer to get great results every time.
| Fabric Type | Recommended Stabilizer | Stabilizer Weight | Example Project |
|---|---|---|---|
| T-Shirt Knit (Cotton/Poly) | Cut-Away (Mesh or Soft) | Light to Medium (1.5 - 2.0 oz) | Graphic tees, monograms |
| Sweatshirt/Fleece | Cut-Away | Medium (2.0 - 2.5 oz) | School logos, large designs |
| Denim (No Stretch) | Tear-Away | Medium to Heavy (2.0 - 3.0 oz) | Jacket backs, jean pockets |
| Canvas/Twill | Tear-Away | Heavy (2.5 - 3.5 oz) | Tote bags, hats, aprons |
| Quilting Cotton | Tear-Away or Light Cut-Away | Light (1.5 - 1.8 oz) | Quilt blocks, decorative accents |
| Terry Cloth (Towels) | Tear-Away + Wash-Away Topping | Medium (2.0 - 2.5 oz) | Monogrammed hand towels |
| Organza/Tulle | Wash-Away | Light (1.2 oz) | Freestanding lace, sheer overlays |
| Linen | Tear-Away | Light to Medium (1.5 - 2.0 oz) | Napkins, delicate garments |
Once you get in the habit of thinking through these factors—fabric, density, and final feel—the guesswork just disappears. You start to build a deep, practical understanding that turns frustrating mistakes into consistent, beautiful results, freeing you up to bring any creative vision to life.
Exploring Specialty Stabilizers and Toppings
Once you get the hang of the big three—cut-away, tear-away, and wash-away stabilizers—a whole new world of embroidery opens up. This is where things get really fun. We're moving beyond the basics into specialty products that solve those head-scratcher embroidery problems, turning what seems like a tricky project into a total success.
Think of these as your secret weapons. They're what you'll reach for when you're faced with fabrics that love to swallow stitches or items that just plain won't fit in a hoop. Getting comfortable with these tools is how you really start to level up your craft, and it's a journey we love to help with through hands-on training and resources here at bsewinn.com. We're all about helping you bring those ambitious ideas to life.
Solutions for Hard-to-Hoop Items
Let's be honest, some things are a nightmare to hoop. Stiff baseball caps, tiny shirt collars, luxe velvet bags, or itty-bitty baby socks just don't have enough flat, accessible fabric to work with in a standard hoop. This is exactly where adhesive-backed stabilizers come in to save the day.
You might hear them called "sticky" or "peel-and-stick" stabilizers, and they have a paper-covered adhesive side. Here's a quick how-to for this method: first, hoop the stabilizer by itself with the paper side up. Then, just score the paper with a pin, peel it back to expose the adhesive, and press your item firmly onto the sticky surface. Just like that, you’re ready to embroider without ever having to wrestle the garment into the hoop.
Another fantastic problem-solver is the fusible stabilizer. Instead of a sticky surface, this type has a heat-activated coating. You simply iron it onto the back of your fabric before hooping. This creates an incredibly secure bond, making it a lifesaver for slippery silks or shifty knits that just don't want to stay put.
The Non-Negotiable Role of Toppings
Now, let's talk about something that will completely change your game when working with plush fabrics: toppings. A topping is a thin, water-soluble film that you place on top of your fabric, not underneath like a normal stabilizer. Its entire job is to create a smooth runway for your stitches, preventing them from sinking and getting lost in the fabric's texture.
If you skip the topping on a fluffy towel or a piece of fleece, your beautiful embroidery will look patchy and incomplete. The threads just disappear into the pile. For a crisp, professional look on these fabrics, using a topping is absolutely non-negotiable.
You'll want to use a topping for fabrics like:
- Terry Cloth: Keeps monograms on towels looking sharp and clear.
- Fleece and Minky: Prevents your stitches from getting buried in that soft, plush surface.
- Velvet and Corduroy: Makes sure the design sits proudly on top of the fabric’s nap.
- Sweater Knits: Helps stitches form cleanly without getting distorted by the knit's texture.
After the machine is done stitching, you just tear away the extra film. Any little bits left behind will dissolve completely in the first wash. The difference it makes is truly night and day.
Think of a topping as a temporary bridge over the fabric's texture. It gives your machine a perfect, flat surface to lay down stitches. Once its job is done, it vanishes, leaving nothing behind but gorgeous, clean embroidery.
Unlocking Your Creative Potential
Embracing these specialty products isn't just about solving problems—it's about giving yourself more creative freedom. All of a sudden, you can confidently say "yes" to projects you might have shied away from before. These tools, combined with a good understanding of design, are what separate nice results from truly great ones.
If you're ready to take that next step, our guide on how to digitize embroidery designs can give you deeper insight into creating patterns that pair perfectly with these advanced techniques. With the right stabilizer in your corner, there are no limits to what you can create.
Troubleshooting Common Stabilizer Mistakes
We’ve all been there. That sinking feeling when a project you were so excited about comes off the machine puckered, shifted, or just… off. It’s frustrating, but every embroiderer, from newbie to seasoned pro, has these moments. The good news is that these aren't just mistakes; they're the best learning opportunities you can get.
Figuring out what went wrong is the fastest way to level up your skills and learn how to pick the best stabilizer for any situation. So instead of just guessing, let's break down the common culprits together. Here at bsewinn.com, we’re all about empowering you with the knowledge you need through our online classes and extensive resources to turn those "oops" moments into flawless finishes.
The Puckering Problem
Puckering—when the fabric gets all wrinkly and bunched up around your design—is probably the most common headache in embroidery. It's a classic sign that your fabric's tension and the design's stitch density are not playing nicely together.
- The Cause: More often than not, the stabilizer is either too light or the wrong type for the fabric. Think about using a simple tear-away on a stretchy t-shirt. It’s a recipe for disaster! The tear-away just doesn’t have the muscle to keep that knit fabric from stretching and pulling as the stitches go in.
- The Fix: For anything with stretch, you need a cut-away stabilizer. It's non-negotiable. A no-show mesh cut-away gives the fabric permanent support, keeping it stable during and after stitching. No more dreaded wrinkles. For really dense designs, don't hesitate to use two layers of a lighter cut-away instead of one heavy piece.
Shifting and Misalignment
Ever finish a design and the outline doesn't quite match up with the fill? That little gap is a dead giveaway that your fabric moved around in the hoop while the machine was working.
The usual suspect here is improper hooping. If you stretch the fabric tight like a drum, or if it's too loose and floppy, it’s going to shift.
The sweet spot for hooping is smooth and taut, but not stretched. If you overstretch the fabric, you’re distorting its natural grain. The second you take it out of the hoop, the fabric relaxes back, and pulls your perfectly stitched design into a misaligned mess.
Choosing the Wrong Type for the Job
Sometimes the stitch-out is technically fine, but the finished project just doesn't look or feel right. A tear-away is fantastic on a sturdy fabric like denim, but the fabric always dictates the stabilizer.
It’s interesting to see how this plays out globally. In North America, where knit sportswear is king, cut-away stabilizers make up a whopping 60% of what embroiderers use. But head over to Europe, where fashion is more focused on wovens and denim, and tear-away stabilizers account for 55-60% of the market. You can see more of these embroidery market dynamics and how fabric trends shape everything.
The lesson is clear: let the fabric be your guide. Having an organized space makes grabbing the right product a breeze. Something like a Baby Lock Over-the-Door Stabilizer Organizer keeps all your options in plain sight, so you can make the right choice without digging through a messy drawer.
By getting a handle on these common slip-ups, you'll save yourself a ton of time, thread, and frustration. You’ll be on your way to creating consistently beautiful embroidery every single time.
Your Embroidery Stabilizer Questions Answered
We’ve walked through the different types of stabilizers, how to pick the right one for your fabric, and even some common mistakes I see all the time. To wrap things up, let's dive into some of the most common questions that pop up when you're trying to find the best stabilizer for embroidery. These are the things people ask me constantly, so I want to give you some direct, practical answers to clear up any final confusion.
My goal here at bsewinn.com is to make you feel totally confident in your craft, whether that’s through our custom sewing machine designs or the support offered in our online classes and training. Think of this as your last-minute checklist before you fire up the machine.
Can I Use More Than One Layer of Stabilizer?
Absolutely! In fact, it's a fantastic trick to have up your sleeve. Layering is a go-to pro move for really dense, high stitch-count designs or for those super unstable fabrics that need all the help they can get. If one layer of a medium-weight stabilizer isn't quite giving you that perfectly flat result, don't be afraid to double up.
A common technique is to hoop two layers of a lighter stabilizer, but turn them so the grain lines are crisscrossed. This little trick creates a super strong, multi-directional foundation that's often way more effective than just a single, stiff, heavy layer. For those really stretchy knits, you could even pair a medium-weight cut-away with a layer of fusible interfacing ironed right onto the fabric for maximum lockdown.
The real secret is adding just enough support to kill any puckering and shifting, but not so much that your final project feels like a piece of cardboard. Experimentation is your best friend here, and if you want to see this in action, our online classes at bsewinn.com offer project-specific guidance for mastering these advanced techniques.
What Does Stabilizer Weight Mean and Why Does It Matter?
When you see a stabilizer weight, like 1.5 oz or 2.5 oz, it’s simply telling you its thickness and density. Getting this right is a huge factor in achieving that professional look because it directly affects how much support your fabric gets during the stitch-out.
I like to think of it in three main tiers. Each one is built for a different level of demand from both your fabric and your embroidery design.
- Lightweight (1.0-1.8 oz): This is your best bet for simple, low-density designs on stable woven fabrics. Think quilting cotton or linen.
- Medium-weight (2.0-2.5 oz): This is your all-purpose workhorse. It’s perfect for the vast majority of projects, like stitching company logos on polo shirts or putting detailed designs on medium-weight knits.
- Heavyweight (3.0 oz+): Save this for the most demanding jobs. I'm talking about super dense, stitch-heavy designs on flimsy sweater knits or thick fleece that can swallow up stitches.
Using a weight that’s too light is a recipe for puckering and misaligned stitches. On the flip side, going too heavy will make your fabric uncomfortably stiff and can be a real pain to remove cleanly.
How Do I Remove Each Type of Stabilizer Correctly?
Getting the stabilizer off properly is the finishing touch that makes your work look clean and beautiful. Each of the three main types needs a slightly different approach to make sure you don't accidentally damage your stitches or your fabric. Trust me, taking an extra minute to do this step carefully is always worth it.
Here’s a quick rundown of how to handle each one:
- For Tear-Away: Use the fingers of one hand to firmly support the stitches. With your other hand, gently tear the extra stabilizer away, pulling it outwards from the design. You want to get as close as you can to the stitching without actually yanking on the threads.
- For Cut-Away: Grab a small, sharp pair of curved embroidery scissors—they make this so much easier. Carefully trim the excess stabilizer, leaving a small border of about 1/8 to 1/4 inch around the edge of your design. Take your time so you don't accidentally snip your fabric or stitches!
- For Wash-Away: First, just trim away the bulk of the extra stabilizer with scissors. Then, dunk the item in water following the manufacturer's directions. Some dissolve in warm water, others need cold. Just let it soak until the stabilizer fully disappears, leaving nothing behind.
Mastering these simple but crucial techniques is that final step to making sure every project you create is something you can really be proud of.
At B-Sew Inn, we are truly dedicated to supporting your creative journey, every step of the way. From getting you set up with the right machines and supplies to offering expert training and classes, we're here to help you get those beautiful, professional-level results you're after. Explore our extensive collection and find everything you need for your next masterpiece at https://www.bsewinn.com.