

A finished quilt top is waiting, the backing is ready, and the longarm frame suddenly looks more complicated than it did during the demonstration. Where should the layers attach? How tight should the backing feel? And how can a quilter tell whether an uneven stitch comes from tension, movement, or the needle?
Learning how to longarm quilt becomes more manageable when each technique is connected to the equipment that supports it. A square load, a compatible needle and thread combination, a sensible pattern, and a comfortable working position matter more than an ambitious first design.
Table of Contents
- What a Longarm Setup Really Includes
- Preparing the Quilt Sandwich and Loading the Frame
- Setting Up Needle, Thread, Tension, and Stitch Length
- Choosing Free Motion, Stitch Regulation, or Computerized Quilting
- Planning Patterns Pantographs and Edge to Edge Designs
- Staying Comfortable on a Longarm Frame
- Finishing Troubleshooting and Your Next Step
What a Longarm Setup Really Includes
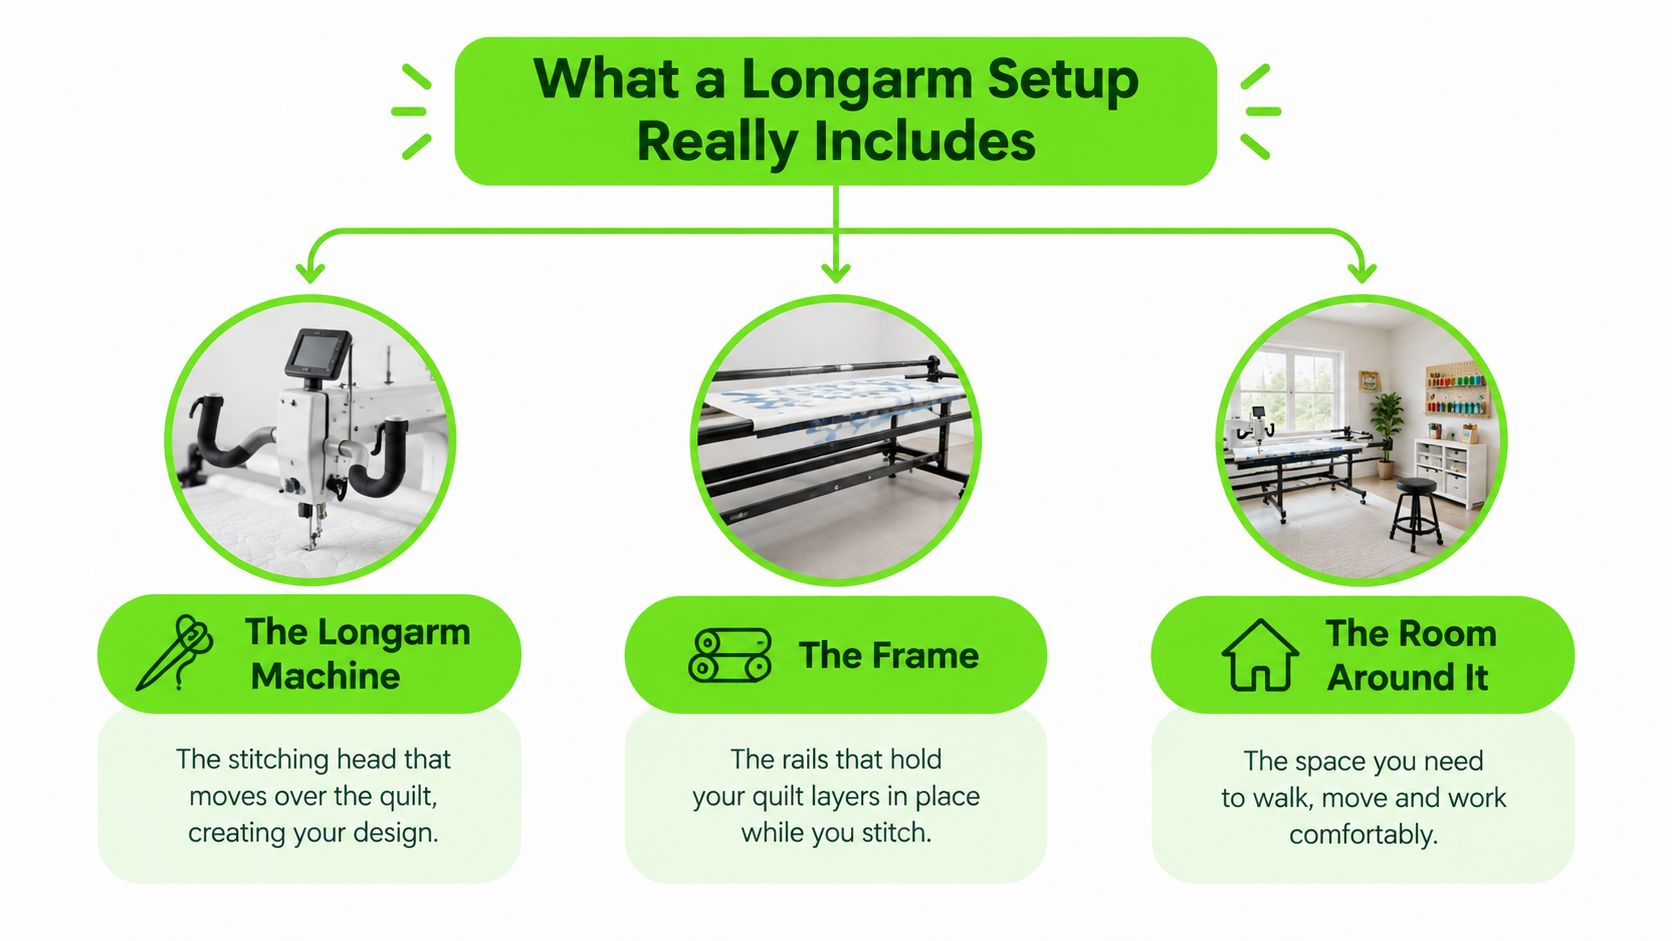
A longarm purchase starts with more than the machine head. The frame and the room around it must work together before stitching begins.
Longarm quilting joins the quilt top, batting, and backing into a finished quilt. On a frame-mounted system, the machine travels on a carriage while horizontal bars support and roll the layers, keeping the working area manageable rather than requiring the operator to push a bulky sandwich through a domestic machine. That distinguishes quilting from piecing, which joins fabric pieces to create the top, as described in this overview of quilting methods.
The Head, Frame, and Leaders
The machine head forms the stitches. The frame supports the quilt, and the carriage or tracks allow the head to move across it. Leaders provide attachment points between the fabric and the frame's rollers.
The architecture isn't a recent experiment. An early quilting machine appeared in 1871, and a recognizable rail-and-hand-crank design developed around 1877, according to this history of quilting-machine development. The essential idea remains practical: support the textile and move the stitching mechanism across the available workspace.
For buyers comparing configurations, this guide to quilting frames provides useful vocabulary before a dealer demonstration.
Make Room for the Operator
A workable quilting room needs more than an empty rectangle matching the frame's footprint:
- Clear access: Leave room to load, advance, inspect, and work from whichever side the chosen system requires.
- Suitable seating: Include a sturdy chair or stool compatible with the frame height and intended working position.
- Supplies within reach: Keep bobbins, thread, and small notions on a cart rather than scattered across the frame.
- Simple cleanup: Place a bin nearby for thread snips and fabric scraps.
A demonstration should include moving the head across the frame, accessing the bobbin, and operating the rollers. Those ordinary tasks reveal whether a setup fits the room and the quilter better than watching a finished design stitch out.
Preparing the Quilt Sandwich and Loading the Frame
A beautiful pattern won't correct a crooked load. Preparation should establish an even, stable sandwich without stretching the layers into alignment.
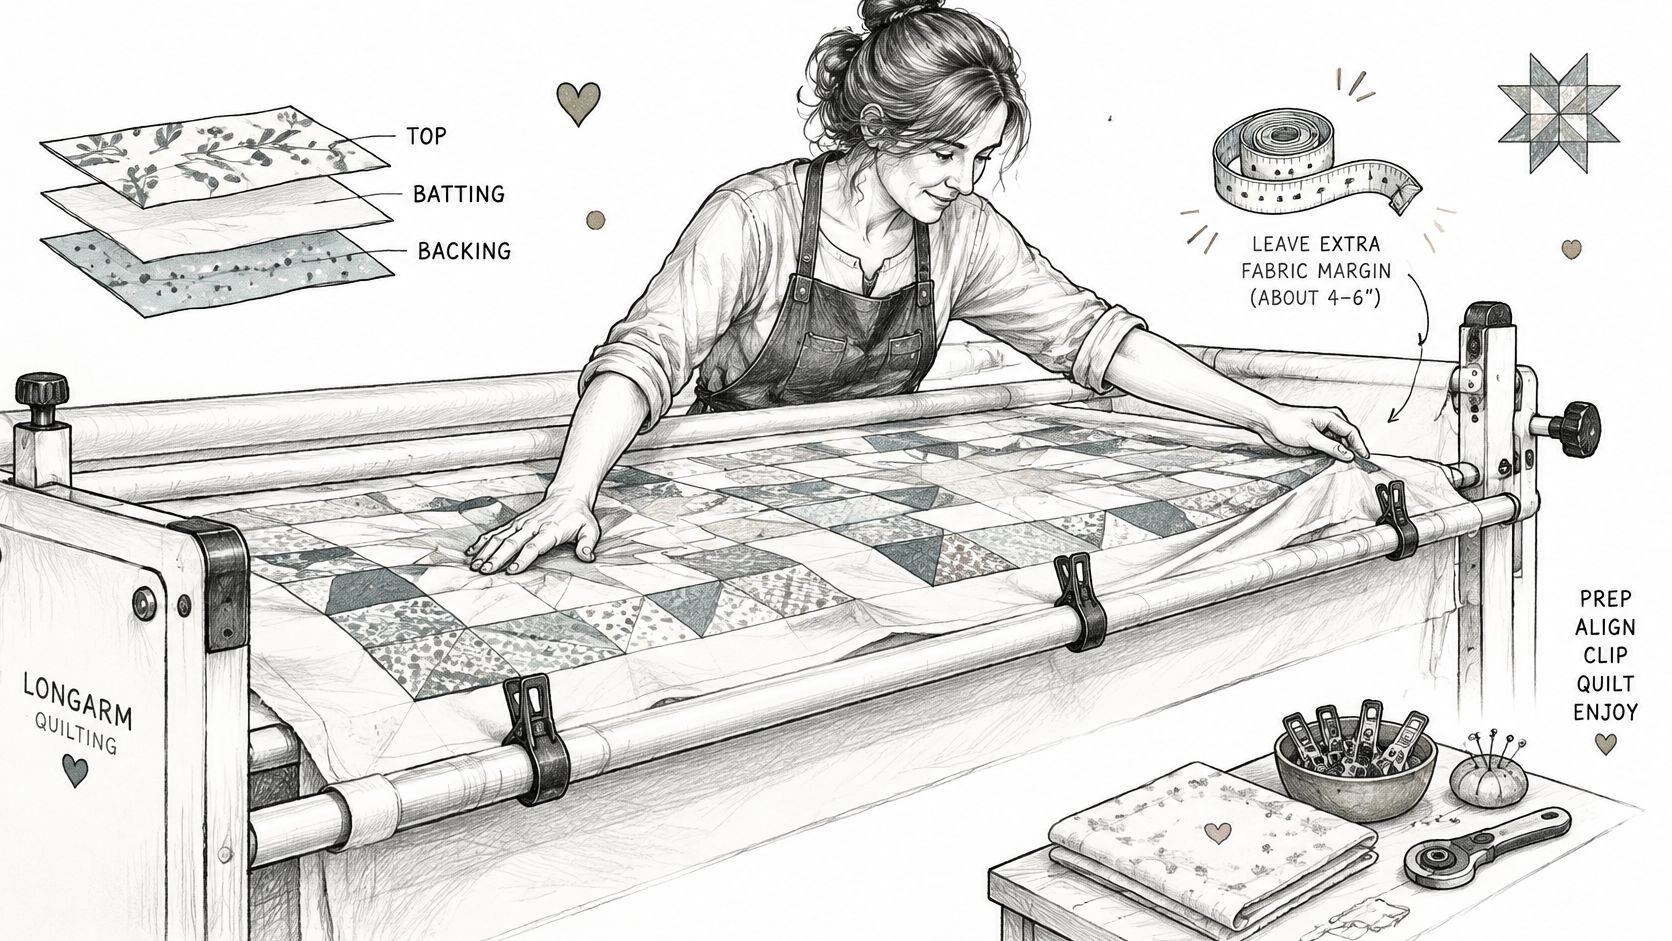
The backing and batting should extend at least 8 inches beyond every edge of the quilt top, providing material for attachment, advancing, and edge stability under these longarm preparation guidelines. That allowance belongs outside the top, not inside its finished dimensions.
Know What Each Part Does
The layer order is backing underneath, batting in the middle, and quilt top above. Leaders attach fabric to rollers; they aren't interchangeable with every bar on the frame. This explanation of longarm leaders helps clarify their role.
A floating arrangement leaves a layer unattached to a dedicated supply roller, depending on the frame's loading method. A bar that supports or guides that fabric doesn't regulate stitches. Stitch regulation controls stitch formation during movement; advancing the quilt exposes the next working area. These are separate operations.
Loading rule: Smooth isn't the same as stretched. Fabric pulled tight to remove every apparent ripple can create a different problem once the frame tension is released.
A Loading Checklist
The machine's loading instructions take priority because roller arrangements differ. For a compatible floating-top workflow, the sequence is:
- Attach the backing: Secure it evenly to the take-up leader and the appropriate supply attachment.
- Roll and check: Roll the backing while watching for skew, folds, or uneven attachment.
- Introduce the batting: Lay it smoothly over the backing without stretching it. Use a batting leader only if the frame's instructions call for one.
- Position the top: Smooth and square it against the established reference.
- Baste deliberately: Secure the upper edge, then the side edges within the working area.
The BERNINA Q Series frame manual specifies basting across the top and along both sides, close to the edges, with the upper edge stitched slowly and carefully.
Basting controls are model-specific. For example, the BERNINA Q 16 manual's BSR3 settings include SPI 1, SPI 2, and SPI 4, meaning one, two, or four stitches per inch. A machine-mastery session should demonstrate the actual controls rather than assume every longarm offers identical settings.
Setting Up Needle, Thread, Tension, and Stitch Length
Needle, thread, tension, and stitch length operate as a connected system. A thread change can require a different needle, slower movement, or a tension adjustment. Turning the tension control alone isn't a complete setup method.
Start with the needle's system, size, and installation direction. The system must match the machine; size must suit the thread and materials. Installation must follow the manual, including the specified orientation. A beginner shouldn't assume every longarm needle has the same shank shape or follows the familiar domestic-machine flat-side rule.
This guide to longarm quilting needles is a useful starting point, but the machine manual remains the authority for compatibility.
Match the Thread Before Adjusting Tension
The Q Series needle and thread guidance specifies matching needle thickness to thread size, reducing quilting speed for 12- and 28-weight threads, and using a thicker needle with reduced upper-thread tension for metallic thread. Those adjustments shouldn't be treated as interchangeable.
A useful setup sequence is:
- Confirm installation: Check that the needle is compatible, fully seated, and correctly oriented.
- Rethread completely: Follow the prescribed upper-thread path and verify bobbin insertion rather than correcting only the most visible thread segment.
- Inspect the test sandwich: Use the project's fabric, batting, needle, and thread combination whenever possible.
- Evaluate movement: Stitch curves, circles, straight lines, and directional changes before committing to the quilt.
As described in the preparation guidance above, balanced stitching has no loose loops or eyelash-like thread on the underside. A fingernail should glide over the stitches rather than catch. Curves and turns deserve particular attention because a straight test line can look acceptable while directional stitching exposes a problem.
Separate Automation From Stitch Quality
The Baby Lock Pro-Stitcher 6 Quilting Robotics Software supports computerized and free-motion quilting within the same system. That capability changes how a design is executed; it doesn't replace correct needle selection, threading, or tension testing.
Change a single variable, test again, and inspect both sides. Changing speed, needle, tension, and regulation together makes the cause harder to identify.
Choosing Free Motion, Stitch Regulation, or Computerized Quilting
The most useful distinction isn't manual versus modern. It's who controls the path and who controls stitch formation.
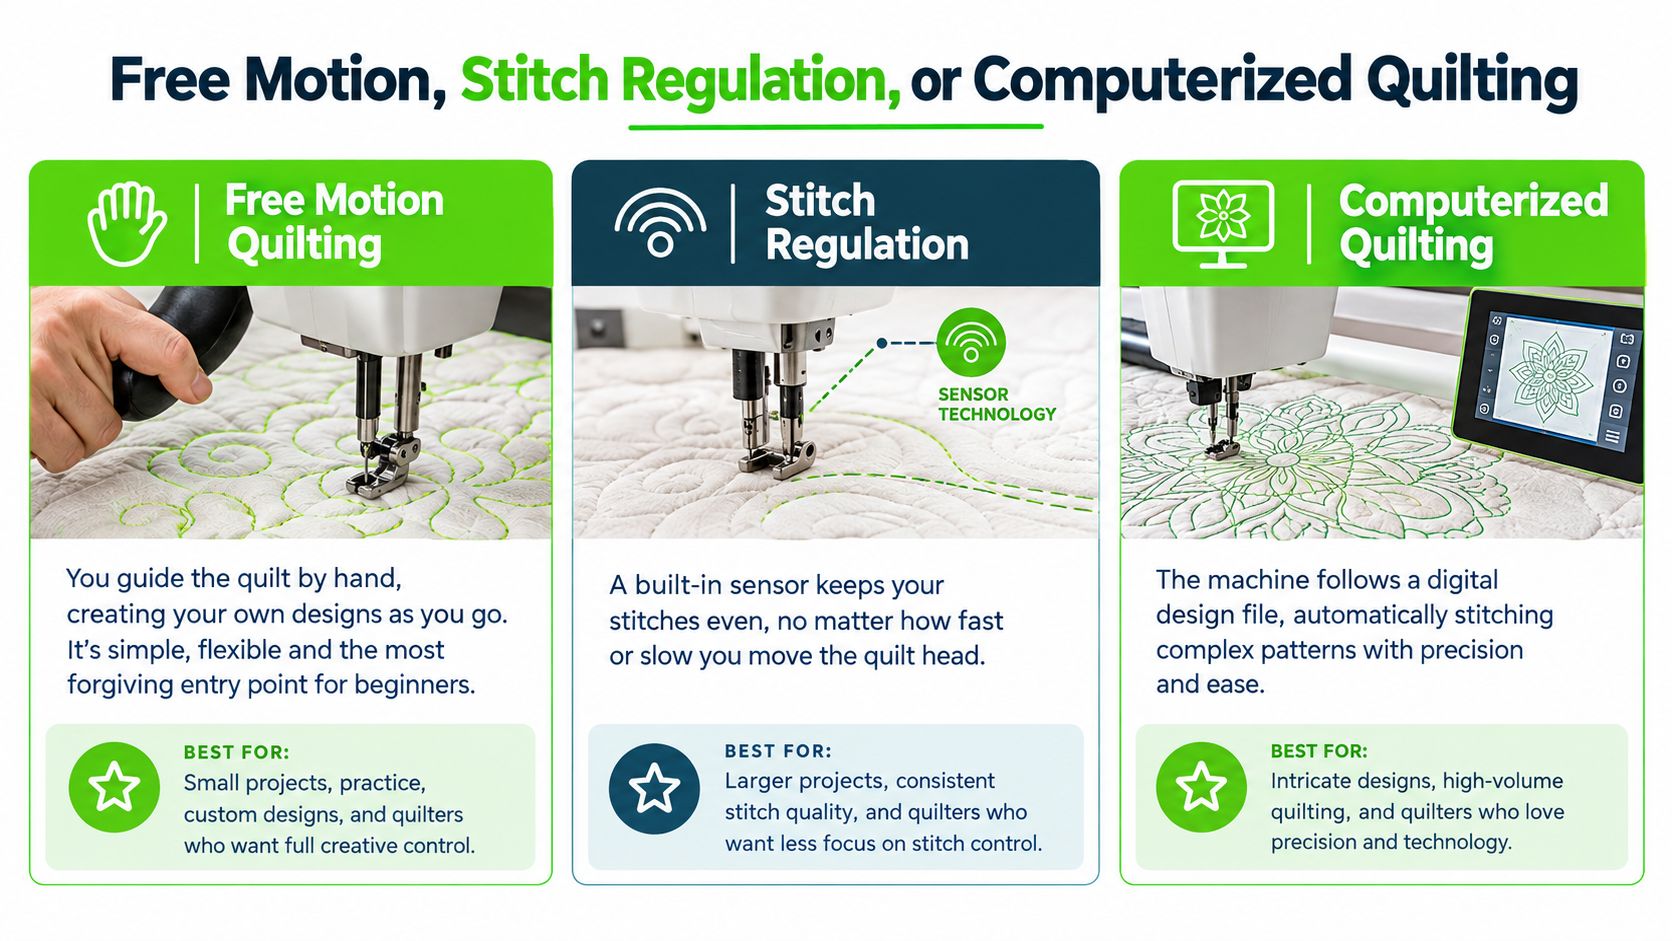
In free-motion quilting, the operator guides the head to draw the design. Without regulation, the relationship between machine speed and hand movement determines stitch length. Free motion can be forgiving creatively because the quilter can redirect a line or improvise a motif, but it isn't automatically the easiest route to even stitches.
Choosing a Longarm Quilting Mode
| Mode | Best For | Skill Needed | Typical Project |
|---|---|---|---|
| Unregulated free motion | Improvisation and individually drawn motifs | Coordinating movement with machine speed | Custom focal areas |
| Regulated hand-guided quilting | Drawing designs with assistance maintaining stitch length | Smooth steering and familiarity with regulation controls | Background fills and hand-guided overall designs |
| Computerized quilting | Repeatable placement and consistent design execution | Software setup, positioning, and checking boundaries | Edge-to-edge quilts, blocks, and borders |
Stitch regulation isn't a separate design style. Sensors or encoders track movement so the machine can help maintain the selected stitch length while the operator still chooses the path. It assists movement; it doesn't steer around a bulky seam or decide how a border should look.
Computerized quilting follows a digital design. The operator still handles positioning, sizing, clearances, and corrections. The system described earlier includes built-in patterns and editing tools, but its usefulness depends on the project and the operator's willingness to learn the interface.
Match the Method to the Work
A practical decision matrix starts with the quilt rather than the feature list:
| Quilt Size and Deadline | Design Consistency Needs | Tolerance for Software Learning |
|---|---|---|
| Practice piece without deadline pressure | Individual motifs can vary | Hand-guided work keeps attention on movement |
| Bed-sized quilt needing an overall finish | Repeated coverage matters | Computerized work may suit an operator comfortable with setup |
| Custom quilt with distinct focal areas | Different regions need different treatment | A hybrid approach allows method changes |
For a first bed-sized project, a regulated overall design can be a sensible choice for a quilter who prefers hands-on control. Computerized quilting may suit someone comfortable with digital placement, but setup isn't automatically a time saving on an unfamiliar project.
A hybrid workflow can combine regulated straight-line backgrounds, hand-guided focal motifs, and computerized overall designs where appropriate. This introduction to free-motion quilting helps explain the drawing skills that remain useful across those choices.
Planning Patterns Pantographs and Edge to Edge Designs
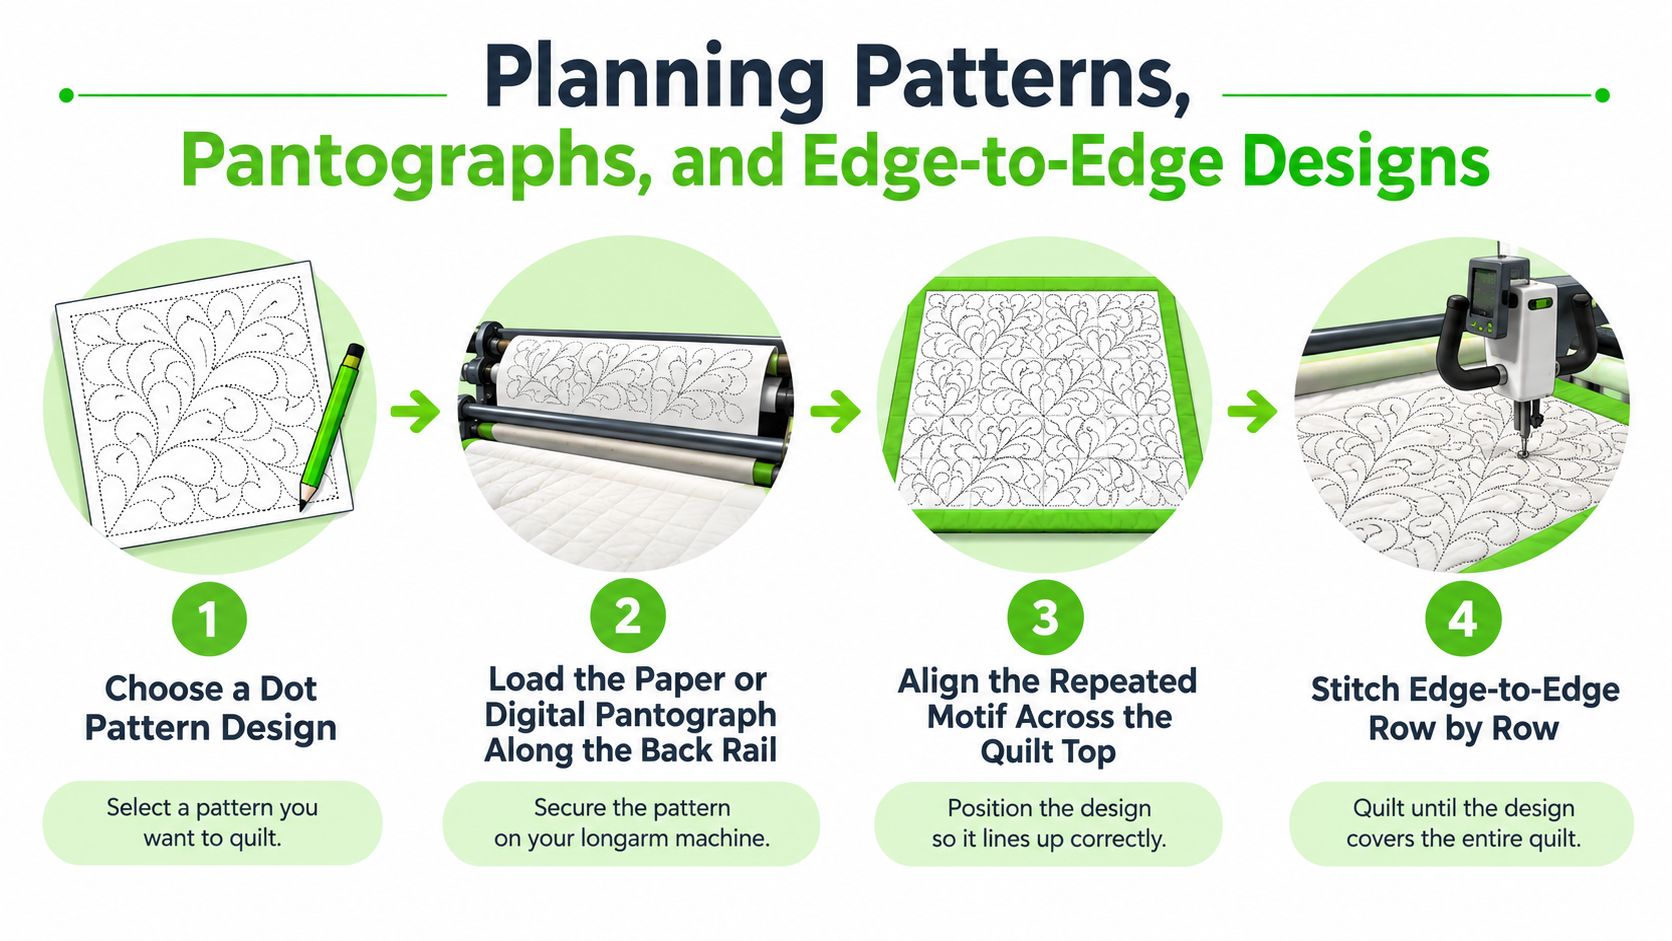
A repeating dot, loop, or curve becomes an edge-to-edge design only when the rows fit together across the quilt. Registration, the process of aligning each new row with the previous stitching, matters as much as tracing the motif.
A paper pantograph sits behind the machine and is followed with the system's tracing aid. A digital pattern is positioned through the computerized interface rather than physically laid on the back rail.
Establish a Reference Before Stitching
The pantograph registration instructions describe placing the paper pattern behind the machine, extending it beyond the quilt top's raw edges, and aligning the laser with the lower horizontal registration line. Subsequent rows use a previously stitched channel-lock line near the right edge as a reference. The same instructions call for basting the lower raw edge when it enters the workspace.
A practical working sequence follows that logic:
- Establish the row: Confirm the pattern's position and its relationship to the quilt boundaries.
- Stitch across: Complete the row from side to side, watching the actual stitching as well as the tracing reference.
- Secure and advance: Finish the current area before exposing the next section.
- Register again: Check overlap and spacing against the reference rather than estimating the next row by eye.
This guide to longarm pantograph patterns can help narrow design choices before a hands-on lesson. A laser-guided setup, channel-lock capability, or digital alignment tools are worth discussing during a machine comparison because they support different workflows.
Choose Density for the Batting
The longarm batting and stitch guidance gives approximately 1.5–2 inches as a spacing benchmark for insulated batting and approximately 3.5–4.0 mm as a stitch-length range for bulkier, higher-loft batting. These are material-specific starting points, not universal settings; the batting manufacturer's instructions take priority.
Short stitches can disappear into lofty fill. Excessive quilting density can also compress loft, stiffen the quilt, consume more thread, and make poor-tension puckering more noticeable.
Pattern check: A design should suit the quilt's intended feel, not merely fill the available screen or paper.
Before committing, compare the planned motif size with the actual batting and desired drape. A test sample is more useful than assuming that a denser pattern will always produce a better finish.
Staying Comfortable on a Longarm Frame
A longarm removes the need to wrestle a bulky quilt through a domestic machine's throat. It doesn't remove the operator from the physical work.
The posture problems to watch for are practical: shoulders creeping upward, prolonged standing or sitting, repetitive gripping, and excessive effort when moving the head or handling the layers. On a frame machine, the operator generally moves the head rather than forcing the fabric through the needle area. If either task feels laborious, the setup deserves attention.
Fit the Frame to the Person
A comfortable starting position places the elbows near a relaxed bend, with the shoulders down and the handles within an easy reach. The operator shouldn't need to lean over the frame to use every available part of the quilting area.
A dealer demonstration should include more than standing at the center:
- Test the reach: Move toward the farthest comfortable working area without lifting the shoulders.
- Check access: Try the controls, bobbin area, and rollers without awkward twisting.
- Try seating: Assess whether a chair or stool works with the frame, foot position, and handle height.
- Assess movement effort: Notice whether the head moves comfortably across the intended range.
More throat depth isn't automatically a better fit. User height, room size, preferred posture, and quilt volume should guide the comparison. A larger working area offers little benefit if the operator can't use it comfortably.
Plan Sessions Around Comfort
Alternate standing and sitting when the setup permits, and schedule short movement breaks rather than waiting until discomfort dominates attention. Design placement also matters: quilting within an easy reach zone is preferable to repeatedly stretching for the far edge.
There isn't a universal session duration appropriate for every quilter. Fatigue should prompt a break; persistent pain, numbness, tingling, or symptoms that recur with quilting warrant stopping and seeking medical advice rather than treating them as an expected learning stage.
For buyers in Oklahoma, Missouri, Texas, and Arkansas, an in-store frame trial provides a useful opportunity to compare reach, posture, and movement. Actual hands-on time can answer comfort questions that a specification sheet can't.
Finishing Troubleshooting and Your Next Step
Before removing the quilt, inspect the final working area and check for missed stitching or folds. Corrections are easier while the quilt remains supported.
Release the frame tension according to the equipment instructions, then unroll the quilt from the take-up rail without pulling against secured attachments. Support it on a flat surface, check the edges for square, and trim excess backing and batting with the intended binding allowance in mind. Preparing the binding before removal keeps the finishing work organized, but it shouldn't encourage rushed trimming.
Diagnose Before Adjusting
The setup checks described earlier provide a starting point, not a guaranteed diagnosis:
- Skipped stitches: Inspect needle condition, compatibility, orientation, and the complete threading path.
- Loops or eyelashing: Check threading, bobbin insertion, lint, and stitch balance before making large tension changes.
- Puckering: Revisit loading tension, stitch balance, and pattern density rather than blaming the fabric immediately.
- Unusual hook noise: Stop and inspect the hook and bobbin area according to the manual. Persistent noise needs service attention.
- Irregular regulated stitches: Check the machine's prescribed encoder contact and movement checks before continuing.
Know When Service Is the Next Step
Keep the hook, race, bobbin case, and needle plate clean using the manufacturer's method. Needle replacement belongs in a preventive routine, not only after a needle breaks. Cleaning, lubrication, and adjustment procedures must remain specific to the machine.
If stitch quality continues to drift after the normal checks, a service appointment is more useful than repeated compensating adjustments. Bring the thread details, needle information, and a stitched sample so the technician can evaluate the combination that produced the problem.
An in-person longarm class or machine-mastery session is a practical next step for quilters who need supervised loading, tension testing, or registration practice.
B-Sew Inn is an authorized sewing, quilting, and embroidery machine dealer, not a manufacturer or custom machine designer, with stores in Tulsa OK, Oklahoma City OK, Springfield MO, Humble TX, and Fayetteville AR, plus an online store. Its selection includes machines from Baby Lock, Bernina, Bernette, Brother, and Janome, along with sergers, longarm quilting machines, embroidery designs, thread, stabilizer, notions, cabinets, and cutting tables; support includes service, repair, trade-ins, in-person classes, and machine-mastery sessions. Quilters ready to compare a frame's fit, choose compatible supplies, or arrange instruction or service can visit B-Sew Inn to contact a store and plan a hands-on next step.

