

A machine rarely fails without warning. It gets a little louder, the handwheel feels a little heavier, and stitching that once sounded smooth starts to sound dry. The right response isn't grabbing the nearest bottle. It's deciding whether that specific machine needs oil, where it needs it, and how one controlled drop reaches the right place.
Table of Contents
- The Moment Your Machine Starts Asking for Help
- What a Sewing Machine Oiler Actually Does
- Choosing the Right Applicator for the Job
- Matching the Oil to the Machine
- Oiling a Mechanical Machine the Right Way
- When Not to Oil and When to Call the Service Team
- Your Oiling Checklist and Next Steps
The Moment Your Machine Starts Asking for Help
A sewist is halfway through a quilt binding when the sound changes. The machine still sews, but the rhythm turns rough and the handwheel doesn't roll forward as freely as it did at the start of the project. That moment tempts many owners to reach for whatever lubricant is already in a kitchen drawer or garage cabinet.
That impulse creates two opposite problems. A dry mechanical machine left running can develop boundary-contact friction, heat, accelerated wear, and thread or timing instability, while excess oil can migrate into the bobbin area and stain fabric, as detailed in an industrial lockstitch manual covering low-viscosity oil and reservoir care. The wrong substitute adds a third risk, because additives or solvents can affect thread-contact surfaces and machine materials.
A Tool, a Lubricant, and a Timing Decision
A sewing machine oiler isn't just a bottle with a pointed cap. It's three choices working together, the applicator that meters the drop, the lubricant that matches the manufacturer's specification, and the timing that fits the machine's design and recent use. Change any one of those choices and a routine task can become a repair.
That's why the first diagnostic step is classification, not application. Owners dealing with noise, stiffness, skipped stitches, or thread trouble can start with a sewing machine troubleshooting guide for common symptoms before assuming oil is the answer. Lint, a dull needle, incorrect threading, or a damaged bobbin area can mimic a lubrication problem.
Noise is a symptom, not an instruction to oil.
Some mechanical machines have clear, owner-accessible oil points and benefit from careful home maintenance. Other machines are sealed, computerized, or built around technician-only lubrication, and adding oil can send it toward belts, sensors, plastics, and fabric. The practical skill is telling those categories apart before a drop leaves the bottle.
A good oiling session therefore starts with restraint. The owner identifies the machine type, reads the manual, cleans first, and treats one drop as a measured dose. That decision-first habit protects a vintage mechanical model from neglect and a modern electronic model from well-intended damage.
What a Sewing Machine Oiler Actually Does
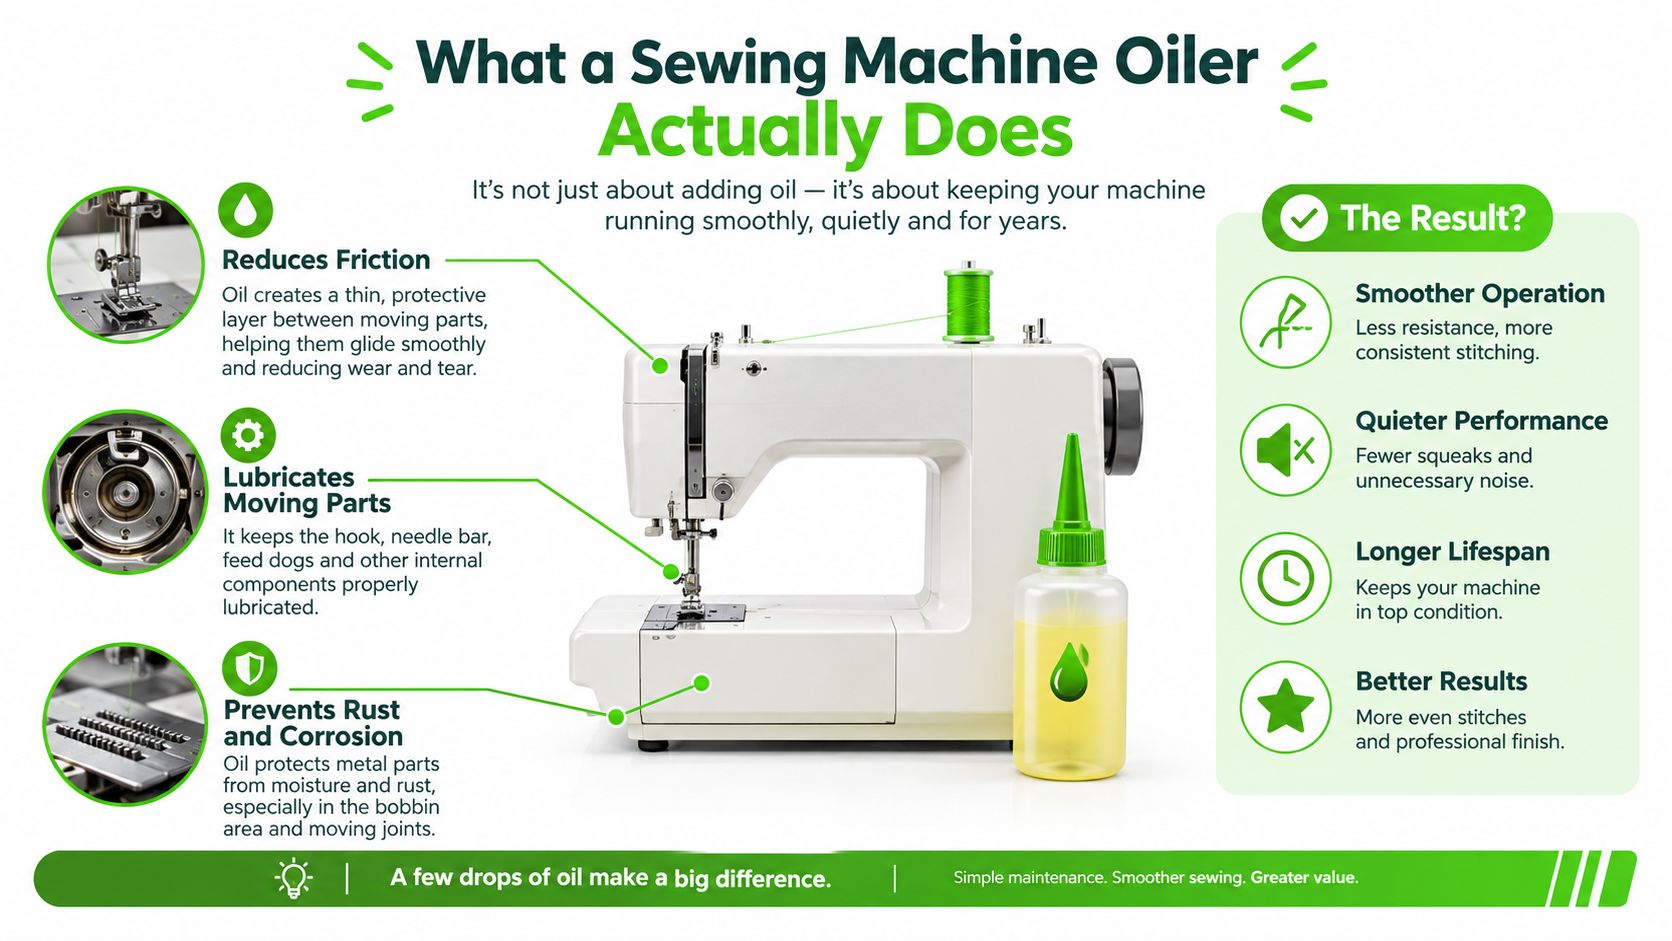
A sewing machine oiler has two parts that beginners often merge into one idea. The oil forms a thin film between moving metal surfaces so they don't rub directly against each other. The oiler is the container and tip that deliver that film-forming liquid to a precise location in a controlled amount.
More oil doesn't create a better film after the contact point is coated. Extra liquid travels, collects lint, or escapes onto thread and fabric. Precision matters more than volume because hook, shaft, and bearing clearances are small and the useful dose is measured in drops.
An Accessory From the Beginning
Oiling equipment isn't a modern afterthought. I. M. Singer and Company was established in New York in 1851, a sewing-machine oil-can holder was patented on November 2, 1869, under U.S. Patent No. 96,527, and Wheeler and Wilson offered early oilers under S. R. Wilmot's Patent No. 2,594, issued February 26, 1867, according to a historical timeline of sewing-machine oilers and holders. By 1905, electrical sewing machines were described as commonplace in households in that same historical record.
Industrial development later moved lubrication inside the machine. A system filed on April 20, 1966, and published on December 31, 1968, described floating-bushing pumps, spiral grooves, porous metering plugs, splash lubrication, and delivery to predetermined locations, as documented in the U.S. patent for that sewing-machine lubrication system. Its pumps had no moving parts, and the patent states that the oil film between pump and shaft produced almost no wear.
The Three Jobs at Home
- Deliver the specified lubricant: The oil must match the machine manual rather than a generic household label.
- Reach the approved point: The tip should place oil at the bearing, oil hole, or hook area named for that model.
- Limit the dose: The applicator should release one visible drop without flooding nearby parts.
Cleaning comes before all three jobs. Lint mixed with fresh oil becomes residue that can hold debris against moving parts, so owners should follow a step-by-step guide to cleaning a sewing machine before lubricating approved points. A clean contact surface lets a small amount of oil spread where it's needed.
Choosing the Right Applicator for the Job
Oil selection gets most of the attention, but applicator design determines whether the correct oil lands as a drop or a spill. A narrow tip, a cap that seals cleanly, and a bottle that shows the oil level all reduce guesswork. The best choice depends on the approved point's depth, the owner's hand control, and whether the task is spot oiling or reservoir filling.
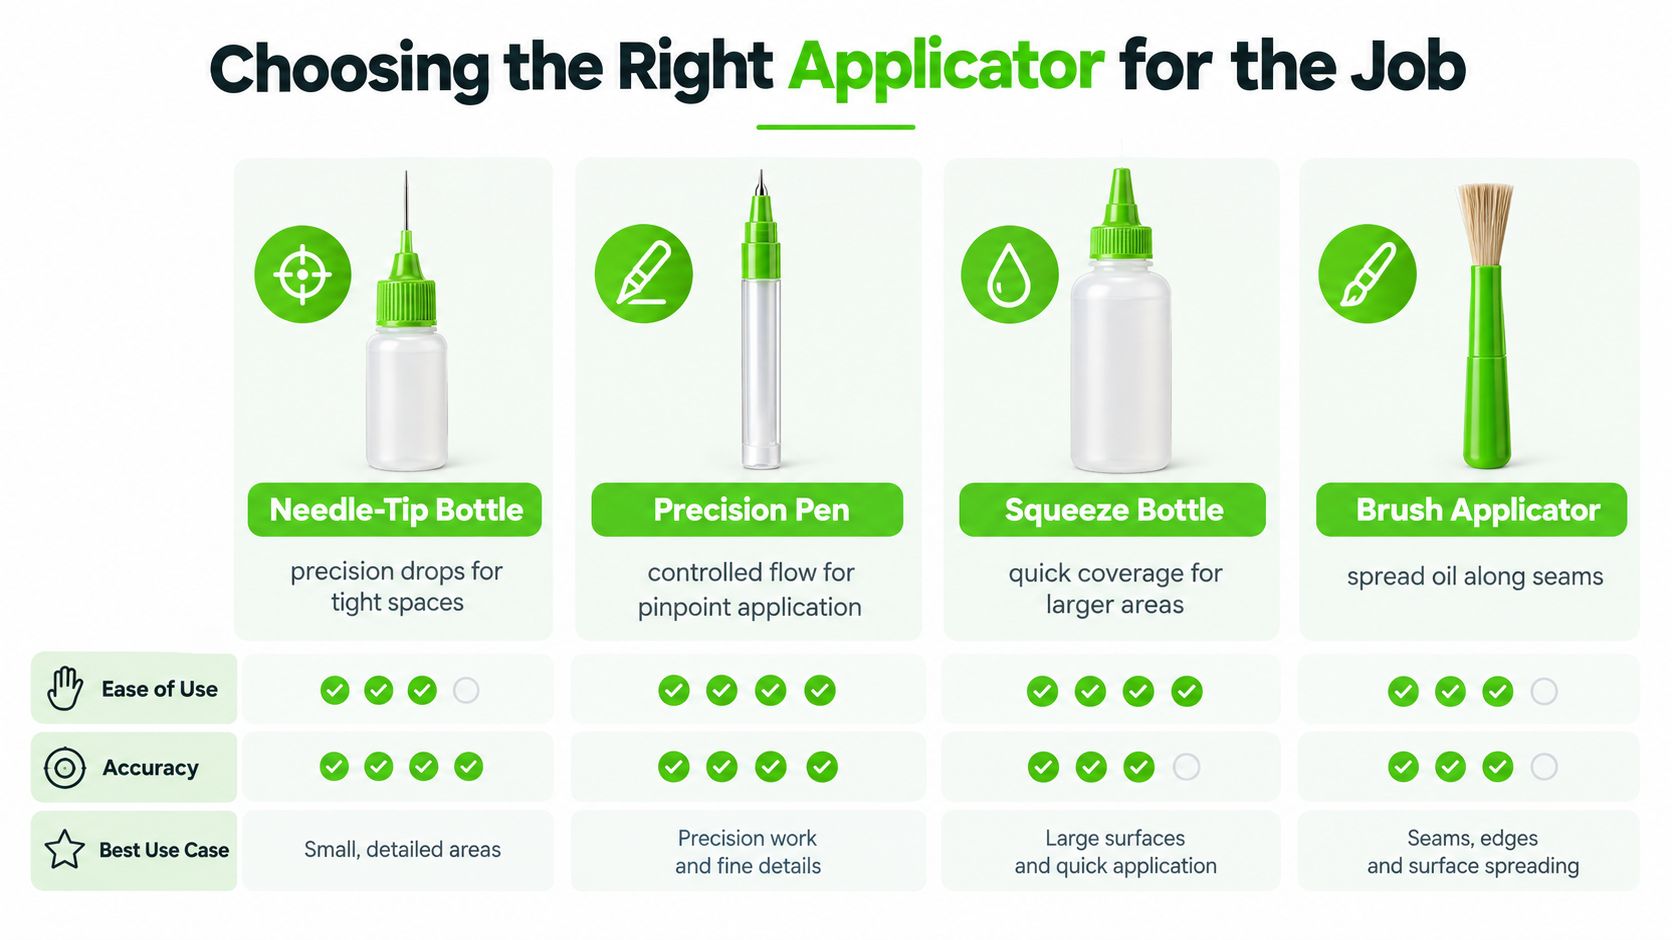
Four Common Designs
- Needle-tip bottle: The long, narrow tip reaches recessed hook and bobbin areas and makes a single drop easier to see. It's usually the strongest choice for manual points because it limits delivery and improves repeatability.
- Precision pen: A pen is stable in the hand and friendly for beginners working at exposed points. Flow can be harder to judge, and the tip must stay clean so lint isn't carried into the mechanism.
- Squeeze bottle: A flexible bottle is convenient for larger, easily reached points, but hand pressure varies. One firm squeeze can release more than the intended drop, especially when the bottle is nearly full.
- Syringe-style applicator: A syringe gives measured control and works well for transferring oil or filling an accessible reservoir. It needs careful storage, a clean tip, and a slow hand so pressure doesn't force oil past the target.
A brush has a narrower role. It can spread a film along an accessible surface when a manual calls for that method, but bristles attract lint and make dose control less exact. For most owner-approved points, placement beats spreading.
Practical rule: Choose an applicator that lets the drop form visibly before it touches the machine.
Owners should also judge the container between uses, not only during application. Guidance on choosing and handling sewing machine oil safely supports evaluating delivery precision, cap sealing, lint contamination, oil visibility, and safe reach without touching moving parts. The bottle should close securely, stay upright, and remain away from heat because sewing-machine oil is flammable.
A dirty tip defeats a precise tip. Before use, the owner wipes the outside of the applicator, checks that no lint clings to it, and tests the first drop on a tissue or scrap if the flow feels uncertain. That small pause prevents the first oversized drop from landing inside the machine.
Matching the Oil to the Machine
Generic labels cause much of the confusion around a sewing machine oiler. A product called machine oil may not match the viscosity a sewing machine manufacturer specified, and common substitutes such as WD-40, 3-in-1 oil, cooking oil, motor oil, penetrating oil, and multipurpose household oil shouldn't be treated as interchangeable. The manual's specification is the starting point.
Viscosity describes how readily oil flows. It affects capillary penetration into small clearances, formation of the protective film, drag on moving parts, and migration away from the target. Oil that's too thick may not reach the interface, while a formulation that doesn't match the design may travel where it doesn't belong.
What Manufacturer Numbers Show
One industrial specification discussed earlier lists 10.9 mm²/s (cSt) at 40°C and 0.86 g/cm³ at 15°C for its recommended oil. A separate Dürkopp Adler manual requires 22.0 mm²/s at 40°C and 0.865 g/cm³ at 15°C, with the reservoir checked before every start-up and kept between marked limits, according to the Dürkopp Adler operating manual for its industrial machine. Those are different specifications for different machines, not evidence that one universal oil fits all equipment.
Industrial documents also show why flash point and viscosity grade matter to the specification. One Juki manual specifies 10 mm²/s at 40°C and a 150°C flash point, while another industrial specification uses ISO viscosity grade 22, as set out in the Juki technical manual covering machine-specific oil requirements. Home owners don't need to copy industrial numbers, but they do need to respect the principle behind them.
Substitutes can create problems beyond thickness. Additives or solvents may attack plastics, leave deposits, contaminate thread-contact surfaces, or fail to maintain a stable film at hook, shaft, and bearing interfaces. Cooking and general household products also weren't selected for sewing-machine clearances or fabric safety.
Machine category adds another layer. A basic mechanical model, a serger, a longarm quilter, and a computerized embroidery machine don't share one owner procedure because all four form stitches. Owners comparing categories can review how a mechanical sewing machine differs in construction and controls before applying mechanical-machine advice to electronic equipment.
The Baby Lock Radiance Sewing & Embroidery Machine illustrates that distinction in a modern sewing, quilting, and embroidery model with intuitive controls and a large embroidery area. Its care should follow its own manual rather than a vintage mechanical routine. When a label doesn't state the information the manual requires, the safer choice is to stop and obtain the specified product or ask a service technician.
Oiling a Mechanical Machine the Right Way
A mechanical machine with owner-accessible points can be oiled at home when the manual identifies those points. New Mexico State University guidance directs owners to consult the machine booklet for lubricant type and locations, apply one drop on each bearing and in each oil hole, and consider oiling after each day of work or approximately 8 to 10 hours of use for a frequently used mechanical machine, as described in its university sewing-machine maintenance guidance. That schedule isn't a universal rule for sealed or computerized models.
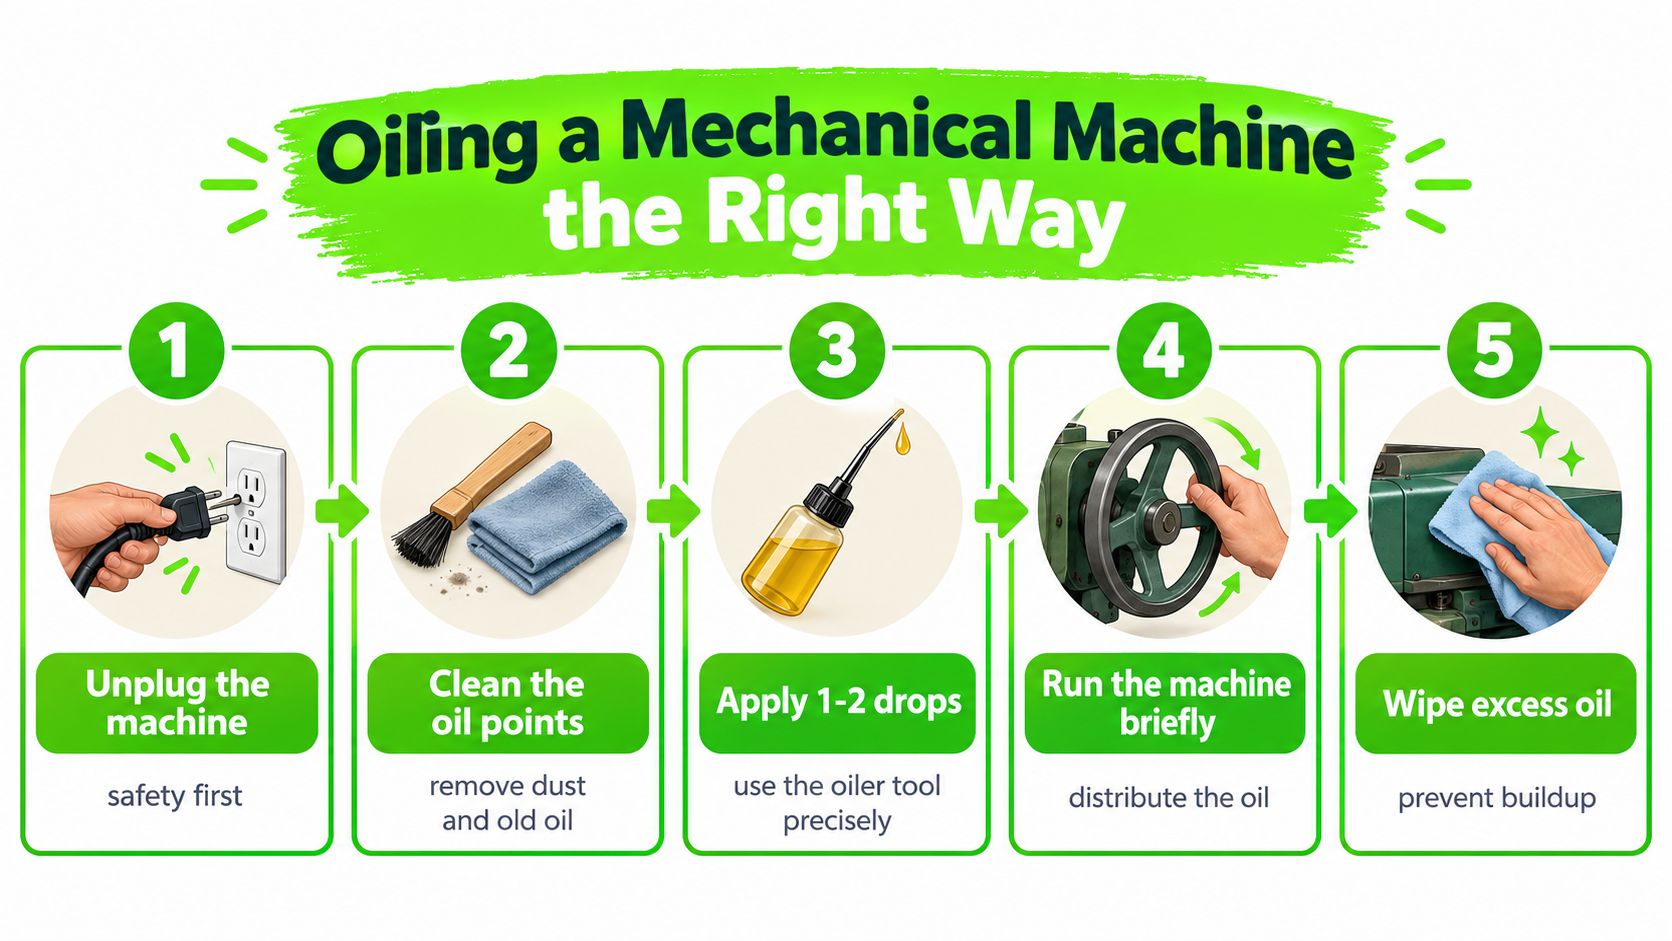
A Careful Home Procedure
- Disconnect power: The machine should be switched off and unplugged before covers, plates, or bobbin parts are handled.
- Remove obstructions: The needle and presser foot come off when access requires it, with small screws placed where they won't roll into the machine.
- Clean first: A brush removes lint and old residue from the feed dogs, bobbin area, and each approved oil point.
- Apply the dose: A needle-tip sewing machine oiler places the manual's specified amount at each listed bearing or oil hole, away from belts and electrical components.
- Distribute by hand: The handwheel is turned manually in the correct direction so oil moves through the bearings.
- Wipe and test: Excess is removed, then the machine runs on scrap fabric before it touches a project.
Dose discipline protects both mechanism and fabric. An NCERT vocational guide specifies one or two drops in each identified oil hole, warns that too much oil can clog the machine, and directs the user to run it slowly for 2 to 3 minutes over waste fabric, as set out in the NCERT vocational sewing-machine maintenance guide. Owners who can't find model-specific points should consult the instruction manual guidance for locating sewing machine directions instead of copying a diagram for another model.
After oiling, the machine should sound and feel smoother without throwing oil onto the test fabric. Persistent resistance, grinding, repeated staining, or a handwheel that still feels wrong isn't solved by adding more drops. Those signs call for inspection, because worn parts, compacted lint, old residue, or timing problems can't be corrected by lubrication alone.
When Not to Oil and When to Call the Service Team
The advice to oil every month sounds responsible, but it ignores machine architecture. A vintage mechanical machine, a sealed household machine, a computerized embroidery model, a serger, and a longarm quilter don't share the same lubrication access or schedule. Frequency depends on design, amount of use, environment, and the manual, not just elapsed time.
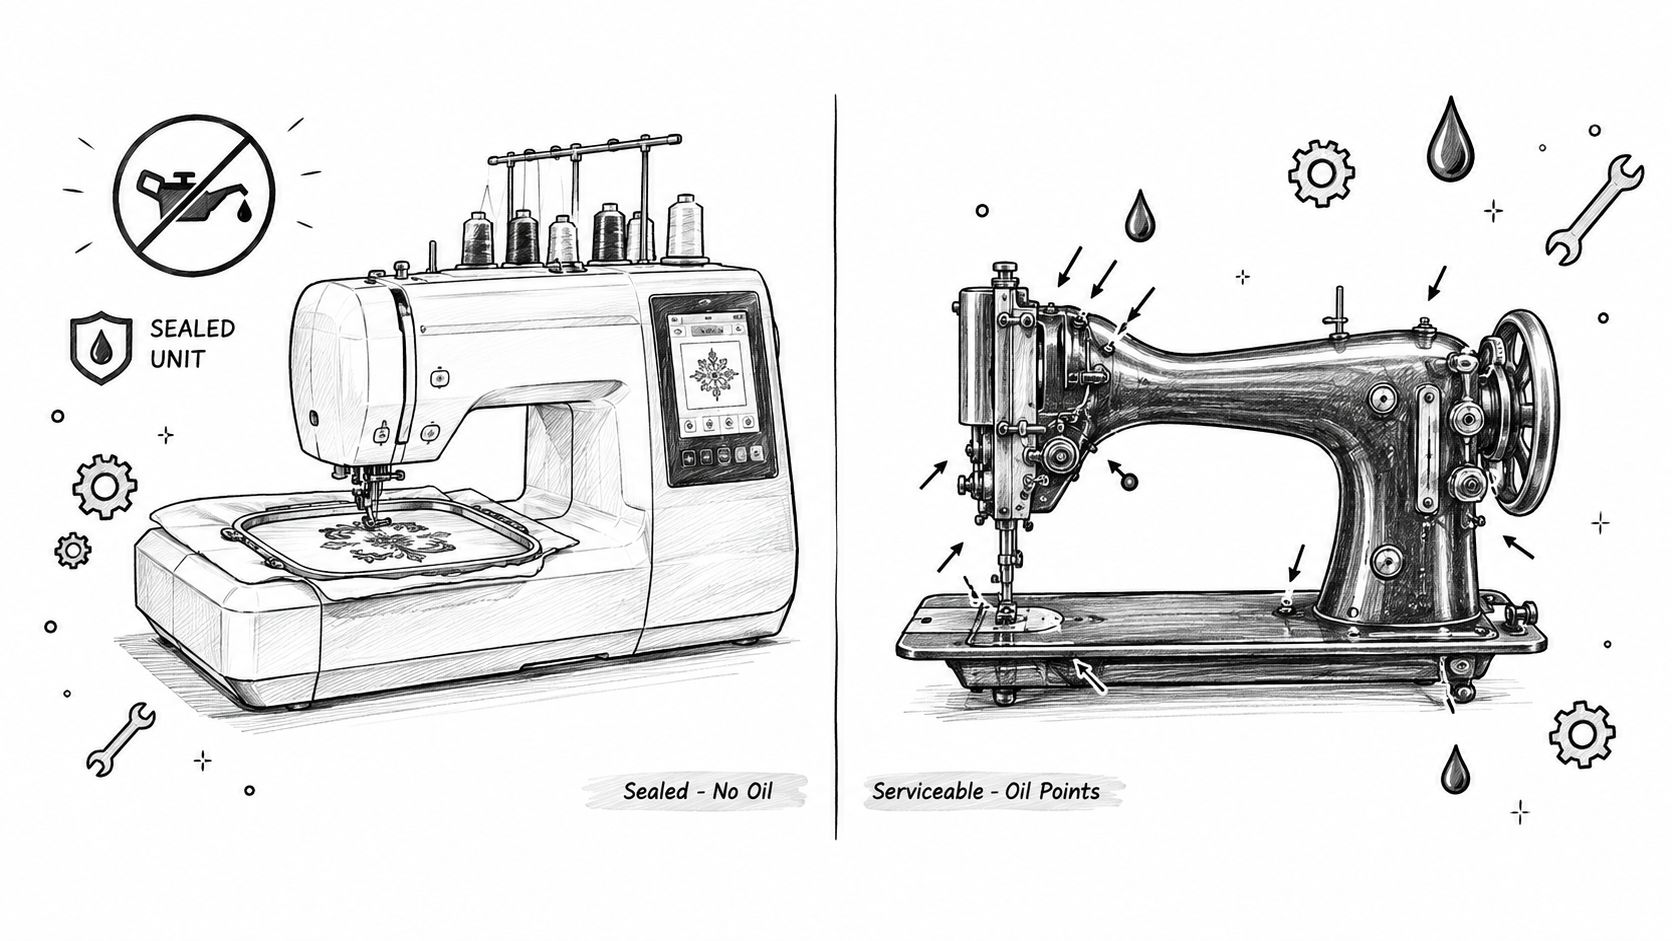
Start With the Machine Category
- Manually lubricated mechanical machine: Owner oiling is appropriate only at points the manual identifies. Cleaning and one-drop discipline remain essential.
- Sealed or pre-lubricated machine: Internal oil shouldn't be added unless the manufacturer gives an owner procedure. Many current machines are described as sealed and pre-lubricated for life, creating a clear conflict with generic monthly advice in the machine maintenance guidance comparing sealed and routine-oiling models.
- Computerized and embroidery machine: Oil can migrate toward sensors, belts, plastics, electronics, and fabric. Technician service is the safer route when no user points are listed.
- Serger and longarm machine: Dedicated mechanisms and manufacturer-specific procedures can differ from a standard sewing machine. The exact manual controls the decision.
- Industrial reservoir machine: The task is level inspection between marked limits and confirmation through the sight window, not repeated spot filling without instructions.
The clean decision rule is simple. If the manual doesn't name a user-accessible oil point, the owner doesn't invent one. If instructions are missing, unclear, or contradicted by the machine's construction, a service appointment is the next step.
A sealed machine that sounds rough needs diagnosis, not an improvised oil point.
Professional help is also appropriate when noise continues after cleaning, the handwheel resists turning, oil has already contaminated fabric or internal areas, or residue has combined with lint around moving parts. A guide to sewing machine maintenance and repair decisions can help owners separate routine care from problems that need a technician. Service protects the warranty process as well when manufacturer instructions restrict internal access.
This is especially important after a machine has sat unused. Old residue may need removal before fresh lubricant can work, and forcing a stiff mechanism can damage parts. A technician can clean, inspect, lubricate approved internal points, and check stitch formation in one visit.
Your Oiling Checklist and Next Steps
A save-worthy checklist turns the decision process into a routine that fits beside the sewing table. It also prevents the most common sequence error, adding oil before cleaning. The owner should be able to answer every item before the applicator cap comes off.
Before, During, and After
- Identify the category: Confirm whether the machine is manually lubricated, sealed, computerized, a serger, a longarm, or a reservoir model.
- Read the exact manual: Use its lubricant specification, oil points, quantity, and frequency rather than advice for another brand or era.
- Clean before oiling: Remove lint and old residue from the bobbin area, feed dogs, and approved points.
- Choose the applicator: Use a clean, resealable design that reaches the target and forms one visible drop.
- Apply sparingly: Keep oil away from belts, electrical components, sensors, thread paths, and fabric-contact areas unless the manual directs otherwise.
- Distribute and wipe: Turn the handwheel manually, remove excess, and inspect the tip and work surface.
- Test on scrap: Run slowly on waste fabric and look for spotting before starting a project.
- Escalate when uncertain: Persistent noise, stiffness, staining, or missing instructions signals professional service.
Owners of modern embroidery equipment should apply the category check first. The Baby Lock Vesta Sewing & Embroidery Machine is a mid-sized sewing, embroidery, and quilting machine with a 6-1/4 inch by 10-1/4 inch embroidery field, and its care should follow its model-specific directions rather than a universal home-oiling calendar. Machines from Baby Lock, Bernina, Bernette, Brother, and Janome can each have different owner and technician boundaries.
B-Sew Inn provides in-person service, repair, machine mastery sessions, classes, and hands-on machine shopping at stores in Tulsa and Oklahoma City in Oklahoma, Springfield in Missouri, Humble in Texas, and Fayetteville in Arkansas. A reader who isn't certain whether a machine should be oiled can bring the manual and machine to a service team instead of risking oil in the wrong place. In-person classes also give owners a supervised setting for building cleaning and maintenance habits alongside sewing technique.
The core lesson is measured care. The right sewing machine oiler, matched to the right lubricant and used only where the manufacturer allows, helps a serviceable mechanical machine run smoothly. For sealed and computerized machines, the most responsible maintenance choice may be keeping the bottle closed and scheduling service.
Visit B-Sew Inn to browse sewing, quilting, and embroidery machines, notions, thread, stabilizer, and accessories, or stop by a store in Oklahoma, Missouri, Texas, or Arkansas to try machines in person. For a machine that sounds rough, feels stiff, or doesn't have clear owner-oiling instructions, book a service appointment or ask about an in-person machine mastery class before adding another drop.

