Gathering fabric is one of those foundational skills that really takes your sewing from homemade to handmade. It’s the secret behind everything from the soft fullness of a flowing skirt to the beautiful volume of dramatic puff sleeves. Once you get the hang of it, you'll start seeing possibilities to add texture and shape everywhere in your custom designs.
Your Guide to Creating Beautiful Gathers
If you've ever felt intimidated by the idea of creating perfectly even gathers, you're in the right place. This is a technique that can truly elevate your projects, whether you're adding a simple ruffle to a pillowcase or tackling a gorgeous tiered dress. My goal here is to completely demystify the process and give you clear, practical steps to get a professional look every time.
Here at bsewinn.com, our whole mission is to empower crafters like you to bring creative ideas to life. From our custom sewing machine designs, which are perfect for replicating projects like these, to our extensive online classes and resources, we're here to offer the support you need to succeed. Think of this guide as your first step toward mastering a beautiful new skill that will open up a whole new world of design possibilities.
A well-executed gather can be the defining feature of a handmade garment. It’s a detail that adds softness, movement, and a touch of bespoke charm that sets your work apart from mass-produced clothing.
We're going to walk through the entire process together. I'll cover:
- The must-have tools and how to prep your fabric for success.
- My step-by-step methods for gathering, both by machine and by hand.
- Pro tips for attaching your gathered pieces without any fuss.
- Solutions for common gathering headaches and troubleshooting tips.
Ready? Let’s dive in and start making beautiful, perfectly distributed gathers with confidence.
Gathering Your Tools and Prepping Fabric
Before you can even think about sewing beautiful, bouncy gathers, a little prep work goes a long way. Trust me, getting your tools and fabric ready beforehand is the secret to a smooth process, from the very first stitch to the final press. It’s like setting up your ingredients before you start cooking—it just makes everything easier.
The basics are probably already in your sewing kit: a good quality needle, strong thread, and sharp scissors are absolute must-haves. If you plan on doing a lot of machine gathering, I highly recommend investing in a specialized gathering foot. It can create perfectly consistent ruffles with hardly any effort on your part, which is a real game-changer.
Choosing Your Fabric and Calculating Ratios
It’s amazing how different fabrics behave when you try to gather them. Lightweight cottons, voiles, and lawns create soft, airy ruffles that feel delicate and dreamy. On the other hand, heavier fabrics like wool or corduroy will give you more structured, almost sculptural folds. Whatever you choose, always, always pre-wash and press your fabric before cutting! This prevents any surprise shrinkage from messing up your lovely gathers later on.
The question I get asked most often is, "How much fabric do I actually need?" The answer really depends on how full and dramatic you want your gathers to be.
I can't stress this enough: the most crucial step in achieving beautiful, balanced gathers happens before you even sit down at your machine. Proper fabric prep and accurate measurement are the secrets to a professional-looking result every single time.
Figuring out the right ratio is key. Here’s a quick guide I use all the time:
- For subtle fullness: Use a ratio of 1.5:1. This is perfect when you just want a little bit of shape. It means your fabric piece will be 1.5 times the length of the finished edge it’s being attached to.
- For standard gathers: A 2:1 ratio is the go-to for most projects. It creates those classic, noticeable ruffles you see on skirts and sleeves.
- For dramatic volume: Go for a 3:1 ratio or even higher. This is where things get fun! It works beautifully with lightweight fabrics to create maximum poof and impact.
To make this even easier, here's a handy little chart you can reference.
Fabric Gathering Ratio Guide
Use this quick reference to determine how much fabric you need based on the desired fullness of your gathers.
| Desired Fullness | Fabric Ratio | Best For |
|---|---|---|
| Subtle | 1.5:1 | Gently easing in sleeves, light gathers on a yoke, or a minimal ruffle. |
| Standard | 2:1 | Classic gathered skirts, cuffs, apron tops, and most everyday ruffles. |
| Full | 2.5:1 | Tiered skirts, fuller sleeves, and projects needing noticeable volume. |
| Very Full | 3:1 | Dramatic ruffles, tutus, curtains, or projects with lightweight fabrics. |
This table should give you a great starting point for almost any project you can dream up!
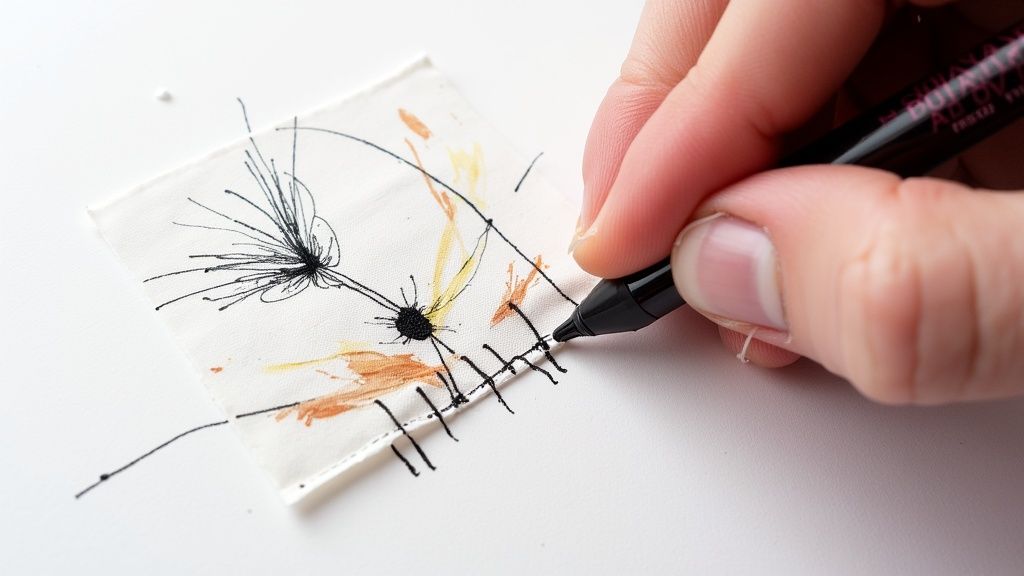
Your final prep step is marking the fabric. Grab a fabric pen or some chalk and draw two parallel lines right inside your seam allowance. These lines will be your guide for your gathering stitches. It might seem like a small thing, but it's essential for keeping your stitches straight, which in turn helps you pull up the threads evenly for perfect gathers.
For a complete rundown of all the essential supplies you'll want in your sewing space, be sure to check out our guide on the top sewing tools for beginners.
How to Sew Gathers with Your Machine
When your project calls for long stretches of ruffles—say, for a tiered skirt or some dramatic curtains—your sewing machine is definitely your best friend. Using a machine not only saves a massive amount of time, but it also gives you wonderfully even and consistent results.
Let's walk through the two most effective ways to gather fabric with your machine. First up is the classic double-basting stitch technique, which is a reliable method every sewer should have in their back pocket. The other involves a specialized gathering foot, a fantastic little accessory for anyone who wants serious speed and precision.
The Double Basting Stitch Method
This is the traditional workhorse method, and for good reason—it offers a ton of control. The idea is simple: you sew two parallel lines of long stitches, then just pull the threads to scrunch up the fabric into gathers.
For the best results, here are the settings I always use:
- Stitch Length: Crank your machine's stitch length all the way up. This is usually somewhere between 4.0 mm and 5.0 mm.
- Tension: I like to slightly lower the upper thread tension. It just makes the bobbin threads that much easier to pull without a fight.
- Stitching Lines: Sew your first line just inside your seam allowance. For a 5/8" allowance, I'd stitch at 1/4" from the raw edge. Then, sew a second parallel line about 1/4" away from the first, even closer to the edge.
Remember to leave long thread tails at the beginning and end of your stitching. And whatever you do, do not backstitch! Backstitching will lock your threads in place, and you won't be able to pull them to create the gathers.
The real trick here is to gently pull on both bobbin threads at the same time. This distributes the tension evenly across both stitch lines, which helps prevent thread breakage and gives you those beautiful, uniform ruffles you see in professional garments.
Using a Gathering Foot for Speed
If you find yourself making gathers pretty often, investing in a gathering foot is a total game-changer. This clever attachment basically does the work for you, creating soft, even gathers as you sew along. Here at bsewinn.com, we believe in empowering crafters with the right tools, and you can check out our high-quality options like the ruffling foot to see what a difference it can make.
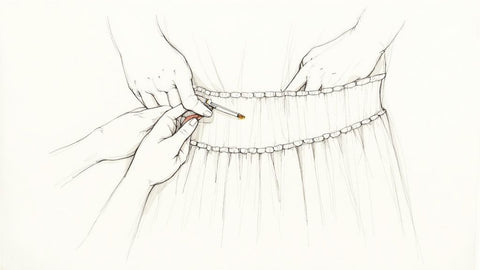
This visual guide shows the initial, crucial step of preparing your fabric by marking your gathering lines accurately.
As the diagram shows, taking the time to mark precisely is the foundation for straight stitches, and straight stitches are what lead to perfectly distributed gathers.
While these machine methods are incredibly efficient, it’s wild to think about how much they’ve evolved. Back in the day, hand sewing gathers could take up to three times longer than doing it by machine for the same length of fabric. The invention of the sewing machine brought faster alternatives, like using a wide zigzag stitch over a cord, which you could then pull to gather the fabric in a flash.
Mastering these machine techniques just takes a little practice. Our custom machines at bsewinn.com and our supportive online training are all designed to help you build confidence and get flawless results on every project you tackle.
The Art of Hand Gathering for Precision Control
While sewing machines are amazing for their speed, there's a certain artistry and precision that you can only get by sewing gathers by hand. I find this timeless method gives you so much more control, making it my go-to choice for really delicate fabrics like silk chiffon or even heavy materials like wool, where a machine might struggle or leave marks. Working gathers by hand really connects you to the history of sewing and a level of craftsmanship that I'm passionate about keeping alive.
One of the most beautiful historical techniques is creating stroke gathers. This method gives you these incredibly structured, uniform pleats that look stunning on heirloom garments, historical reproductions, and high-end couture pieces. It was a must-know skill for shaping garments long before sewing machines were a household item.
Mastering Stroke Gathers
The key to this technique starts just like machine gathering: you create two parallel rows of strong running stitches. The real magic, though, happens after you’ve pulled the threads to create the initial bunching.
That’s when you’ll take the tip of a blunt needle to "stroke" the fabric. By gently pushing the needle down into the trough of each little fold, working from the stitching line to the raw edge, you encourage the fabric to settle into crisp, even pleats. It’s definitely a meticulous process, but the results are absolutely worth it.
This hands-on approach is what makes the difference. It lets you manipulate each fold individually, ensuring every gather is perfectly spaced and aligned. This creates a texture and finish that is simply impossible to get with a machine.
This technique has some seriously deep historical roots. The ability to sew gathers well was a game-changer in the early 19th century. Around 1806, cotton thread became strong enough for garment construction, replacing the traditional linen and silk. Since dyes weren't common until later, it's pretty normal to see 19th-century wool garments with hand-sewn gathers made with undyed linen thread. You can dive deeper into this kind of history in these articles on historical sewing techniques.
At bsewinn.com, we really believe that understanding these foundational skills gives you a deeper appreciation for the craft. Our online classes and resources are all about helping you explore both modern and traditional methods, empowering you to create some truly exceptional pieces.
Attaching Gathers for a Professional Finish
Creating those beautiful, bouncy ruffles is only half the fun; attaching them smoothly is what truly gives your project that polished, professional look. The absolute key here is to distribute your gathers evenly before your fabric ever sees the needle. Take a moment to carefully adjust the fabric along your basting threads, coaxing out any lumps or flat spots.
I like to start by dividing both the gathered piece and the flat piece into quarters, or even eighths for longer sections, marking each point with a pin. Match up these pins first. This breaks the seam down into smaller, more manageable sections, making it so much easier to get that fullness spread just right.
The secret to a professional finish is patience during the pinning stage. Rushing this step almost always results in uneven gathers. Take your time to slide the fabric along the threads until the ruffles look balanced and consistent. It's worth it.
Securing and Finishing the Seam
Once you're happy with your pinning, it's time to stitch. I always recommend sewing with the gathered side up. This lets you keep an eye on everything and helps prevent the little folds from getting tucked or flattened by the presser foot as you go. You'll want to stitch just inside your gathering stitches—this hides them neatly on the inside of the seam.
If you're working with bulky fabrics, a walking foot can be a total lifesaver. It grips and feeds both layers of fabric through the machine at the same rate, preventing any shifting. For example, when adding a gathered wool skirt to a bodice, a walking foot ensures both heavy layers move together without slipping.
After sewing, go back and carefully remove any visible gathering stitches with a seam ripper for a clean finish. To finish it off, serge the seam allowance or use a zigzag stitch. This simple step prevents fraying and keeps the inside of your garment looking as beautiful as the outside.
This kind of mindful process really gets to the heart of slow fashion, emphasizing quality over quantity. By practicing these techniques, you're not just creating durable, beautiful items; you're helping preserve the art of textiles for another generation.
Answering Your Top Gathering Questions
Even with the best instructions, you’re bound to hit a few snags when you're learning how to sew gathers. Getting stuck is just part of the process, but having the right answers can get you moving again in no time. Think of this as your personal troubleshooting guide for the most common issues that pop up when you're adding ruffles and fullness.
Whether you're dealing with snapped threads or gathers that just won't cooperate, a few simple tweaks to your technique can make all the difference. Let's get those problems solved so you can get back to creating.
Why Does My Thread Keep Breaking?
It's one of the most frustrating things that can happen—you're almost done pulling your gathers, and snap! The thread breaks. I've been there. Usually, it comes down to a few easy-to-fix culprits.
- Thread Quality: Old or cheap thread just doesn't have the strength to handle the tension of being pulled tight. For your gathering stitches, always reach for a good quality polyester thread or even a specialty heavy-duty thread.
- Pulling Too Hard: It’s so tempting to just yank the threads to get the job done faster, but that's the number one cause of breakage. The trick is to gently ease and slide the fabric along the threads, not force it.
- Stitch Length is Key: Your stitch length needs to be long—I'm talking a 4.0 mm to 5.0 mm setting. Shorter stitches create way too many friction points, putting extra stress on the thread and making it much more likely to snap.
How Can I Get My Gathers Perfectly Even?
The secret to beautiful, professional-looking gathers is all in the distribution. Lumpy, uneven ruffles can throw off the look of your whole project, but there’s a simple trick to get a balanced finish every single time.
Start by dividing both the fabric edge you're gathering and the flat piece you're attaching it to into quarters. Mark each point with a pin. If you're working with a really long piece, like for a tiered skirt, divide it into eighths instead. Then, match up these pins and secure them.
Now, you can gently slide the fabric along your gathering stitches, focusing on distributing the fullness evenly between each set of pins. Once a section looks just right, lock it in by wrapping the thread tails in a figure-eight around the pin. This holds everything perfectly in place while you move on to the next section.
People often ask about gathering versus pleating. While both control fullness, the key difference is in the structure. Gathering creates soft, organic-looking folds by pulling up threads for a ruffled effect. Pleating, on the other hand, involves making sharp, uniform folds that are precisely measured and pressed for a more tailored, geometric look.
Can I Use Elastic Thread To Make Gathers?
Absolutely! Using elastic thread in your bobbin is a fantastic shortcut called shirring. It’s a technique that automatically creates soft, stretchy gathers as you sew, which is perfect for things like comfy waistbands, cuffs, or decorative panels.
To get started, you'll need to hand-wind the elastic thread onto your bobbin without stretching it at all. Use your regular all-purpose thread in the needle. As you sew your lines, the machine does the gathering work for you! Just be sure to test it out on a scrap of your project fabric first—you'll likely need to play with your tension and stitch length to get the look just right.
At B-Sew Inn, we believe mastering skills like gathering is what unlocks your creative potential. From our custom-designed sewing machines to supportive online classes and tons of resources, we're here to help you at every stage of your sewing journey. Come explore everything we have to offer and find the tools you need to bring your vision to life at B-Sew Inn's official website.