

If your fabric stash has taken on a life of its own, you're not alone. The best way I've found to really get a handle on it is to just pull everything out. Seriously. Pile it all up where you can see it. From there, you can sort it into piles that make sense to you—maybe by color, maybe by project—and then you can figure out what kind of bins or shelves will actually work for what you have.
This first step is crucial. It keeps you from just shuffling piles from one corner to another and helps you build a system that you'll actually use.
Creating Order from Your Fabric Chaos
Looking at a mountain of fabric can feel a little... daunting. But I promise, with a clear plan, you can turn that beautiful chaos into a curated collection that’s ready for your next quilting adventure.
Any seasoned quilter will tell you the first step isn't a trip to the container store. It's taking a "fabric census" to get a real picture of your stash. This is the time to be honest about every single fat quarter, scrap bundle, and bolt tucked away in your space.
This isn't just about tidying up. It's about creating a sewing room that inspires you to fire up that sewing machine and create, not just hunt for supplies. Here at bsewinn.com, we are committed to empowering crafters through extensive resources like this guide. We believe an organized space is the first step to unlocking your creative potential—a philosophy we bring to all our online classes and training.
Sorting Strategies for a Functional Stash
Once you've got everything out in the open, the real fun begins: sorting. Organizing by color is a classic for a reason (it's gorgeous!), but it’s definitely not the only way to go. Think about how you actually work and what will make your life easiest.
- By Designer or Collection: If you love working with specific designers, grouping their collections together is a game-changer. It keeps those cohesive color palettes intact and makes pulling coordinates for a new quilt a total breeze.
- By Project: This is my personal favorite for staying on track. I dedicate a bin or a basket for each project I have planned. When I'm ready to start, I just grab the container and go—no searching required.
- By Fabric Type: It just makes sense to keep your quilting cottons, cozy flannels, and specialty fabrics like lawn or canvas in their own zones. You'll always know exactly where to find the right material for the job.
An organized fabric stash is more than just tidy shelves—it's a library of creative possibilities. By creating an intuitive system, you spend less time searching and more time sewing, turning inspiration into tangible art.
It's clear we're all building our stashes. Quilting has seen a huge resurgence, with the global quilting fabric market growing from USD 3.5 billion in 2023 to a projected USD 5.7 billion by 2032. That's a lot of fabric finding a home in our sewing rooms!
To get started, it can be really helpful to look at how professional organizers tackle spaces. This ultimate guide to closet organization systems has some great foundational strategies you can adapt for your fabric.
Many of these same ideas can be used for all your other supplies, too. If you're looking to organize your whole creative corner, check out our guide on how to organize craft supplies. At B-Sew Inn, we want to give you the tools and know-how to make your entire creative process a joy.
Choosing Your Fabric Sorting Method
Not sure where to begin? Every quilter's brain works a little differently, so the "best" system is the one that clicks for you. Here’s a quick look at the most popular methods to help you decide.
| Sorting Method | Best For | Pros | Cons |
|---|---|---|---|
| By Color | Visual quilters who love scrappy projects. | Easy to find shades, creates a beautiful rainbow display. | Can be hard to find specific prints or collections. |
| By Designer/Collection | Quilters who buy full collections for specific patterns. | Keeps coordinated fabrics together, easy to pull for projects. | Can be difficult to mix and match between designers. |
| By Project | Goal-oriented quilters with a list of WIPs. | Super efficient, keeps you focused and ready to sew. | Requires pre-planning; not ideal for spontaneous sewing. |
| By Fabric Type | Crafters who sew more than just quilts (garments, bags, etc.). | Practical, easy to find the right substrate for a pattern. | Less visually inspiring; might not matter for quilting cottons. |
| By Size (Fat Quarters, Yardage, Scraps) | Quilters with a wide variety of fabric cuts. | Makes it easy to grab the right amount of fabric. | You still have to sort within each size category. |
Ultimately, you might end up with a hybrid system! Maybe you sort yardage by color but keep your fat quarter bundles together by collection. Don't be afraid to experiment until you find what truly simplifies your creative flow.
Prepping Fabric for Long-Term Storage
The secret to a stash that’s ready to use the moment inspiration strikes? It’s all in the prep work. Taking a little time now to get your fabric ready for storage not only protects your investment but also turns those unruly piles into a beautiful, functional library of textiles.
One of the biggest debates you’ll hear in any quilting circle is whether or not to prewash fabric. It’s a hot topic for a reason!
Washing fabric before you store it can save you a massive headache down the line by preventing shrinkage that could warp your quilt seams. It’s also your best defense against dye bleeds—a quilter’s worst nightmare, especially with those gorgeous, saturated reds or deep blues.
On the other hand, many quilters swear by the crisp, stable feel of unwashed fabric. It can make getting a precise cut much easier, particularly when you're working on intricate designs with your custom sewing machine. A good middle ground? Always prewash fabrics with highly saturated colors and anything hand-dyed. For standard quilting cottons, you can often leave them as-is until you wash the finished quilt.
Folding Versus Rolling Your Fabric
Once your fabric is washed (or not) and pressed smooth, you’ve got another choice to make: fold or roll? Both methods are fantastic, and the best one for you really depends on the size of your fabric cuts and the kind of space you’re working with.
For anything over a yard, creating "mini-bolts" is a game-changer. Just wrap your fabric around comic book boards or specially designed fabric organizers. You end up with a neat, uniform stack that looks like a mini quilt shop right on your bookshelf. This keeps your fabric smooth, easy to see, and incredibly simple to browse through.
Rolling is another great option, especially for smaller pieces like fat quarters or jelly roll strips. When you roll them up tightly, you can store them vertically in drawers or baskets, which lets you see every single print at a glance. It's a perfect strategy for getting the most out of smaller containers.
A well-prepped fabric stash is your future self's best friend. Pressing out every crease and choosing a consistent folding or rolling method means your materials are pristine and ready for the cutting mat, saving you time and frustration on project day.
This simple diagram breaks down the core steps to take your fabric from chaotic piles to a beautifully organized system.
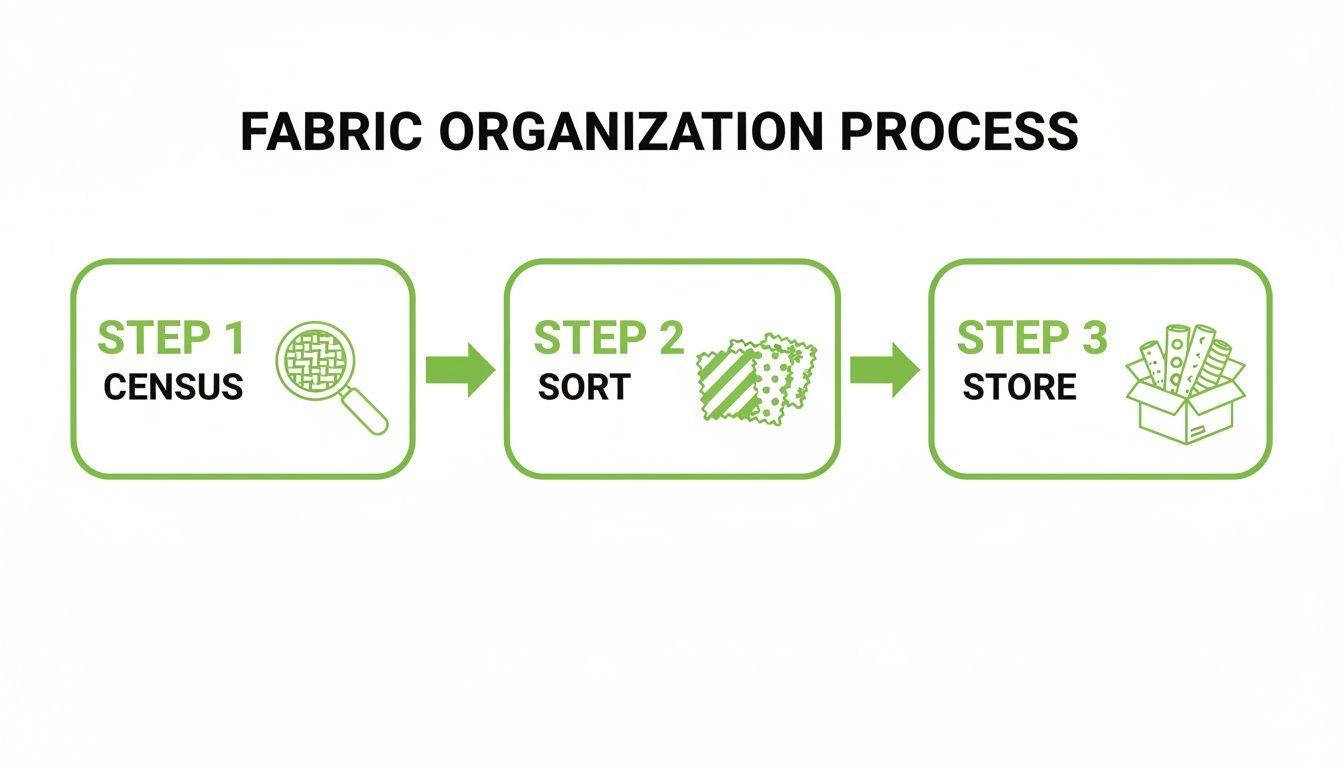
It all comes down to this: taking a proper inventory (census) and sorting everything logically before you even think about putting it away. That's the key to effective, long-term storage.
Finding the Right Storage Solutions
Okay, your fabric is sorted and ready to go. Now for the fun part: finding its perfect home. This isn't about a one-size-fits-all solution. It’s about creating a system that truly works for you, your space, and how you like to create. The real goal here is to build a sewing space that feels good to be in—a place that makes you want to pull out your fabrics and get to work on your sewing machine.
And let's be real, there's a huge community of us trying to figure this out! North America is home to between 9-11 million quilters. That passion fuels a massive industry, expected to hit $4.5 billion by 2025. All those quilters need smart ways to keep their precious stashes organized, wrinkle-free, and ready for inspiration to strike.
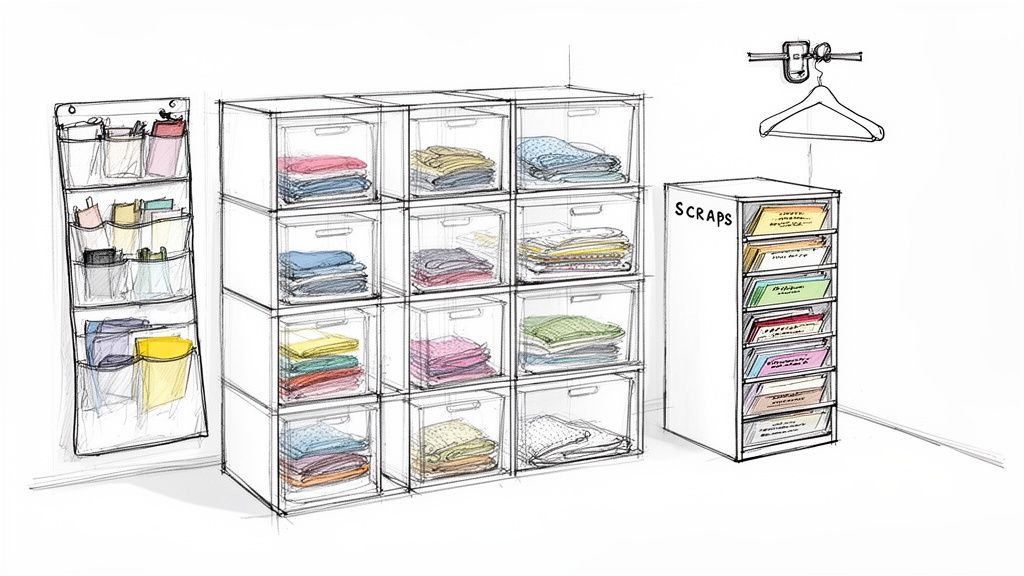
Containers and Shelving That Work
One of the easiest wins for fabric storage is using clear plastic bins. Their superpower is transparency. You can see exactly what you have without pulling down and opening a half-dozen containers. It turns "shopping your stash" into a joyful hunt instead of a frustrating chore.
Cube shelving is another quilter-favorite, and for good reason. It’s so versatile. You can start small with a four-cube unit and just keep adding on as your collection (inevitably) grows. These shelves are perfect for stacking folded fabric, lining up mini-bolts, or tucking in baskets filled with scraps. You can mix and match to create a completely custom storage wall.
The best storage system is one that reduces friction between an idea and the act of creating. If you can see your fabric and access it easily, you're more likely to use it.
Getting Creative with Vertical Space
When you're short on floor space, the only way to go is up. Think beyond traditional sewing room furniture and see what you can repurpose. You'd be surprised what works!
- Filing Cabinets: A metal filing cabinet can be a game-changer for scraps or fat quarters. Just hang your folded fabric pieces over hanging file folders. It creates a browsable library of your smaller cuts, keeping them neat and tidy.
- Hanging Systems: For larger cuts and yardage, those multi-pant hangers from the closet aisle are brilliant. Drape your fabric over the bars, and you can hang it in a closet, keeping it visible and free of deep creases.
- Over-the-Door Organizers: Don't forget the back of the door! Those clear pocket organizers are perfect for holding precuts like charm packs, jelly rolls, and layer cakes. It gets them off your work surfaces but keeps them right where you can see them.
Sometimes the best ideas come from looking at how people solve similar problems in other areas. For more clever ways to maximize tight quarters, check out these genius small space clothing storage ideas—many of the principles translate perfectly to fabric. And if you’re looking for a deeper dive, our own guide to sewing room storage ideas is packed with inspiration to help you build your perfect creative space: https://www.bsewinn.com/blogs/inspiration/sewing-room-storage-ideas
Our passion at bsewinn.com is empowering crafters. It's not just about providing top-tier custom sewing machine designs, but also about sharing the knowledge you need to create a space that fuels your creativity. We're here to help you turn that corner of your home into an organized, inspiring studio.
How to Label and Track Your Fabric Stash
Getting your fabric stash beautifully organized is a fantastic feeling, but it’s really only half the battle. If you can't remember what you have or where you put it, that perfect print for your next project might as well be lost forever. This is where a simple inventory system comes in, transforming your stash from a pretty collection into a seriously powerful creative resource.
Building a good system doesn't have to be some monumental task. It’s all about finding a method you’ll actually stick with, something that makes project planning easier and way more fun. This is a core skill we love to teach in our B-Sew Inn online classes because it directly fuels your creativity and confidence.
Simple Labeling Techniques
The easiest way to get started is with physical tags. I can't tell you how many times a basic label has saved me from guesswork and frustration down the line.
- Info Tags: Grab some cardstock or pre-made tags and attach them with a safety pin. At the very least, write down the yardage. If you know the details, add the designer, collection name, and maybe even where you bought it.
- Color-Coded Dots: This is a great trick for fabric stored in bins. Stick small, colored dots on the outside. You can create your own system—maybe blue is for flannel, red is for Riley Blake, or green is for a specific project—letting you see what’s inside at a glance.
Trust me, this one small step makes a huge difference. You'll never again have to pull out and unfold a whole cut of fabric just to check if you have enough for your pattern.
Think of your inventory system as your own personal fabric search engine. It stops you from buying duplicates and helps you 'shop' your own collection first, saving both time and money.
Going Digital with Your Stash
For those of us who enjoy a more tech-forward approach, creating a digital catalog of your fabric is a total game-changer. Just imagine standing in the fabric store, pulling out your phone, and instantly checking if you already own that perfect floral print you're holding.
A simple spreadsheet is a perfect place to start. Set up columns for designer, collection, yardage, fabric type, and maybe even a spot to drop in a photo. Just like that, you’ve created a searchable database of your entire collection.
If you want something a bit more specialized, there are several mobile apps designed specifically for tracking fabric. Many let you upload photos, scan barcodes from the bolt, and track how much fabric you use for each project. This method turns your stash into a meticulously organized digital library, ready for your next big idea on your custom sewing machine.
Here at bsewinn.com, we're firm believers that pairing classic crafting skills with modern tools is a wonderful way to support and grow your passion for sewing.
Protecting Your Fabric from Damage
Let's be honest, your fabric stash is a beautiful (and sometimes pricey) investment in your creativity. After all the work of organizing your collection, the last thing you want is for it to get damaged. A few simple care strategies can keep every piece just as vibrant as the day you brought it home.
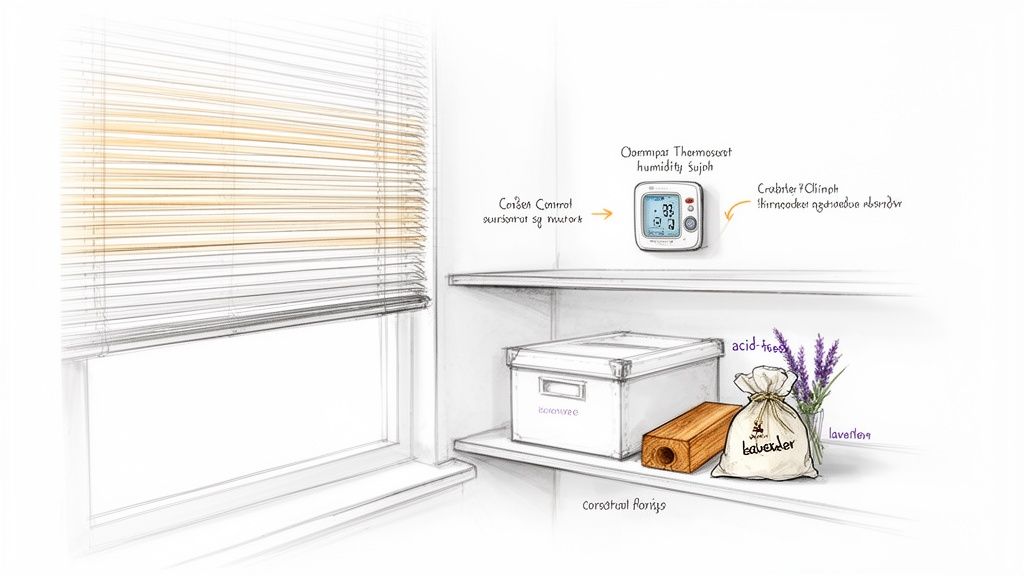
Your fabric's number one enemy? Direct sunlight. Its UV rays are notorious for fading those gorgeous colors and can weaken the fibers over time, causing damage you just can't undo. Storing your collection in a room with the blinds drawn or in closets and bins away from windows is one of the easiest ways to prevent this.
With the quilting market hitting USD 695.84 million in 2024 and projected to soar toward USD 1.15 billion by 2030, our personal fabric stashes are only becoming more valuable. Protecting these creative investments just makes sense so they're ready for whatever project comes next.
Climate and Pest Control
Beyond just sunlight, a stable climate is your fabric's best friend. I've seen too many stashes ruined by being stored in basements or attics where extreme temperature swings and high humidity create a perfect breeding ground for mildew. It can also make fibers brittle. Aim for a consistently dry, temperate environment.
When it comes to pests, you don’t need to resort to harsh chemicals. I've found that natural deterrents work wonders:
- Cedar Blocks: A few cedar blocks or shavings tossed into your storage bins are fantastic for repelling moths.
- Dried Lavender: Sachets of lavender not only smell amazing every time you open a bin, but they also help keep pests at bay.
- Regular Checks: Every so often, take some time to air out your stash. It’s a great way to catch any potential issues early and keep everything fresh.
Here's a pro tip: for vintage textiles or heirloom projects, using acid-free storage materials is absolutely non-negotiable. Standard cardboard boxes and tissue paper release acids that will yellow and degrade delicate fabrics. Always spring for archival-quality supplies for your most precious pieces.
These simple preservation habits will ensure your fabric is always ready for its moment on the cutting mat. The more you know about your materials, like understanding what quilting cotton fabric is, the better you can care for them. Here at bsewinn.com, we're all about helping you master every part of your craft, offering the resources and training to support you every step of the way.
Answering Your Biggest Fabric Storage Questions
Even when you have a solid game plan, certain questions always seem to pop up during a big organizing project. Let's tackle some of the most common dilemmas quilters run into when figuring out their fabric storage. These are the exact kinds of real-world challenges we love helping people solve in our B-Sew Inn community.
What’s the Best Way to Store Fat Quarters?
Fat quarters are basically the candy of the quilting world, aren't they? They deserve a storage system that’s both practical and inspiring. One of my favorite methods is to fold them into neat, uniform rectangles and file them vertically in a drawer or a clear bin. It lets you flip through them just like records in a shop, making it so easy to see every gorgeous print at a glance.
Another brilliant option, especially if you're tight on space, is to roll them up tightly and stand them on end in a basket or a cube shelf organizer. If you really want a stunning visual display, some quilters fold their fat quarters over small comic book boards. This creates adorable "mini-bolts" you can line up by color on a shelf, turning your stash into a piece of art.
Should I Pre-Wash My Fabric Before Storing It?
Ah, the great quilting debate! And honestly, there isn't one right answer here. It really boils down to your personal quilting style and what you're comfortable with.
Pre-washing is a great way to deal with any potential shrinkage before you start cutting and to check for color bleeding. This is a lifesaver with those highly saturated fabrics, like deep reds or navy blues. On the other hand, many quilters (myself included, sometimes!) prefer the crisp, stable feel of unwashed fabric for getting those super-precise cuts with a rotary cutter.
A good middle-ground approach many experienced quilters take is to wash only those high-risk, deeply colored fabrics. The rest can be washed after the quilt top is all pieced together. You really get the best of both worlds that way.
The biggest mistake you can make is storing fabric in sealed plastic containers in an attic or basement. Fabric needs to breathe! Airtight bins can trap moisture, which leads to mildew, and those wild temperature swings can degrade the fibers over time.
How Can I Organize Fabric in a Small Closet?
When you're working with a small closet, you have to think vertically to use every single inch. An over-the-door organizer with clear pockets is an absolute game-changer for stashing precuts like charm packs and layer cakes. Also, don't be afraid to install shelves as high up as you can reach—they're perfect for bins of fabric you don't use as often.
You can also use those multi-pant hangers to gently drape larger cuts of yardage. This keeps the fabric visible and mostly wrinkle-free without hogging precious shelf space. And don't forget the floor! A small set of rolling drawers tucked underneath can be the perfect spot for scraps and essential tools, making sure no space is wasted.
At B-Sew Inn, we are passionate about empowering your creativity at every stage. From providing state-of-the-art custom sewing machines to offering the training and resources you need to build an inspiring space, we're here to support your journey. Explore our extensive collection of supplies and educational opportunities at https://www.bsewinn.com.

