

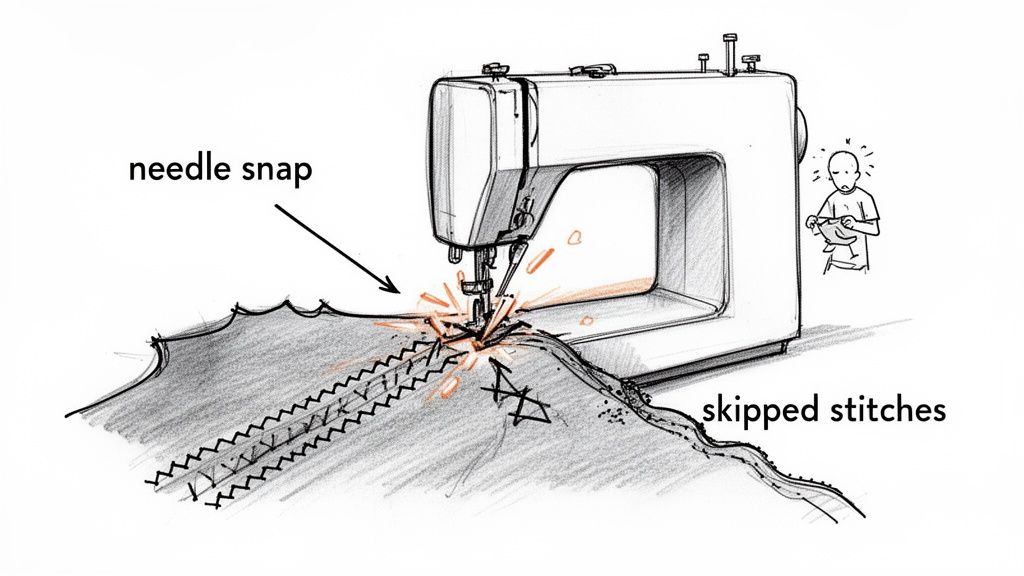
Ever tried to sew leather on your regular sewing machine, only to be met with a snapped needle and a mess of skipped stitches? It’s a frustrating experience, and a super common one. It happens because that trusty machine just doesn't have the power and specialized parts needed for a material as tough as leather. It’s a bit like trying to chop down a tree with a butter knife—you're just not using the right tool for the job.
Why Your Regular Machine Just Can't Handle Leather
If you’ve heard your home sewing machine groan and struggle when you tried to punch through a piece of leather, you've met its limits head-on. Standard machines are built for soft, pliable fabrics like cotton or linen, not dense, tough hides. The real problems boil down to three things: the motor, how it feeds the material, and the strength of its parts.
A typical home machine's motor is built for speed, not the raw power—or torque—needed for leather. When it meets that kind of resistance, it can overheat or just burn out. It simply lacks the muscle to consistently drive a needle through thick layers without stalling, which is what causes those frustrating skipped stitches. It's the first major roadblock for anyone trying a leather project on the wrong machine.
The Friction and Feeding Problem
Leather has a unique surface; it can be sticky or slippery, and that spells trouble for a standard machine's feeding system. Those little metal teeth under the fabric, the feed dogs, just can't get a good grip to move the leather along smoothly.
This leads to a few headaches:
- Wobbly, uneven stitches: The stitch length goes all over the place, making for a weak and amateur-looking seam.
- Bunching and puckering: Instead of gliding, the leather gets stuck and bunches up under the presser foot.
- Scratches and marks: The feed dogs can easily leave permanent marks on the surface of your beautiful leather.
A standard machine's inability to work with different types of leather is a huge part of the problem, a topic covered well in Alexander Noel's review of leather grades. This is exactly why a proper sewing machine for leather is non-negotiable.
Parts Under Pressure
It’s not just the motor and feed system. The basic components of a regular machine—the needles, the thread, even the frame itself—aren't designed for the stress of leatherwork. Even something as simple as putting stitches too close together can act like a perforation, weakening the leather along the seam just like the edge of a postage stamp.
Using the right tool isn’t just about getting a better result; it’s about making the whole creative process feel possible. A machine built for leather transforms a frustrating struggle into a smooth, rewarding flow.
Here at bsewinn.com, we get it. We've seen the frustration, and that's why our custom sewing machine designs are built to tackle these challenges from the ground up, giving you the confidence to work with any material. Through our online classes and extensive resources, we empower you to turn an intimidating material like leather into something you can create with joy and skill.
What Makes a Sewing Machine Great for Leather
To figure out what makes a particular sewing machine for leather tick, you’ve got to look under the hood. It’s not about a million fancy features; it’s about raw power, clever engineering, and sheer durability. When you break it down, you start to see why some machines glide through hide while others just grind to a halt.
At the very heart of any capable leather machine is its motor. You need to think of it less like the engine in a zippy sports car and more like the one in a heavy-duty truck. Its main job isn’t speed, it’s torque—that raw rotational force needed to drive a thick needle through dense, tough material, layer after layer, without even thinking about stalling. A standard machine motor will often whine and overheat under that kind of pressure, which leads to skipped stitches or, even worse, a complete breakdown.
A powerful motor makes sure every single stitch has the same consistent, driving force behind it, whether it's your first or your thousandth. That kind of reliability is everything when you're creating strong, professional-looking seams that you need to trust for years to come.
The All-Wheel-Drive Feed System
Okay, so the needle pierces the leather. What next? The machine has to pull that material forward for the next stitch, and this is where the feed system comes into play. For leather, a standard system just won’t cut it. Leather’s surface can be a little sticky, causing it to drag against a metal presser foot. Or, it can be so slick that the little feed dogs underneath can’t get a good grip.
This is exactly why a walking foot (or a more advanced compound feed system on industrial models) is so critical. A walking foot isn't just a passive guide; it has its own set of feed dogs on top that work in perfect time with the feed dogs below.
Think of it like your machine suddenly has all-wheel drive. The bottom feed dogs push the material from below while the walking foot actively pulls it from above. This ensures both the top and bottom layers of leather move together as one solid piece, preventing any slipping, bunching, or wonky stitches.
This dual-action grip is the real secret to getting perfectly straight, uniform seams on tricky materials. It takes away the frustration of your project shifting around and gives you total control.
Strength and Stability: A Solid Frame
The incredible force required to sew leather creates a ton of vibration. A machine with a plastic frame is going to shudder and flex under that kind of stress, which can easily throw off the timing and lead to inconsistent stitches or even damage the machine's internal parts. Any machine that's truly ready for leather is built on a full-metal frame.
This heavy-duty construction provides the rock-solid stability needed to handle the motor's torque and the material's resistance. It acts as an unyielding foundation, ensuring every component stays perfectly aligned and operates smoothly, even when you’re punching through multiple layers of thick hide. This internal strength is completely non-negotiable if you want longevity and reliable performance.
Specialized Tools for a Unique Material
Beyond the machine's core build, having the right accessories makes all the difference. Since you can't use pins on leather (they leave permanent holes!), clips become your best friend for holding pieces together. But the real game-changers are the presser feet.
Different feet are designed to solve the unique challenges that leather presents:
- Teflon Foot: This foot has a non-stick coating on the bottom, letting it glide effortlessly over sticky or patent leathers that would otherwise drag.
- Roller Foot: Instead of sliding, this foot uses tiny rollers to move across the leather's surface. This seriously reduces friction and prevents marks on more delicate hides.
Choosing the right foot can make a night-and-day difference in your final product. For a deeper look into all the options, check out our guide on sewing machine feet to see how different choices can elevate your projects. At bsewinn.com, we know that having the right tools unleashes creativity, which is why we offer machines engineered for this kind of power and provide the hands-on training to help you master them.
How to Choose the Right Machine for Your Projects
Finding the perfect sewing machine for leather isn't just about grabbing the most powerful model off the shelf. It’s all about finding the right tool for the job you have in mind. A machine that’s a dream for crafting delicate leather wallets would choke on a thick sofa slipcover, and an industrial upholstery beast would be complete overkill for a few weekend projects.
To avoid buyer's remorse, start by thinking about what you actually want to make. When you define your projects first, you can zero in on the features that truly matter. This approach ensures you get a machine that not only handles your current ambitions but also gives you some room to grow.
The Weekend Hobbyist
Let’s say you’re just dipping your toes in, excited to try making some small, personal items. You can replicate tangible examples like wallets, keychains, or cool journal covers. You’re probably working with thinner garment or craft leathers, maybe stitching through two layers at most. You need a machine that’s got some muscle but isn’t going to be a nightmare to operate.
For this kind of work, a heavy-duty domestic machine is your best bet. These are a solid step up from your average home sewing machine and have a few key things going for them:
- A Stronger Motor: While it’s not an industrial powerhouse, the motor has enough torque to push through light and medium-weight leathers without giving up.
- Metal Frame: That solid internal metal construction is a must. It keeps the machine stable, preventing annoying vibrations and skipped stitches that are common when you push a regular machine too hard.
- Key Adjustments: You can manually tweak things like stitch length and tension, which is absolutely critical for getting those nice, clean seams on leather.
This type of machine gives you the freedom to explore leatherworking without the steep price tag or intimidating learning curve of an industrial setup. It’s the perfect launchpad for building your skills and making some really beautiful small goods.
This chart can help you visualize which features to focus on, whether you're sewing for fun or for a business.
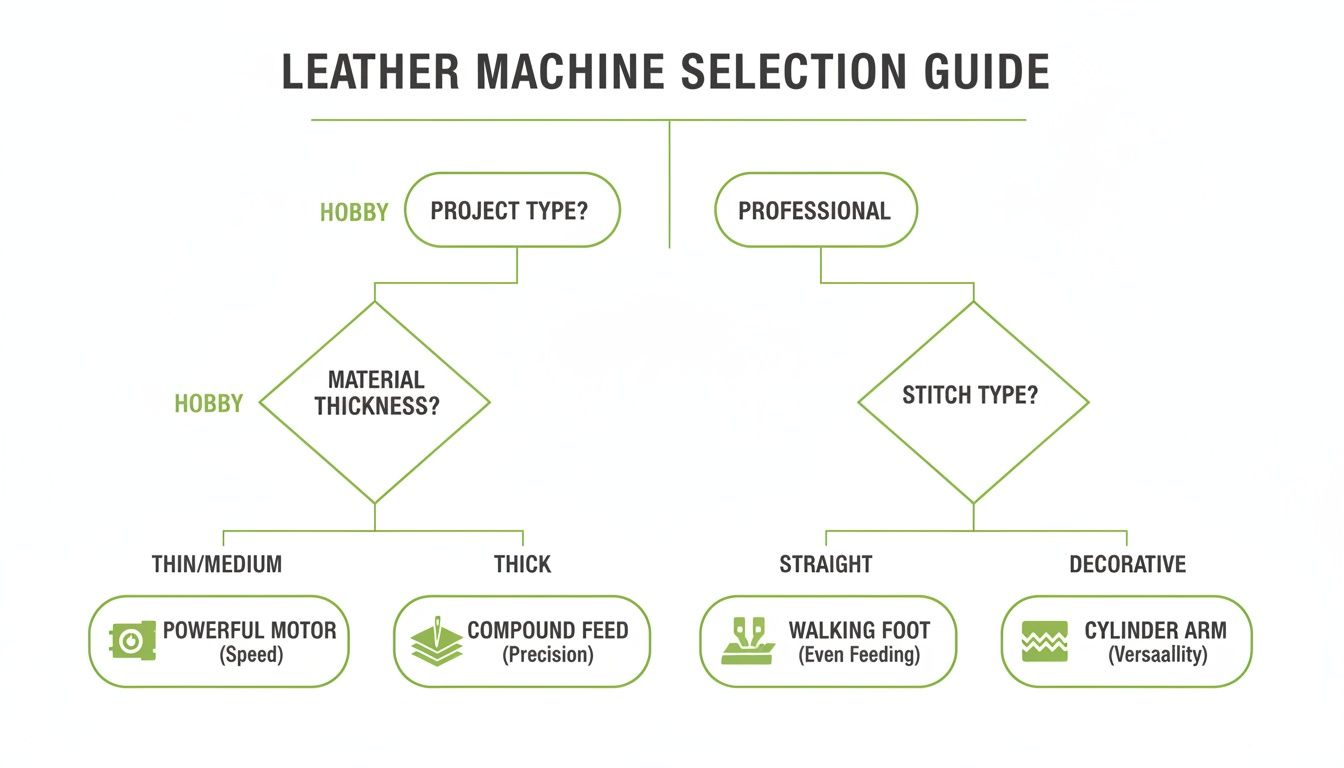
As you can see, a hobbyist might get by focusing on motor power, but once you go pro, a walking foot feed system becomes non-negotiable for consistent, high-quality work.
The Etsy Artisan
Okay, now let's imagine you're running a small but growing business. You’re crafting and selling custom leather bags, sturdy belts, and other detailed accessories. Your name is on the line with every stitch, so they have to be flawless and durable. You’re also working with thicker, pricier leathers.
Your needs have definitely outgrown a basic heavy-duty model. You need a workhorse that delivers consistent, professional results, every single time. This is where a semi-industrial or portable walking foot machine really starts to shine.
A walking foot is the single biggest game-changer for a serious leather crafter. Think of it like all-wheel drive for your sewing machine. It actively grips both the top and bottom layers of leather, pulling them through in perfect sync. This eliminates any shifting or puckering, giving you perfectly even stitches.
These machines are built for the demands of regular production. They’ve got the power to punch through multiple layers of medium- to heavy-weight leather with no trouble, creating the kind of impeccable seams that customers are happy to pay for. For more on picking the right machine for your goals, check out our broader guide on how to choose a sewing machine.
The Professional Upholsterer
Finally, let’s talk about the full-scale professional. This is the crafter who wrestles with the toughest materials out there: thick upholstery hides, heavy marine vinyl, and dense canvas for furniture, boat covers, or custom car interiors. Their projects are huge, demanding, and require a machine with uncompromising power.
For this level of work, there is simply no substitute for a full-scale industrial sewing machine. These are specialized brutes designed to do one thing: plow through the thickest, most difficult materials all day long without even breaking a sweat.
Industrial machines are in a class of their own with features like:
- Compound Walking Foot: This is the ultimate feed system. It combines a walking foot with a needle-feed mechanism, giving it an unbeatable grip on bulky, multi-layered assemblies.
- Servo Motor: Unlike the loud clutch motors of old, a modern servo motor is quiet, energy-efficient, and gives you incredible speed control. This is essential for navigating tight corners and detailed topstitching on massive pieces.
- Integrated Table: These machines aren't just sitting on a desk; they're built directly into a large, heavy-duty table that can support the weight and bulk of a full sofa cushion or boat cover.
Matching Your Sewing Machine to Your Leather Crafting Ambitions
To make things even clearer, here’s a breakdown of how these different machine tiers stack up. This table offers a comparative look to help you select the ideal model based on your project scope, essential features, and budget.
| Crafter Profile | Typical Leather Projects | Must-Have Machine Features | Typical Price Range |
|---|---|---|---|
| The Weekend Hobbyist | Wallets, keychains, small pouches, journal covers (thin to medium leather, 2-4 oz) | Strong motor, all-metal frame, adjustable stitch length and tension | $250 - $600 |
| The Etsy Artisan | Handbags, belts, pet collars, small-batch production (medium to heavy leather, 4-8 oz) | Walking foot (or compound foot), powerful servo motor, high presser foot lift | $800 - $2,500 |
| The Professional Upholsterer | Furniture, automotive interiors, large bags, saddlery (heavy to extra-heavy leather, 8-16 oz+) | Compound walking foot, large work area, built-in table, high-torque servo motor | $2,000 - $5,000+ |
Choosing the right machine is a huge step in your leatherworking journey. By aligning the machine's capabilities with the kinds of projects that excite you, you're not just buying a tool—you're investing in your own creativity and success.
Here at bsewinn.com, we know that every creative path is different. Whether you're making your very first stitch or managing a full-time workshop, we're here to help. We offer expert advice and training to match your ambition, ensuring you have the perfect tool to bring your vision to life.
Dialing In Your Machine for Flawless Leather Stitching
Having the right sewing machine for leather is a huge step, but the real magic happens in the setup. Think of your machine as a high-performance engine; it’s packed with all the power you need, but you have to use the right fuel and give it a proper tune-up to get a flawless result. This guide will walk you through the three pillars of great leather sewing: the needle, the thread, and the machine settings.
Getting these elements right transforms the process from a potential struggle into a smooth, creative flow. With the correct components—all readily available here at bsewinn.com—your machine will be perfectly prepped to create strong, beautiful seams from your very first project.
The Right Needle and Thread Combination
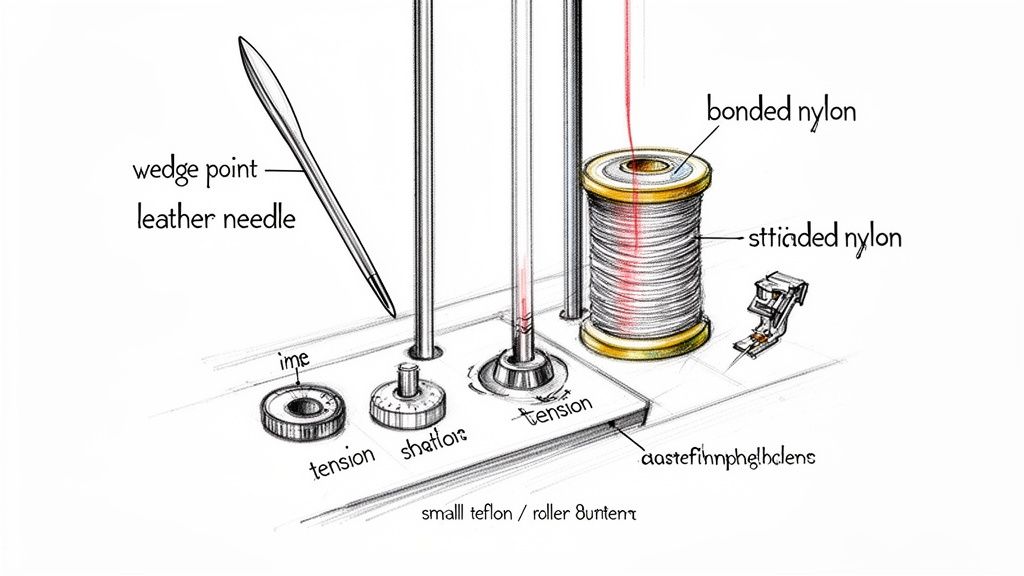
First things first: you absolutely cannot use a standard sewing needle for leather. It just won't work. A regular needle has a rounded point designed to slip between the fibers of woven fabric. Leather isn't woven—it's a solid, dense material. Trying to punch a standard needle through it will create a ragged hole, tear the hide, and almost certainly snap the needle.
Instead, you need a specialized leather needle. These have a sharp, wedge-shaped tip, often called a chisel or cutting point. This design slices cleanly through the leather, making a precise hole for the thread without causing extra stress or damage.
Next up is your thread. Your everyday cotton or polyester thread just doesn't have the muscle to hold leather seams together. It will fray and break under any real stress. For leather, you have to go with a heavy-duty option. The most popular and reliable choices are:
- Bonded Nylon: This stuff is incredibly strong, durable, and resistant to abrasion and moisture. It’s the go-to thread for things like bags, belts, and upholstery.
- Bonded Polyester: Just as strong as nylon, but it has superior UV resistance. This makes it the perfect choice for anything that will see a lot of sun, like outdoor gear or car interiors.
Using the right needle and thread isn't just a suggestion; it’s the foundation of a durable, professional-looking leather project.
Tweaking Your Machine Settings
Once your needle and thread are squared away, it’s time to adjust your machine. Leather behaves very differently from fabric, and your machine needs to be told how to handle it. The two most critical settings are stitch length and tension.
When sewing leather, stitches that are too close together act like a perforation. They create a weak point that can easily tear—just like the edge of a postage stamp. A longer stitch is essential for creating a strong, durable seam.
As a rule of thumb, aim for a stitch length between 3.0 mm and 4.5 mm. This longer stitch provides the strength you need and also gives you that classic, professional look associated with high-quality leather goods.
Adjusting Tension and Presser Foot Pressure
Proper thread tension is key. It ensures the top and bobbin threads lock perfectly between the layers of leather, creating a stitch that looks identical on both sides. If your tension is too tight, you'll see the bobbin thread getting pulled up to the top. Too loose, and you'll see loops of the top thread on the bottom. Always, always run a test stitch on a scrap piece of the same leather to get your tension dialed in just right.
Finally, if your machine has adjustable presser foot pressure, you might need to increase it. More pressure helps clamp the leather firmly against the feed dogs, preventing the material from lifting as the needle pulls back up. This simple adjustment can dramatically reduce the risk of skipped stitches.
This combination—the right needle, strong thread, and carefully adjusted settings—is what unlocks flawless results. Here at bsewinn.com, we're dedicated to empowering you with not just the best machines but also the knowledge and supplies to use them right. Our online classes and extensive resources are here to help you master these setups, making sure every leather project you start is a success.
Essential Techniques for Professional-Looking Results
Alright, your machine is dialed in and ready to go. Now, let’s get down to the hands-on skills that separate a homemade-looking project from a truly professional piece. This is where the real magic happens—mastering a few key techniques is what gives your work that polished, high-end feel.
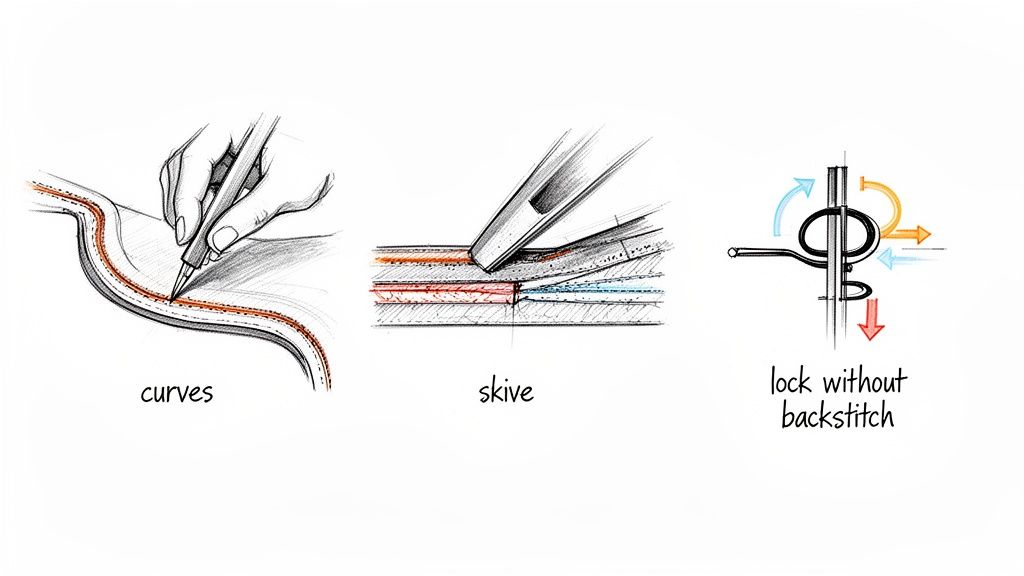
First thing's first: avoid backstitching. On regular fabric, it’s second nature for locking a seam. But on leather, it’s a recipe for disaster. Punching a bunch of extra holes that close together basically creates a "tear here" line. It perforates the material and creates a massive weak spot just waiting to rip.
Securing Your Seams Without Backstitching
So, how do you lock your stitches? We go old school. At the beginning and end of every seam, just leave long thread tails—about four to six inches should do the trick.
Once your seam is done, here’s how to secure it properly:
- Gently tug the top thread. You’ll see a little loop of the bobbin thread pop up.
- Use a seam ripper or an awl to carefully pull that bobbin thread all the way through to the top side.
- Now both tails are on the same side (I usually do this on the back or inside of the project). Tie them off with a tight double knot.
- For bomb-proof security, add a tiny dab of fabric glue or seam sealant right on the knot. Once it's dry, just snip the ends.
This manual method gives you a rock-solid seam without ever compromising the leather's strength.
Mastering Curves and Corners
Sewing smooth curves and crisp corners is all about being slow and deliberate. You can’t just pivot on a dime like you can with cotton. For curves, use both hands to gently guide the leather, making tiny adjustments as you stitch. Think of it like steering a car through a long, sweeping turn—no sudden jerks.
Sharp corners require a bit more precision:
- Sew right up to the corner point, then stop with the needle down in the leather.
- Lift your presser foot.
- Carefully pivot the entire piece of leather 90 degrees.
- Lower the presser foot and keep on sewing.
This little maneuver gives you that perfect, clean corner every single time. It's a foundational skill you'll find yourself using constantly.
Skiving for a Refined Finish
Ever wonder how high-end bags and wallets have such clean, flat edges that seem to melt into each other? The secret is skiving. It's the simple process of thinning out the edges of the leather where you plan to stitch a seam.
By shaving down the material's thickness just along the seam allowance, you eliminate a ton of bulk. This lets your edges lay perfectly flat, creating a much more elegant and professional finish, especially on things like wallet pockets or bag flaps.
You can get a dedicated skiving knife or a more user-friendly safety skiver to do the job. It definitely takes some practice to get the feel for it, but mastering skiving is a total game-changer for the quality of your work.
Here at bsewinn.com, our whole mission is to arm you with these exact skills. From our custom-designed machines to our online classes and extensive resources, we want to give you the support you need to go from basic stitches to beautifully crafted projects you’re proud of. Whether you’re making a simple belt or a complex handbag, we’re here to help you grow. And remember, a good machine isn't just for new creations; it's great for mending, too. For more on that, you might find this guide on repairing scratched leather helpful.
Your Top Leather Sewing Questions Answered
Diving into leatherwork always brings up a ton of questions. I get it—it feels like a whole different world than sewing fabric. To help you feel more confident at the machine, I've pulled together the answers to the questions I hear the most from fellow crafters.
Can I Use My Regular Sewing Machine for Thin Leather?
This is probably the #1 question people ask, and it's tempting, I know. You have some really thin garment leather and a machine you already know and love. But honestly, it's a risky move.
Your standard home machine just wasn't built for that kind of fight. The motor can easily get overworked and burn out trying to punch through leather, even the thin stuff. Plus, the feed dogs—those little teeth that pull fabric through—are designed for quilting cottons and knits. On leather, they’ll leave behind permanent tracks and scratches. It's heartbreaking.
For consistent, professional-looking results (and to avoid a costly repair bill), you really need a heavy-duty machine. At the very least, make sure you're using a proper leather needle and a non-stick or walking foot. It’s the safest bet, even for your lighter projects.
What Is the Single Most Important Feature for Sewing Leather?
A powerful motor is non-negotiable, for sure. But if I had to pick the one feature that makes the biggest difference, it's hands-down the feed system. Getting a machine with a walking foot or a compound feed mechanism is a complete game-changer.
Why? Because it grabs and pulls both the top and bottom layers of your leather through the machine at the exact same time.
This synchronized feeding is the secret sauce. It stops the layers from shifting, stretching, or bunching up, which happens all the time with leather because it can be sticky or just plain thick. It’s how you get those perfectly straight, even stitches that just scream "professional."
A standard feed system just can't give you that level of control. Period.
How Should I Clean My Machine After a Leather Project?
Taking a few minutes for cleanup after a leather project is one of the best habits you can get into. You'd be surprised how much fine dust and tiny fibers leather kicks up. That stuff builds up fast inside your machine and can cause all sorts of headaches later on.
Here’s my post-project routine. It’s simple, but it works:
- Swap the Needle: Leather is tough and dulls needles incredibly fast. I always start a new project with a fresh, sharp leather needle. It makes a world of difference in getting clean stitches.
- Do a Thorough Sweep: Grab a small brush and get all that dust and debris out of the bobbin area and from under the throat plate. Don't skip this!
- Oil If Needed: After a really long or heavy-duty project, it's a good idea to oil your machine. Just check your manual to see where to apply a drop or two. This keeps all the moving parts happy and running smoothly.
Here at bsewinn.com, we believe having the right tools is only half the battle. We're committed to empowering crafters like you with the knowledge to really succeed. That's why we offer extensive resources, online classes, and expert support. Check out our custom sewing machine designs and educational programs to get your leatherworking journey started on the right foot.
Find your perfect machine at https://www.bsewinn.com.

