

Stepping into the world of sewing can feel both exciting and overwhelming. The hum of the machine and the endless fabric possibilities represent a crafter's dream, but knowing exactly where to begin can be a challenge. This guide is designed to be your roadmap, a comprehensive "how-to" for creating a variety of sewing machine designs. We have carefully curated a list of the best sewing projects for beginners, each one a tangible example that you can replicate to build confidence and learn fundamental skills.
At B-Sew Inn, our mission is to empower your creative journey at every stage. We do more than provide custom sewing machine designs; we cultivate your skills through comprehensive online classes, hands-on training, and an extensive library of resources tailored to your needs. Each project detailed in this article serves as a practical stepping stone. We will guide you through the process, demonstrating how the right tools and dedicated support from B-Sew Inn can transform your creative vision into a tangible reality.
This comprehensive listicle will provide everything you need for each project, including:
- Difficulty ratings and time estimates.
- Required supplies and fabric suggestions.
- Recommended B-Sew Inn machines and accessories.
- Clear, step-by-step instructions.
- Troubleshooting tips for common beginner mistakes.
- Skill progressions to guide your next creative endeavor.
Let’s thread that needle, lower the presser foot, and begin your sewing adventure.
1. Simple Tote Bag
The simple tote bag is arguably the quintessential first project for anyone new to sewing. Its construction relies almost entirely on straight lines, making it an excellent way to master fundamental skills without the frustration of complex curves or closures. This project teaches you how to accurately cut fabric, sew a consistent seam allowance, and construct a functional, three-dimensional item from flat fabric pieces.
Because of its straightforward design, the tote bag is one of the best sewing projects for beginners to build confidence and learn the rhythm of their machine. It’s a low-stakes project that yields a high-reward, practical item you can use immediately for groceries, books, or carrying other craft supplies.
Project Breakdown
- Difficulty: Beginner
- Estimated Time: 1-2 hours
- Core Skills: Straight stitching, pivoting at corners, pressing seams, topstitching, basic hemming.
Recommended Supplies & Tools
- Fabric: 1/2 to 1 yard of sturdy, medium-weight woven fabric like canvas, duck cloth, denim, or quilting cotton.
- Thread: All-purpose polyester thread that matches or contrasts with your fabric.
- Sewing Machine: A reliable machine like the Baby Lock Jubilant is perfect for this. Its sturdy construction handles canvas well, and its clear markings help you maintain an accurate seam allowance.
- Essential Notions: Fabric scissors or a rotary cutter and mat, a clear acrylic ruler, pins or sewing clips, and an iron.
Getting Started: Actionable Tips
To ensure your first tote bag is a success, focus on precision from the very beginning.
- Press Everything: Iron your fabric before cutting to remove wrinkles. After sewing each seam, press it open or to one side as your pattern directs. This single step creates crisp, professional-looking results.
- Reinforce Handles: The handles are the highest stress point on a tote. Secure them by sewing a square with an "X" through the middle (a box stitch) where the handle meets the bag body. This distributes the weight and prevents tearing.
- Finish Your Seams: Prevent the raw edges inside your bag from fraying over time. You can use a simple zigzag stitch on your sewing machine or, for a truly clean finish, explore the Baby Lock Vibrant serger. A serger trims and encases the seam allowance in one quick step.
2. Pillowcase with Simple Border
After mastering the tote bag, a pillowcase with a decorative border is the perfect next step. This project builds on the skill of sewing straight lines but introduces the important concept of finishing seams for items that will be laundered frequently. It's an ideal way to learn how to handle larger pieces of fabric and attach a contrasting cuff or border, adding a touch of professional polish to a simple item.
Creating a custom pillowcase is one of the best sewing projects for beginners because it offers immediate gratification and a highly useful end product. You can personalize your bedroom décor, create thoughtful gifts, or make themed pillowcases for holidays, all while honing essential construction techniques.
Project Breakdown
- Difficulty: Beginner
- Estimated Time: 1-2 hours
- Core Skills: Sewing straight seams, attaching a cuff/border, pressing, finishing seams (French seams).
Recommended Supplies & Tools
- Fabric: 3/4 yard of main fabric and 1/4 yard of a coordinating border fabric. Quilting cotton is an excellent choice due to its stability and vast print selection.
- Thread: All-purpose polyester thread to match your fabric.
- Sewing Machine: A machine with a good-sized throat space, like the Baby Lock Ballad, makes managing the fabric bulk easy. Its precise stitching ensures your border attaches beautifully.
- Essential Notions: Fabric scissors or a rotary cutter and mat, a long acrylic ruler for accurate cuts, pins or clips, and a reliable iron.
Getting Started: Actionable Tips
A well-made pillowcase feels wonderful and lasts for years. Focus on these details for a high-quality finish.
- Pre-wash Your Fabric: Always wash, dry, and press your fabric before cutting. This pre-shrinks the cotton, ensuring your finished pillowcase fits perfectly even after repeated laundering.
- Master the French Seam: A French seam encloses the raw edges within the seam itself, creating a durable and tidy finish inside the pillowcase. It sounds fancy, but it’s just two straight seams. This technique is a game-changer for professional-looking garments and home décor.
- Press Seams Directionally: When attaching the border, press the seam allowance toward the darker fabric. This prevents the darker color from showing through the lighter fabric on the right side, resulting in a crisp, clean line.
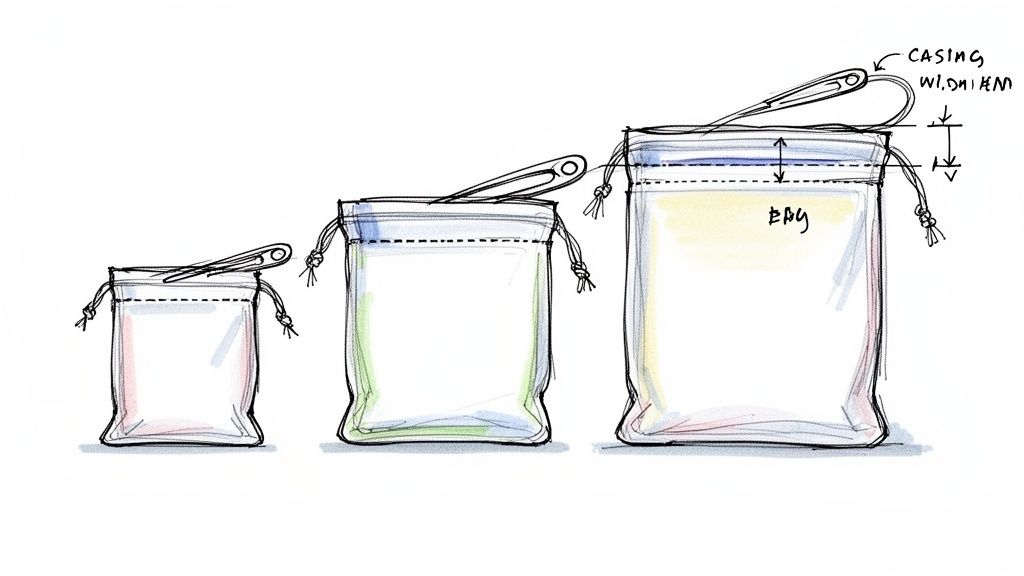
3. Drawstring Bag or Pouch
The drawstring bag is a fantastic project that introduces a new, crucial technique: creating a casing. This simple bag, often made from just two rectangles of fabric, teaches you how to sew a channel for a drawstring, a skill that translates directly to making elastic-waist pants, pajama bottoms, and hooded jackets. It’s a fast, gratifying project with endless uses, from personalized gift bags to handy storage pouches for sewing notions or gym shoes.
This project is one of the best sewing projects for beginners because it builds upon the straight-line sewing of a tote bag while adding the functional element of a closure. The result is a polished and practical item that looks more complex than it is, providing a major confidence boost for any new sewist.
Project Breakdown
- Difficulty: Beginner
- Estimated Time: 1 hour
- Core Skills: Straight stitching, creating a casing, threading cord or ribbon, reinforcing openings.
Recommended Supplies & Tools
- Fabric: 1/4 to 1/2 yard of lightweight to medium-weight woven fabric like quilting cotton, linen, or chambray.
- Drawstring: 1 to 2 yards of cord, ribbon, or twill tape.
- Thread: All-purpose polyester thread to match your fabric.
- Sewing Machine: The Baby Lock Zest is a wonderful choice for this project. Its user-friendly design makes it easy to sew straight seams and pivot cleanly, which is perfect for forming the bag and its casing.
- Essential Notions: Fabric scissors, a ruler, pins, an iron, and a safety pin or bodkin for threading the drawstring.
Getting Started: Actionable Tips
A well-made drawstring bag hinges on a neatly executed casing. Follow these tips for a professional finish.
- Press for Precision: Before you sew the casing, fold the top edge of your fabric down twice and press it firmly with an iron. This creates a sharp, stable crease that is much easier to stitch straight.
- Perfect Casing Width: Cut the fabric for your casing about 1/2 inch wider than the drawstring itself. This ensures the drawstring can slide smoothly without bunching up or getting stuck inside the channel.
- Use a Safety Pin Trick: To easily thread your drawstring, attach a safety pin to one end. Push the safety pin into the casing opening and guide it through to the other side. This is much faster and less frustrating than trying to push the soft end of a cord through.
- Reinforce the Openings: The small openings of the casing are high-stress points. Backstitch at the beginning and end of your stitches on either side of the side seam to add strength and prevent the threads from coming undone with use.
4. Simple Apron (Chef or Craft Apron)
Ready to sew your first wearable item? The simple apron is the perfect entry point into garment construction. It builds on the skills learned from flat projects, like tote bags, but introduces key concepts like fitting, attaching straps, and creating functional pockets without the complexity of sleeves or zippers. This project teaches you how to create an item that is both practical and personal.
Because it is so forgiving with measurements and fit, the apron is one of the best sewing projects for beginners to gain confidence in making things for people to wear. It’s a highly customizable project that results in a durable, useful item for the kitchen, garden, or craft room, making it a fantastic handmade gift.
Project Breakdown
- Difficulty: Beginner
- Estimated Time: 2-3 hours
- Core Skills: Straight stitching, hemming edges, creating and attaching straps, attaching a pocket, topstitching for durability.
Recommended Supplies & Tools
- Fabric: 1 to 1.5 yards of a durable woven fabric like canvas, denim, or heavyweight quilting cotton.
- Thread: All-purpose polyester thread that coordinates with your fabric.
- Sewing Machine: A versatile machine like the Baby Lock Brilliant is ideal. Its wide range of stitches is perfect for both construction and decorative topstitching, and its extension table provides ample support for the large fabric pieces.
- Essential Notions: Fabric scissors, a clear acrylic ruler, pins or sewing clips, an iron, and a fabric marking pen.
Getting Started: Actionable Tips
A well-made apron is all about crisp details and sturdy construction. Here’s how to achieve a professional look.
- Pre-Wash Your Fabric: Always pre-wash and dry your fabric before cutting, especially for items that will be laundered frequently. This prevents shrinking and warping after you’ve put in all the hard work.
- Master the Pocket: Pocket placement is key to both function and appearance. Use your iron to press the pocket hems before attaching it to the apron body. Pin it carefully in place and topstitch close to the edge for a clean, secure finish.
- Personalize with Embroidery: Elevate your apron from handmade to bespoke by adding a name, monogram, or simple design. Many Baby Lock machines have built-in embroidery capabilities, making personalization an easy and rewarding step. Test the neck strap length on the intended wearer before you permanently stitch it down to ensure a comfortable fit.
5. Quilted Placemat
For those intrigued by the beautiful artistry of quilting, a quilted placemat serves as a perfect entry point. This project introduces the fundamental concept of a "quilt sandwich" (top fabric, batting, and backing) on a manageable scale. It allows you to practice straight-line quilting and binding without the commitment of a full-size quilt.
Creating a placemat is one of the best sewing projects for beginners because it demystifies quilting techniques and yields a beautiful, functional item for your home. You can experiment with different fabric combinations for holidays, seasons, or everyday decor, making each placemat a unique piece of practical art.
Project Breakdown
- Difficulty: Beginner
- Estimated Time: 2-3 hours
- Core Skills: Creating a quilt sandwich, straight-line quilting, squaring up, applying binding.
Recommended Supplies & Tools
- Fabric: Two coordinating "fat quarters" (18" x 21" cuts) of 100% quilting cotton for the front and back.
- Batting: A small piece of cotton or cotton-blend batting, slightly larger than your fabric pieces.
- Thread: All-purpose or quilting thread that complements your fabric.
- Sewing Machine: A machine with a walking foot attachment is highly recommended. The Baby Lock Ballad is an excellent choice, as its spacious throat area and included walking foot make maneuvering the quilt sandwich smooth and effortless.
- Essential Notions: Rotary cutter and mat, clear acrylic ruler, pins or quilting clips, and a marking tool (like a hera marker or water-soluble pen).
Getting Started: Actionable Tips
Precision is key in quilting, even for small projects. These tips will help you achieve a polished finish.
- Make Your Sandwich Carefully: Lay your backing fabric wrong side up, followed by the batting, and finally the top fabric right side up. Smooth out all wrinkles and secure the layers with safety pins or clips, starting from the center and working your way out.
- Use a Walking Foot: A walking foot feeds all three layers of your quilt sandwich through the machine at the same rate. This prevents the layers from shifting and puckering, resulting in perfectly flat, even stitches.
- Start Quilting in the Middle: Begin your first line of quilting stitches in the center of the placemat and work outward. This helps push any excess fabric to the edges, preventing bumps from forming in the middle of your project. For more hands-on guidance, B-Sew Inn offers online classes that walk you through quilting fundamentals.
6. Simple Cushion Cover with Zipper
Once you've mastered straight lines, the simple cushion cover with a zipper is the perfect project to elevate your skills. This project introduces one of the most essential techniques in sewing: zipper insertion. Learning to install a zipper opens up a world of possibilities, from clothing to accessories, and this project provides a low-pressure way to learn.
Creating a functional, removable cover builds confidence and teaches crucial lessons in precision and planning. As one of the best sewing projects for beginners looking to move beyond the absolute basics, it delivers a highly professional and practical result you can proudly display in your home.
Project Breakdown
- Difficulty: Advanced Beginner
- Estimated Time: 2-3 hours
- Core Skills: Zipper insertion, straight stitching, precise measuring, using a zipper foot, pivoting corners.
Recommended Supplies & Tools
- Fabric: 1/2 to 1 yard of home décor weight fabric, canvas, denim, or sturdy quilting cotton.
- Zipper: One all-purpose or invisible zipper, at least 2 inches shorter than the width of your cushion panel.
- Thread: All-purpose polyester thread that coordinates with your fabric.
- Sewing Machine: A machine with good speed control, like the Brother Luminaire XP3, is excellent here. Its built-in guide light and precise stitching are invaluable for accurate zipper placement.
- Essential Notions: A zipper foot for your machine (crucial!), fabric scissors or rotary cutter, pins or clips, a ruler, and an iron.
Getting Started: Actionable Tips
A well-installed zipper is the key to a professional-looking cushion cover. Focus on these tips for a smooth process.
- Use a Zipper Foot: This is non-negotiable. A zipper foot allows your needle to stitch right alongside the zipper teeth without the standard presser foot getting in the way, ensuring a close, clean seam.
- Baste First: Before committing to a final stitch, baste the zipper in place. You can use a long machine stitch, pins placed perpendicular to the zipper, or double-sided basting tape to hold it securely. This prevents shifting and puckering.
- Press Carefully: After sewing the zipper, press the seams flat. Use a pressing cloth and a lower heat setting to avoid melting the plastic zipper teeth. For an in-depth guide on installation, review our tutorial on how to sew a zipper.
7. Fabric Scrap Patchwork Quilt or Wall Hanging
Diving into quilting can seem intimidating, but a patchwork project is a fantastic entry point that transforms leftover fabric scraps into a beautiful, functional piece of art. This project introduces the core concepts of quilting: precise cutting, piecing blocks together, and layering. By starting with simple squares, you can focus on mastering an accurate quarter-inch seam allowance, which is the foundation of all quilting.
Creating a small quilt or wall hanging is one of the best sewing projects for beginners because it builds skills incrementally and offers immense creative freedom. The satisfaction of seeing disparate pieces of fabric come together into a cohesive, charming design is incredibly motivating and teaches valuable lessons in color theory and composition.
Project Breakdown
- Difficulty: Beginner
- Estimated Time: 4-6 hours (for a small project)
- Core Skills: Accurate cutting, piecing with a consistent seam allowance, pressing seams, basic quilting (stitching through layers), and binding.
Recommended Supplies & Tools
- Fabric: An assortment of cotton fabric scraps or pre-cut "charm packs" (5" squares), plus larger pieces for backing and binding. You will also need cotton batting.
- Thread: High-quality 50-weight cotton thread for piecing and a matching thread for quilting.
- Sewing Machine: A machine with a good quarter-inch foot and a wide throat space, like the Baby Lock Ballad, makes piecing and quilting much easier. Its smooth feeding system ensures your fabric layers don't shift.
- Essential Notions: A rotary cutter, self-healing mat, and a long acrylic quilting ruler are non-negotiable for accuracy. You'll also need pins or quilting clips, an iron, and a walking foot for your machine.
Getting Started: Actionable Tips
A successful first quilting project is all about precision and preparation.
- Start with Pre-Cuts: Eliminate cutting anxiety by using pre-cut fabric squares, often called charm packs. This allows you to jump straight into arranging your design and sewing, ensuring all your pieces are perfectly uniform.
- Press Seams Thoughtfully: How you press your seams matters. Pressing seams to one side (usually toward the darker fabric) helps them "nest" together, making it easier to align your block intersections perfectly for sharp points.
- Plan Your Layout: Before you sew a single stitch, arrange your fabric squares on a flat surface or a design wall. Take a picture with your phone to reference as you piece the blocks together. This step helps you visualize the final product and avoid mistakes. For more advanced finishing techniques, consider taking an online class with B-Sew Inn.
8. Embroidered Tea Towel or Kitchen Cloth
An embroidered tea towel is a fantastic project that bridges the gap between basic sewing and the beautiful world of decorative machine embroidery. This project allows you to take a simple, functional item and transform it into a personalized piece of art. Whether you sew the towel from scratch or embellish a pre-made one, you’ll learn how to handle an embroidery machine, use stabilizers, and precisely place designs.
This project is one of the best sewing projects for beginners because it offers a small canvas for creativity without a large commitment of time or fabric. You can experiment with monograms, seasonal motifs, or even intricate patterns, resulting in a beautiful and practical item that makes a perfect handmade gift or a custom accent for your own kitchen.
Project Breakdown
- Difficulty: Beginner (with an embroidery machine)
- Estimated Time: 1-2 hours
- Core Skills: Operating an embroidery machine, using stabilizer, hooping fabric, centering a design, finishing and pressing embroidered items.
Recommended Supplies & Tools
- Fabric: 1/2 yard of linen, cotton, or a pre-made blank tea towel.
- Thread: High-quality embroidery thread in various colors and a bobbin wound with embroidery bobbin thread.
- Sewing & Embroidery Machine: A combination machine like the Baby Lock Verve is ideal. It offers robust sewing stitches for constructing the towel and a user-friendly embroidery unit for adding beautiful designs.
- Essential Notions: Embroidery hoop (sized for your design), stabilizer (tear-away or cut-away), fabric scissors, small embroidery snips, a clear acrylic ruler, and an iron.
Getting Started: Actionable Tips
A successful embroidery project depends on a stable foundation and careful preparation.
- Stabilizer is Key: The stabilizer is a non-negotiable backing that prevents the fabric from puckering or stretching during the dense stitching of embroidery. For a cotton tea towel, a medium-weight tear-away stabilizer is an excellent choice.
- Perfect Your Placement: Don't guess where your design will go. Fold your towel in half lengthwise and press a crease to find the vertical center. Measure up from the bottom hem to your desired height and mark the horizontal center with a fabric pen. This cross-hair ensures your design is perfectly aligned.
- Run a Test Stitch: Before embroidering your final project, always stitch out the design on a scrap piece of similar fabric with the same stabilizer. This allows you to check thread tensions, colors, and overall appearance, preventing any costly mistakes on your finished towel. B-Sew Inn offers extensive resources and training to help you master your embroidery machine.
8 Beginner Sewing Projects: Side-by-Side Comparison
| Project | Complexity 🔄 | Resources & Tools ⚡ | Expected Outcomes 📊 | Ideal Use Cases 💡 | Key Advantages ⭐ |
|---|---|---|---|---|---|
| Simple Tote Bag | Very low — straight seams, beginner-friendly | Minimal fabric, basic sewing machine, handles; quick (1–3 hrs) | Usable tote; solid foundation in seams and construction | Beginner practice, sustainable shopping bags, simple gifts | Low cost, forgiving, fast to finish |
| Pillowcase with Simple Border | Low–Moderate — straight seams + precise border application | Fabric + trim/lace, pressing tools, basic machine; modest time | Decorative pillowcase; teaches pressing and finishing | Home décor, gift sets, learning seam finishes | High visual impact from simple techniques |
| Drawstring Bag or Pouch | Low — casing creation and measurement precision | Minimal fabric, cord/elastic, bodkin/safety pin; very quick | Functional pouches; teaches casing/channel technique | Gift bags, organizers, batch sewing for markets | Highly customizable, low waste, quick to produce |
| Simple Apron (Chef or Craft) | Low–Moderate — strap attachment, optional pockets | Medium fabric, interfacing, straps, basic notions; moderate time | Wearable apron; introduces basic garment construction | Cooking/craft use, personalized gifts, promotions | Wearable, adjustable, many customization options |
| Quilted Placemat | Moderate — three-layer assembly, quilting, binding | Fabric, batting, walking foot, rotary cutter; moderate time | Durable decorative placemat; core quilting skills learned | Quilting practice, seasonal/home décor gifts | Teaches quilting/binding fundamentals; strong visual payoff |
| Simple Cushion Cover with Zipper | Moderate — precise zipper insertion required | Fabric, zipper, zipper foot, measuring tools; moderate time | Professional removable cushion cover; zipper skill gained | Home décor upgrades, practicing zipper application | Teaches essential zipper technique; professional finish |
| Fabric Scrap Patchwork Quilt / Wall Hanging | Moderate–High — planning, many seams and pressing | Scraps or yardage, batting, rotary tools, walking/long-arm; time-intensive | Patchwork quilt or hanging; advanced piecing and design skills | Scrap use, heirlooms, large-scale quilting practice | Economical, sustainable, highly customizable and meaningful |
| Embroidered Tea Towel or Kitchen Cloth | Low–Moderate — hand or machine embroidery skills | Towel base, stabilizer, embroidery thread; machine optional | Personalized kitchen textile; embroidery technique practice | Personalized gifts, branding, introducing embroidery | High perceived value for low cost; excellent personalization |
Your Next Stitch: How B-Sew Inn Empowers Your Craft
You’ve done it. By exploring and completing some of the projects detailed in this guide, from a simple tote bag to an elegant embroidered tea towel, you have officially moved beyond theory and into practice. You have taken fabric, thread, and an idea, and transformed them into something tangible and useful. This is the magic of sewing, and the journey you've just begun is filled with endless creative possibilities. Each stitch you've sewn has been more than just a mechanical action; it's a building block of skill, confidence, and creative expression.
Reflecting on the projects covered, a clear pattern emerges. You started with mastering straight lines on a tote bag and pillowcase, then moved to creating channels for a drawstring bag. You tackled gentle curves with the simple apron, explored layering with quilted placemats, and conquered the often-intimidating zipper on a cushion cover. The patchwork and embroidery projects introduced you to precision piecing and decorative artistry. Each of these represents a core competency in sewing that will serve you in every future endeavor. These foundational skills are not just about making specific items; they are about understanding how fabric behaves, how a sewing machine works in harmony with your hands, and how to troubleshoot the inevitable hiccups along the way.
From Beginner Projects to a Lifelong Passion
The transition from following a tutorial step-by-step to envisioning and executing your own designs is where the true excitement begins. The best sewing projects for beginners are not an endpoint but a launchpad. Mastering these allows you to develop the muscle memory and technical understanding needed for more complex garments, intricate quilts, and sophisticated home decor. The confidence gained from successfully inserting a zipper or finishing a seam neatly is the fuel that will propel you to attempt a tailored shirt or a custom-fit dress.
Think about how you can now build upon these skills:
- Customization: The simple tote bag can become a fully lined, pocketed beach bag. The apron can be customized with ruffles or specialized pockets. As you progress, you might even consider how to personalize your sewn items further; these tips for beginners on fabric transfers can help you explore decorating finished pieces with unique graphics.
- Fabric Knowledge: You've likely worked with stable cottons so far. Your next challenge could be experimenting with different fabric types like linen, flannel, or even a stable knit. Each one will teach you something new about tension, needle choice, and handling.
- Advanced Techniques: The patchwork project introduced you to precision. Now, you can explore more intricate quilt blocks. The embroidery project was a taste of decorative stitching; imagine creating detailed designs with an embroidery machine.
Your Partner in Creativity
This journey of growth is precisely why B-Sew Inn exists. We understand that creativity flourishes when it is supported by the right tools and, more importantly, the right knowledge. A great sewing machine is an incredible asset, but it’s the skill to use it that unlocks its true potential. Our extensive selection of Baby Lock sewing, quilting, and embroidery machines is curated to grow with you, from reliable beginner models to advanced, feature-rich equipment that can handle any project you can dream of.
Beyond the hardware, our commitment is to your education and empowerment. We've seen thousands of crafters blossom through our B-Creative membership, online classes, and expert-led training events. These resources are designed to demystify complex techniques and provide the hands-on guidance needed to build real-world skills. Whether you're learning to insert your first zipper or mastering edge-to-edge quilting, our community and educators are here to support you. You have already taken the most important step by starting. Now, continue to feed your curiosity, celebrate your progress, and never stop learning. Your next stitch is waiting.
Ready to take your sewing skills to the next level with the right tools and support? Explore the full range of sewing machines, classes, and resources at B-Sew Inn and discover how we can help you turn your creative vision into reality. Visit us online at B-Sew Inn to find the perfect partner for your crafting journey.

