

Squaring up your quilt blocks is a simple, two-step trim. You’ll press the block flat, line up a square quilting ruler with an important seam or diagonal line, and then use a rotary cutter to trim off the excess on two sides. Then, just give the block a 180-degree turn, align the ruler with those nice new edges, and trim the last two sides. That’s it—a perfect square. At bsewinn.com, we empower crafters with custom sewing machine designs and extensive resources to master foundational techniques like this.
Why Squaring Up Is the Secret to Professional Quilts
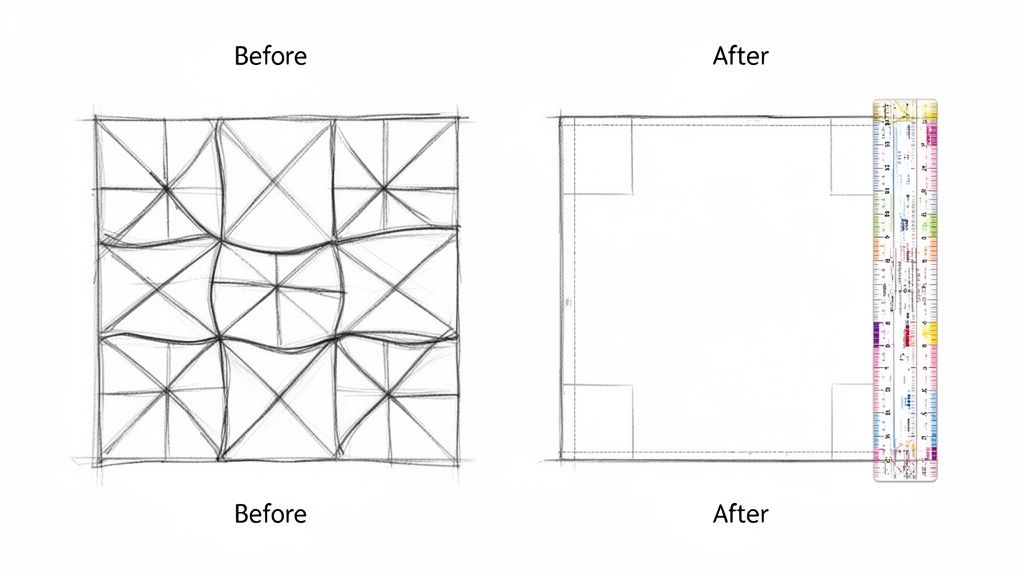
Have you ever pieced a beautiful quilt top, only to step back and see wavy borders, points that don't quite meet, or a frustrating little bulge right in the middle? I’ve been there. More often than not, the real culprit is tiny little inaccuracies in the quilt blocks themselves, adding up across the whole project.
Squaring up is probably the single most important step separating a project that looks "homemade" from one that has a truly heirloom quality. It’s not just some tedious extra step; it's the secret sauce that makes every other part of the quilting process easier and way more fun. When every block is precisely the same size, your seams will practically line up on their own, your points will meet with a satisfying crispness, and the whole quilt top will lie beautifully flat. This guide provides a tangible, replicable example of this crucial process.
The Foundation of a Flawless Finish
I like to think of squaring up as creating a perfect set of building blocks. If your foundational pieces are wobbly or uneven, the whole structure is going to be unstable. In quilting, that instability shows up as puckers, unwanted stretching, and a whole lot of frustration during assembly. Taking just a few moments to square up each block pays off big time.
- Perfectly Matched Seams: Uniform blocks mean that when you go to join them, seams and points line up without any pushing, pulling, or fudging.
- A Beautifully Flat Quilt Top: This step gets rid of the subtle distortions that cause a finished quilt top to ripple or wave. It makes the final quilting process a dream.
- Stress-Free Assembly: You'll spend less time fighting with your fabric and more time enjoying the creative flow of watching your quilt come together.
This technique has been a game-changer for quilters ever since they started piecing blocks back in the mid-19th century. Today, with 9-11 million quilters in North America alone fueling a massive $4.2 billion market, precision is a bigger deal than ever. Some data even suggests that working with squared blocks can trim your total quilting time by 15-25% because everything feeds so much more smoothly through your machine. You can dive deeper into the amazing craft traditions behind this by exploring the history of quilting.
At B-Sew Inn, we truly believe that mastering foundational skills like squaring up is what empowers crafters to the next level. It’s not about chasing perfection; it's about building the confidence to create quilts you are incredibly proud to show off.
With our custom sewing machine designs, deep library of resources, and supportive online classes, we’re here to help you elevate your entire quilting practice. By learning how to square up your quilt blocks the right way, you make the whole creative process more rewarding and turn your final project into a true work of art.
Before you even think about making that first cut, let's talk about gear. Having the right tools on hand is truly the difference between a frustrating afternoon and a stack of flawless quilt blocks. I always say it’s like trying to cook a gourmet meal with dull knives—you can do it, but it’s not going to be fun. The same goes for squaring up your blocks.
Let’s walk through the tools that will quickly become your best friends in this process.
The Non-Negotiable Trio
There are three tools I simply won't quilt without when it comes to trimming. If you invest in quality versions of these, I promise they'll pay you back with perfectly pieced quilts for years to come.
- A Sharp Rotary Cutter: The most important word here is sharp. A dull blade is your enemy—it will snag your fabric, create raggedy edges, and can even stretch your block out of shape. A 45mm rotary cutter is a fantastic workhorse for most projects, but a 60mm one can really power through thicker seams. A fresh blade is non-negotiable for a clean, single-pass cut. If you want a refresher, we have a complete guide on how to use a rotary cutter safely.
- A Self-Healing Cutting Mat: This is the foundation of your cutting station. A good self-healing mat protects your table, sure, but it also saves your rotary blade from dulling too quickly. More importantly, those grid lines are your secret weapon for aligning everything perfectly. I recommend finding a mat with clear, easy-to-read markings, including 1/8-inch increments and those all-important diagonal lines.
- Square Quilting Rulers: You'll want a couple of different sizes in your collection. A 6.5-inch and a 12.5-inch square ruler will cover a massive range of common block sizes. The real magic of a square ruler is its diagonal line. It's an absolute game-changer for lining up half-square triangles and other units cut on the bias. The clear markings let you see your seam intersections right underneath, making sure your trim is perfectly centered every single time.
To make it even easier, here's a quick checklist of the essentials.
Your Squaring Up Toolkit Checklist
This is your quick-reference guide to the tools that will set you up for success. I’ve included a few notes on why each one is so crucial for getting those perfectly squared blocks we're all aiming for.
| Tool | Recommended Size/Type | Why It's Essential |
|---|---|---|
| Rotary Cutter | 45mm for all-purpose, 60mm for thick layers | A sharp blade prevents fabric snagging and ensures a clean, precise cut in one pass. |
| Self-Healing Mat | At least 18" x 24" with clear grid lines | Protects your work surface and provides essential alignment guides, including crucial diagonal lines. |
| Square Rulers | 6.5" and 12.5" are great starters | The diagonal line is invaluable for aligning HSTs and other biased units accurately. Clear markings help you see seam points. |
| Specialty Ruler | Slotted or Fons & Porter-style HST rulers | Drastically speeds up trimming repetitive units by locking onto the seam line, making it almost foolproof. |
Getting these basics right is the first step. Once you have them, you can feel confident tackling any block.
Precision isn't about being perfect; it's about having tools that do the heavy lifting for you. When your ruler has clear markings and your cutter is sharp, you can focus on the creative process instead of worrying about wobbly cuts.
Specialty Rulers for Common Blocks
While your basic square rulers are the MVPs, some specialty rulers are designed to make trimming notoriously tricky units much, much easier.
Take half-square triangles, for example. A slotted trimming ruler can be a total game-changer here. These rulers are designed to literally lock onto your diagonal seam, making it nearly impossible to trim incorrectly. They often come in various sizes and can shave so much time off the process when you're making dozens of identical units for something like a big star quilt or a chevron design. It's tools like these that really build your confidence and make quilting more joy than chore. At bsewinn.com, we believe the right tools and custom sewing machine designs are key to empowering crafters to create stunning projects.
The Core Technique for Squaring Up Any Quilt Block
Alright, with your tools laid out, let's get into the nitty-gritty of squaring up a block. This is the fundamental process that, once you get the hang of it, will become pure muscle memory. For our walkthrough, I'm using a classic nine-patch block, but honestly, the principles apply to just about any block you can dream up. Mastering this is a huge step, and it's one of those things where you can really acquire practical skills that pay off in every single quilt you make down the road.
First thing's first: before a ruler ever touches your fabric, you have to give it a good press. Your block needs to be as flat and relaxed as possible, with no annoying puckers or waves. When you press, use an up-and-down motion with your iron. If you slide it back and forth, you risk stretching out the delicate bias edges in your block and distorting the whole thing.
A flat block is a happy block. It means your ruler sits flush and your measurements will be spot-on.
Aligning for the Perfect First Cut
Lay your beautifully pressed nine-patch on the cutting mat and grab your square ruler. The real magic of a good quilting ruler is in all those lines and markings—they are your best friends for getting a perfectly square trim.
Your goal here is to use the seams inside the block as your guide, not the wobbly raw edges. The raw edges lie, but the seams tell the truth! Look for a key horizontal and vertical seam intersection within your block. Line up the corresponding grid lines on your ruler with those seams. For a block with a strong diagonal, you'd use the ruler's diagonal line instead.
Make sure you have a little extra fabric peeking out from under the top and right sides of the ruler. That's the excess we're about to trim off.
Executing the Two-Cut-and-Rotate Method
This two-cut approach is the gold standard for a reason—it’s fast, simple, and incredibly accurate. Once your ruler is perfectly aligned with your internal seams, it's time for the first two cuts.
- Hold it steady: Plant your non-dominant hand firmly in the center of the ruler. Spread your fingers out to apply even pressure. This is crucial for preventing the dreaded ruler slip, which is the number one cause of wonky cuts.
- Make the cuts: Holding your rotary cutter straight up and down, trim along the top edge of the ruler, then the right edge. Use a smooth, confident motion, always cutting away from your body. Just like that, you have two perfect, 90-degree sides.
Now for the rotate. Carefully turn the entire block 180 degrees. The two sides you just trimmed should now be at the bottom and to the left.
Pro Tip: Don't get sloppy with the rotation! A rushed turn can completely undo your careful alignment work. If you need to, pick up the block and mat together to turn them, or just carefully spin the block on the mat.
With your block rotated, you're ready for the final two cuts. This time, your reference points are the clean, straight edges you just made. Line up the ruler's measurement lines (for example, the 6.5-inch marks if you're trimming to a 6.5-inch square) with the bottom and left edges of your block.
This simple diagram shows how the three main tools work together.
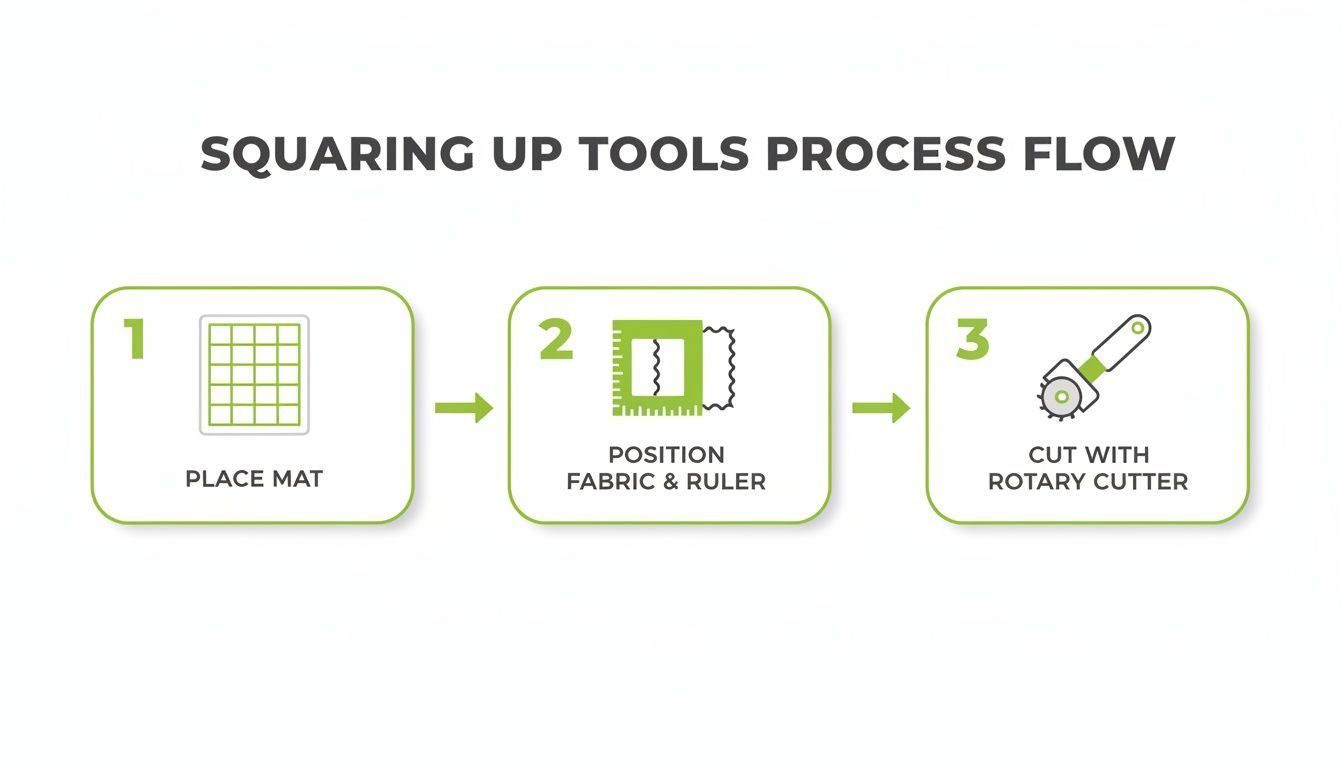
From the mat providing a base, to the ruler for alignment, to the cutter for the final action—it’s a simple but effective system. Go ahead and trim the last two sides. Voilà! One perfectly squared quilt block.
This obsession with precision isn't just a modern thing. As fabrics became more available and affordable through economic booms, quilters developed techniques to turn every last uneven scrap into a masterpiece, especially once sewing machines hit the scene. In today's global quilt market, which is valued at $5.32 billion, a whopping 85% of professional quilters square up every single block. They know it can reduce distortion in the final quilt top by up to 50%.
Here at B-Sew Inn, we know that building confidence comes from mastering these foundational techniques one at a time. That's why we create everything—from our custom sewing machine designs to our online classes—to support you on your quilting journey. If you're ready to dig even deeper, check out our guide on how to use quilting rulers for perfectly straight cuts to really hone your skills.
Advanced Squaring for Tricky Quilt Blocks
Once you've gotten the hang of the two-cut-and-rotate method on a simple block, you'll quickly realize that not all blocks play by the same rules. Some of the most common and beautiful units, like the half-square triangle (HST) or the elegant Flying Geese, have their own little quirks. Learning how to handle these is what opens the door to more complex and impressive quilt designs.
These units are almost always pieced a little oversized on purpose. That means trimming isn't just a suggestion—it's a non-negotiable step for getting everything to line up perfectly. Let's walk through the best ways to tackle these trickier (but totally doable!) blocks.
Taming the Half-Square Triangle
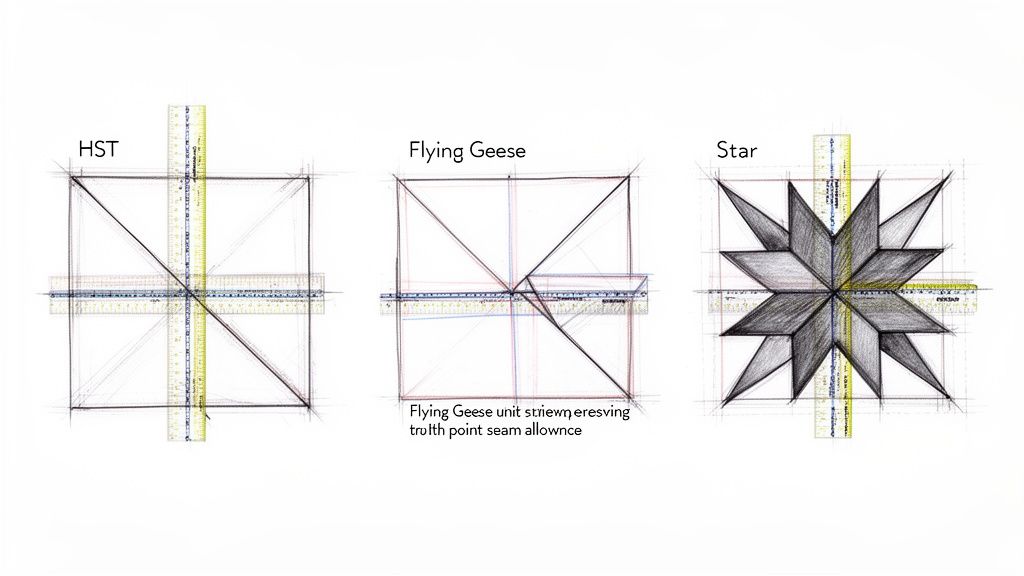
Ah, the half-square triangle. It's a quilter's workhorse, but that diagonal seam is cut on the bias, making it notoriously stretchy and easy to distort. When you square up an HST, you're not just getting it to the right size; you're stabilizing that delicate edge and making sure the diagonal seam runs perfectly from one corner to the other.
Your standard square ruler is your best friend here. Lay it over your HST and line up the ruler’s 45-degree diagonal line right on top of your seam. You'll need to slide the ruler around a bit until your block fits within your target measurement (say, 3.5 inches), then just use the familiar two-cut-and-rotate method. The most important part is keeping that diagonal line locked onto your seam.
If you're making a quilt with what feels like a million HSTs, a specialty ruler is a true game-changer. Tools like the Quilt in a Day Square Up Ruler or a Bloc-Loc ruler are designed to grip the seam, which makes precise alignment practically automatic and speeds things up immensely.
Perfecting Your Flying Geese Points
The biggest heartbreak with Flying Geese is accidentally trimming off the tiny point where the two "sky" triangles meet the "goose." To get that crisp, perfect point, you have to leave exactly a 1/4-inch seam allowance beyond that intersection. If you slice it off, the point will completely vanish into the seam when you sew the unit to another piece. A quilter's tragedy!
Here's how to square up Flying Geese units the right way:
- Find your point: First, locate that little intersection where all three triangles meet.
- Measure from the point: Use your ruler to make sure there is a clean quarter-inch of fabric between that point and the top edge you're about to cut.
- Check the base: Make sure the base of the main "goose" triangle is perfectly parallel with the bottom markings on your ruler.
- Trim with confidence: Trim the sides and the top, but always, always double-check that crucial quarter-inch measurement first.
Paying attention to this tiny detail makes a world of difference in your finished quilt. It’s the secret to those sharp, professional-looking points we all strive for. Our online classes provide in-depth training on details like this to help you create with confidence.
Squaring Up Complex Star Blocks
Star blocks are a whole different ballgame. They often combine various units like HSTs and squares, which means you have multiple seam intersections that all need to line up beautifully. When squaring up a complex star block, your focus isn't just on a single diagonal line, but on all the different points where seams come together.
The points of the star are your main guides. You need to check that each point has a 1/4-inch seam allowance extending out to the block's raw edge. If you trim one point just a little too short, you’ll lose it in the seam allowance later.
I also like to use the block's internal seams as a grid. Line up the horizontal and vertical lines on your ruler with the seams forming the center square or connecting the star points. This helps confirm the entire block is truly square, not just the right size. Taking your time here will save you from the frustration of discovering blunted points in your finished quilt top.
Troubleshooting Common Squaring Up Problems
Even when you do everything right, some quilting days just don't go according to plan. We've all been there. Instead of getting frustrated, think of these moments as learning opportunities that sharpen your skills for the long run. Let's walk through some of the most common squaring up headaches and figure out how to fix them.
My Blocks Are Too Small After Trimming
This is probably the most frequent issue quilters run into, and thankfully, it's usually preventable. The number one culprit is a seam allowance that's just a little too generous or starting with fabric pieces that were cut a hair too small. It's always a good idea to piece your blocks slightly oversized—this gives you a built-in "fudge factor" for trimming down to the perfect size.
Your iron can also be a secret saboteur. If you're using a sweeping, back-and-forth motion, you can easily stretch the fabric out of shape, which throws off the final dimensions. Always press gently, lifting the iron up and down. For a deeper dive, check out our guide on how to press seams for crisp, perfect results.
At B-Sew Inn, we know that becoming a confident quilter is a journey. Our online classes and resources are here to help you turn those "oops" moments into skills you'll use for a lifetime.
My Ruler Keeps Slipping Mid-Cut
A wobbly ruler is more than just annoying; it can be downright dangerous. The best way to keep it steady is to apply firm, even pressure with your non-cutting hand. Spread your fingers wide across the center of the ruler, rather than just holding down the edges.
If you need a little extra help, you can find small, adhesive non-slip grips to stick on the back of your rulers. They add just enough friction to lock the ruler onto the fabric, giving you much better stability and control for a clean, safe cut.
I Accidentally Trimmed Off My Points
Oh, that sinking feeling when you realize you've lopped off the perfect point of a star or a Flying Geese unit. It’s a quilter’s rite of passage, really. This usually happens when the block isn't lined up just right, leaving you with less than a 1/4-inch seam allowance past the point.
The best fix is prevention. Before you make that final cut on any block with points, pause and double-check. Make sure you can see a full quarter-inch of fabric between where your seams intersect and the edge of your ruler. If a mistake does happen, you can sometimes perform a little "quilt surgery" with a tiny scrap of matching fabric to piece a new point on. But honestly, the best solution is to take a deep breath, learn from it, and be extra careful on the next one.
Your Squaring Up Questions, Answered
Even after years of quilting, a few questions about squaring up seem to pop up again and again. Let's tackle some of the most common ones I hear, so you can trim your blocks with total confidence.
Do I Really Need to Square Up Every Single Block?
I get it. It feels like a tedious, time-consuming step, especially when you have a mountain of blocks for a king-sized quilt. The temptation to just start sewing them together is real!
But trust me on this: yes, you absolutely should. Skipping this step is the number one culprit behind wavy borders, points that refuse to match up, and a quilt top that just won't lay flat. Even a seemingly tiny 1/8-inch difference can snowball across an entire quilt, leading to major headaches during assembly. Think of it as the foundation of your quilt—get it right, and everything else will fall into place so much more easily.
What's the Best Way to Press My Seams Before Trimming?
How you press can make or break your block's accuracy. A beautifully flat block is a dream to square up, and your pressing technique is key to getting there.
- Pressing to the Side: This is the classic method for a reason. Pressing your seam allowances toward the darker fabric is a great way to prevent the darker color from peeking through on the front. It works perfectly for most standard blocks.
- Pressing Seams Open: When you're dealing with a block that has a ton of seams coming together in one spot (like an eight-point star), pressing those seams open is a game-changer. It distributes the fabric layers and dramatically reduces bulk, helping your block lie perfectly flat for trimming.
Here's a golden rule I learned the hard way: Always 'press' your seams, don't 'iron' them. Use a simple up-and-down motion with your iron. Sliding it back and forth is a surefire way to stretch the fabric, especially along a bias edge, and distort your block before you even get your ruler out.
Can I Square Up Blocks That Have Appliqué on Them?
Of course! You just need to be a little more careful to protect all your hard work. The process is pretty much the same, but you'll use the background fabric's seams or a pre-marked center point to align your ruler.
The main trick is to not let the weight of your ruler rest on the raised appliqué pieces. This can tilt the ruler just enough to give you a wonky, inaccurate cut. Go gently! A fresh, sharp rotary blade is also your best friend here—it will slice cleanly through all the layers without dragging the fabric or messing with your delicate appliqué stitches.
At B-Sew Inn, we know that building a strong foundation of skills is what lets your creativity truly shine. We’ve curated a huge selection of machines, accessories, online classes, and other resources to cheer you on at every step of your quilting adventure. Come see what we have to offer and find exactly what you need to create with joy and confidence at https://www.bsewinn.com.

