

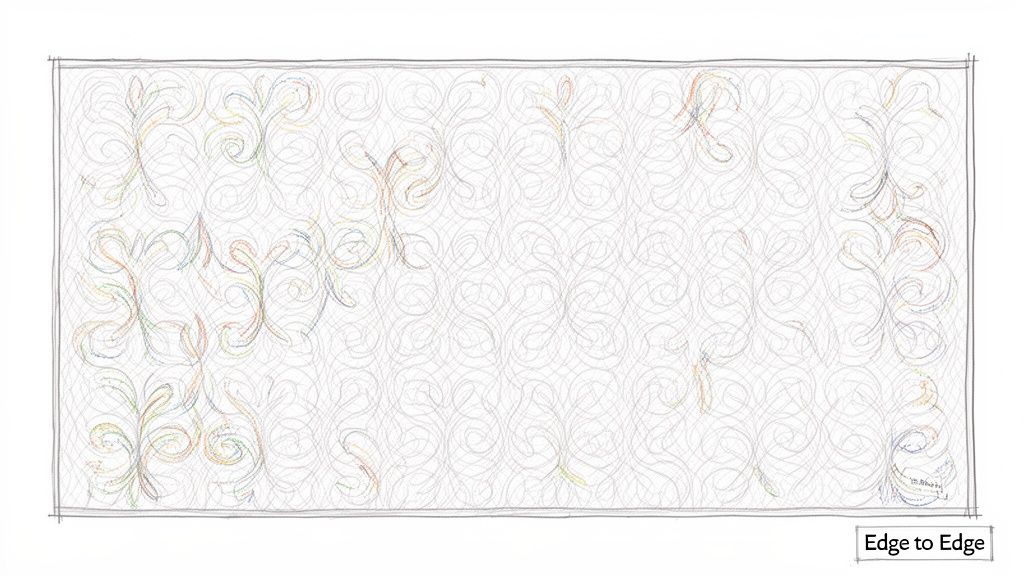
Ever dreamed of giving your entire quilt top a single, gorgeous texture that flows from one edge to the other? That's the magic behind edge-to-edge (E2E) quilting. It’s a fantastic method where one continuous design is stitched across the whole quilt, creating a cohesive and polished finish that’s a favorite for quilters of all skill levels.
Getting to Know Edge-To-Edge Quilting Patterns
Think of edge-to-edge quilting like using a patterned paint roller on a wall. Instead of getting bogged down quilting every single block with a unique design, you use one repeating pattern that covers the entire surface. This approach is a game-changer; it unifies the quilt top, adding beautiful texture and movement that complements your piecing instead of competing with it.
This guide will walk you through everything you need to know about this popular technique. At bsewinn.com, we're committed to empowering crafters through our custom sewing machine designs, and we'll show you how to replicate these results yourself. With the support of our online classes, training, and extensive resources, you can turn your beautiful tops into stunning finished quilts.
Why Crafters Love This Technique
The real appeal of E2E quilting is its perfect blend of efficiency and aesthetic consistency. You can finish projects so much faster compared to custom quilting, which means more quilts get done! The end result is always a beautifully textured quilt that looks professional and feels incredibly inviting.
Here’s why it’s so popular:
- Speed and Efficiency: It’s just plain faster. You can finish quilts in a fraction of the time it takes for custom block-by-block work.
- Cohesive Look: A single, flowing pattern creates a unified texture that ties the whole quilt together.
- Professional Finish: The continuous design gives your quilts that polished, high-quality appearance everyone loves.
- Versatility: It looks incredible on a huge variety of quilt styles, from the most traditional to super modern designs.
The Evolution of All-Over Quilting
This style, often called "all-over" quilting, really took off with the rise of longarm quilting machines in the late 20th century. Suddenly, machines could stitch continuous patterns at speeds of 500–1,200 stitches per minute, completely changing the game for hobbyists and small quilting businesses. What used to take hundreds of hours by hand could now be accomplished in a single afternoon. You can learn more about quilting history over at Britannica.com.
At B-Sew Inn, we're all about empowering you with the best tools and knowledge. Our huge library of resources, online classes, and hands-on training are designed to help you confidently master techniques like edge-to-edge quilting, turning your creative vision into something you can actually hold.
This leap in technology also standardized the look of quilts through digitized templates and pantographs, allowing quilters to achieve consistent, high-quality results every single time. Today, you'll find amazing bundled solutions that include a machine, software, and pattern collections, letting home sewists bring a professional workflow right into their own sewing rooms.
Choosing Between Digital and Paper Patterns
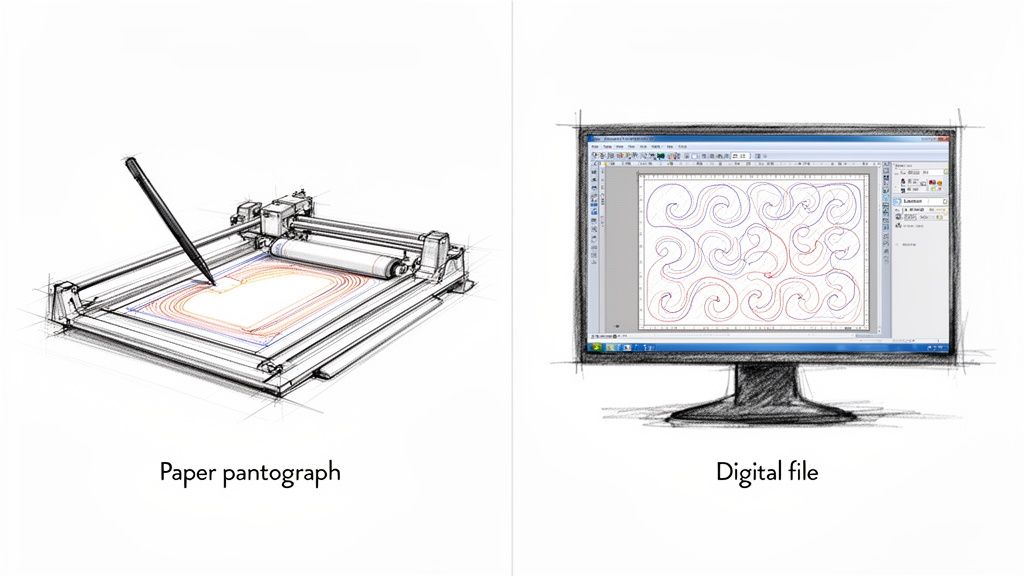
When you're ready to quilt that beautiful all-over texture on your masterpiece, you’ll find yourself at a crossroads. There are really two main paths for edge-to-edge quilting: the classic, hands-on feel of paper pantographs or the automated precision of modern digital files. Each one offers a totally different quilting experience, and figuring out which is right for you is the first step to getting that perfect finish.
A paper pantograph is essentially a long, printed roll of paper with a continuous line design. You unroll it behind your longarm machine and trace the pattern using a laser light or a physical stylus attached to the machine's head. This is a very tactile, hands-on process. You’re in direct control, guiding the machine to stitch out the design. It’s a wonderful way to feel connected to every single stitch going into your quilt.
The Precision of Digital E2E Files
On the other hand, digital E2E files are made for computerized quilting systems. Instead of you tracing by hand, the machine does the work. You upload a design file—you’ll often see formats like .BQM or .QLI—straight into your machine’s software. From there, the robotics take over, stitching the pattern with flawless accuracy and consistency from one edge of the quilt to the other.
This digital approach opens up a whole world of intricate, complex designs that would be nearly impossible to trace perfectly by hand. It also gives you incredible freedom to customize. You can resize, rotate, and place patterns with pinpoint precision to fit your quilt top just right. If you value precision and efficiency, digital patterns are a game-changer.
A Head-to-Head Comparison
So, how do you decide which method is the best fit for you? Let's break down the key differences. Think of it like choosing between driving a classic manual car (paper) and a high-tech car with cruise control (digital). Both will get you where you're going, but the journey feels completely different.
This table gives a quick rundown of what to expect from each method.
Digital vs. Paper Edge To Edge Quilting Patterns
| Feature | Digital E2E Patterns | Paper Pantographs |
|---|---|---|
| Machine Type | Computerized Longarm/Mid-arm | Non-computerized Longarm/Mid-arm |
| Process | Automated stitching via software | Manual tracing with laser/stylus |
| Design Complexity | Virtually unlimited; intricate interlocking | Limited to continuous, traceable lines |
| Precision | Extremely high and repeatable | Dependent on operator skill |
| Setup Time | Digital setup, scaling, and alignment | Physical setup of the paper pattern |
| Customization | Easy to scale, rotate, and edit | Very limited; requires redrawing |
| Cost | One-time pattern file purchase | Physical pattern purchase, shipping |
As you can see, there are some clear trade-offs. Paper pantographs are a great entry point for non-computerized systems and offer that satisfying, hands-on quilting experience. But for automation, precision, and an endless variety of designs, digital files are where modern quilting technology really shines.
The real magic happens when you find the method that sparks your creativity. At B-Sew Inn, our goal is to empower you with the right tools and knowledge, whether you love the hands-on control of a pantograph or the incredible possibilities of digital quilting. Our classes and resources are here to support your journey.
Ultimately, your choice between digital and paper edge to edge quilting patterns will come down to your equipment, your creative goals, and how involved you want to be in the stitching itself. If you have a computerized system, diving into the vast libraries of digital designs is a fantastic way to elevate your projects. And if you're working with a manual longarm, mastering paper pantographs will build your free-motion skills and give you beautiful, consistent results. Both paths lead to a stunningly finished quilt.
How to Select the Perfect E2E Pattern
Picking out an edge-to-edge quilting pattern is so much more than just finding a design you like; it’s about listening to what your quilt top is telling you it needs. The right pattern works with your piecing, adds the perfect texture, and truly makes your quilt’s personality shine. The three big things to juggle are the pattern’s density, its scale, and your thread color.
Think of yourself as the interior designer for your quilt. You wouldn’t hang busy, floral wallpaper in a room already full of patterned furniture, right? It would be a visual competition. The same idea applies here. The goal is to choose a quilting design that creates a beautiful, harmonious finish, not one that fights for attention.
Consider the Pattern Density
First up is pattern density. This is just a quilter's way of saying how close together the lines of stitching are. This one choice has a huge impact on how your finished quilt will feel and hang.
- Open, Looser Designs: Patterns with more breathing room between the stitches give you a softer, cuddlier quilt. This is exactly what you want for a cozy bed quilt or a throw you plan to snuggle up with on the couch.
- Dense, Tighter Designs: On the other hand, patterns with less space between the lines create a firmer, flatter finish. This is fantastic for wall hangings, table runners, or any show quilt where you want that rich, detailed texture to really stand out.
Imagine a simple meander with lines spaced an inch apart—that quilt will be soft and drapey. Now picture an intricate geometric design where the lines are only a half-inch apart. That quilt will feel much more substantial. Just ask yourself what the quilt’s job will be. Will it be used and loved daily, or is it meant to be admired on a wall? That will point you in the right direction.
Balance the Scale with Your Piecing
Next, let's talk about scale. This refers to the overall size of the pattern's repeating design, and you have to balance it with the piecing on your quilt top. The secret is finding that sweet spot where the quilting supports your patchwork without completely taking over.
If your quilt top has big, simple blocks or large areas of solid fabric, you have the freedom to go with a larger-scale, more detailed E2E pattern. The quilting can become a star player, adding gorgeous interest to all that "negative space."
But if your quilt top is a busy bee—full of tiny, complex piecing or bold, multi-colored fabrics—a smaller-scale, simpler quilting pattern is usually the way to go. You’re aiming for a subtle, all-over texture that adds dimension without clashing with the piecing. A design that’s too big can get lost in the chaos, and one that’s too tiny and dense can make a busy quilt feel stiff and overworked.
The goal is synergy. Your piecing and quilting should work together like a duet, with neither part trying to shout over the other. This thoughtful balance is what creates a truly memorable and professional-looking quilt.
Choose Your Thread Color Wisely
Finally, the thread color you pick can completely change the look of your quilt. The big question is: do you want your quilting to be a focal point or a supporting actor?
You generally have three paths to choose from:
- Blending Thread: Pick a thread that matches the main color of your quilt top. The quilting will seem to melt into the background, adding beautiful texture without stealing the spotlight from your fabric choices and piecing.
- Contrasting Thread: Feeling bold? Choose a thread that pops against the fabric—like a light thread on a dark quilt or vice versa. This is a great move when you want your edge to edge quilting patterns to be a strong, graphic element of the final design.
- Neutral Thread: When you’re just not sure, a good neutral like gray, beige, or cream is a quilter’s best friend. It almost always works, providing just enough definition to show off your quilting without overpowering anything.
By thinking through density, scale, and thread color, you can walk into any project feeling confident you’ll pick the perfect pattern. At B-Sew Inn, we're here to help you on that creative journey. You can explore a fantastic variety of designs, like those found in the Amelie Scott Designs Edge-to-Edge Pro Pack 1, to find the perfect match for your next masterpiece. Our online resources and classes are here to give you the skills and inspiration to create quilts you’ll be proud of for years to come.
Setting Up Your Machine for E2E Success
A beautiful quilt finish doesn't just happen at the needle; it starts with a thoughtful and precise setup. Getting your machine ready for edge to edge quilting patterns is where the magic really begins, creating the perfect foundation for every stitch that follows. From loading the quilt just right to dialing in your digital design, these details make all the difference.
The first, and arguably most important, step is loading your quilt sandwich onto the frame. Think of this less as just getting the fabric on the machine and more like stretching a canvas for a masterpiece. Your goal is to create a perfectly smooth, taut surface with even tension across the backing, batting, and quilt top. This prevents any puckers, pleats, or weird stretching while you quilt. Honestly, a poorly loaded quilt can cause headaches that even the fanciest machine can't solve.
Loading Your Quilt Sandwich
Each layer of your quilt needs to be smooth and secure, almost like they've become a single piece of fabric. Start by attaching your backing to the leaders on your frame, making sure it's dead straight and completely free of wrinkles.
Next up is the batting, which you'll want to lay smoothly over the backing. Finally, place your quilt top over the batting and take a moment to center it perfectly. Don't rush the pinning process! Taking your time here to ensure everything is square and evenly tensioned is a game-changer.
The secret to that professional, flat finish is all about consistency. When a quilt is loaded with even tension from side to side, the machine can glide effortlessly. This creates beautiful, uniform stitches and stops the fabric from shifting and creating those dreaded puckers.
This careful prep work makes for a much smoother quilting experience, letting your machine and pattern shine without having to fight a shifty foundation.
The image below breaks down the key decisions you'll make during setup—density, scale, and thread color—and how they all connect.
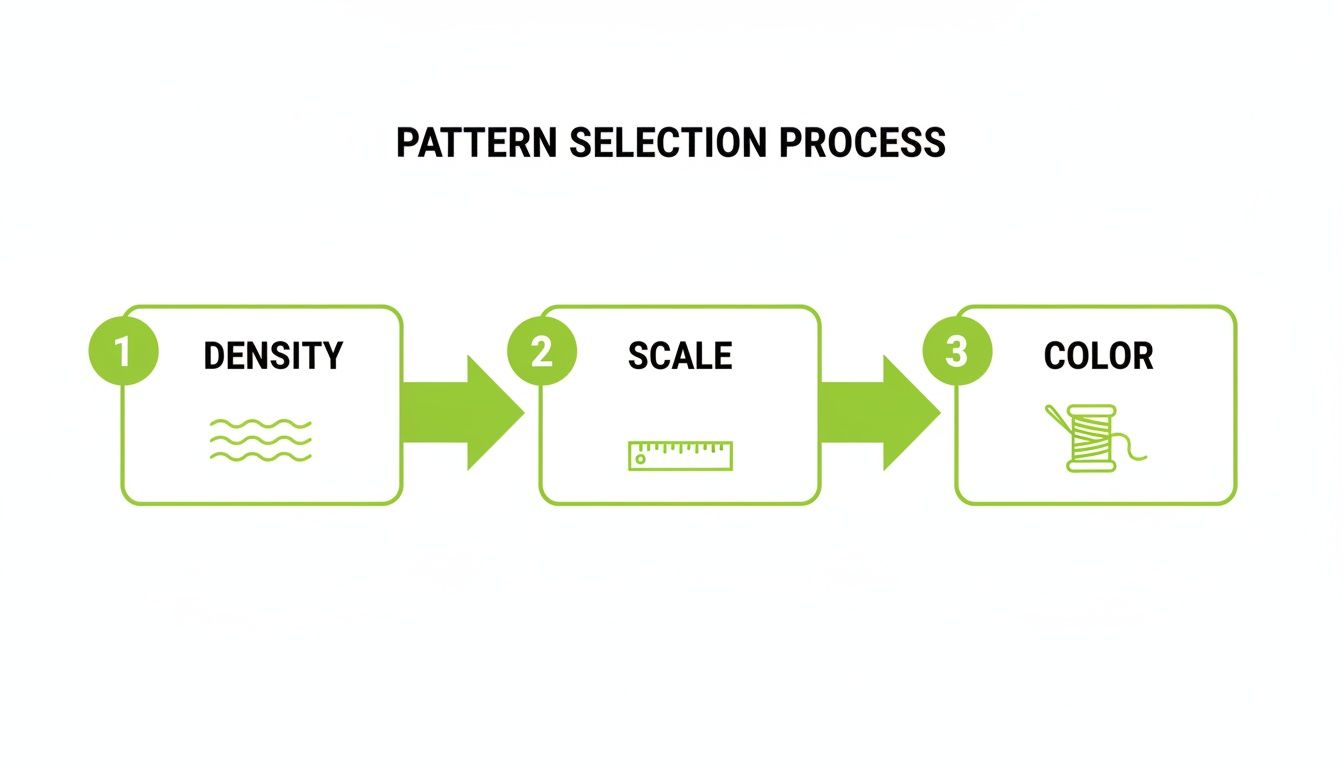
This visual guide shows just how much each choice shapes the final look and feel of your quilted project.
Configuring Your Digital Pattern
With your quilt loaded and ready, it's time to jump over to the computer. This is where you tell your quilting system exactly how you want it to stitch out the pattern. First things first, you'll need to import your chosen design file into your machine's software.
Once the pattern is loaded, your next job is to get the scale just right. This means adjusting the row height and the overall pattern size to fit your quilt top like a glove. A great starting point is to measure the width of your quilt and let your software calculate how many repeats it needs. While many digital patterns offer sizing suggestions, don't hesitate to tweak them. For instance, a pattern with a default 4.5" row height might need a little nudge down to 4.1" to end perfectly at your quilt's edge.
Getting the row alignment right is what creates that seamless, all-over look. Your software will have tools to set the gap between rows. You might be surprised to see this is often a negative number, which simply means the rows will nestle into each other a bit. This "nesting" is super common with curvy designs like wishbones, where the bottom of one row tucks neatly into the top of the next. Perfect alignment is what makes the design feel truly continuous. To dive deeper into the tech that makes this so seamless, check out our complete guide to the longarm computerized quilting machine to see how it all works.
Choosing the Right Needle and Thread
Your needle and thread are the final, crucial pieces of the setup puzzle. The right combo makes for strong, gorgeous stitches and helps you avoid frustrating thread shreds or breaks.
The needle you pick should match your fabric and thread. A solid rule of thumb is a size 90/14 needle for standard quilting cottons paired with a 40-weight thread. But if you're using a thicker thread or quilting over bulky seams, you might want to bump up to a size 100/16 needle. And always, always start a big project with a fresh needle! A dull one is a top culprit for skipped stitches and puckering.
Thread choice is equally important. For most E2E projects, a high-quality 40 or 50-weight polyester or cotton thread is a fantastic choice. Polyester gives you strength and a hint of sheen, while cotton offers that classic, matte look. To keep your tension balanced, try to use the same thread in your needle and bobbin, or opt for a slightly lighter-weight thread in the bobbin.
By taking the time to nail your quilt loading, pattern configuration, and tool selection, you're setting yourself up for a successful and enjoyable quilting session. This preparation gives you the confidence to tackle any E2E project, knowing your machine is ready to produce a beautiful result. At B-Sew Inn, we're here with the training and resources to help you master these essential skills.
Troubleshooting Common E2E Quilting Issues
Let’s be real—even the most experienced quilter hits a snag every now and then. But what really separates the pros from the beginners is knowing how to diagnose and fix those little frustrations on the fly. This is your go-to guide for wrestling with the most common issues that crop up with edge to edge quilting patterns, so you can feel confident tackling any challenge.
Think of this as your personal troubleshooting cheat sheet. We'll walk through those super annoying problems like thread breaks, ugly loops on the back of your quilt, and pattern rows that just refuse to line up. For each one, we’ll get to the bottom of what’s likely causing it and give you some simple, clear fixes to get you back to quilting bliss.
Solving Thread Breaks and Shredding
Nothing kills the creative vibe faster than the constant snap of your top thread. It’s a super common headache, but the good news is, it’s usually an easy fix once you know what to look for. Before you throw in the towel, take a deep breath and run through this checklist.
More often than not, the culprit is the simplest thing: a dull or damaged needle. If your needle has hit a pin or is just plain worn out, it can start shredding your thread immediately. A good rule of thumb is to always start a big project with a fresh needle. A size 90/14 is a fantastic all-purpose choice for quilting cottons with a 40-weight thread.
Here are a few other usual suspects:
- Incorrect Threading: I know, I know, you've threaded it a million times. But even a tiny mistake in the thread path can throw your tension completely out of whack. Unthread the whole machine and re-thread it slowly, making sure the thread is snug in every single guide and tension disc.
- Tension Imbalance: If your top tension is cranked up too high, it's constantly straining the thread until it gives up and breaks. Try loosening the top tension just a little bit and run a quick test swatch to see if that solves it.
- Burrs on Machine Parts: This one is sneaky! Grab a cotton ball or a soft piece of fabric and run it along the entire thread path, from the spool holder down to the needle plate. If it snags anywhere, you might have a tiny burr that’s catching and weakening your thread.
Banishing Loops on the Back of Your Quilt
Is there anything more heartbreaking than flipping over a gorgeous section of quilting, only to find a mess of loops on the back? We call them "eyelashes," and they're a dead giveaway that your top and bobbin tension are not on speaking terms.
Nine times out of ten, this happens because the top tension is too loose compared to the bobbin tension. Your bobbin thread is basically winning the tug-of-war, yanking loops of the top thread down to the back of the quilt.
The perfect stitch is all about balance. Your top and bobbin threads should meet right in the middle of the batting, creating a beautiful, identical stitch on both the front and back of your quilt.
To fix this, you'll want to slightly tighten your machine's top tension. Make tiny adjustments—about a quarter turn at a time—and stitch a small test area to check your work. You're aiming for that sweet spot where the stitches look the same on both sides. For a deeper dive, a good sewing machine troubleshooting guide can give you more detailed tips for getting your tension just right.
Aligning Pattern Rows Perfectly
One of the trickiest parts of E2E quilting is getting each new row to line up perfectly with the last one. When rows are misaligned, it shatters the seamless illusion of the pattern. This usually happens because the quilt itself "shrinks" or draws inward as you add more quilting, meaning your digital pattern on the screen no longer matches the real-life quilt on your frame.
To fight this, get smart with your software’s alignment tools. Instead of lining up a new row from the outer edge, try realigning from a point in the middle of the quilt. This makes sure the center is perfectly placed, even if you have to gently nudge the edges into place for the first few repeats. For patterns with deep, interlocking curves, you might need to use your hands to gently guide the fabric so the rows nestle together just right.
Getting these troubleshooting skills down will empower you to quilt like a pro on every single project. Here at B-Sew Inn, our online classes and training are designed to help you build these skills, so you feel supported and confident every step of the way.
Grow Your Skills with B-Sew Inn
Figuring out edge-to-edge quilting is a fun journey, but you definitely don't have to go it alone. Here at B-Sew Inn, we think of ourselves as your creative partner. We’re here with the tools, know-how, and steady support you need to take your quilting from good to genuinely fantastic. It’s all about helping you nail the basics so you can unlock what you're truly capable of creating.
Our whole approach goes way beyond just selling you a machine and sending you on your way. We pack our calendar with hands-on workshops and online classes where our expert instructors give you real, personalized guidance. Whether you're just getting the hang of your new longarm or trying to master some tricky software, we're right there with you, building up your confidence one stitch at a time.
Your All-Access Creative Pass
Dive into our huge library of digital E2E patterns, which we’ve carefully picked to help you bring just about any idea to life. If you want to take things a step further, we also have the B-Creative membership—it’s like an all-access pass to a lively community of quilters, exclusive tutorials, and special events that are sure to get your creative gears turning.
We really believe that the key to feeling fulfilled in your craft is to never stop learning. Our goal is to create a space where you feel comfortable asking questions, showing off your work, and finding that spark of inspiration to dive into your next big project with total excitement.
And if you’ve ever thought about turning your quilting passion into a little business, it’s so important to know what your beautiful work is worth. You can learn how to price your handmade items effectively with some great guides out there. At B-Sew Inn, we're not just a store; we're a home base for your creative life, giving you the resources to succeed at every stage of your quilting journey.
A Few Common Questions About E2E Quilting
Once you start diving into edge-to-edge quilting, a few practical questions always seem to bubble up. I’ve been there! Let’s walk through some of the most common ones that quilters ask, so you can feel confident tackling any project.
Getting the little technical details right from the start can make a world of difference. Think of it as setting yourself up for a smooth, frustration-free quilting session.
What File Format Do I Need For My Machine?
This is a big one, and the answer comes down to your specific machine. Every brand has its own language, so to speak. For example, if you're running a Baby Lock computerized system, you'll likely be looking for .BQM or .QLI files. Other brands will need something entirely different.
The good news? Most digital pattern designers know this and package several common file types together with your purchase. You’ll almost always get what you need. My best advice is to pull out your quilting machine’s manual and see what it recommends. If you're ever stuck or just want to be sure, we at B-Sew Inn can help you figure out exactly what works for your setup. We want to make sure you never buy a beautiful design you can't use!
Can I Use E2E Patterns On A Domestic Machine?
While true E2E patterns are really designed for the robotic precision you get with a longarm on a frame, you can absolutely create a similar all-over look on your home sewing machine. I've seen some beautiful work done this way! Using a walking foot for simple grids or getting creative with free-motion quilting for more organic, meandering designs are fantastic ways to add that consistent texture.
The real challenge, though, is wrestling the bulk of a large quilt and getting that perfect, seamless repetition. It's incredibly difficult without a frame and robotics. That automation is what makes a longarm system shine for true edge-to-edge quilting, giving you that flawless, professional finish.
How Much Thread Do I Need For An E2E Project?
This is where your quilting software can be a huge help. Many programs will give you a stitch count, which is a great starting point for estimating your thread needs. But for a quick rule of thumb, a queen-sized quilt with a moderately dense pattern can easily eat up 1,500 to 3,000 yards of thread.
My personal rule? Always have two large cones of your thread ready to go—one for the top and one for the bobbin. There’s nothing worse than playing thread chicken in the middle of a project.
Keep in mind that a simple, open design will use way less thread than a super dense, intricate one. A little planning here saves a lot of headaches later.
Here at B-Sew Inn, our goal is to support you every step of the way. From the latest machines and a huge library of designs to hands-on training and a wonderful community, we’re here to help you get beautiful, pro-level results on every quilt you make. Come explore what we have to offer and get inspired for your next project at https://www.bsewinn.com.

