

Ever look at a perfectly stitched company logo on a polo or a beautiful floral design on a pillow and wonder, "How did they do that?" The secret behind that flawless needlework is a process called embroidery digitizing.
Simply put, digitizing is the art and science of turning a regular image file (like a JPG or PNG) into a special stitch file that an embroidery machine can actually read and sew. It's the critical step that bridges the gap between a design on your screen and a textured, threaded piece of art on fabric.
From Screen to Stitch: The Art of Digitizing
A lot of beginners assume there's a magic "convert" button that instantly turns a picture into a stitch-ready design. I wish it were that easy! In reality, it couldn't be further from the truth. A standard image is just a collection of pixels or vector lines. An embroidery file, on the other hand, is a detailed set of instructions—a blueprint for the machine. It tells the needle exactly where to go, what kind of stitch to make, when to switch thread colors, and where to trim the excess.
Think of a digitizer as a translator. They need to be fluent in two completely different languages: the visual language of art and design, and the mechanical language of stitches, thread, and fabric that embroidery machines understand.
The whole process involves a skilled person, called a digitizer, using specialized software to meticulously trace over an image. But they aren't just tracing lines. They're making crucial artistic and technical choices with every single click, all to make sure the final embroidered product looks amazing and holds up over time.
Before we go deeper, it helps to see just how different these two file types really are.
Image File vs. Embroidery File At a Glance
| Attribute | Standard Image File (e.g., JPG, PNG) | Digitized Embroidery File (e.g., PES, DST) |
|---|---|---|
| Composition | Made of pixels or vector paths | Made of stitch data and machine commands |
| Purpose | Viewing on a screen or printing on paper | Instructing an embroidery machine to sew |
| Creation | Created with photo or graphics software (like Photoshop) | Created with specialized digitizing software |
| Editing | Can be easily resized, cropped, and color-changed | Resizing is limited; editing requires changing stitch properties |
| Information | Contains color and shape information | Contains stitch types, density, color stops, and trim commands |
As you can see, they're built for entirely different worlds. One is for looking, the other is for doing.
The Human Touch in a Digital Process
This hands-on, manual process is what separates a professional-looking design from a puckered, sloppy mess. A great digitizer thinks about things an automated program just can't grasp:
- Stitch Direction: The angle of the stitches changes how light reflects off the thread, which can add incredible depth, texture, and sheen to a design.
- Fabric Type: You can't use the same design for a thin, stretchy t-shirt and a tough denim jacket. Each fabric needs a different foundation of stitches (called an underlay) to stay stable.
- Stitch Density: Jamming too many stitches into a small area will bunch up the fabric and can even break needles. Too few, and the design looks sparse with ugly gaps showing through.
- Push and Pull Compensation: Fabric isn't static; it stretches and shifts as the needle punches through it thousands of time. A digitizer has to anticipate this "push and pull" and cleverly adjust the shapes so everything lines up perfectly in the end.
This level of detailed planning is what truly transforms a flat image into something you can feel and touch. It’s a craft that has exploded into a massive, tech-driven industry. The global embroidery software market was valued at around USD 1.2 billion in 2023 and is expected to hit USD 2.5 billion by 2032, thanks to the huge demand for custom apparel and home goods. You can dig into the numbers in this embroidery software market report.
Here at bsewinn.com, we're committed to empowering crafters by demystifying this foundational process. Through our supportive online classes, extensive training, and other resources, our goal is to take the mystery out of digitizing. We want you to feel empowered to start creating your own custom sewing machine designs with total confidence.
Understanding the Building Blocks of a Digitized Design
Think of a beautifully embroidered design like a well-built house. It’s not just about what you see on the surface; it’s about the strong, invisible framework holding everything together. To really get what embroidery digitizing is, you have to know its three foundational elements: Stitch Types, Stitch Density, and Underlay. Getting a handle on these is your first big step toward creating professional, durable designs that look amazing.
These are the essential tools in your digital toolkit. They all work in concert to turn a flat image into a textured, three-dimensional piece of art made of thread. Each one has a specific job to do to make sure your final stitch-out is crisp, clean, and just plain beautiful.
This flowchart breaks down the journey from a simple digital image to a final stitch file.
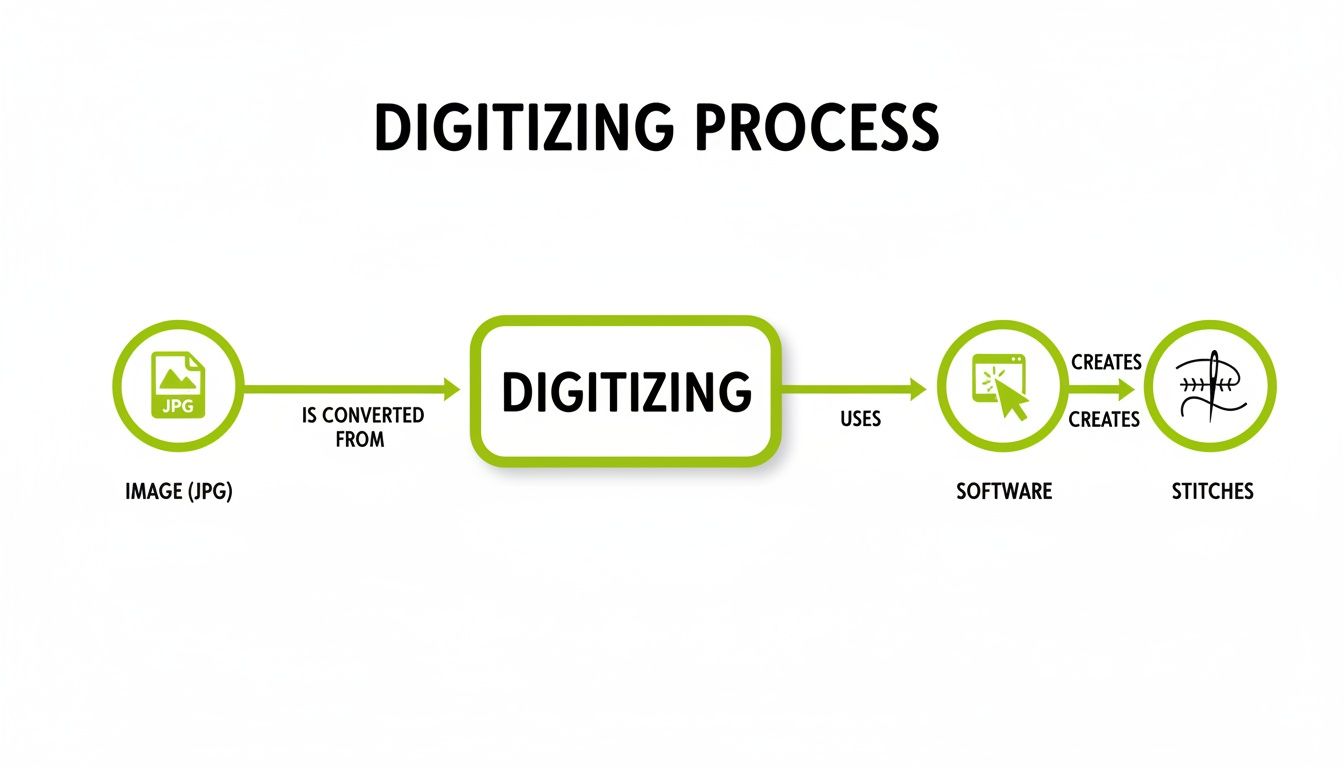
As you can see, the software is the critical bridge, taking your image and translating it into a complex set of instructions—the stitch file—that your machine can read.
Your Digital Toolkit: The Three Main Stitch Types
Just like a painter has a whole collection of brushes for different effects, a digitizer has different stitch types. While you can get into some pretty fancy specialty stitches, almost every single design you'll ever see is built from three basic types. Knowing what each one does is the key to creating designs with real depth and visual pop.
In the world of digitizing, these three stitches are your workhorses. The table below breaks down what they are and when you'll want to reach for them.
Essential Stitch Types and Their Best Uses
| Stitch Type | Description | Best For |
|---|---|---|
| Running Stitch | The simplest of the bunch, it's a single line of thread, like a basic hand-sewn stitch. | Fine details, delicate outlines, creating texture, and underlay. |
| Satin Stitch | A series of straight stitches laid side-by-side to create a smooth, solid column with a nice sheen. | Bold lettering, borders, and giving logos a crisp, clean edge. |
| Fill Stitch (Tatami) | Rows of running stitches are laid down to cover large areas with solid color, creating a woven texture. | "Coloring in" large shapes, backgrounds, and creating a solid foundation of color. |
Mastering these stitches gives you the creative control to bring any design to life with precision.
Stitch Density: The Secret to Perfect Coverage
Once you’ve picked your stitches, the next big decision is stitch density. Think about it like painting a wall. If your paint is too thin, you'll see the old color peeking through. But if it's way too thick, it's going to get clumpy and crack. Stitch density is basically the "thickness" of your thread "paint."
Technically, it's the distance between individual stitches. Higher density means stitches are packed closer together for rich, solid coverage. Lower density means they're farther apart, which gives you a lighter, more transparent look. Finding that sweet spot is everything.
Too much density can make the fabric pucker and might even cause thread to break or snap a needle. Too little, and you'll see ugly gaps where the fabric shows through, making the whole design look sparse and cheap.
The right density always depends on your fabric and thread. A delicate silk, for instance, needs a much lighter touch (lower density) than a tough denim jacket.
Underlay: The Unsung Hero of Embroidery
Finally, let's talk about the most important—and most overlooked—element: underlay. These are the hidden stitches that are sewn directly onto the fabric before any of the pretty top stitches go down. They are the true unsung heroes that prevent a whole laundry list of embroidery headaches.
It’s like the foundation of a house. You never see it once the house is finished, but without it, the whole structure would be a wobbly mess. Underlay does a few critical things:
- Stabilizes the Fabric: It tacks the fabric to the stabilizer, stopping it from shifting, stretching, or sliding around while the machine is working.
- Prevents Puckering: By creating a stable base, it keeps the fabric from bunching up under the weight and pull of the top stitches.
- Adds Loft: It gives the top stitches a slightly raised, smooth surface to sit on, which makes the design's definition and texture really pop.
This foundation is non-negotiable if you want professional results, especially on tricky fabrics like knits and fleece. To dive deeper into this, check out our guide on how to use embroidery stabilizer, which goes hand-in-hand with underlay for flawless results. Once you understand these building blocks, you’re no longer just following a pattern; you’re the architect of your own beautiful embroidery.
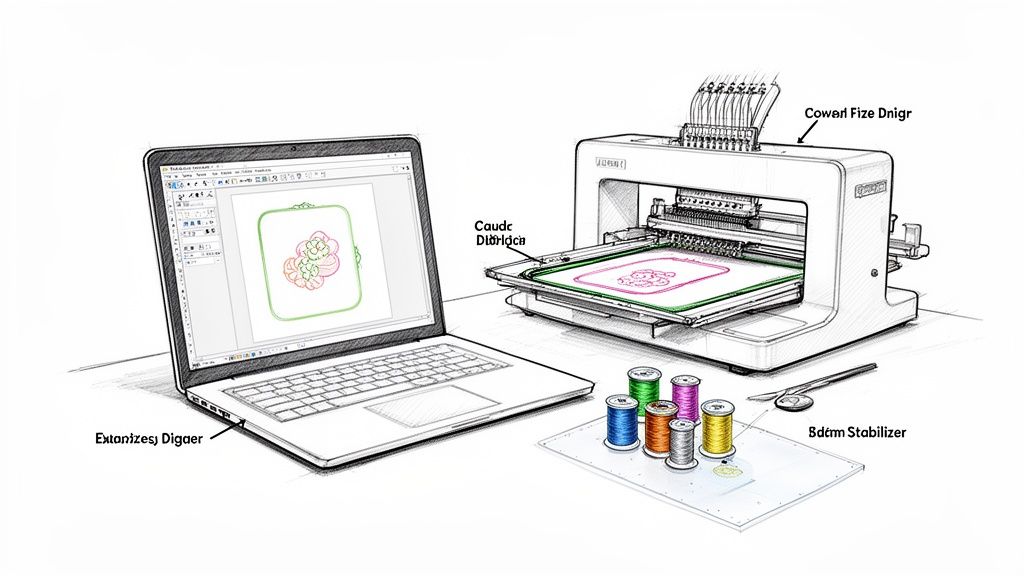
Choosing Your Tools: Software and Hardware Essentials
Embroidery digitizing is really where the art of sewing crashes into technology, and having the right tools is what makes the magic happen. Think of it like a chef's kitchen—you need good knives and pans. For a digitizer, that means the right software and hardware to turn a cool idea into a flawless stitch file. This setup is your digital studio, and building it right is the first step to creating designs you can be proud of.
The good news? You don't need a supercomputer or some massive industrial machine to get your start. Today's tools are more accessible than ever, but picking the right ones will save you a ton of frustration and make the whole process, from screen to fabric, a lot more fun.
Selecting the Right Digitizing Software
Your software is the heart of your entire operation. It's where you’ll spend your time plotting stitches, assigning colors, and tweaking every last detail. The market is full of options, from beginner-friendly programs that feel intuitive right out of the box to advanced suites packed with features for commercial-level work.
The single most important thing to look for is compatibility with your embroidery machine. Different brands read different file formats. For instance, Baby Lock and Brother machines usually take .PES files. Your software absolutely must be able to export in a language your machine understands.
Think of your software as a translator. If your design is speaking French (.pes) but your machine only understands Spanish (.dst), they’re just not going to communicate. The right software gets everyone speaking the same language.
Here at bsewinn.com, we help crafters find software that not only fits their budget and skill level but also pairs perfectly with their machine, empowering you to create with confidence. And for those looking for fresh inspiration, tools like an AI shirt generator for initial design concepts can be a great place to find unique artwork to digitize.
Essential Hardware for Your Creative Space
Beyond the software, you'll need a couple of key pieces of hardware. Luckily, the list is pretty straightforward.
-
A Capable Computer: No need for a high-end gaming rig, but a computer with a decent processor and enough RAM (at least 8GB is a good starting point) will make a world of difference. A clear, high-resolution monitor helps, too. Digitizing can be surprisingly graphics-intensive, and a capable machine prevents annoying lag when you're doing the detailed work of placing individual stitches.
-
A Reliable Embroidery Machine: This is where your digital creations come to life. Whether you have a single-needle home machine or a multi-needle beast for bigger projects, its capabilities will shape your digitizing choices. Things like hoop size, stitching speed, and whether it has an automatic thread trimmer all matter. If you're just starting out, our guide on choosing your first embroidery machine for home use is a fantastic resource to check out.
Don't Forget the Physical Supplies
Finally, great digitizing doesn't happen in a vacuum. The quality of your physical supplies—your thread, needles, and stabilizer—directly impacts how well your design stitches out. This isn't the place to cut corners.
High-quality thread that doesn't shred, the right needle for your fabric, and the correct stabilizer aren't just extras; they're essential parts of the system. A perfectly digitized file can still turn into a mess if it's stitched on flimsy fabric without the right backing. At bsewinn.com, we help crafters build a complete ecosystem of tools—software, hardware, and supplies—that all work together to produce beautiful, durable embroidery every single time.
Manual Digitizing vs. Auto Digitizing
When you first dive into the world of embroidery, you'll hear about two ways to get a design ready for your machine: the manual way and the automated way. This is one of the first big forks in the road you'll face, and the path you choose really shapes the look and feel of your final piece. Figuring out the difference is the key to knowing which tool to grab for which job.
Think of auto-digitizing like using your phone's GPS on "fastest route" mode. You punch in your destination (your image), and an algorithm spits out a path in seconds. It’s fast and gets the job done for simple trips, but it doesn’t know about the scenic route, and it definitely can’t see that unexpected road closure ahead. It's a one-click guess at the best way to stitch something out.

The Case for Auto-Digitizing
Most embroidery software has an auto-digitizing feature that promises to turn an image into a stitch file with almost no effort. And you know what? For clean, simple vector graphics with solid blocks of color, it can actually do a decent job. If you just need a quick monogram for a personal project, the speed is a huge plus.
The problem is, algorithms don't have an artist's touch. They often get tripped up by complex images, gentle color gradients, or the simple fact that different fabrics behave differently. You can end up with designs that have bizarre stitch paths, weirdly dense areas, and an overall flat, uninspired look.
The Art of Manual Digitizing
This is where the real magic happens. Manual digitizing is less like following a GPS and more like being a mapmaker, carefully drawing every single road by hand. Here, the digitizer is in total control—plotting each stitch, deciding its direction, compensating for how the fabric will pull, and layering threads to build texture and depth. This isn't just a conversion; it's a creative interpretation.
Manual digitizing is an art form. It takes technical skill, sure, but it also demands an artistic eye. You’re the one deciding on the underlay, stitch density, and pathing—choices that an automated program just can't make with the same level of care.
It's this control that takes a design from just okay to truly professional. It makes sure your lettering is sharp, fill areas are buttery smooth, and the finished embroidery is durable enough to last. It takes more time and practice, no doubt about it, but the difference in quality is night and day.
So, Which One Should You Use?
It really comes down to the project. Here's a quick guide:
-
Go for Auto-Digitizing When:
- You’re working with super simple, clean vector art.
- It’s a personal project, and "good enough" is all you need.
- Speed is the only thing that matters for a quick, non-critical design.
-
Stick with Manual Digitizing When:
- Quality is your top priority, period.
- You're making something for a client, a business logo, or to sell.
- The artwork has lots of detail, fine lines, or small text.
- You're stitching on a tricky fabric (like stretchy knits or fluffy towels) that needs special handling.
For anyone serious about their craft, learning to manually digitize is an investment that pays off big time. If you're ready to get started, our guide on how to digitize embroidery designs is a fantastic place to begin.
Even in the pro world, things are advancing. AI is starting to pop up, helping automate parts of the process like optimizing stitch paths and flagging errors, which cuts down on design time. With the digitizing software market projected to hit $1.5 billion by 2028, this tech is becoming more important for both efficiency and quality. Here at bsewinn.com, we focus on empowering you with hands-on training so you have the skills to create truly outstanding designs from scratch.
When to DIY or Hire a Professional Digitizer
So, you have a design you want to embroider. Now comes the big question: should you digitize it yourself or call in a professional? Honestly, there’s no single right answer. The best path really depends on your project, your deadline, and what you’re trying to achieve.
Figuring this out is a key skill. It’s all about balancing that desire to learn and create with the practical need for a perfect, predictable result. Sometimes the fun is in the journey of making it yourself, and other times, all that matters is a flawless final product.
When to Digitize It Yourself
There's something incredibly satisfying about digitizing your own designs. It gives you total creative freedom and is hands-down the best way to really understand the craft from the inside out. Rolling up your sleeves and doing it yourself is a fantastic idea in a few common situations.
- For Personal Projects and Gifts: If you’re making a one-off gift, like a monogrammed towel for your sister or a custom onesie for a friend's baby shower, DIY is the way to go. That personal touch makes it extra special, and any little quirks are just part of its charm.
- When You're Learning the Craft: You can't get better at digitizing without, well, digitizing! Start with simple projects like basic text or straightforward shapes. Every design you create teaches you something new about how stitches and fabric play together.
- For Simple, Text-Based Designs: Creating names, dates, or simple phrases is a great first step into the world of digitizing. These projects help you get comfortable with the lettering tools in your software without the headache of a complex, multi-layered image.
At bsewinn.com, we're all about empowering crafters. Our extensive resources, from supportive online classes to hands-on training, are here to give you the confidence to tackle more and more DIY projects as your skills blossom.
When to Hire a Professional Digitizer
As much as we love the DIY spirit, sometimes hiring an expert is the smartest move you can make. A professional digitizer brings years of experience to the table, along with a deep, almost intuitive, understanding of all the technical details that guarantee a perfect stitch-out.
Think of it as a strategic investment in quality and your own peace of mind. There’s a reason custom embroidery digitizing drives 45% of apparel decoration services worldwide—people need professional results, and they need them fast. The industry has gotten so efficient that simple logos can often be turned around in just a day or two. You can dive deeper into these industry facts and figures on Digitizing USA.
Here’s when you should seriously consider calling in a pro:
- For Complex Business Logos: Your brand’s logo has to be perfect, period. A professional knows exactly how to handle tiny text, fine details, and precise color matching to make sure your logo looks crisp and sharp on any garment.
- When Stitching Intricate Artwork: Got a design with gradients, photorealistic elements, or tons of overlapping layers? That kind of complexity needs advanced techniques. A seasoned digitizer can translate that art into a clean, sewable file that won’t turn into a knotted bird’s nest on your machine.
- If You Need a Guaranteed Result: When you're making products for a client or to sell in your shop, there's just no room for trial and error. Paying for a professionally digitized file is like an insurance policy; it guarantees a high-quality, market-ready product you can be proud of.
Your Top Embroidery Digitizing Questions, Answered
Once you start dipping your toes into the world of digitizing, you’re bound to have a few questions. It’s totally normal! Let's walk through some of the most common things people ask, clearing up the confusion and getting you ready to stitch with confidence.
Can I Use Any Image for Embroidery Digitizing?
Technically, you can start with almost any image, but the quality of that starting file makes a world of difference. For the cleanest, sharpest results, you really want to use high-resolution images with crisp lines and clear colors. Think vector files like .AI or .SVG—those are the gold standard.
If you start with a blurry, low-quality JPEG, the digitizer has to guess where the lines are supposed to go, and that guesswork can lead to a messy stitch-out. The old saying "garbage in, garbage out" has never been more true. A great source image is the first step to a beautiful finished product.
Does Resizing a Digitized Design Affect Its Quality?
Oh, absolutely. This is a huge one. A digitized file isn't like a regular picture you can just stretch or shrink. It’s a very specific set of instructions—a map of every single stitch.
If you shrink it without thinking, all those stitches get crammed together, making the design stiff and causing thread to bunch up and break. If you enlarge it, you'll suddenly see ugly gaps between stitches where the fabric peeks through. You have to do any resizing within your digitizing software, which will cleverly recalculate all the stitch properties for the new size. Your best bet is always to digitize the design at the exact size you plan to sew it.
One of the biggest mistakes beginners make is treating a stitch file like a simple JPG. You’re not just changing the size; you're fundamentally altering the instructions your machine follows. Recalculating those stitches is the only way to get a professional look.
Why Are Different Files Needed for a Hat and a T-Shirt?
Every fabric and every item has its own personality, and a good digitizer knows how to work with it. A stretchy t-shirt, for example, is notorious for puckering. To combat that, you need special underlay stitches and something called pull compensation to keep the design stable and flat.
A curved baseball cap is a whole different ballgame. The design has to be digitized to sew from the center out and from the bottom up. This pathing is critical to prevent the design from getting distorted as the machine moves around the cap’s curve. A pro digitizer will tailor every aspect of the file specifically for the item it's going on.
What Are the Most Common Embroidery File Formats?
Think of file formats as different languages. Each brand of embroidery machine "speaks" its own language, and if you give it the wrong file, it won't know what to do. Knowing your machine's format is step one to avoiding a headache.
Here are a few of the big ones you'll see:
- PES: The go-to for Brother and Baby Lock machines.
- DST: A very common, almost universal format used by Tajima and many other commercial machines.
- JEF: If you have a Janome machine, this is your format.
- EXP: Used by Melco and Bernina machines.
Always, always check your machine's manual to see what format it needs. Saving your design in the right format is a simple step that makes the whole process run smoothly.
Ready to go from asking questions to creating your own incredible designs? At bsewinn.com, we're here to empower you with the tools, training, and friendly support to unleash your creativity. Check out our lineup of machines, software, and online classes to take the next step in your embroidery adventure.

