

Using an embroidery stabilizer is the secret weapon for getting those clean, professional-looking designs we all want. You simply hoop a layer of it with your fabric, and it provides temporary support to stop the material from stretching or puckering under the tension of thousands of stitches. Once your design is finished, the stabilizer comes away, leaving you with a flawless piece.
Why Stabilizer Is Your Most Important Embroidery Tool
Let’s be honest, stabilizer is the unsung hero of machine embroidery. It's the essential foundation for every beautiful design, and without it, even the most stunning pattern from bsewinn.com can turn into a frustrating mess of puckered fabric and wonky stitches.
Think of it as a temporary scaffold for your fabric. It holds everything firm and steady, preventing any shifting or warping while your machine works its magic. This support is absolutely non-negotiable if you're aiming for that professional, store-bought quality. The intense push-and-pull from a dense stitch design can easily distort fabrics—especially tricky ones like stretchy knits or delicate silks. Stabilizer is what fights back against those forces, making sure every single stitch lands exactly where it should.
The Foundation of Flawless Designs
I can't stress this enough: mastering how to use embroidery stabilizer is the single most important skill that separates homemade-looking projects from polished, beautiful pieces. It’s the one tool that, when used right, completely elevates your craft.
Here at bsewinn.com, we’re all about empowering you to succeed. We don't just provide custom sewing machine designs; we offer the support you need to replicate beautiful projects through our online classes, training, and extensive resources. Getting to know your tools is a huge first step, which is why we've even put together a handy list of the top sewing tools for beginners to get you started.
The need for stabilizer really grew with technology. As computerized machines made more complex and dense patterns possible, having a reliable support structure became critical. In fact, stabilizers became a staple from the 1980s onward, right alongside the rise of advanced embroidery machines that could handle incredibly intricate work.
The right stabilizer doesn't just improve your project; it protects it. It ensures the time and creativity you invest in a design are reflected in a final product you can be proud of.
To help you jump right in, I've put together a quick reference table matching common fabrics with the right type of stabilizer. This little guide will help you build confidence as you start your next embroidery adventure.
Quick Guide to Stabilizer and Fabric Pairings
This table is a great starting point for matching your project's fabric to the right stabilizer. You'll quickly get a feel for what works best with different materials.
| Fabric Type | Recommended Stabilizer Type | Best For |
|---|---|---|
| Cotton, Linen (Wovens) | Tear-Away or Cut-Away | Quilting, tote bags, and sturdy apparel where puckering is a risk. |
| T-shirt Knit, Fleece | Cut-Away | Stretchy garments that need permanent support to prevent design warping. |
| Towels, Corduroy | Wash-Away (Topper) + Cut-Away (Backing) | Piled fabrics where stitches could sink and disappear without a top layer. |
| Silk, Organza (Delicates) | Wash-Away or Heat-Away | Sheer or delicate materials where no trace of the stabilizer should remain. |
| Freestanding Lace | Heavy Water-Soluble | Projects made entirely of thread, like ornaments or jewelry. |
Keep this chart handy, and you'll be making smarter stabilizer choices in no time. It's all about practice and seeing what combinations give you the results you love.
Choosing the Right Stabilizer for Your Project
Walking into a craft store and facing a wall of stabilizers can feel pretty overwhelming. With so many options, how do you know which one is the perfect partner for your project? Let’s demystify the process by breaking it all down.
Getting the hang of the core differences is the first step toward flawless embroidery. Each stabilizer is designed for a specific purpose, and matching it correctly to your fabric and design is absolutely crucial.
The Four Main Stabilizer Types
When it comes down to it, picking the right stabilizer involves answering two simple questions: How stable is your fabric, and will the back of your embroidery be visible or against the skin?
- Cut-Away Stabilizer: This is the powerhouse of support. It's a non-woven material that you trim away with scissors after stitching, leaving a permanent foundation behind the design to keep it looking great.
- Tear-Away Stabilizer: Perfect for stable, non-stretchy fabrics like canvas or denim. Just like the name says, you simply tear it away from the edges of your design once you're finished.
- Wash-Away Stabilizer: This kind dissolves completely in water. It's the go-to choice for delicate projects like freestanding lace or when you're working on sheer fabrics where no backing should ever show.
- Heat-Away Stabilizer: This is a specialty film that vanishes with the heat of an iron. You'll want to grab this for fabrics that can't be washed, like velvet or certain silks.
Think of it this way: a stretchy baby onesie needs the permanent support of a Cut-Away to prevent the design from warping and stretching out of shape after a few tumbles in the wash. A sturdy canvas tote bag, on the other hand, is stable enough to work beautifully with a simple Tear-Away.
This handy flowchart is a great visual guide to help you decide what you need, whether you're working with woven or knit fabrics.
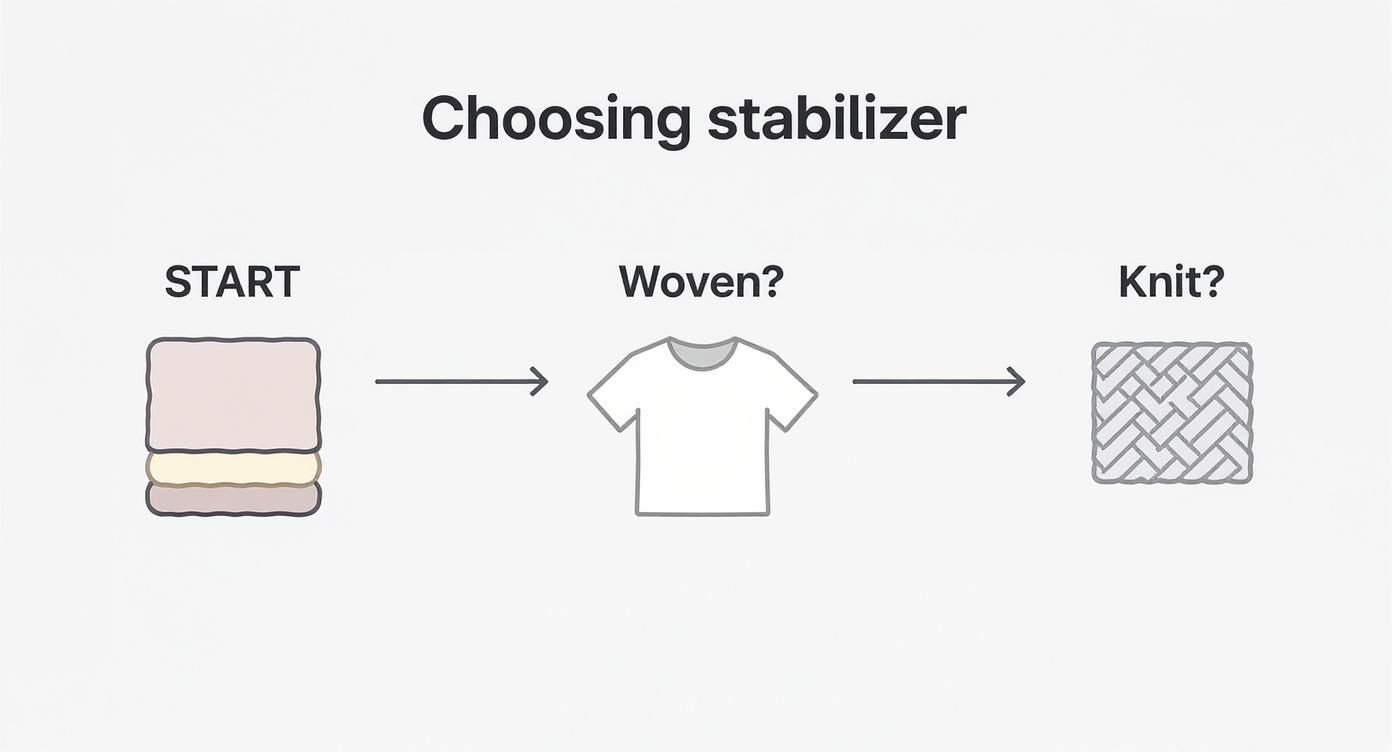
As you can see, the stability of your fabric is the number one thing that dictates which type of stabilizer will give you the best results.
For a deeper look at how these types stack up, check out this comparison table.
Stabilizer Type Deep Dive Comparison
| Stabilizer Type | Best For Fabrics | Removal Method | Pros | Cons |
|---|---|---|---|---|
| Cut-Away | Unstable, stretchy knits (t-shirts, fleece), high stitch-count designs | Trim with scissors | Provides permanent, maximum support; prevents design distortion over time. | A permanent backing remains; can be bulky or irritating on skin if not covered. |
| Tear-Away | Stable wovens (cotton, denim, canvas), low to medium stitch-count designs | Tear away by hand | Quick and easy removal; leaves a clean finish with no leftover backing. | Not suitable for stretchy fabrics; can distort delicate stitches if torn too aggressively. |
| Wash-Away | Sheer fabrics, freestanding lace, towels (as a topper), projects where both sides are visible | Dissolves in water | Disappears completely, leaving no trace; perfect for delicate and intricate work. | Not for fabrics that can't be washed; offers no long-term support. |
| Heat-Away | Non-washable fabrics (velvet, corduroy, some silks), lace work | Disappears with heat from an iron | Ideal for water-sensitive materials; leaves no residue behind. | Can scorch heat-sensitive fabrics if the iron is too hot; has a plastic-like feel. |
Each stabilizer truly has its moment to shine, and knowing when to use each one will make a world of difference in your projects.
Matching Stabilizer Weight to Your Project
Beyond the type, you'll also notice stabilizers come in different weights: light, medium, and heavy. The general rule is to match the stabilizer weight to your fabric's weight and the design's stitch density. An airy, light-stitch design on quilting cotton will only need a light or medium-weight stabilizer. Simple enough.
But a dense, full-coverage design with tens of thousands of stitches? That's going to need a heavy-weight stabilizer to prevent puckering, no matter what fabric you're using. If you're ever on the fence, it's always safer to go with a slightly heavier stabilizer than one that's too light. You can learn more about picking the perfect product in our guide to the best stabilizer for embroidery.
The numbers back this up, too. Tear-away stabilizers are incredibly popular, used in roughly 60-70% of projects on lighter fabrics where easy removal is key. Cut-away stabilizers, however, are the heroes for high-stitch-density designs on unstable knits, accounting for about 20-25% of stabilizer use because of their superior, lasting support.
A crucial step in selecting the right stabilizer is understanding different fabric types, as the material's properties directly influence your choice. For instance, you might want to consider articles on understanding different fabric types like fleece.
Exploring Specialty Stabilizers
Sometimes, a project throws a curveball that standard stabilizers can't handle. That's where specialty options come into play, helping you tackle even the trickiest items.
Sticky-Back Stabilizer: This stuff is a game-changer for items that are impossible to hoop, like baseball caps, velvet collars, or the pocket of a thick backpack. It has a paper backing that you peel away to reveal an adhesive surface. You hoop the stabilizer itself, stick your item on top, and you’re ready to stitch.
Toppers: Ever notice how embroidery stitches just sink into a fluffy towel or a piece of fleece and disappear? A "topper" solves this problem. It's usually a thin, wash-away film that you place on top of your fabric before embroidering. It creates a smooth surface for the stitches to sit on, ensuring they stay crisp and visible right on top of the pile.
Even after you’ve picked the perfect stabilizer, its magic only works if you secure your fabric properly. A loose hoop is a one-way ticket to puckers, wonky stitches, and designs that just don't line up. Getting that perfect, drum-tight tension is the secret sauce for professional-looking embroidery, every single time.
This isn't just about clamping fabric in a frame. Think of it like a painter stretching a canvas—any slack will totally distort the final piece. The goal is to get the fabric and stabilizer to act like one smooth, taut surface for your machine.
Getting That Perfect 'Tambourine-Tight' Feel
You'll hear the term "tambourine-tight" or "drum-tight" a lot, and for good reason. It’s your benchmark. When you give the hooped fabric a gentle tap, you should hear a firm, satisfying sound, kind of like a little drum. It needs to be taut, but not stretched. This is a huge distinction, especially with knits.
If you stretch the fabric when you hoop it, it’s just going to snap back to its original size when you’re done. The result? A puckered, distorted mess. The stabilizer is there to support the fabric, not to fight against it being pulled out of shape.
The real secret to a great hoop is smoothness, not just tightness. You want to make sure there are zero wrinkles or ripples in your fabric or stabilizer. Those tiny folds are weak spots just waiting to mess up your stitches.
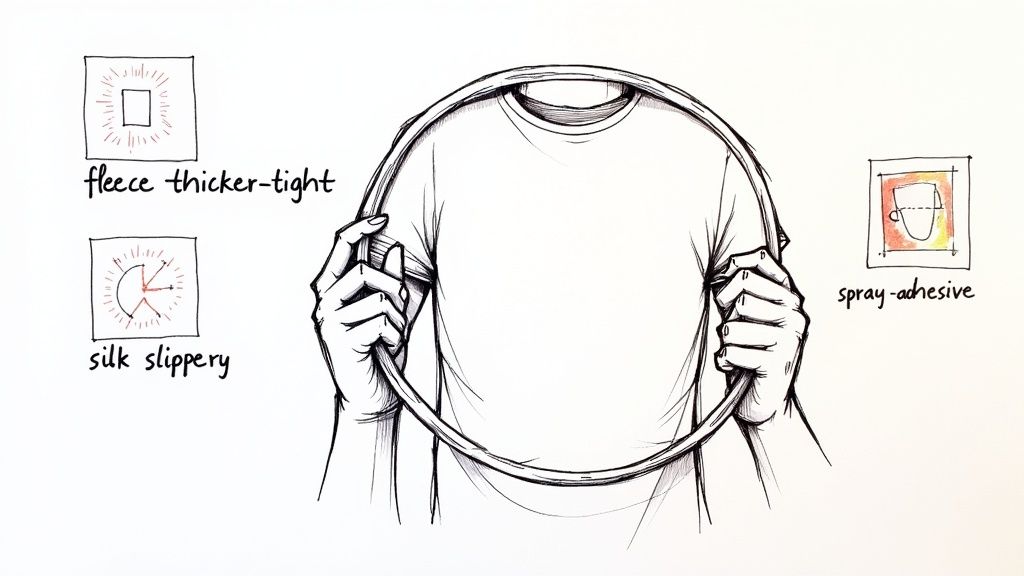
Hooping Tricks for Different Fabrics
Every fabric has its own personality. Slippery silk is a world away from thick, fluffy fleece, and you have to adapt your hooping style to match.
- For Stretchy Knits (like T-shirts): Whatever you do, don't stretch the fabric. Lay your cut-away stabilizer on a flat surface, place the t-shirt smoothly over it, and then gently press the top hoop ring into the bottom one. The fabric should be relaxed, at its natural tension.
- For Slippery Fabrics (like Silk or Satin): These guys love to shift around. To keep them in line, a light mist of temporary spray adhesive can be a lifesaver. It gently bonds the fabric to the stabilizer, making them one manageable piece that won't slide while you're trying to hoop it.
- For Thick Fabrics (like Fleece or Towels): Forcing these into a hoop can be a struggle and often leaves behind "hoop burn"—that annoying compression mark. A much better approach is to "float" the fabric. Just hoop the stabilizer by itself, use a bit of adhesive spray, and stick the fleece right on top. This keeps everything secure without crushing that beautiful pile.
When to Go 'Hoopless' with Adhesives
Let's be real, some things just can't be hooped. Imagine trying to cram a structured baseball cap, a velvet collar, or the pocket of a sturdy backpack into a standard hoop. It’s not going to happen, and you'll probably damage the item trying. This is where sticky-back stabilizer becomes your absolute best friend.
Here’s how to use it:
- Hoop the sticky-back stabilizer with the paper side facing up.
- Lightly score the paper inside the hoop with a pin or needle. This makes it way easier to peel.
- Carefully peel away the paper backing to expose that sticky surface.
- Firmly press your item onto the stabilizer, making sure it’s flat and perfectly positioned.
This method gives you incredible stability for those "un-hoopable" projects, opening up a whole new world of things you can embroider.
Why Hoop Size Matters
Using the right size hoop is just as critical as your hooping technique. The golden rule is to use the smallest hoop that your design will comfortably fit in. Why? Because a bigger hoop leaves more unsupported fabric around the edges, which is just an invitation for shifting and puckering.
Keeping a few different hoop sizes on hand is a smart move. It lets you match your gear perfectly to your project. If you're ever on the fence about what size you need, our embroidery hoop size chart is a fantastic resource. It's a simple choice that makes a surprisingly huge difference in your final quality.
Getting That Clean, Professional Finish When You Remove Stabilizer
The machine has gone quiet and the last stitch is in, but you’re not done just yet. This next part—removing the stabilizer—is what really separates a decent project from a truly great one. How you handle this final step is what gives your work that polished, professional look.
You can't just rip and go. Each type of stabilizer needs its own removal technique to keep from wrecking the stitches or stretching the fabric you just spent so much time on. Rushing this can undo all your hard work, so take a deep breath and give it the attention it deserves. As we always emphasize in our bsewinn.com online classes and training, the finish is everything.
Tackling Tear-Away Stabilizer
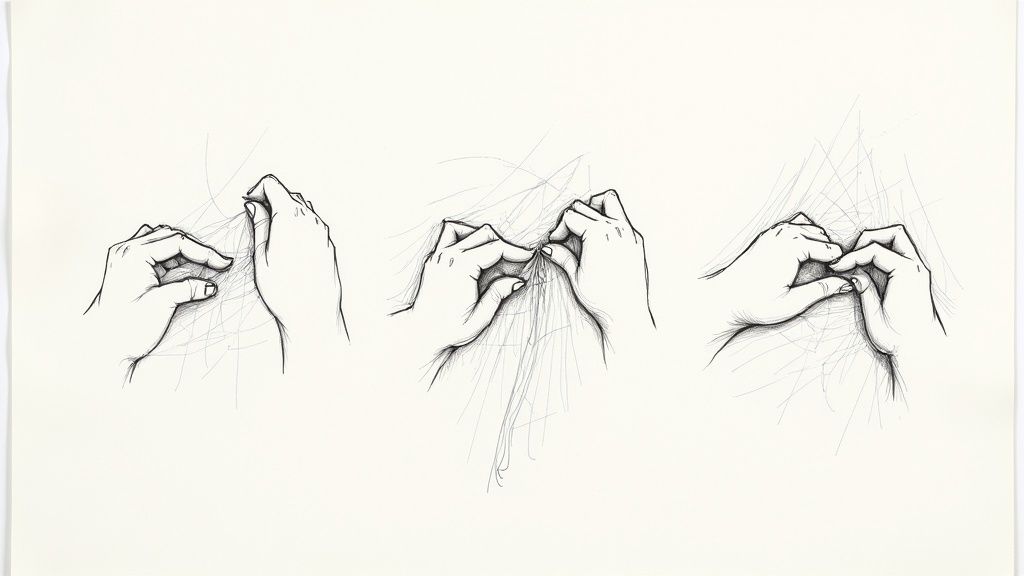
There’s something so satisfying about removing tear-away, but you have to be gentle. If you just yank it, you risk pulling and looping your stitches, or worse, snapping threads. This is especially true around fine details and sharp corners.
Here’s the right way to do it: lay one hand flat on the embroidery to hold everything in place. With your other hand, start tearing the stabilizer away, pulling it horizontally against the stitch line, not straight up and away from the fabric.
Think of it like tearing a page from a perforated notebook. You’re aiming for a clean break right along the edge of the stitches. For those tiny, trapped bits inside letters like an 'o' or an 'a', a good pair of tweezers is your best friend.
Trimming Cut-Away Stabilizer
Cut-away is meant to stick around and provide long-term support, so you’ll leave a little bit behind the design. The trick is trimming it close enough to look neat without accidentally cutting your fabric or bobbin threads. I think we’ve all been there!
Grab a small, sharp pair of curved embroidery scissors for this. That curved tip is a lifesaver—it lets you get right up against the stitches without poking through to the front.
It’s a simple process:
- Flip your project over to the back.
- Gently slide the curved blade of your scissors under the stabilizer.
- Trim around your design, leaving a small border of about 1/8 to 1/4 inch. This little bit of extra stabilizer is crucial for keeping your design from warping over time.
- If you’re working on a shirt or anything that will be against skin, I highly recommend ironing a soft fusible backing over the trimmed stabilizer. Something like Sulky Tender Touch will keep it from feeling scratchy.
Dissolving Wash-Away and Heat-Away Types
These are the magic wands of the stabilizer world, perfect for projects where you want absolutely no trace of backing left behind. Think freestanding lace or sheer fabrics like organza. Getting the removal right is key to that flawless, invisible finish.
Wash-Away Stabilizers: Just as the name implies, these dissolve in water. Pop your finished piece into a basin of warm water and swish it around gently. You’ll literally feel the stabilizer melt away. Once it's gone, give the item a good rinse to get rid of any residue, then lay it flat to dry. This is the secret step that gives freestanding lace its final structure.
Heat-Away Stabilizers: This is your go-to for fabrics that can’t handle a bath. Set your iron to the right temp for your fabric (and turn the steam OFF), then press the embroidered area. The stabilizer will shrivel up into flakes you can just brush away with a soft brush.
Getting this right isn't just about how your project looks; it's about how smoothly your work goes. Using the wrong stabilizer can slow your machine speed by up to 30% from constant headaches like needle breaks and rethreading. If you’re interested in the nitty-gritty of production, you can check out some market insights about embroidery equipment to see the real impact.
Working Through Common Stabilizer Snafus
Even when you do everything right, machine embroidery can throw you a curveball. But don't sweat it—every little hiccup is a chance to learn something new. This is when you get to put on your detective hat, figure out what went wrong, and add a new trick to your embroidery toolbox. Honestly, here at bsewinn.com, we think troubleshooting is just as important as the initial setup. Our online classes and extensive resources are designed to give you the confidence to tackle any challenge.
Think of it like this: when a problem pops up, your machine and your project are trying to tell you something. More often than not, the message is about the relationship between your fabric, thread, and stabilizer. Learning to read those signs is what turns a moment of frustration into a real step forward in your craft.
Tackling the Dreaded Fabric Puckering
Puckering. It's the absolute worst and probably the most common headache for any embroiderer. You finish a gorgeous design, take it out of the hoop, and suddenly your fabric is surrounded by a halo of tiny wrinkles and gathers. The fabric just won't lie flat, and it can feel like all your hard work was for nothing.
Nine times out of ten, the culprit is a simple mismatch in tension. The embroidery thread pulls on the fabric with every stitch, and if that fabric doesn’t have enough support, it caves under the pressure. This is a classic sign that your stabilizer just wasn't up to the job.
Let me paint a picture for you: you’re stitching a dense, beautiful floral design from bsewinn.com onto a simple cotton tea towel. You reached for a lightweight tear-away, figuring the cotton was sturdy enough on its own. But as the stitch count climbs into the thousands, you see it happening—the fabric starts to pull inward, creating those tell-tale puckers around the satin stitches.
To fix and prevent puckering, here's your checklist:
- Check Your Stabilizer Weight: Is it beefy enough for the design's density? A design with 20,000 stitches needs a whole lot more support than one with 2,000. If you see puckers, the first thing to do is either switch to a heavier stabilizer or simply add a second layer. For that tea towel project, a medium-weight cut-away would have been the perfect choice from the start.
- Get Your Hoop Tension Right: Your fabric should be taut like a drum, but not stretched out of shape. Any looseness in the hoop is an open invitation for puckers. Make sure your fabric and stabilizer are hooped smoothly together, with absolutely no ripples or slack.
- Match the Design to the Fabric: Let's be real, some designs are just too heavy for very delicate or lightweight fabrics. If you've already beefed up your stabilizer and perfected your hooping and you're still getting puckers, it might be time to choose a less dense design for that particular material.
Fixing Outlines and Fills That Don't Line Up
Another frustrating issue is when a design's outlines don't quite meet up with the filled areas. You might see tiny gaps between the fill stitches and the final satin stitch border, which can make the whole project look a bit sloppy.
This problem is all about movement. If the fabric shifts—even a fraction of a millimeter—inside the hoop while the machine is stitching, the registration will be thrown off. This almost always happens because the fabric and stabilizer aren't working as a single, unified piece.
Think of your fabric and stabilizer as a single, unified canvas. If they can move independently of each other, even by a millimeter, your machine can't maintain perfect alignment from the first stitch to the last.
Imagine you're embroidering a company logo onto a slippery polyester polo shirt. You've used a good cut-away stabilizer, but you didn't use any temporary adhesive to hold the shirt in place. As the machine chugs along, that slick fabric ever-so-slightly shifts on top of the stabilizer. The result? The final outline is just a tiny bit off from the fill, leaving a noticeable gap.
Here’s how to lock everything down and get perfect registration:
- Use a Temporary Spray Adhesive: A light mist of spray adhesive between your fabric and stabilizer is an absolute game-changer, especially for knits and slinky fabrics. It creates a gentle bond that stops any micro-movements in their tracks.
- Try a Sticky-Back Stabilizer: For things that are a pain to hoop (like bags or caps) or for fabrics that just love to shift, sticky-back stabilizer is your best friend. It holds the item firmly in place, guaranteeing nothing is going to move an inch.
- Don't Skip the Basting Box: Most embroidery machines have a basting function. Use it! It runs a line of large stitches around your design's perimeter, tacking the fabric directly to the stabilizer. It's one extra, simple step that provides a huge amount of security.
Every mistake is really just a lesson in disguise. Once you understand why these common issues happen, you'll have the confidence to spot the problem, tweak your technique, and save your project. This is the kind of hands-on skill that turns you from a beginner into a pro, transforming potential disasters into beautiful, finished pieces.
Common Embroidery Stabilizer Questions, Answered
Even after you’ve got the basics down, a few tricky questions always seem to pop up when you're working with embroidery stabilizer. I've been there! This section is like having an experienced friend on speed dial, ready with clear, straightforward answers to the questions I hear the most. It's the perfect spot to turn when you need to solve a problem on the fly and get back to your project.
At bsewinn.com, our goal is to do more than just provide amazing custom designs; we are committed to empowering you with the know-how to bring them to life beautifully through our online classes, training, and extensive resources.
Can I Use More Than One Layer of Stabilizer?
Oh, absolutely! In fact, layering is one of my favorite pro tricks, especially when I'm tackling a design with a high stitch count or working with a really fussy fabric like a thin, stretchy knit. Doubling up gives you that extra backbone to prevent puckering and keep everything smooth on those more demanding projects.
You can go about this a couple of ways. You could simply use two layers of the same thing—say, two pieces of medium-weight cut-away—or you can mix and match types. A really popular combo is to use a cut-away for permanent support and then float a layer of tear-away on top for a little extra stability while the machine is running.
Whatever you decide, the golden rule is to always test your combination on a scrap of fabric first. See how it stitches out before you even think about moving to your final garment.
What's the Real Difference Between Stabilizer and Interfacing?
This is such a great question because it's easy to get them confused. They look similar, but they have completely different jobs in your sewing room.
- Interfacing is meant to be a permanent part of a garment. You use it to add body and structure to things like shirt collars, cuffs, and the area behind your buttons. It builds the garment.
- Stabilizer is almost always a temporary tool used only during the embroidery process. Its only job is to keep the fabric from shifting, stretching, or puckering while it's being stitched.
Once the embroidery is done, most stabilizers are removed completely (except for cut-away, which stays behind the design for support). Interfacing, on the other hand, is in it for the long haul.
Here's an easy way to think about it: Interfacing is the permanent foundation of the house. Stabilizer is the temporary scaffolding you put up while you're painting the fancy trim.
How Do I Get Tear-Away Out of Tiny Letters?
Ugh, this can be a real pain! Trying to pick out tiny bits of tear-away from the inside of letters like 'a' or 'o' is a common frustration, but it’s totally manageable with the right approach.
Your best friend for this task is a good pair of sharp tweezers. Use them to get a good grip on those little trapped pieces. Here’s the key: when you pull, try to tear the stabilizer horizontally, parallel to the stitches, not straight up and away from them. This simple change of direction puts way less stress on your threads and helps you avoid distorting those beautiful stitches you just made.
If you're still having a tough time or the font is just impossibly detailed, switch to a wash-away stabilizer for that project. It dissolves with water, leaving you with perfectly crisp lettering and zero fuss.
Which Stabilizer Weight Is Right for My Project?
Choosing the right weight—light, medium, or heavy—is just as critical as choosing the right type. The general rule I follow is to match the stabilizer's weight to both the fabric's weight and the design's density.
Here’s a quick guide to get you started:
- Light-weight stabilizer: This is for your delicate, lightweight fabrics like linen or batiste, especially with airy, low-density designs.
- Medium-weight stabilizer: Your everyday workhorse. It's perfect for medium-weight fabrics like quilting cotton and chambray with standard stitch counts.
- Heavy-weight stabilizer: Break this out for the tough stuff. Think heavy fabrics like denim and canvas, or for any fabric that's getting a super dense, high stitch-count design.
When in doubt, it’s always better to go a little heavier with your stabilizer than too light. A bit of extra support is always better than a puckered mess.
Ready to put all this knowledge to good use? B-Sew Inn is your go-to spot for everything you need, from the latest embroidery machines to every kind of stabilizer and thread you can imagine. Check out our huge collection of supplies and our exclusive B-Creative classes to really elevate your craft. Visit us today at https://www.bsewinn.com and start creating with total confidence.

