

Getting the right glue for putting rhinestones on fabric is a make-or-break decision for your project. You really need an adhesive that dries clear, stays flexible, and is completely washable—otherwise, all that sparkle you worked so hard on won't last. The secret is matching the glue to your specific fabric and the type of rhinestones you're using. At bsewinn.com, our goal is to empower you on your crafting journey with comprehensive how-to guides like this one, helping you create stunning designs you can be proud of.
Choosing the Right Glue for Rhinestones on Fabric
Let’s be honest, there's no single "best" glue out there. The perfect adhesive for your project depends entirely on what you're making. A glue that’s a rockstar on a sturdy denim jacket would be a disaster on delicate silk or a stretchy dance costume. This is where a little know-how about how materials interact really pays off.
Here at bsewinn.com, we are committed to empowering crafters with the skills to bring their visions to life. That’s why we offer extensive resources, including online classes and training, to help you master techniques like choosing the right glue. With our support, you'll gain the confidence to turn your creative ideas into gorgeous, durable finished pieces.
Quick Guide to Rhinestone Glue Types
To help you get started, I’ve put together this quick comparison table. It breaks down the most common adhesives we use for fabric projects and highlights where each one really shines. Think of it as your cheat sheet for making a fast, smart decision.
| Adhesive Type | Best For | Key Feature | Washability |
|---|---|---|---|
| Hot-Fix | Pre-coated rhinestones, fast application | Heat-activated glue is already on the stone | Very Good |
| Fabric Glue | Cotton, denim, most non-stretchy fabrics | Dries flexible and clear, non-toxic | Excellent |
| E6000 | Heavy embellishments, non-porous fabrics | Industrial-strength permanent bond | Good |
| Gem-Tac | Delicate fabrics, small stones | Gentle, low-odor, easy precision application | Very Good |
| Glue Gun | Quick crafts, non-wearable items | Fast-setting, thick application | Poor |
| Silicone | Stretchy performance wear, outdoor gear | Extreme flexibility and waterproofing | Excellent |
Remember, this is just a starting point. The absolute best choice always comes down to the specific fabric you’re working with and how the finished item will be used and cared for.
Matching Adhesive to Fabric Type
The fabric is always your first consideration. Different materials have completely different personalities when it comes to holding onto glue.
- Stretchy Fabrics (Spandex, Lycra): If you're working on performance wear or a dance costume, you need a glue that can really move. Anything that dries hard and rigid will just crack and pop off the second the fabric stretches.
- Delicate Fabrics (Silk, Satin, Organza): For these lighter materials, go for a gentle, thin glue. A thick, heavy adhesive can bleed right through the fibers, leaving ugly dark spots or making the fabric stiff and awkward.
- Porous Fabrics (Cotton, Denim): These fabrics are pretty forgiving and grab onto glue for a strong bond. Most high-quality fabric glues work well here, but you still want to make sure they offer enough flexibility for a wearable garment.
- Tricky Surfaces (Leather, Velvet): Materials like leather or velvet can be a real challenge because their smooth or textured surfaces resist typical glues. You’ll often need to bring out an industrial-strength adhesive to get a permanent bond that won’t peel away.
This decision tree gives you a great visual for picking a glue based on your fabric.
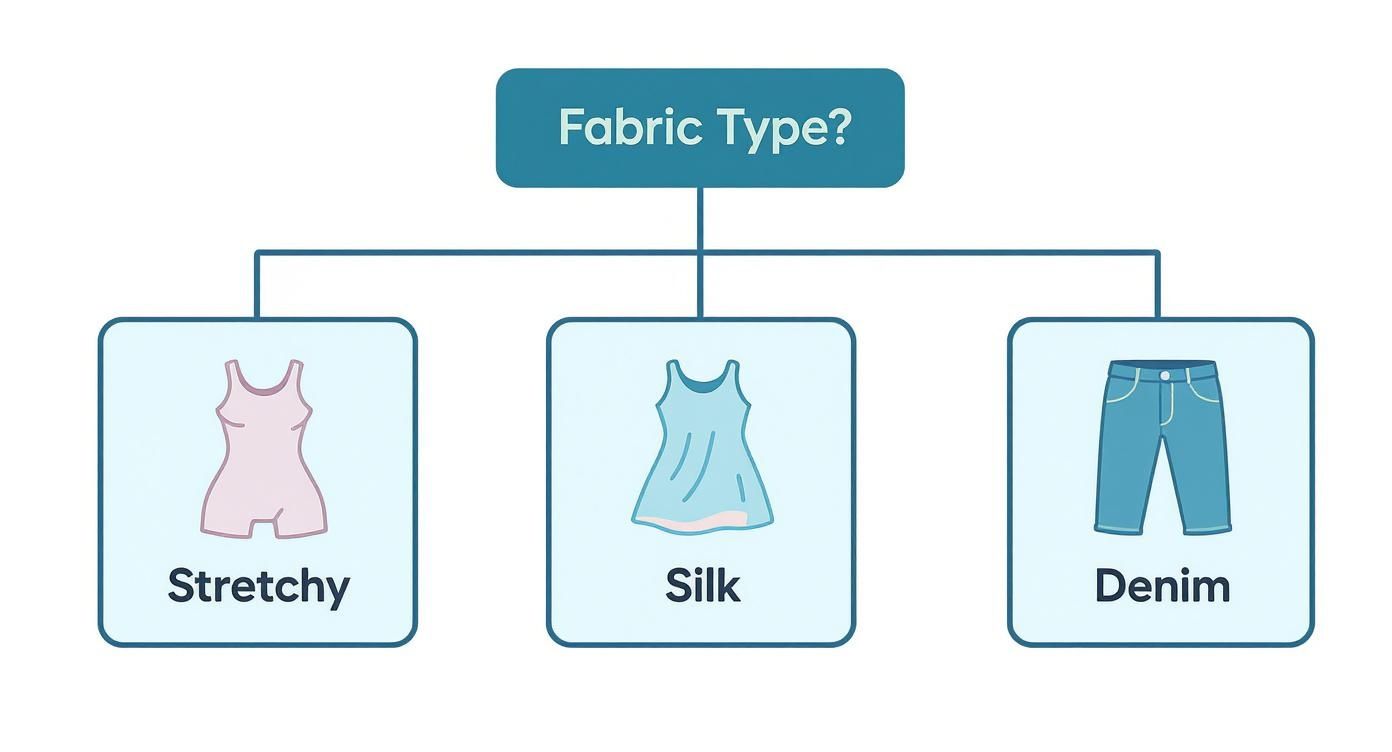
As you can see, there’s no one-size-fits-all answer. The fabric really does call the shots if you want your design to last.
The Role of Rhinestone Type
The kind of rhinestone you’re using matters, too. They generally fall into two camps: flat-back (or non-hot-fix) stones and hot-fix stones. Flat-backs need a separate liquid glue to attach them. Hot-fix stones, on the other hand, come with a heat-activated glue already on their backing.
Key Takeaway: You can use liquid glue on hot-fix stones, but why would you? They’re more expensive because the glue is already included. Always match your application method to your stone type to get the best performance and value.
For those of you looking to scale up a hobby into a business, getting your materials right is half the battle. This applies whether you're just buying some fun embellishments or seriously looking into sourcing jewelry making supplies in bulk. At the end of the day, professional-quality work comes from combining the right supplies with the right techniques. Properly prepping your fabric, maybe with a little help from the Baby Lock Stabilizer Ultimate Kit, is what sets you up for a flawless finish.
Let's Compare the Top Glues for Rhinestoning Fabric
Walking down the craft store aisle for fabric adhesive can feel a little overwhelming. There are so many options! But instead of just giving you a list, I want to put the most popular choices head-to-head to see how they actually stack up in the real world. This way, you can find the perfect glue for rhinestones on fabric that truly fits what you’re making.
Knowing the difference will give you the confidence that your sparkly creations won't just look amazing, but will also last. It’s this kind of hands-on knowledge we focus on here at bsewinn.com, giving you the skills and resources to nail any project you dream up.
The Crafter's Favorite: Gem-Tac
There's a reason you'll find Gem-Tac on nearly every crafter's table, especially when dealing with delicate fabrics or tiny stones. This is a water-based adhesive that’s known for being gentle and super precise. It's my go-to for any intricate design where I need total control over where the glue goes.
One of its best features is the low odor and non-toxic formula. You can work with it for hours indoors without needing to open every window in the house. It also dries totally clear and, most importantly, stays flexible. That’s a must-have for any clothing that needs to stretch and move.
The tradeoff is patience. Gem-Tac needs a full 24 hours to cure before you can really handle or wear the item. While the bond is strong, it doesn't have the brute industrial strength of other glues, so I wouldn't use it for super heavy gems on a high-wear item like a backpack.
Tangible Example: Imagine you're creating a custom galaxy design on a child's dark blue t-shirt. You would use Gem-Tac with a precision tip to place tiny silver rhinestones as stars. The glue's flexibility ensures the design won't crack as the child moves, and its clear-drying formula won't leave a cloudy residue on the dark fabric. This is a project you can replicate at home for a truly special gift.
The Industrial Powerhouse: E6000
When you have a project that absolutely, positively cannot lose a single stone, E6000 is usually the answer. This is an industrial-strength adhesive that famously sticks to just about anything, including tricky surfaces like leather, vinyl, and other non-porous materials.
The biggest pro for E6000 is its sheer strength and durability. It creates a waterproof bond that can take a serious beating, making it fantastic for things like denim jackets, shoes, or bags that are going to see a lot of action. It also keeps a bit of flex when cured, so it won’t get brittle and crack over time.
But there's a big catch: E6000 has very strong, toxic fumes. You absolutely must use it in a well-ventilated space. Its thick, almost gel-like consistency can also be a pain to control, sometimes leading to a mess if you're not using a precision tip applicator.
Comparison at a Glance
| Feature | Gem-Tac | E6000 |
|---|---|---|
| Bond Strength | Strong | Industrial-Strength |
| Best For | Delicate fabrics, small stones | Heavy stones, tricky surfaces |
| Flexibility | Very high | High |
| Odor/Fumes | Low odor, non-toxic | Strong fumes, requires ventilation |
| Application | Easy to control | Can be messy and thick |
| Curing Time | 24 hours | 24-72 hours |
The No-Mess Method: Hot-Fix Applicators
Hot-fix rhinestones change the game entirely by getting rid of liquid glue altogether. These stones come with a little dab of heat-activated adhesive already on the back. You just use a special hot-fix applicator tool to melt that glue, pressing the stone right onto the fabric.
The beauty of this method is speed and cleanliness. No sticky fingers, no accidental drips, and zero drying time. As soon as the stone is applied and cools down, the bond is set. This creates a really durable bond that's often machine-washable, which is a huge plus for everyday clothing.
The downside? The hot-fix method doesn't work for every fabric. Heat-sensitive materials like some synthetics, leather, or vinyl can get damaged or even melt from the applicator's heat. You're also limited to buying hot-fix rhinestones, which can sometimes be a bit pricier than their glue-on cousins.
The demand for easy, embellished apparel has made all these methods popular. In fact, while multipurpose glues had a slightly lower rating of 3.9, they led in sales volume at 1,187.3 units per month. That just shows how many people are jumping into DIY crafting and looking for versatile, strong adhesives. You can always explore more about rhinestone adhesive trends to see how things are evolving.
Ultimately, picking the best glue for rhinestones on fabric is a balancing act. You have to think about your fabric, the size of your stones, and how the final piece will be used. Make that choice thoughtfully, and you're guaranteed a beautiful, long-lasting result.
How-To: Apply Rhinestones for a Flawless Finish
Okay, you’ve picked your fabric and have the perfect glue ready to go. Now for the fun part: bringing that sparkling vision to life. This is where the magic happens, transforming a simple garment into a custom, dazzling piece. Getting that flawless, professional look isn't about luck—it's about having a solid process that sets you up for success right from the start.
Here at bsewinn.com, we are committed to empowering crafters like you. Through our online classes, training, and extensive resources, we provide the step-by-step guidance to master these exact techniques. We want you to feel supported as you learn, giving you the confidence to create professional-quality custom sewing machine designs.
Step 1: Prep Your Fabric and Workstation
Before you even think about uncapping that glue, a little prep work is non-negotiable. Trust me, this initial stage is the foundation for a design that lasts and helps you avoid those common mistakes that can frustrate even the most seasoned crafters.
First things first: always pre-wash your fabric. New textiles often come treated with sizing or other chemicals that act as a barrier, stopping the adhesive from getting a good grip. Wash it just like you normally would, but skip the fabric softener entirely. Fabric softeners leave behind a waxy film that is the absolute enemy of a secure rhinestone bond.
Next, get your workspace ready. Lay your fabric completely flat on a clean, hard surface. If you’re blinging out a t-shirt, dress, or anything with a front and back, slide a piece of cardboard or a plastic mat inside. This is a simple but critical step to keep glue from seeping through and sticking the layers together. Nobody wants that!
Pro Tip: Never skip the glue test. Before you commit to your full design, stick one or two rhinestones on a scrap piece of the same fabric or in a hidden spot like an inner seam. Let it cure completely, then give it a gentle pry. This quick test confirms your glue and fabric are compatible and gives you peace of mind that your design will hold up.
Step 2: Mastering Liquid Glue Application
When you’re working with a liquid glue like Gem-Tac, precision is the name of the game. The goal is to use just enough adhesive to secure the stone without it oozing out and creating a messy "halo" around the edges. This is where the old mantra "a dot, not a lot" really proves its worth.
The best way I’ve found to control the flow is with a precision applicator tip or a syringe. These tools give you so much control, letting you place tiny, consistent dots of glue exactly where you need them. Your dot of glue should always be slightly smaller than the rhinestone, as it will spread out a bit when you press the stone down.
For actually picking up and placing the stones, a beeswax stick or a crystal pickup tool is a total game-changer. Forget fumbling with tweezers! These tools have a slightly tacky tip that grabs the top of the rhinestone effortlessly, letting you place it with perfect accuracy.
Your Liquid Glue Checklist:
- Use Precision Tools: A syringe or fine-tip bottle is your best friend for controlling glue flow.
- Place Tiny Dots: Remember, the glue dot should be smaller than the stone itself.
- Work in Small Sections: Only apply enough glue for a few stones at a time. It dries faster than you think!
- Press Gently: Place the stone onto the glue dot and press down gently with your pickup tool to set it firmly in place.
Step 3: Using a Hot-Fix Applicator Tool
If you prefer a cleaner, no-mess approach, the hot-fix method is fantastic. The adhesive is already on the back of the rhinestone, so your main tool is a hot-fix applicator wand. It simply heats the glue to its melting point, fusing it directly to the fabric.
Start by screwing on the correct metal tip for your wand—it should match the size of your rhinestones. Turn the wand on and let it heat up for a few minutes. While it’s heating, arrange your rhinestones with the shiny, faceted side facing up.
Gently pick up a rhinestone with the applicator; the stone will fit snugly right into the heated tip. Hold the wand vertically, place it on your fabric, and wait for about 10-15 seconds. You’ll often see the glue start to look wet or bubble slightly, which is the signal that it’s melted. Lift the wand straight up, and the stone will stay put, securely attached to your garment.
In the apparel industry, flat-back rhinestones are king, and hot-fix types are a huge part of that. The specific glue on the back is engineered for a permanent, heat-pressed bond, a process that has to be done right to ensure stones don’t pop off after a wash. You can read the full research about the rhinestone market to see just how popular this method is.
And while you're embellishing, don't forget how other tools can complement your work. Whether you're adding delicate seed beads alongside your rhinestones, a specialized attachment like the Beading Foot for Vibrant can open up another layer of creative possibilities for your projects.
No matter which method you choose, the real key is to work patiently and methodically. Rushing is how you end up with misplaced stones or messy glue. Take your time, follow these steps, and you’ll be on your way to creating a stunning piece that sparkles for years.
From Sticky to Set: Curing and Caring for Your Masterpiece
Placing that last rhinestone feels like crossing the finish line, but hold on—the race isn't quite over. To make sure your hard work doesn't just wash away (literally), you need to get serious about the final steps: letting the glue cure and handling the finished piece with a bit of TLC. This is what truly separates a one-night-wonder from a beloved garment that dazzles for years.
Think of curing as more than just "drying." Sure, the glue might feel tacky or even dry to the touch in an hour, but there’s a whole chemical reaction happening under the surface. The adhesive is busy creating super strong bonds with the fabric fibers. Rushing this part is hands-down the number one reason rhinestones go AWOL after the first wash.
Why You Can't Rush a Good Cure
Every glue has its sweet spot for curing, but a solid rule of thumb is to give your project at least 24 to 72 hours of alone time before you wear or wash it. Those heavy-duty, industrial-strength glues often need the full 72 hours to really lock in and become water-resistant.
During this waiting period, find a safe, flat spot where your garment can just chill, completely undisturbed. Laying it flat is key—it stops any stones from sliding around while the glue is still finding its final resting place. You'll also want to keep it out of direct sunlight and away from extreme temperatures, which can mess with the curing chemistry and sometimes cause certain glues to yellow. A little patience now saves a lot of heartache later.
It's a common mistake to grab an iron and try to heat-set a regular fabric glue, thinking it’ll speed things up. Bad idea. Unless the glue specifically says it’s a "heat-set" formula, you can actually cook the adhesive and destroy its chemical bonds, making it weaker. Always, always read the manufacturer's instructions first.
How to Wash Without Wrecking Your Work
The washing machine can feel like a war zone for anything with embellishments. But with the right strategy, you can keep your sparkly creations looking brand new. The name of the game is minimizing friction, heat, and harsh chemicals.
First thing's first: always turn the garment inside out. This simple move is your best defense. It shields the rhinestones from snagging on other clothes or banging against the inside of the machine.
For the best chance of survival, follow this game plan:
- Bag It Up: Pop the inside-out garment into a mesh laundry bag. It’s like a little suit of armor against snags.
- Keep It Gentle: Always choose the delicate or hand-wash cycle. Less tumbling means less stress on your stones.
- Go Cold: Hot water is the enemy. It can soften some glues and weaken their grip over time. Cold water is your safest bet.
- Mild is Best: Harsh detergents can eat away at adhesives. Stick with a gentle soap, and whatever you do, skip the fabric softener.
The Golden Rule of Drying
This is non-negotiable: never put rhinestone clothing in the dryer. The intense heat is the fastest way to melt the glue and turn your masterpiece into a tragedy. The tumbling action is just as bad, putting a ton of strain on every single bond.
The only way to dry your pieces is to air-dry them. You can lay the garment flat on a clean towel or hang it up. If you decide to hang it, just make sure the weight of the wet fabric isn't pulling on the embellished sections. Let it dry completely—this also helps the glue firm back up if it softened a tiny bit in the wash.
Proper aftercare is the final step in honoring all the time and creativity you poured into your project. At bsewinn.com, we believe that empowering crafters means supporting them through the entire process, from that first spark of an idea to long-term care. Our online classes and extensive resources are built to give you the skills to not only make beautiful things but make them last. And once your piece is fully cured and ready to show off, you might get some inspiration by checking out ideas for styling vintage flower hair accessories to pull your whole look together.
Tackling Common Rhinestone Application Glitches
Even when you do everything by the book, sometimes things go sideways. A perfectly placed rhinestone decides to pop off, or the glue leaves a frustrating little halo. Don't sweat it—these common hiccups happen to everyone, and they’re almost always fixable. Better yet, they're a great chance to really dial in your technique.
Think of this as your go-to guide for turning those "oops" moments into hard-won crafting wisdom.

Here at bsewinn.com, we know that learning to fix mistakes is just as important as the application itself. It's all part of the process! Our online classes and extensive resources are here to support you at every stage, giving you the confidence to nail that beautiful, professional finish on all your custom sewing machine designs.
Why Are My Rhinestones Falling Off?
This is easily the most common headache, especially after that first nerve-wracking wash. If your gems are making a break for it, the problem almost always traces back to the initial bond. Let's play detective and figure out the likely culprits.
- The Fabric Softener Film: Did you skip the pre-wash, or did you use fabric softener? Softeners leave behind an invisible, waxy film that stops even the best glue for rhinestones on fabric from getting a solid grip.
- Rushing the Cure Time: Patience is everything. Did you let the glue cure for the full 24-72 hours recommended by the manufacturer? That downtime is crucial for the adhesive to fully cross-link with the fabric fibers and build maximum strength.
- The Wrong Glue for the Job: Trying to use a rigid glue on a stretchy fabric is just asking for trouble. The second that material flexes, the inflexible bond will crack, and the stone will pop right off.
The quality of your adhesive is non-negotiable. Bad glue is a huge pain point for crafters. In fact, if you look at reviews for embellishment products, issues with the adhesive dominate the negative feedback (18.5% of the time!). And products like pre-made rhinestone strips see interest drop by 33.6% simply due to poor adhesion. It’s clear: choosing a high-quality, appropriate glue is the single most critical step. You can read more about these consumer trends in rhinestone crafting to see just how vital the right adhesive is.
Dealing with Messy Glue Halos and Cloudy Finishes
Another classic issue is seeing glue ooze out from under the stone or noticing a cloudy look once it dries. This can really cheapen an otherwise professional-looking project, but thankfully, it’s usually an easy fix for next time.
That "glue halo" is simply a sign of using too much adhesive. The trick is to apply a dot of glue that's slightly smaller than the rhinestone itself. When you press the stone down, the glue will spread perfectly to the edges without squeezing out. A precision applicator tip or a syringe will give you the control you need to pull this off.
If your glue is drying cloudy instead of crystal clear, a couple of things could be going on. Applying the adhesive too thickly can trap moisture inside, which prevents it from drying clear. Sometimes, it can also be a chemical reaction with sizing agents on unwashed fabric.
Key Insight: Less is truly more. A tiny, well-placed dot of high-quality glue creates a much stronger and cleaner bond than a big, messy glob. Get a feel for it by practicing on a scrap piece of fabric to find that sweet spot for your rhinestone size.
Mastering these little details is what separates good work from great work—kind of like knowing when to add intricate beadwork to complement your rhinestones. If you're looking to explore more advanced embellishment techniques, our guide on how to make a beaded bag is packed with inspiration.
Your Rhinestone Glue Questions Answered
When you're in the middle of a project, questions always seem to pop up. To help you get past those tricky spots and achieve a result you'll love, here are some quick answers to the questions I hear most often from fellow crafters using glue for rhinestones on fabric.
Can I Use a Hot Glue Gun for Rhinestones on Fabric?
I know it's tempting to reach for the hot glue gun for a quick fix, but for anything you plan to wear, it's just not the right tool for the job. Standard hot glue creates a thick, stiff bond that has zero flexibility. The second that fabric stretches or gets washed, that rigid glue is likely to crack, and your beautiful rhinestones will start popping off.
For any garment that needs to move with a body, always stick with a specialized fabric adhesive. They're designed to stay pliable for a reason!
What Is the Best Glue for Stretchy Fabrics Like Spandex?
Working with performance fabrics like spandex or lycra for dance costumes or athletic wear is a whole different ballgame. For these, a super flexible adhesive is non-negotiable. I've had great success with glues like Gem-Tac because they cure into a pliable bond that moves with the fabric instead of fighting against it.
My Pro Tip: Before you commit to the full project, do a quick stretch test. Glue a few rhinestones onto a scrap of the same fabric, let it cure completely, and then give it a good pull. This is the only way to know for sure if your adhesive can handle the movement without failing.
How Do I Remove a Misplaced Rhinestone or Glue Stain?
Don't panic! Placing a stone in the wrong spot or getting a little glue smear happens to all of us. If the glue is still wet, you can usually wipe it away carefully with a damp Q-tip or cloth. Once it's cured, though, things get trickier.
An adhesive remover like rubbing alcohol or acetone can sometimes dissolve the bond. But you absolutely must test it on a hidden part of the fabric first, like an inside seam. Some solvents can completely ruin delicate textiles or cause discoloration. If it's safe, apply a tiny amount with a cotton swab right at the edge of the glue, let it sit for a minute to soften, and then gently try to pry the stone off with tweezers. Patience is key here.
How Long Before I Can Wash My Rhinestone Project?
This is where you have to be patient. I know you're excited to wear your new creation, but most fabric glues need between 24 to 72 hours to fully cure. It might feel dry to the touch way sooner, but it hasn't developed its maximum strength and water resistance yet.
Always, always check the manufacturer's specific instructions on the bottle. If you're ever in doubt, waiting the full 72 hours is your safest bet. It's the best way to ensure your sparkling design stays put through its first gentle wash.
Here at B-Sew Inn, we're passionate about supporting your entire creative journey, from helping you find the perfect machine to mastering detailed techniques like this. You can explore our huge selection of sewing machines, supplies, and classes to bring all your ideas to life. Find everything you need at https://www.bsewinn.com.

