

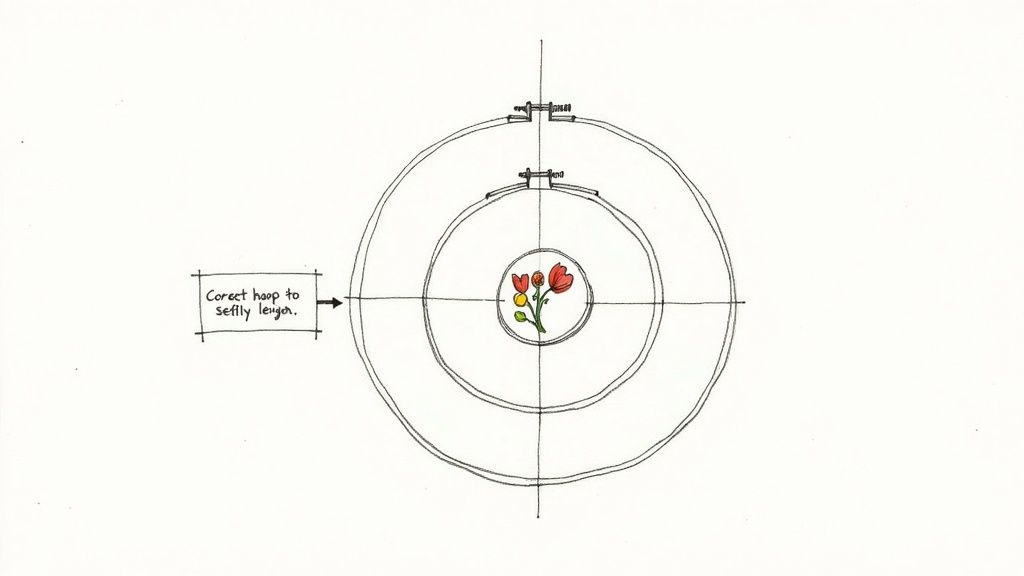
Starting a new embroidery project is always exciting, but the secret to a perfect stitch-out often comes down to one simple choice: the hoop. It’s a foundational rule, but it’s a game-changer: always choose a hoop that is slightly larger than your design.
This sweet spot gives you that perfect, drum-tight tension across the fabric. Get it right, and you’ll avoid wasting stabilizer or putting unnecessary strain on your machine. This guide will show you exactly how to select the right hoop and use it to create beautiful, replicable sewing machine designs.
Why Your Embroidery Hoop Size Matters
Think of the embroidery hoop as the foundation of a house. If that foundation is shaky or the wrong size, you’re going to have problems with the whole structure. It’s the same with embroidery. The right hoop holds your fabric taut, preventing those dreaded puckers and making sure every single stitch is crisp, clean, and exactly where it’s supposed to be.
Honestly, it’s the very first step to getting that professional look we all want for our projects.
Choosing the wrong hoop can send you down a rabbit hole of frustrating issues. If the hoop is way too big for your design, the fabric can sag, leading to distorted stitches and puckering. On the flip side, cramming a design into a hoop that’s too small is just asking for trouble. You risk the presser foot crashing into the hoop, which can break needles or—even worse—damage your machine.
The Foundation of Flawless Stitches
Matching your hoop to your project is a core skill that really sets you up for success. This one decision has a ripple effect on several parts of your work:
- Stitch Quality: A perfectly tensioned surface is non-negotiable for beautiful stitches. The right hoop size makes sure your fabric doesn’t shift an inch while the machine is working its magic.
- Design Placement: Your hoop is your work area. It helps you perfectly center and align designs on everything from t-shirts and quilt blocks to tea towels.
- Stabilizer Efficiency: Here’s a practical tip: using the smallest hoop that fits your design comfortably means you use less stabilizer. Over time, that really adds up, saving you money and materials. If you want to dive deeper into this, check out our guide on choosing the best stabilizer for embroidery.
At bsewinn.com, we are committed to empowering crafters like you. We believe that when you master the basics, like picking the right hoop, you build the confidence to replicate tangible examples and tackle those bigger, more creative projects you've been dreaming of.
We don't just provide the tools; we offer the support to help you get the most out of them. Through our online classes, training, and extensive resources, we’ll walk you through every step. This guide will take the mystery out of hoop sizes and show you exactly how to make the right choice, every single time.
Diving Into Embroidery Hoop Basics
Before you can pick the right hoop for your project, it really helps to get to know the tool itself. An embroidery hoop is more than just a couple of rings; think of it as a precision instrument that creates the perfect canvas for your machine. Its main job is to hold your fabric perfectly taut, giving you a stable, even surface for flawless stitching.
The material a hoop is made from is a big deal and can really affect its performance. Each type has its own strengths, depending on what you’re sewing.
A Look at Common Hoop Materials
You'll mostly run into three types of hoops on your embroidery journey. Figuring out the pros and cons of each will make choosing the right one for your next project a whole lot easier.
- Plastic Hoops: These are the trusty standbys that often come with a new embroidery machine. They’re light, tough, and usually have some kind of interlocking feature that grips the fabric securely. This makes them a fantastic choice for tricky materials like stretchy knits or slippery silks.
- Wooden Hoops: A classic in the hand-embroidery world, wooden hoops have also found a place in machine embroidery. Crafters love them for their traditional feel and solid grip. They provide excellent tension, though they can sometimes be a bit heavier than their plastic cousins.
- Magnetic Hoops: These are a game-changer for projects that are a real pain to hoop traditionally. Instead of an inner and outer ring, they use super-strong magnets to clamp the fabric and stabilizer together. They are perfect for bulky items like quilt sandwiches and thick towels, or for delicate fabrics you don’t want to mark up.
At bsewinn.com, our online classes and extensive resources are packed with projects that show you exactly when to reach for each type of hoop. It’s a great way to build your skills with real, hands-on examples that you can replicate at home.
The Anatomy of a Standard Hoop
A standard hoop is a beautiful example of simple, effective design. It’s made of two parts that work in harmony to get your fabric just right.
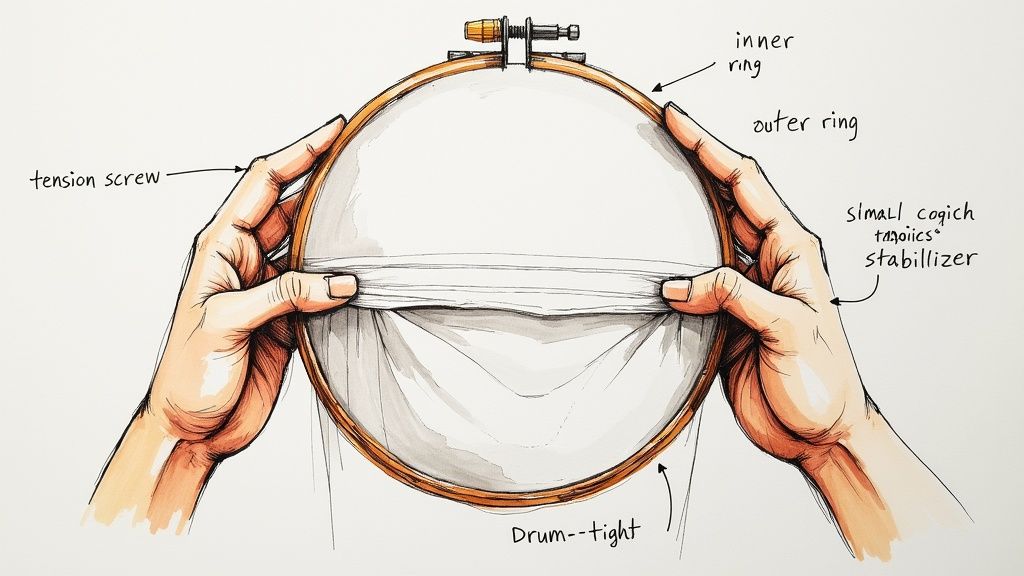
- The Inner Ring: This is the smaller, solid ring that you place underneath your fabric.
- The Outer Ring: This larger ring fits snugly over the inner ring and fabric. It almost always has a tension screw on the side, which is what lets you tighten or loosen the grip.
When you lay your fabric over the inner ring and pop the outer ring on top, they lock together. From there, you just tighten the screw until the fabric is pulled taut. That perfectly smooth, "drum-tight" surface is what your machine needs to lay down crisp, beautiful stitches. Grabbing a good round embroidery hoop set is a great way to get a feel for how these pieces work together in different sizes.
The secret to professional-looking embroidery is getting the fabric tight as a drum without stretching or distorting the material. This perfect tension is the foundation that prevents puckering and makes sure every single stitch lands exactly where it’s supposed to.
Standard Hoops vs. Specialty Hoops
The hoops that came with your machine are your everyday workhorses, built to handle a wide variety of common projects. But as you get more adventurous, you’ll find a whole world of specialty hoops designed for very specific jobs. Some of these include:
- Tiny hoops made for tricky spots like shirt cuffs and collars.
- Continuous border hoops for creating long, seamless patterns on things like table runners.
- Extra-large quilting hoops that can handle massive, expansive designs.
It's interesting to see that while crafters use all sorts of hoops, the ones between 6 and 8 inches are the most popular by a long shot. They account for nearly 45% of sales globally because they’re just so versatile. This really shows why having a few core sizes in your collection is a smart move.
Of course, hoops are just one piece of the puzzle. At bsewinn.com, we're here to help you make sense of all these options, giving you the training and confidence to pick the perfect tool for any creative vision you have.
A Practical Guide to Common Hoop Sizes
Now that we have the basics down, let's put it all into practice. Choosing the right hoop size gets a whole lot easier when you can actually picture the finished project. Just think of your hoops like different tools in a toolbox—each one is designed for a specific job.
This is the exact hands-on approach we take at bsewinn.com. We're all about empowering you with real, repeatable examples that build your confidence stitch by stitch. Our custom sewing machine designs and online classes are built around this very idea, showing you precisely how to match a hoop to a project you can be proud of.
Small But Mighty: The 4"x4" Hoop
The 4"x4" (or 100x100mm) hoop is usually the smallest one that comes with a new machine, and it's an absolute workhorse. Its compact frame gives you fantastic tension for those tiny, detailed designs where every single stitch counts.
Don't ever underestimate this little powerhouse! It’s your secret weapon for adding those personal touches that turn something simple into a custom-made treasure.
- Delicate Monograms: Perfect for stitching crisp, clean initials on shirt cuffs, collars, or pocket squares.
- Baby Items: The ideal size for adding sweet little motifs to onesies, bibs, and hats without puckering the fabric.
- Small Logos: Great for creating branded apparel or accessories with a sharp, professional finish.
- Free-standing Lace Ornaments: These intricate designs need firm, even tension, which this small hoop delivers perfectly.
The Versatile All-Rounder: The 5"x7" Hoop
If you could only have one hoop in your collection, the 5"x7" (or 130x180mm) hoop would be a top contender. It strikes that perfect balance between size and manageability, making it the go-to for a huge range of projects. It's large enough for more complex designs but isn't so big that it feels unwieldy.
This is the hoop you'll find yourself reaching for again and again. It handles everything from home décor to garment embellishments with total ease.
At bsewinn.com, we often call the 5"x7" the "gateway hoop." It’s the size where you really start to see the creative possibilities of your machine open up, tackling the kinds of projects featured in many of our intermediate online training classes.
This visual guide helps break down another key choice you'll make: which hoop material works best for your fabric. It's just as important as the size!
It really simplifies the decision: stable wovens do great with classic wood hoops, stretchy knits love the grip of plastic, and those bulky fabrics are finally tamed by magnetic hoops.
Making a Statement: The 8"x12" Hoop and Larger
When your creative vision is just too big for a smaller frame, large-format hoops like the 8"x12" (or 200x300mm) and bigger are your best friends. These hoops let you create those jaw-dropping, statement pieces that become the star of the show. They’re built for stitching large, continuous designs without the headache of re-hooping.
Now, working with a large hoop definitely takes a bit more care with your stabilization and hooping technique, but the results are absolutely worth it. These are perfect for:
- Jacket Backs: Stitching those bold, intricate designs across the back of a denim or leather jacket.
- Pillow Covers: Creating elaborate patterns or scenes for decorative pillows that pop.
- Large Quilt Blocks: Embroidering detailed blocks that will be the cornerstone of an heirloom quilt.
This move toward bigger projects is something we're seeing all over the crafting world. Back in 2015, the average embroidery hoop sold was about 6 inches across. By 2023, that number had jumped to 7.5 inches! This shift, detailed in this market analysis on embroidery hoop trends, shows just how much we all love creating larger, more complex embroidery art.
Embroidery Hoop Size and Project Application Chart
To pull it all together, here is a quick reference chart to help you match hoop sizes to your next project at a glance. Think of it as your cheat sheet for creating tangible designs you can replicate.
| Hoop Size (Inches) | Common Project Types | Best For... | Recommended bsewinn.com Class with Replicable Designs |
|---|---|---|---|
| 4"x4" | Monograms, baby clothes, logos | Small, high-detail designs on stable fabric. | "Introduction to Personalized Gifts" |
| 5"x7" | Quilt blocks, tote bags, towels | Versatile mid-sized designs on various fabrics. | "Creative Home Décor Embroidery" |
| 8"x12" | Jacket backs, large pillows, wall art | Expansive, single-hooping statement pieces. | "Advanced Apparel Embellishment" |
By getting to know what each hoop size does best, you can walk into your sewing room and grab the right tool for the job with confidence. It's the first step to a smooth, fun, and successful stitching experience.
Matching Hoops to Your Machine and Design
Think of picking the right hoop as a three-way conversation between your project, your hoop collection, and your embroidery machine. The machine gets the first and last word because it has a boundary line it simply can't cross. This is its maximum embroidery field—the largest single area it can stitch without you having to re-hoop anything.
This maximum field is what determines the biggest hoop your machine can handle. It’s the hard limit, the first thing you need to know before you even fall in love with a design. It sets the absolute upper boundary for what you can create in one go.
Know Your Machine’s Limits
Every single embroidery machine, from a sweet little starter model to a multi-needle beast, has this specific maximum field size. If you try to attach a hoop that’s too big for it, it just won’t work. The machine won’t recognize it, and you might not even be able to physically connect it.
So, where do you find this magic number?
- Dust Off the Manual: Your machine’s instruction book is your most trusted source. Flip to the specifications page or look for a section on embroidery hoops.
- Glance at the Screen: Many modern machines are kind enough to display their maximum field size (like 8"x12" or 200x300mm) right on the embroidery screen.
- Check Your Stash: The largest hoop that came in the box with your machine is a dead giveaway for its maximum field size.
Knowing this boundary from the get-go saves you from the heartache of buying a gorgeous, sprawling design only to find out your machine can’t stitch it out.
Sizing Up Your Embroidery Design
Okay, so you know what your machine can handle. Now the spotlight shifts to your design file. The golden rule here is beautifully simple: pick the smallest hoop that your design fits into comfortably, leaving about an inch of wiggle room on all sides.
I like to call this extra space the "design float." It’s crucial because it gives the machine's presser foot the clearance it needs to zoom around without bumping into the inner edge of the hoop. A collision is bad news—it can lead to snapped needles, a cracked hoop, or even an unscheduled trip to the repair shop.
To check your design's size, just open the file in your embroidery software or on your machine. It will tell you the exact height and width. Jot those numbers down, add about an inch to both, and that’s your minimum hoop size.
For example, let’s say your design is 3.8" x 3.8". Sure, it will technically fit in a 5"x7" hoop, but a 4"x4" hoop is a far better choice. You'll get much better tension on your stabilizer and you won't waste as much material. It's also fun to see how these sizes trend; here in North America, the 6, 8, and 10-inch hoops are the rockstars, making up over 70% of sales.
Tackling Projects Larger Than Your Hoop
What happens when your creative vision is bigger than your biggest hoop? Don't panic! This is your invitation to learn a super useful advanced skill: multi-hooping.
Multi-hooping, sometimes called splitting, is the art of breaking a large design into smaller, manageable chunks that fit within your machine’s embroidery field. You stitch the first section, then carefully re-hoop your fabric to stitch the next part, lining it up perfectly with what you’ve already done. Modern machines and amazing tools like this innovative 10" x 10" magnetic hoop for the Solaris make this process so much smoother than it used to be.
With this technique, you can create those stunning, large-scale embroideries you see on jacket backs, table runners, and quilt borders, even without a giant commercial machine. It takes a bit of precision and practice, but once you get the hang of it, a whole new world of creative projects opens up.
At bsewinn.com, we know skills like multi-hooping can feel a little intimidating at first. That's why our detailed online training classes are designed to walk you through it, step-by-step. We’re here to give you the support and hands-on guidance to build your confidence and finally tackle those incredible, large-scale projects you’ve been dreaming about.
Mastering Hooping Techniques for Perfect Stitches
Having a great selection of embroidery hoops is a fantastic start, but the real magic happens when you master the art of using them. Flawless stitch-outs are a direct result of skillful hooping. When a project is hooped just right, you're giving your machine the perfect canvas to work on, ensuring every stitch is crisp, clean, and exactly where it should be.
This section is all about getting you those professional-looking results. We'll walk through the entire process, from prepping your fabric to troubleshooting those common frustrations that can derail a beautiful design. Think of this as your practical how-to guide for creating with confidence, one perfect stitch at a time.
Achieving Perfect Fabric Tension
The goal of hooping is to get your fabric "drum-tight." This means it's held taut and smooth in every direction, just like the surface of a drum. When you tap it lightly with your finger, you should feel a slight bounce and hear a faint thumping sound.
This perfect tension isn't just a suggestion—it's non-negotiable for quality embroidery. It’s what stops the fabric from shifting or puckering while the machine is stitching, which is the number one cause of distorted, wonky-looking designs.
But here’s a crucial distinction: "taut" is not the same as "stretched." You should never, ever stretch your fabric, especially knits or anything with a bit of give. If you stretch the fabric while hooping, it’s just going to snap back to its original size the second you unhoop it, leaving you with a puckered mess around your beautiful embroidery.
Step-by-Step Hooping Process
For consistent, beautiful results every time, follow this simple hooping method. It’s a replicable process you can use for countless projects.
- Prep Your Materials: Start by cutting a piece of stabilizer that is larger than your outer hoop. Lay it flat on your work surface.
- Position Your Fabric: Place your fabric smoothly on top of the stabilizer. Make sure there are no wrinkles!
- Place the Inner Ring: Slide the inner ring of your hoop under both layers, centering it right where you want your design to go.
- Secure the Outer Ring: Gently press the outer ring down over the inner ring. They should fit together snugly, sandwiching the fabric and stabilizer between them.
- Adjust for Tension: Lightly tighten the tension screw, but don’t crank it down yet. Gently pull on the fabric edges around the outside of the hoop to remove any slack, working your way around the circle. Once it's smooth, tighten the screw the rest of the way until the fabric is drum-tight.
A common mistake is to fully tighten the screw before smoothing out the fabric. By tightening it gradually as you adjust, you can achieve much more even tension across the entire surface without accidentally stretching the material.
Handling Challenging Fabrics
Let's be real—not all fabrics are created equal when it comes to hooping. Stretchy knits and slippery silks can be a real headache, but with the right approach, you can master them.
- For Stretchy Knits: A high-quality cut-away stabilizer is your best friend here; it gives the fabric a solid foundation. I also recommend using a temporary spray adhesive to lightly bond the knit to the stabilizer before hooping. This simple step keeps the fabric from shifting and stretching out of shape.
- For Slippery Silks: These delicate fabrics can easily be marked or even damaged by the pressure of a hoop. To avoid this, try sandwiching a piece of tissue paper or a thin layer of batting between the hoop and your silk to act as a cushion.
When to "Float" Your Fabric
Sometimes, the best way to hoop something is to not hoop it at all. Floating is a fantastic technique where you only hoop the stabilizer itself. Then, you use a temporary spray adhesive or basting stitches to secure your project fabric on top of the hooped stabilizer.
This method is an absolute lifesaver for:
- Bulky Items: Things like thick towels, quilt sandwiches, or jackets are often way too thick to fit comfortably in a hoop.
- Delicate Fabrics: Materials like velvet or corduroy can be permanently crushed by the pressure of a hoop. Floating prevents what we call "hoop burn."
- Hard-to-Hoop Areas: Trying to embroider close to a seam, zipper, or collar? Floating gives you the precision you need without wrestling with the hoop.
At bsewinn.com, our online classes and training sessions are packed with projects that show you exactly when to hoop and when to float. We give you real-world examples that empower you to tackle any fabric with confidence, backed by our extensive resources and specialty tools designed to make perfect hooping easier than ever.
Choosing the right embroidery hoop is a skill that gets better with every project you stitch out. Before you know it, it’ll be second nature.
Just keep the essentials in mind: always know your machine’s maximum embroidery field, measure your design carefully, and then grab the smallest hoop that’s just a little bit bigger. Getting that fabric tension perfectly drum-tight is that final secret to making your work look truly professional.
At bsewinn.com, we're more than just a store; we're your creative partner. Our community and resources are here for you, offering the tools and know-how to bring every idea to life, one perfect stitch at a time.
Don't be afraid to play around with different hoop sizes and just enjoy the process. Every single project—whether it comes out perfectly or not—is a step forward in building your skills and confidence.
When you feel that spark and you're ready to try something new, take a peek at our exclusive custom sewing designs or jump into one of our hands-on online training classes. We’re here to help you nail everything from the basics to the really fancy techniques. We truly believe in helping crafters like you turn those amazing ideas into beautifully finished pieces you can’t wait to show off. Your next masterpiece is just a hoop away.
Common Questions About Embroidery Hoop Sizes
Diving into the world of embroidery hoops can feel a little overwhelming at first, with all the different sizes and types. It definitely brings up a lot of questions! Getting some clear, real-world answers is the best way to build your confidence and start mastering your craft.
We've heard just about every question in the book, so we’ve gathered the most common ones right here. Think of this as the friendly, hands-on guidance and support you'll always find at bsewinn.com.
Can I Use a Hoop That Is Much Larger Than My Design?
It might seem easier to just grab your biggest hoop for every project, but trust me on this one—it’s not the best idea. When you use an oversized hoop for a small design, you lose a ton of control. It becomes incredibly difficult to get that perfect, drum-tight tension right where you need it most.
When the fabric isn't properly tensioned, it can sag in the middle of the hoop. This almost always leads to puckering and distorted stitches in your final design. Plus, you’ll end up wasting a surprising amount of stabilizer. The golden rule is to always choose the smallest hoop that your design fits into comfortably, leaving about an inch of space around all sides.
Do I Need Branded Hoops for My Specific Machine Model?
Yes, this is an absolute must! Hoops aren't a one-size-fits-all accessory. Every machine brand has its own unique attachment system that connects the hoop to the embroidery arm, so you have to use hoops that are made specifically for your machine's make and model.
Trying to use an incompatible hoop is a huge risk. Best-case scenario? Your machine just won't recognize it. Worst-case scenario? You could end up with broken needles or, even worse, cause serious damage to your embroidery arm. It's always worth double-checking for compatibility before you buy a new hoop.
What if My Project Is Too Big for My Largest Hoop?
This is where the real fun begins! When your ambition is bigger than your biggest hoop, you get to learn a powerful technique called multi-hooping, sometimes known as design splitting. The idea is to break up a large design into smaller, manageable sections that each fit inside your machine’s embroidery field.
You’ll stitch out the sections one by one, carefully re-hooping your fabric to line up each new piece perfectly with the one before it. It’s definitely a more advanced skill, but once you get the hang of it, a whole new world of large-scale projects opens up.
At bsewinn.com, we love demystifying techniques like multi-hooping in our online classes and training resources. We're here to give you the step-by-step guidance and support you need to tackle those ambitious projects that just won’t fit in a single hoop.
What's the Difference Between Metric and Imperial Hoop Sizes?
You've probably noticed that hoop sizes are listed in both inches (Imperial) and millimeters (metric). Here in the US, we're used to seeing sizes like 4"x4" or 5"x7". But many machine manufacturers and design files stick to metric measurements, like 100x100mm or 130x180mm.
It really helps to get comfortable with both. For example, a 100x100mm hoop is the same as a 4"x4" hoop. Your machine's manual is the best place to check which system it uses, so you can make sure you’re matching your designs and hoops perfectly every time.
Ready to see what else is possible? Come explore our huge collection of embroidery machines, hoops, and custom sewing machine designs at bsewinn.com. We’d love to be your partner in creativity, with all the tools, online classes, training, and extensive resources you need to bring your vision to life. Visit us today at https://www.bsewinn.com.

