
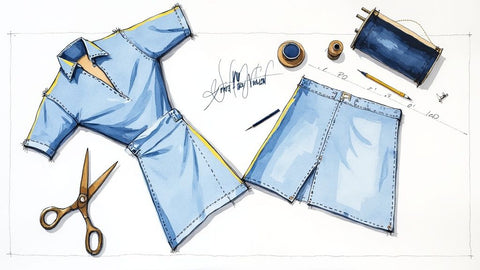
Making your first pair of jeans is one of the most rewarding sewing projects you can possibly take on. At bsewinn.com, we believe that with the right guidance and tools, any crafter can replicate this tangible design. This guide is designed to empower you through every step, showcasing how our custom sewing machine designs and extensive resources can turn a challenging project into a creative triumph.
The whole process really breaks down into four main stages: getting the right tools for the job, prepping your pattern and fabric so you get a perfect fit, mastering those durable seams, and finally, adding all the cool hardware that makes jeans look like, well, jeans.
Think of this as your roadmap. We'll walk through it together, backed by the support and expertise we offer through our online classes and training.
Your Essential Jeans Sewing Blueprint
I know, sewing a pair of jeans seems like a huge mountain to climb, but it's absolutely something you can do. The key is to break it down into smaller, manageable steps. That’s exactly what we’re going to do here, taking the mystery out of everything from picking the right denim to installing that final button.
A successful project starts way before you even touch your sewing machine. It all begins with a good plan and the right supplies. Using the wrong needle or thread leads to nothing but skipped stitches and a whole lot of frustration. And trust me, properly prepping your fabric is the secret sauce to avoiding shrinkage and getting a fit you love right from the start.
Mapping Your Creative Journey
Think of this project like you're building something from the ground up. Each step lays a solid foundation for the next, which is how you end up with a high-quality pair of jeans you’ll be genuinely proud to wear. This guide provides a tangible example of a project you can create, supported by our commitment to your crafting success.
Here are the key phases we'll tackle:
- Tooling Up: We'll gather all the non-negotiables, like heavy-duty denim needles, topstitching thread, and sturdy hardware.
- Preparation is Key: This is where we take accurate body measurements, make any necessary pattern adjustments, and pre-wash that denim.
- Construction Zone: Time to get sewing! We’ll cover essential techniques like flat-felled seams, installing a fly zipper, and attaching the waistband.
- Finishing with Flair: This is the fun part where we add all the professional details—rivets, buttons, and a perfectly clean hem.
Before we dive into cutting fabric, let's make sure your sewing space is stocked with everything you'll need. Having these items on hand before you start will make the entire process so much smoother.
Your Must-Have Jeans Sewing Toolkit
| Tool Category | Specific Item | Why It's a Game-Changer |
|---|---|---|
| Needles & Thread | Denim Needles (Size 90/14 or 100/16) | Standard needles will break. These are designed to pierce dense denim fabric without skipping stitches. |
| Topstitching Thread | This heavy-duty thread creates those classic, durable seams that are a hallmark of good jeans. | |
| All-Purpose Thread | For construction seams that won't be visible, like sewing pocket bags. | |
| Cutting & Marking | Rotary Cutter & Mat | Way more accurate and faster for cutting denim than scissors alone. |
| Pattern Weights | Denim is heavy and can shift easily. Weights keep your pattern pieces perfectly still while you cut. | |
| Chalk or Fabric Marker | You'll need something that shows up on dark denim for marking notches and placement lines. | |
| Hardware | Jeans Button & Rivets | This is what gives your jeans that authentic, professional look. Don't skip these! |
| Metal Zipper (7"-9") | A sturdy metal fly zipper is a must for durability. | |
| Pressing & Tools | Seam Gauge | Invaluable for pressing accurate hems and seam allowances. |
| Hammer or Mallet | Essential for installing rivets and your jeans button. A regular household hammer works fine. |
Gathering your tools first is one of my biggest pieces of advice. There's nothing worse than getting into your sewing flow only to realize you're missing a critical piece and have to stop everything.
At bsewinn.com, we live for ambitious projects just like this one. Our goal is to empower crafters not just with custom sewing machine designs built for heavy-duty work, but also with the dedicated support you need. Through our extensive online classes and resources, we're here for every stitch of your creative journey. This blueprint is your roadmap, and we’re excited to help you navigate it.
Choosing Your Fabric and Pattern
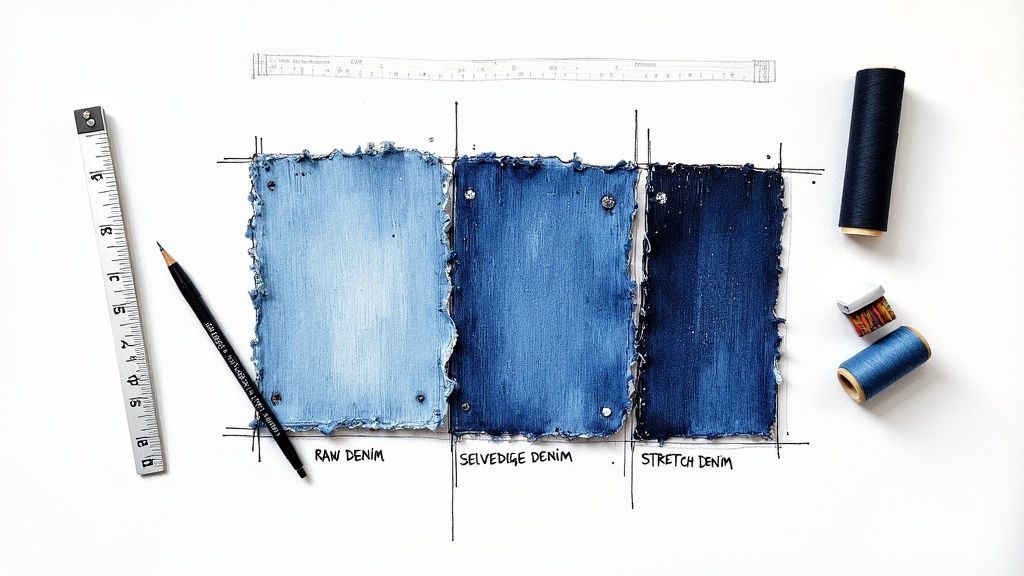
The soul of a truly great pair of jeans is the fabric. Your choice of denim is going to dictate everything from the fit and comfort to how they wear and fade over time. Getting this foundational step right is a huge part of creating a successful, replicable design.
The world of denim can feel a little overwhelming at first, but it really just comes down to a few key types. Each one offers a different feel and, frankly, a different sewing experience. Understanding these will help you make a pair of jeans you’ll actually want to live in.
Decoding Your Denim Options
When you're figuring out how to sew a jeans, the first big decision is the fabric itself. You've got non-stretch, or rigid denim, which gives you that classic, sturdy structure you see in vintage jeans. For your first pair, though, I'd strongly suggest a stretch denim with 2-3% elastane. It's just so much more forgiving and comfortable right off the bat.
Here are the main players you’ll run into:
- Raw Denim: This is the pure, unwashed, untreated stuff. It's stiff as a board initially but breaks in beautifully, fading based on how you move and live. It's a project in itself!
- Stretch Denim: My personal recommendation for beginners. That little bit of stretch provides comfort and makes the fitting process way less stressful.
- Selvedge Denim: Known for its tightly woven "self-edge" that prevents fraying. This is premium stuff, often raw, with a distinct, high-quality look that denimheads love.
Once you have your fabric, the single most important thing you can do is pre-wash it. Denim can shrink up to 10% in that first wash. If you skip this, you’ll sew a perfect pair of jeans that are suddenly too small after their first trip through the laundry. It's a classic—and heartbreaking—beginner mistake. Don't do it!
Selecting Your Pattern and Perfecting the Fit
With your fabric washed and ready to go, it's time to turn your attention to the pattern. Taking accurate body measurements is completely non-negotiable here. Measure your waist, hips, and inseam, and then compare those numbers to the pattern’s sizing chart.
Don’t be afraid to grade between sizes. It's incredibly common to be one size at the waist and another at the hips. Creating a hybrid size on your paper pattern before you cut will save you a world of frustration later on.
The absolute best way to check your fit is by making a quick "muslin" or test garment out of some cheap fabric. This lets you make all your adjustments before you ever touch your beautiful denim. Pay close attention to the crotch curve and the rise—these are the most critical areas for comfort. For more guidance on this, our online training and resources at bsewinn.com can provide the detailed support you need to perfect your fit.
Finally, a quick word on thread and needles, because they matter. You’ll need two types of thread: a heavy-duty topstitching thread for those iconic golden stitches and a standard all-purpose polyester thread for all the construction seams. You'll want to pair these with a strong denim needle (a size 100/16 or 110/18) to power through those thick layers without breaking.
Mastering Key Jeans Construction Techniques
Now for the fun part. Your fabric is prepped, your pattern pieces are all cut out, and it's time to actually build your jeans. This is the stage where all those flat pieces of denim start looking like a real pair of pants, and it’s all about nailing a few key techniques that give jeans their signature strength and style.
The methods we're about to walk through are the structural backbone of your project. Things like the flat-felled seam aren't just for show; they create an incredibly durable finish that can stand up to years of wear. Getting these details right is what separates a homemade project from a high-quality, long-lasting pair of jeans you’ll be proud of.
The Art of the Flat-Felled Seam
The flat-felled seam is the absolute hallmark of professionally made jeans. You’ll see it on the yoke and the inseam, creating those iconic two parallel lines of topstitching. It’s a genius technique that neatly encases all the raw fabric edges on the inside, making it both beautiful and incredibly strong.
To pull it off, you start by sewing the seam with the wrong sides of the fabric together—which I know feels completely backward at first! Then, you just trim one side of the seam allowance, fold the wider side over it, press it flat, and topstitch it all down. It sounds a little fussy, but once you get into the rhythm of it, it’s a really satisfying process.
This visual shows a little cross-section of how the fabric is folded and stitched to create that strong, clean finish.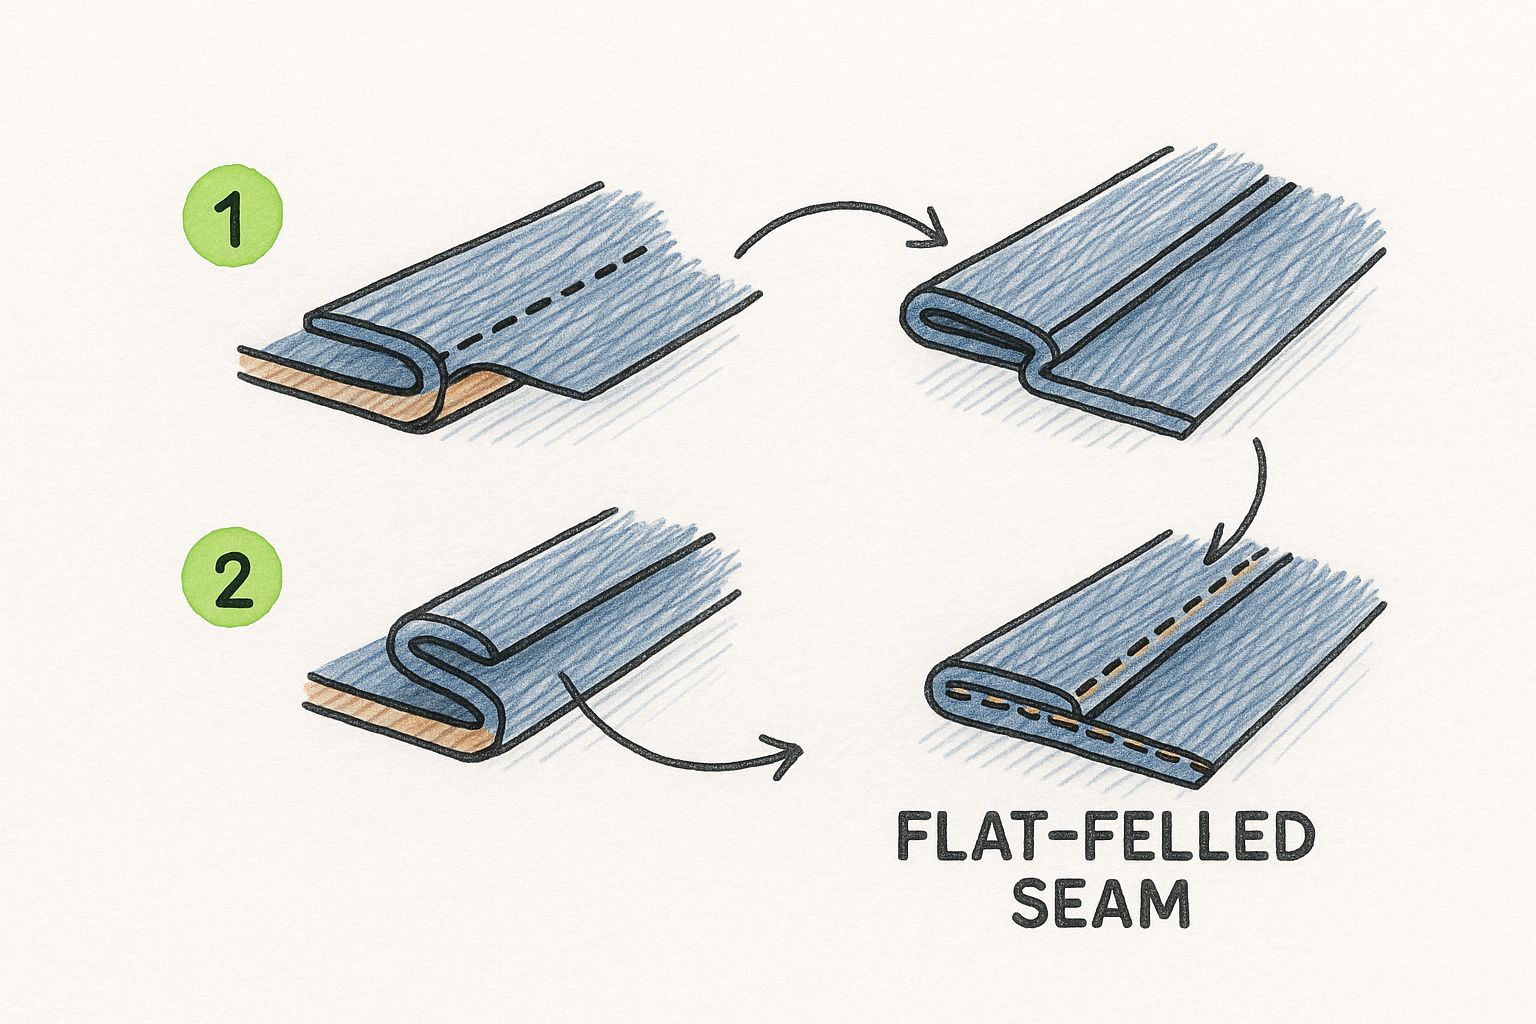
As you can see, the diagram really highlights how this technique hides every single raw edge, which is absolutely crucial for preventing heavy denim from fraying over time.
Installing a Front Fly Zipper
Okay, let's talk about the front fly zipper. This is easily the most intimidating step for people just learning how to sew jeans. But honestly, it's just a sequence of simple steps that, when you follow them in the right order, come together perfectly. Don't rush it—patience is your best friend here.
Most jeans patterns come with excellent, detailed illustrations for this part, so lean on those. You're essentially building a "fly shield" and a "fly facing" to hide the zipper neatly. The real key to success is basting the front crotch seam closed first. This gives you a stable, straight guide for placing your zipper accurately before you commit to the final stitches.
Achieving Perfect Topstitching
Crisp, straight topstitching is what truly makes a pair of jeans pop. This is where your heavy-duty topstitching thread and a fresh denim needle are non-negotiable. If you want to keep your lines perfectly straight, an edge-stitching foot is a total game-changer; it has a little guide that runs right along the edge of your seam.
Pro Tip: Lengthen your stitch to about 3.0-3.5 mm for topstitching. This longer stitch length is a classic detail on jeans and looks so much more professional than a standard stitch. Always, always test your settings on a scrap of denim first to dial in the tension.
If you're struggling with control over thick layers, a walking foot can be a lifesaver. It grips the top and bottom layers of fabric at the same time, preventing them from shifting around. You can learn more about this incredibly useful tool in our guide on how to use a walking foot.
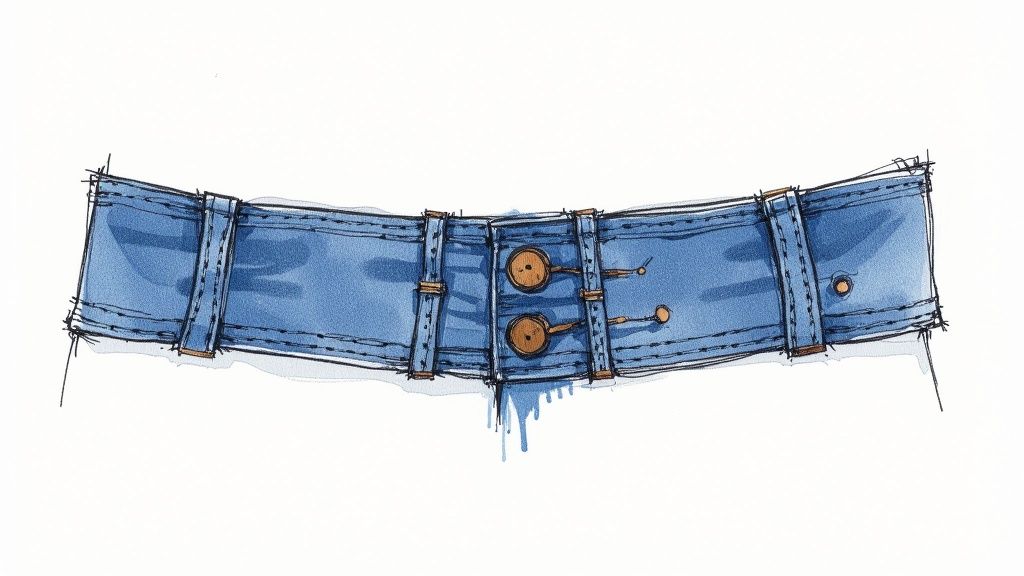
Attaching the Waistband and Belt Loops
The final big construction step is attaching the waistband. This is always a moment of triumph because it brings the entire main body of the jeans together. Accuracy is everything here; you want to attach the waistband evenly all the way around without any stretching or puckering. Take your time and pin carefully.
Belt loops are the last little detail. I find it easiest to create one long tube of fabric, topstitch both edges, and then chop it up into individual loops. Spacing them evenly—usually one at each side seam, two in the back, and one on either side of the front fly—gives you the best support. A "hump jumper" or even just a small piece of folded denim placed under the back of your presser foot will help your machine sew over these thick spots without skipping stitches. It's a simple trick that works wonders.
Adding Professional Finishing Touches
This is the part I live for—the moment a well-made garment becomes a truly professional-looking pair of jeans. It’s all in the details. The little things we add now, like the metal hardware and reinforced stitching, are what make your project really sing. These touches aren't just for show; they add serious durability and character.
Honestly, getting these final steps right is incredibly satisfying. You get to step back and see a real, rugged pair of jeans that you brought to life from just a piece of fabric. This is where your craftsmanship truly shines.
Installing the Metal Hardware
Nothing says "jeans" quite like that classic metal hardware. At first glance, installing the front button and rivets might feel a little intimidating, but I promise that with the right tools, it's a straightforward and even fun process. You'll need a special anvil and setter, which usually come in the hardware kits, and a good hammer or mallet.
Take your time marking the placements before you punch any holes. For rivets, you’ll want to hit the high-stress areas, like the corners of the front and back pockets. The button, of course, goes on the waistband. Once you're happy with the marks, use an awl to create a small hole, then hammer the button or rivet post through the denim to secure the top piece.
Takeaway: Always practice on a scrap piece of denim first. This is non-negotiable. It helps you get a feel for how hard you need to hammer to set the hardware securely without crushing it. A solid, sturdy work surface is also a must for this step.
Creating Bartack Reinforcements
Ever notice those dense, tight zigzag stitches on the corners of back pockets or at the base of belt loops? Those are bartacks, and they're critical for reinforcing areas that take a lot of strain. While industrial machines have a dedicated function for this, you can absolutely create a convincing bartack on your home machine.
Here's how: set your machine to a narrow zigzag stitch with the stitch length dialed almost down to zero. Sew a few stitches forward and then a few in reverse, building up a dense little bar of thread right over the stress point. I find that a bartack about 1/2 inch long gives that classic, durable finish we're after.
Nailing the Perfect Hem
The final hurdle! A clean, even hem is the last bit of polish your new jeans need. There are a few different ways to tackle this, and each one gives a slightly different vibe.
Some of my go-to hemming options include:
- Classic Double-Fold Hem: This is the workhorse. Just fold the raw edge up by 1/2 inch, press it flat, and then fold it up again by another 1/2 to 1 inch. A quick topstitch near the upper fold gives you a clean, timeless finish.
- Faux Chainstitch Look: If you love that coveted chainstitch look but don't have the specialty machine, a twin needle is your best friend. It creates two perfect parallel lines of stitching on the outside that beautifully mimics the real deal.
- Original Hem: This is a fantastic technique for alterations. You carefully cut the original hem off a pair of store-bought jeans and then reattach it to your newly shortened pair. It preserves that factory-worn look perfectly.
Hemming can feel a bit fussy, but getting it right ensures your jeans have that perfect break over your shoes. If you want to dive deeper into these techniques, we have a complete walkthrough in our guide on how to hem pants.
So, Why Bother Sewing Your Own Jeans?
Let's be real: learning to sew a pair of jeans is a big undertaking. It's so much more than just another sewing project. When you decide to make your own, you're plugging into a massive global industry and taking a small but powerful step toward a more thoughtful way of dressing. You're not just making clothes—you're making a choice with every single stitch.
Each seam you sew is a deliberate move away from the world of mass production. That idea is at the very core of what we do at bsewinn.com. We are committed to empowering a community of makers who genuinely care about their impact. The moment you start choosing your own materials, you get complete control over the ethics and sustainability of your clothes.
From Workwear to Wardrobe Staple
Have you ever stopped to think about how denim went from being the rugged uniform for miners to a style icon all over the world? It's a pretty amazing story. What started as fabric valued purely for its toughness has become a symbol of youth, rebellion, and laid-back style everywhere. Knowing this little bit of history gives the jeans you’re making from scratch a whole new layer of meaning.
When you understand that evolution, you get a much deeper appreciation for why jeans never go out of style. You aren't just hopping on a trend; you're taking part in a rich textile history every time you sit down at your machine.
At the end of the day, sewing your own denim is an act of empowerment. It puts the power of making things back into your own two hands. You get to create high-quality, long-lasting clothes that truly reflect who you are and what you care about.
Making a Conscious Impact
The scale of the traditional denim industry is honestly mind-boggling. Our global obsession with jeans has created a production cycle that's pretty tough on the environment. Industry data shows that around 1.24 billion pairs of jeans are sold every year across the globe. That demand is fueling a market projected to be worth over $113 billion by 2025. If you're curious, you can explore more data on the global jeans market to see just how huge it is.
But when you make your own jeans, you're choosing a different way. You get to find sustainable materials and use methods that don't leave such a heavy footprint.
Here are a few ways your sewing practice can make a real difference:
- Smarter Fabric Choices: You have the freedom to pick organic cotton, recycled denim, or other eco-friendly fabrics that cut down on water and pesticide use.
- Less Water Waste: By only pre-washing the fabric you actually need, you skip the enormous amounts of water used in industrial finishing.
- Minimal Waste: You can get clever with your pattern layout to use your fabric wisely, which drastically reduces textile waste compared to giant factory cutting rooms.
This is the kind of thoughtful making we live for at bsewinn.com. Through our resources and training, we want to help you not only nail the craft but also become a more conscious creator. Every pair of jeans you make is a little testament to quality, care, and a more sustainable way forward for fashion.
Even after you’ve got the perfect pattern and fabric, a few questions always seem to pop up when you're staring down your first real pair of jeans. It's totally normal! Working with heavy denim for the first time can feel a little intimidating, so let's tackle those nagging doubts and get you sewing with confidence.
It's also pretty cool to think about what you're doing on a bigger scale. Sewing your own jeans is not just a creative win; it's a conscious one, too. The apparel industry is a thirsty business—historically, it could take around 3,800 liters of water to get a single pair of jeans from the cotton field to the store, and that's before a single stitch is sewn. The industrial machines in those factories can pull 500 to 1500 watts each, running day and night. When you make your own, you're stepping outside of that system and making thoughtful choices. If you want to dive deeper, you can discover more insights about denim sustainability and see just how much of an impact home sewing can have.
What Kind of Sewing Machine Do I Really Need?
Let's clear this up right now: you absolutely do not need some giant, factory-floor industrial machine to make a great pair of jeans. A solid, heavy-duty home sewing machine is more than capable of handling denim.
The real secret is looking for a model with a beefy motor, good speed control (this is a big one!), and the ability to handle a proper denim needle, like a size 100/16 or 110/18. Features like a straight stitch plate for precision and adjustable presser foot pressure will make your life a whole lot easier when you hit those bulky seams. Many of the custom sewing machine designs from bsewinn.com are built with exactly this kind of power in mind, so you can get smooth, even stitches without feeling like you're fighting your machine.
How Do I Stop Skipped Stitches on Thick Seams?
Ah, the dreaded skipped stitch. It's probably the number one frustration when sewing denim, but I promise, it's preventable. This usually happens when the needle flexes as it tries to punch through multiple thick layers, causing the needle to slightly miss catching the bobbin thread.
The simplest trick is often the best one: always, always start with a fresh, sharp denim needle. You'd be surprised how quickly they dull on fabric this tough.
When you see a bulky spot coming up—like where the belt loops meet the waistband—slow way down. Seriously, just ease off the pedal. Using a "hump jumper" (or even a little folded-up scrap of denim) placed behind the needle will level out the presser foot and help the fabric feed through smoothly. Sometimes, just bumping up your stitch length to around 3.0 mm can make all the difference.
What Is the Secret to Neat, Professional Topstitching?
Getting that iconic, perfect topstitching really comes down to three things: the right thread, the right needle, and a steady hand. Grab a spool of dedicated topstitching thread for your needle, but—and this is important—use regular all-purpose thread in your bobbin. This little trick helps prevent a lot of tension headaches. You’ll also want a topstitching needle (size 100/16 or bigger), which has a larger eye that keeps that thicker thread from shredding.
For that classic jeans look, lengthen your stitch to somewhere between 3.0-4.0 mm. The real game-changer, though? An edge-stitching foot or a magnetic seam guide. These tools do the hard work of keeping your lines perfectly straight and parallel for you. And please, remember the golden rule of sewing: always test your setup on a scrap of your denim first to get that tension dialed in just right.
Making your first pair of jeans is a huge accomplishment for any sewist. It's a project to be proud of! With the right techniques and a little patience, you can create a garment that's not just stylish but truly and uniquely yours. Here at B-Sew Inn, we are committed to empowering your sewing journey with the best machines, online classes, and resources we can offer.
Ready to tackle your next big project? Explore our custom sewing machines and educational resources today!

