

If you want flawless, professional-looking stitches, choosing the right needles for sewing is the single most important thing you can do. I like to think of a sewing needle less like a simple tool and more like a specialized key, precision-engineered to work perfectly with a specific lock—which is your fabric and thread. Using the wrong one is a fast track to skipped stitches, pulled threads, and a whole lot of frustration.
Your Essential Guide to Sewing Needles
Staring at a wall of needles at the craft store can feel pretty overwhelming. But here’s the secret: understanding this tiny, often-overlooked tool is what will truly elevate your sewing. The humble sewing needle is the unsung hero of every project. It's what dictates how your thread meets your fabric, and it directly impacts the quality of every single stitch.
Here at bsewinn.com, we're all about empowering crafters with the knowledge and tools to bring their visions to life. We don't just sell custom sewing machine designs; we provide comprehensive support through online classes, training, and extensive resources. This guide is a perfect example of our commitment—demystifying the sewing needle so you can turn creative ideas into tangible, beautiful realities you can replicate at home.
Understanding Needle Anatomy
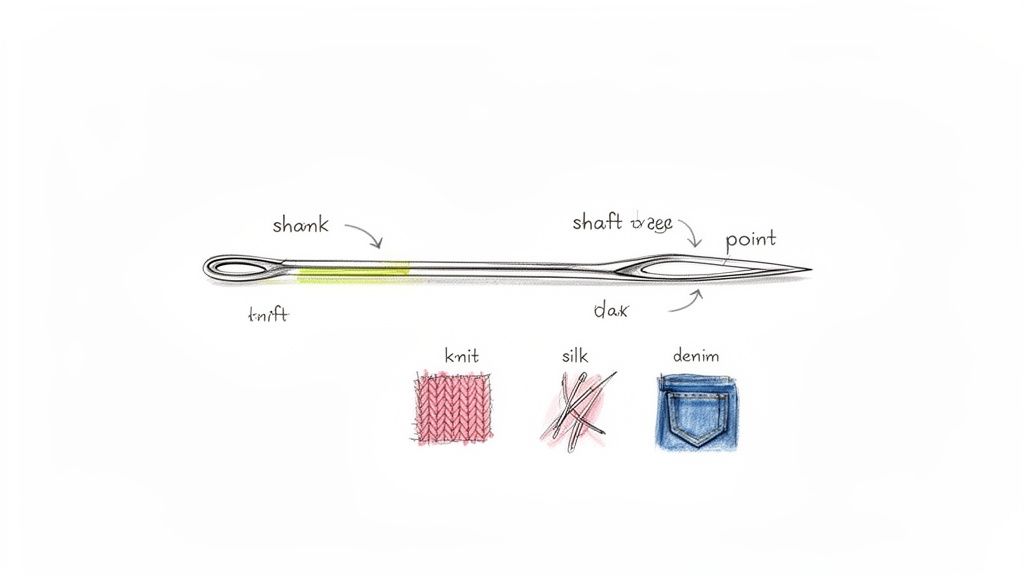
Every single sewing machine needle, no matter the type or brand, shares the same basic parts. Getting to know them helps you understand why different needles give you such different results.
- Shank: This is the thick part at the top that you insert into your machine. It has a flat side that should always face the back, making it impossible to put in backward.
- Shaft: This is the main body of the needle that tapers down to the point. The thickness, or diameter, of the shaft is what determines the needle's size.
- Eye: This is the little hole the thread goes through. The eye’s shape and size are designed to let specific types of thread pass through smoothly without shredding or snagging.
- Point & Tip: This is the business end. The tip is engineered to either pierce through the threads of woven fabrics or gently slide between the loops of knit fabrics.
This is why that "key in a lock" analogy works so well. A mismatched needle is almost always the culprit behind common sewing headaches like skipped stitches, puckered seams, and shredded thread.
The right needle is your best friend for achieving professional quality. It prevents damage to your fabric and ensures each stitch is formed perfectly, transforming a good project into a great one.
Choosing the correct needle is one of those small details that makes a huge difference. In the same way, having the right tools and accessories ready to go makes every project smoother.
And for things like precise needle placement, especially with intricate work, it never hurts to improve your hand-eye coordination. Mastering these fundamentals builds a solid foundation, whether you're using a standard machine or a specialized one from a great brand like Baby Lock. This is the kind of practical knowledge we love to share, giving you the confidence to tackle any creative challenge that comes your way.
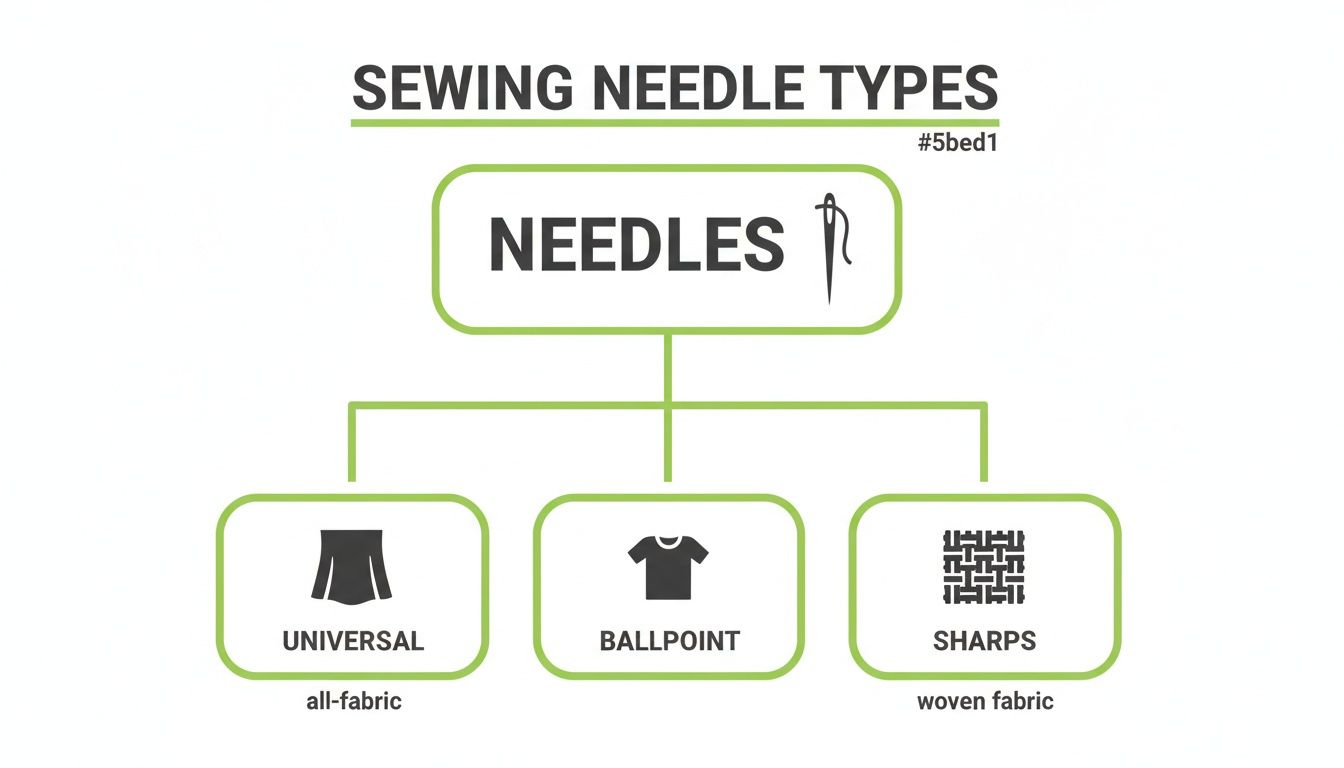
Decoding Sewing Needle Types
Stepping beyond the standard "universal" needle is one of those little changes that unlocks a whole new level of sewing. If you’ve ever fought with your machine, feeling like you were hitting a wall, the fix might be simpler than you think. It's often that tiny, inexpensive part you can swap out in seconds. Learning the wide world of needles for sewing is what lets you pick the perfect tool for any project, making sure your machine, thread, and fabric all play nicely together.
Think of each needle type like a specialist doctor. A universal needle is your trusty general practitioner—great for a lot of common situations, but you wouldn't send every single problem their way. When you need absolute precision, you call in a specialist. The same goes for sewing. This is a core part of what we teach at bsewinn.com; it’s how we help sewists go from feeling frustrated to finishing projects flawlessly, all by choosing the right tool for the job.
The All-Purpose Universal Needle
The Universal Needle is the default for most home sewing machines and probably the one you know best. It has a slightly rounded point and a tapered shape, which makes it a true jack-of-all-trades. It's built to perform reasonably well on both woven fabrics, like cotton poplin, and some of the more stable knits, like fleece.
For your everyday sewing projects or when you're just getting your feet wet, the universal needle is a fantastic workhorse. It's a reliable pick for hemming curtains, stitching up simple cotton dresses, or making basic home decor. But its versatility is also its weakness. For fabrics that are more delicate or demanding, a specialized needle will give you far better results, every time.
Ballpoint and Jersey Needles for Knits
Sewing with knit fabrics like jersey, rib knit, or interlock can feel like a nightmare. Using the wrong needle is the fastest way to get skipped stitches and—even worse—permanent snags or holes in your beautiful fabric. That's where the Ballpoint Needle, sometimes called a Jersey needle, comes in to save the day.
Picture this needle’s point not as a sharp spear, but as a gentle finger. Instead of piercing through the fabric threads, its rounded tip is designed to slide right between the loops of the knit.
- Action: Pushes fibers aside instead of cutting them.
- Best For: Stable, medium-weight knits like cotton jersey, fleece, and double knits.
- Result: No more snags, runs, or holes. Just a smooth, professional-looking seam.
By gently parting the fibers, a ballpoint needle protects the fabric's natural stretch and recovery, making sure your finished garment moves the way it was meant to.
Sharps and Microtex Needles for Precision
On the complete opposite end of the needle spectrum are Sharps Needles, which you'll often see labeled as Microtex needles. If a ballpoint needle is a gentle finger, a Sharps needle is a surgeon’s scalpel. It has an extremely fine, sharp point designed to make a clean, precise hole in tightly woven fabrics.
A Sharps needle is your secret weapon for getting perfectly straight stitches on fabrics like silk, microfiber, and quilting cotton. Its acute point slices through with minimal resistance, which prevents puckering and keeps your stitches looking crisp and clean.
This precision makes it the go-to choice for topstitching, edge stitching, and heirloom sewing—anytime your stitches are on display and need to look perfect. For quilters piecing together lots of small, exact blocks, a Sharps needle is an absolute must-have for accurate seams. If you want to dive even deeper, you might like our dedicated article covering the nuances of different sewing machine needle types.
Specialized Needles for Tough Jobs
Beyond those main players, there’s a whole cast of supporting characters, each designed for a specific—and often challenging—task. Getting to know these specialty needles for sewing can save you from broken needles, skipped stitches, and ruined projects.
Denim (or Jeans) Needles:
These are the heavyweights. A Denim needle has a reinforced blade, a super sharp point, and a modified scarf built to handle the dense weave of denim, canvas, and other tough fabrics. It powers through multiple layers without bending or breaking.
Stretch Needles:
While it sounds a lot like a ballpoint, a Stretch needle is engineered specifically for highly elastic fabrics with Lycra or spandex, like what you’d use for swimwear and activewear. It has a deeper scarf and a specially designed eye to prevent the skipped stitches that are so common with these slinky materials.
Leather Needles:
This one is unique. It has a wedge-shaped point that acts like a tiny chisel, cleanly cutting a small hole in leather, suede, and vinyl. Just remember to never use it on regular fabric, as it will slice the threads and weaken the material.
The global market for sewing machine needles actually tells a fascinating story about this. It's shown amazing resilience, skyrocketing by an impressive 45% to hit a value of $3.4 billion. That marks the second year in a row of major expansion, pointing to a renewed passion for both home sewing and industrial work. It turns out that more and more people are discovering the difference the right tool can make.
This growth just proves what we’ve known all along: crafters are realizing that using specialized tools leads to better results. Whether you're hemming a pair of jeans, sewing a swimsuit, or crafting a leather bag, bsewinn.com has the selection and expertise you need to match the perfect needle to your project, helping you create with confidence and precision.
Mastering Needle Sizes for Any Fabric
Have you ever looked at a package of needles for sewing and wondered what on earth those numbers—like 80/12 or 90/14—actually mean? They’re not just random codes. Think of them as a secret language that, once you learn it, tells you exactly which fabrics a needle is built to handle. Getting this right is the key to preventing skipped stitches, broken needles, and fabric damage.
It helps to think of needle sizes like different grits of sandpaper. You wouldn't use a coarse, heavy-duty grit on a delicate piece of wood, right? And you wouldn’t try to sand a rough plank with super-fine paper. It's the exact same logic here: the smaller the number, the finer and more delicate the needle.
That one simple rule unlocks the entire sizing system, so you can pick the right needle with confidence every single time.
The Dual Sizing System Explained
You'll almost always see two numbers on a needle package, separated by a slash (e.g., 90/14). It looks a little confusing, but it’s actually pretty straightforward. One number is European, and the other is American.
- European Sizing: This system ranges from 60 to 120. It’s super logical—it’s just the metric measurement of the needle's shaft. A size 80 needle has a shaft that's 0.80mm thick. Simple!
- American Sizing: This system uses a different scale, ranging from 8 to 20. It’s an older convention but still hangs around on most packaging.
Even though the numbers are different, they mean the same thing. A European 80 is the same as an American 14, which is why you see "80/14" on the pack. Just stick with the golden rule: for both systems, a lower number means a finer needle for lightweight fabrics, and a higher number means a thicker, stronger needle for heavy-duty stuff.
The image below shows a few of the most common needle types. Once you've picked your type, the next step is nailing down the right size for your fabric.
This little hierarchy is a great reminder: first, choose your needle type (like Universal, Ballpoint, or Sharps), then pinpoint the correct size.
Matching Needle Size to Fabric and Thread
Choosing the right size is really a balancing act between your fabric's weight and your thread's thickness. If your needle is too small, it will struggle to get through thick fabric and might shred or break your thread. Go too big, and you'll be left with noticeable, gaping holes in your delicate fabrics.
The perfect needle creates a hole just large enough for the thread to pass through without friction or stress. This synergy between needle, thread, and fabric is the foundation of a beautiful, durable seam.
To make things a whole lot easier, we've put together a quick-reference chart. Here at bsewinn.com, we believe in giving you practical tools that help you succeed, and this chart is a fantastic starting point for any project. And since thread is the other half of the equation, you can learn more from our comprehensive sewing thread size guide.
This way, you’re not just guessing. You’re making smart, informed decisions that lead to professional-looking results every single time you sit down at your machine.
Here’s a practical guide to get you started:
Sewing Needle Size and Fabric Compatibility Chart
This chart is your cheat sheet for matching needle sizes with common fabrics and the right thread weights. Keep it handy, and you'll take all the guesswork out of getting that perfect stitch.
| Needle Size (European/American) | Best For Fabric Types | Recommended Thread Weight |
|---|---|---|
| 60/8 or 70/10 | Very fine, lightweight fabrics like silk, chiffon, organza, voile, and fine lace. | Extra-fine or silk thread (100 wt) |
| 75/11 or 80/12 | Lightweight wovens like quilting cotton, poplin, chambray, linen, and stable knits. | All-purpose polyester or cotton (50-60 wt) |
| 90/14 | Medium-weight fabrics such as flannel, corduroy, suiting, and light denim. | All-purpose polyester or cotton (40-50 wt) |
| 100/16 | Heavyweight fabrics like denim, canvas, upholstery fabric, and thick wool. | Heavier-duty or topstitching thread (40 wt) |
| 110/18 or 120/20 | Very heavy materials including thick canvas, leather, vinyl, and multiple layers of denim. | Heavy-duty or upholstery thread (30 wt or lower) |
By using this chart as your guide, you eliminate the trial-and-error of selecting the right needles for sewing. It’s a simple step, but honestly, it’s one of the most effective ways to level up your craft and make sure your vision is supported by the right tools from start to finish.
How to Choose the Perfect Needle for Your Project
Okay, you've got the basics of needle types and sizes down. Now for the fun part: putting it all into practice. The real magic happens when you can confidently walk up to any project, feel the fabric, consider your thread, and just know which needle will give you the best results.
This is how you start to think like a pro, and it's a skill we are passionate about building through our online classes here at bsewinn.com. By showcasing tangible examples, we provide comprehensive "how-to" guides for creating various sewing machine designs that you can replicate.
Let’s step away from the charts and into the sewing room with a few common scenarios. We’ll look at the "why" behind each choice, connecting the needle directly to the fabric and what you're trying to accomplish. This hands-on thinking will get you ready to tackle any project with the right tools.
Scenario 1: The Cozy Baby Quilt
Imagine you're making a beautiful baby quilt, a project filled with love and care. You've pieced together your quilt top with soft cottons, and now it's time to stitch through all those layers—the top, the fluffy batting, and the backing fabric. This is where a Quilting needle becomes your absolute best friend.
A Quilting needle is engineered specifically for this job. It has a slightly rounded, tapered point designed to pass cleanly through multiple layers without snagging or pushing the delicate fibers around.
- The Challenge: Sewing through a "quilt sandwich" creates a lot of bulk and friction. A standard needle might bend, break, or cause nasty puckers as it struggles to penetrate everything evenly.
- The Solution: The Quilting needle's strong, tapered shaft provides the stability you need, while its special point glides smoothly through. The result is those perfectly even stitches that give your quilt that lovely, professional texture.
Of course, the needle is only half the equation. Perfect stitches also depend on your thread, so it's worth learning about choosing the best thread for quilting to really nail the finished look.
Scenario 2: The Classic Pair of Jeans
Next up: hemming a sturdy pair of jeans or tackling a project with heavy canvas. This is a job that calls for a true powerhouse—the Denim needle. Trust me, trying to punch through thick, tightly woven fabric with a universal needle is just a recipe for frustration and a pile of broken needles.
A Denim needle is built tough. It features a reinforced blade to prevent bending under pressure, an extra-sharp point to pierce dense fabric, and a deep scarf that helps form a perfect stitch lockup in thick material.
Using a Denim needle for heavy-duty fabrics isn't just a suggestion; it's practically a requirement. It’s the difference between a clean, strong seam and a messy, skipped-stitch disaster. It lets your machine do its job without straining.
Think of it this way: using a universal needle on denim is like trying to cut a steak with a butter knife. You might eventually get through it, but it's going to be a mess. A Denim needle is the sharp steak knife you need to do the job right, every single time.
Scenario 3: The Sleek Swimsuit
Let's pivot to a completely different challenge: sewing a swimsuit or activewear from a slinky, four-way stretch fabric with lots of Lycra or spandex. This is where many sewists run into the dreaded skipped stitch. Your secret weapon here is the Stretch needle.
It might seem similar to a ballpoint, but a Stretch needle has some unique tricks up its sleeve for high-stretch knits. Its slightly rounded point slips between the knit fibers, but it also has a deeper scarf and a specially coated eye. This design ensures your machine's hook can grab the thread loop every single time, even when the fabric is stretching and bouncing around.
- The Problem: The wild elasticity of swimwear fabric can actually cause it to bounce away from the needle as it forms a stitch, leading to those frustrating gaps in your seam.
- The Right Tool: The Stretch needle's design works with the fabric's properties, guaranteeing consistent stitch formation for seams that can stretch as much as the fabric does without breaking.
These real-world examples show why having the right tool for the job matters. It’s a trend we’re seeing across the crafting world. The sewing supplies market, which includes essential needles for sewing along with threads and notions, grew from $5.24 billion to $5.50 billion.
This growth is projected to continue, which tells us there’s a strong global demand from the exact audience bsewinn.com serves with our huge selection of custom sewing machine designs and hands-on training. This data shows that more and more people are investing in the right tools to get better results. By understanding these project-specific needs, you’re already ahead of the curve.
Needle Care and Troubleshooting Common Issues
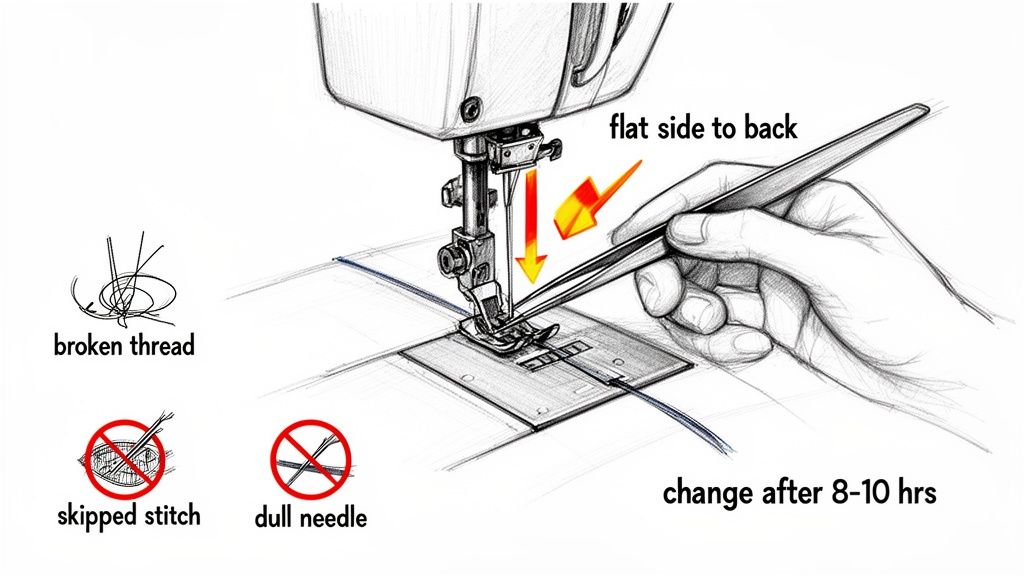
A fresh, sharp needle is the single best—and cheapest—insurance policy you can get for your sewing projects. It’s a tiny detail that makes a massive difference, preventing a whole host of headaches from damaged fabric to a strained machine. Making a habit of changing it regularly is one of those simple things that instantly elevates the quality of your work.
This is a core principle we drill down on at bsewinn.com. We want to empower you with the practical skills to maintain your own tools and figure out what’s wrong when things go sideways. When you can troubleshoot with confidence, you’ll keep creating long after you’ve brought your machine home.
When to Change Your Sewing Needle
Here's the golden rule we live by: change your needle after every 8-10 hours of actual sewing time. Another good milestone is at the start of every new project. Just think of a needle's point like a super-sharp pencil tip; the more you use it, the duller it gets.
Your machine and your fabric will usually give you some pretty obvious hints when it’s time for a change. You just have to know what to look and listen for:
- That Rhythmic "Thump": Hear a distinct thumping or punching sound as the needle hits the fabric? That’s your cue. A dull point is forcing its way through the fibers instead of piercing them cleanly.
- Snagged or Pulled Threads: A dull or damaged needle will catch on fabric threads, creating little pulls or even runs. You’ll notice this most on delicate or tightly woven materials.
- Uneven or Skipped Stitches: This is a classic symptom. A worn-out needle is one of the most common culprits behind poor stitch formation, leaving you with frustrating gaps in your seams.
A fresh needle should glide through fabric almost silently, forming perfect stitches every time. Start treating your needles like a consumable part—not a permanent fixture—and you'll see a night-and-day difference in your results.
How to Change a Machine Needle Correctly
Swapping out a needle is a quick job that takes less than a minute. Once you’ve done it a few times, it’ll become second nature. Getting it right is key to keeping your machine running smoothly and safely.
- Power Down: First thing’s first—always turn off your sewing machine. Safety first!
- Loosen the Screw: Find the small screw on the side of the needle clamp. Give it a counter-clockwise turn, just enough to release the old needle. You don't need to remove it completely.
- Remove the Old Needle: Gently pull the old needle straight down and out of the clamp.
- Insert the New Needle: This is the most important step. Take your new needle and make sure the flat side of the shank is facing the back of the machine.
- Secure It: Push the new needle all the way up into the clamp until it won't go any further. Then, tighten the clamp screw securely by turning it clockwise. Give it a gentle tug to be sure it's snug.
Solving Common Needle-Related Problems
So many sewing frustrations can be traced right back to that tiny piece of metal. Before you start messing with your tension dials or re-threading your entire machine for the fifth time, always check your needle first.
Problem: Thread Shredding or Breaking
This usually happens when the needle's eye is too small for your thread, creating too much friction and causing it to fray. A dull point or a microscopic burr on the needle can also be the culprit. The fix? Pop in a fresh needle. If it keeps happening, you might need a needle with a larger eye, like a Topstitch or Embroidery needle.
Problem: Skipped Stitches
Skipped stitches almost always mean the needle isn't creating a proper thread loop for the hook to catch underneath. This is often caused by using the wrong type of needle for your fabric (like a universal needle on a slinky knit) or simply because the needle is dull or bent. Swapping to the right needle for the job—like a Stretch or Ballpoint needle for knits—often solves the problem instantly.
The obsession with high-quality needles isn't just for us home sewists. Industrial needles for sewing are the workhorses of a global textile market valued at a staggering $1.5 billion. That number is projected to nearly double to $2.9 billion in the next decade. Big brands pump out over 500 million units every year to keep factory floors running, which shows just how vital this small part is for high-stakes performance. You can discover more insights about this industrial market and its key players online.
Common Questions from the Sewing Room
Even after you get the hang of needle types and sizes, there are always little questions that pop up mid-project. This is your go-to spot for clear, straightforward answers to the things we hear most often from fellow sewists. Getting these small details right is what really builds your confidence and keeps you in that creative flow.
At bsewinn.com, we want to do more than just provide you with great tools; we want you to know exactly how to use them. We've put together the most common questions we get about needles for sewing so you can quickly find a solution and get right back to making something wonderful.
How Often Should I Really Change My Sewing Needle?
The professional rule of thumb is to swap out your needle after 8 to 10 hours of actual sewing time. But who's counting? A much easier habit is to simply start every new project with a fresh needle. It might look perfectly fine to the naked eye, but that needle tip gets microscopically dull with every single stitch.
That dullness is what causes that thump-thump-thump sound as the needle punches through the fabric instead of piercing it cleanly. It's also a top culprit for skipped stitches, fabric snags, and messy seams. If you're working with something delicate like silk or chiffon, always, always start with a new needle. Think of it as the cheapest, easiest insurance policy for your project and your machine.
Can I Use Any Brand of Needle in My Sewing Machine?
For the vast majority of modern home sewing machines, including fantastic brands like Baby Lock, the answer is a big yes! Most domestic machines are built around a universal needle system called System 130/705 H. This standardization means needles from trusted brands like Schmetz, Organ, or Klasse are almost always interchangeable.
The most important thing to check is that you're buying needles for a home machine, not an industrial one. Industrial needles have a totally round shank and simply won't fit or work in your machine. While your machine’s manual might recommend a certain brand, you definitely have the freedom to pick the one you like best and that fits your budget.
What's the Difference Between a Ballpoint and a Stretch Needle?
This is a great question because they do very similar jobs. Both are made for knit fabrics, but they’re each designed to solve slightly different problems.
-
A Ballpoint Needle (sometimes called a Jersey needle) has a rounded tip that’s designed to gently push the fibers of stable knits—like cotton jersey or interlock—out of the way. This prevents it from snagging or creating holes in fabrics that have a little bit of stretch.
-
A Stretch Needle also has a rounded tip, but it has a deeper scarf (that’s the groove above the eye) and a specially shaped eye. This design is engineered to stop skipped stitches on super stretchy fabrics with Lycra or spandex, like you'd find in activewear, swimwear, or lingerie elastic.
It's simple: For a t-shirt, a ballpoint needle is your best bet. For yoga pants or a swimsuit, the stretch needle is going to be your new best friend.
Why Does My Thread Keep Shredding or Breaking?
Ugh, thread shredding. It’s one of the most frustrating sewing problems, but it's almost always a sign that your needle needs attention. Before you even think about touching your tension dials, check the needle first. It usually comes down to one of these three things:
- Your needle is old, dull, or has a tiny burr. A worn-out needle can develop a rough spot, especially in the eye, that acts like a tiny cheese grater on your thread. The first and easiest thing to try is always just swapping it for a new needle.
- The needle's eye is too small for your thread. If you’re trying to use a thick topstitching or decorative thread with a standard needle, you’re creating too much friction. The thread just can't handle it. Switch to a Topstitch or Embroidery needle, which has a much larger eye.
- You're using the wrong type of needle for the job. Trying to punch a sharp needle through a dense knit or a dull needle through denim creates a ton of friction and heat. That heat weakens the thread until it snaps. Making sure your needle, thread, and fabric are all on the same team is key.
Here at bsewinn.com, we truly believe that getting the fundamentals right is what opens up a world of creativity. From helping you find the perfect machine to offering expert advice through our online classes and resources, we’re here to support you on every step of your sewing journey.
Explore our huge collection of machines, notions, and accessories to find everything you need for your next masterpiece at https://www.bsewinn.com.

