

A heavy quilt is halfway under the needle, the fabric is bunching against the machine, and the operator's shoulders are creeping upward. The machine may be perfectly capable of the project, yet the small flatbed leaves too much material unsupported. That unsupported weight creates drag, awkward handling, and uncertainty exactly where precise stitching matters most.
A Sew Steady extension table can solve that problem, but only when the table fits the machine and the sewing station. Acrylic tables aren't universal trays that can be moved from one model to another. The cutout, support legs, bed height, and access points all matter. A careful purchase starts with the machine's exact model number, then ends with a real check of fit, level, and posture.
Table of Contents
- Why Your Quilt Needs a Flatbed Extension
- Choosing the Right Acrylic Table Size
- Navigating Machine Compatibility and Fit
- Achieving Perfect Coplanarity During Setup
- Optimizing Ergonomics and Long-Session Comfort
- Testing Your Setup In Person at B-Sew Inn
Why Your Quilt Needs a Flatbed Extension
Free-motion quilting exposes a cramped sewing surface quickly. As a quilt advances beneath the needle, the portion resting on the operator's lap or desk can pull backward or sideways. The hands then compensate by pushing harder, lifting the quilt, or changing direction abruptly. Those movements can affect stitch consistency and make a manageable project feel physically exhausting.
A flush extension changes the way the quilt is supported. Instead of dropping from the edge of a raised machine bed, the quilt travels across a broader, continuous surface. That reduces the amount of fabric hanging from the needle area and gives the operator more control during curves, ruler work, and long quilting lines.
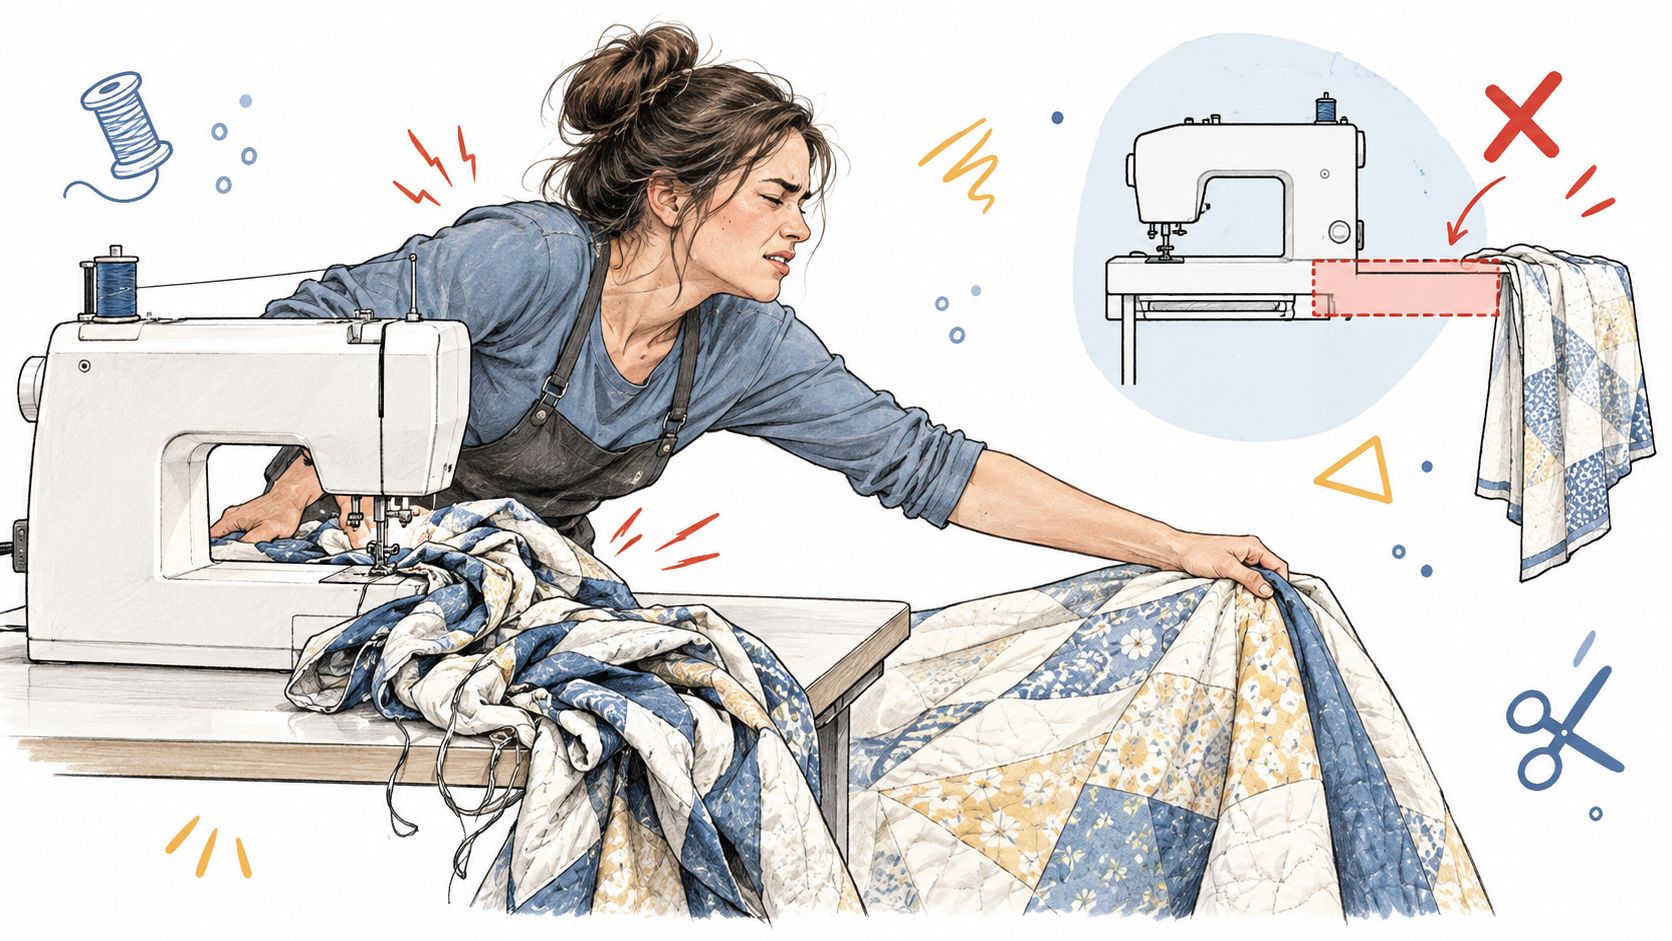
What the flatbed supports
The machine's feed system moves fabric through the needle area, but it doesn't carry the entire weight of a large quilt. The operator does that, often without realizing how much effort is being spent preventing the project from catching on the bed edge. A height mismatch or abrupt transition can also snag fabric and interfere with smooth movement.
That's why a properly fitted table is more than a convenience. It creates a stable working plane around the needle, which is especially important for free-motion work where the operator controls the fabric path. For walking-foot projects, the same principle applies, though the feeding foot helps move the layers. A practical companion guide is machine quilting with a walking foot.
Practical rule: If the quilt repeatedly pulls, catches, or shifts at the machine bed, improve the support surface before changing tension settings or blaming the needle.
A broader surface can also reduce shoulder tension. The operator can keep both forearms supported rather than reaching forward to hold a heavy project in midair. That doesn't replace correct needle choice, thread preparation, or machine adjustment, but it removes one major source of resistance from the sewing process.
For embroidery and large garment panels, the benefit is similar. Fabric that rests evenly is less likely to tug at the hoop, catch on an edge, or pull the operator out of a neutral position. The table won't fix every handling problem, but it gives the machine and the person a more predictable workspace.
Choosing the Right Acrylic Table Size
A small sewing room can make a model-specific acrylic table look like an easy online purchase. The hidden risk is choosing a footprint that fits the machine but leaves too little room for the project, or one that fits the desk while placing the needle uncomfortably far from the operator. Sew Steady tables come in four listed footprint classes: the junior table measures 11.5 x 15 inches, the large table measures 18 x 24 inches, the big table measures 24 x 24 inches, and the giant table measures 24 x 32 inches, as shown in this Sew Steady table size listing. These measurements describe the acrylic surface, not the space needed for the machine, chair, controls, and fabric.
Measure the desk or cabinet from front to back and side to side before ordering. Also check the machine's working clearance around the handwheel, power cord, foot control, bobbin access, and needle area. A specialized dealer can place a sample table beside the machine and expose awkward reach or fabric drag that photographs and product dimensions do not show.
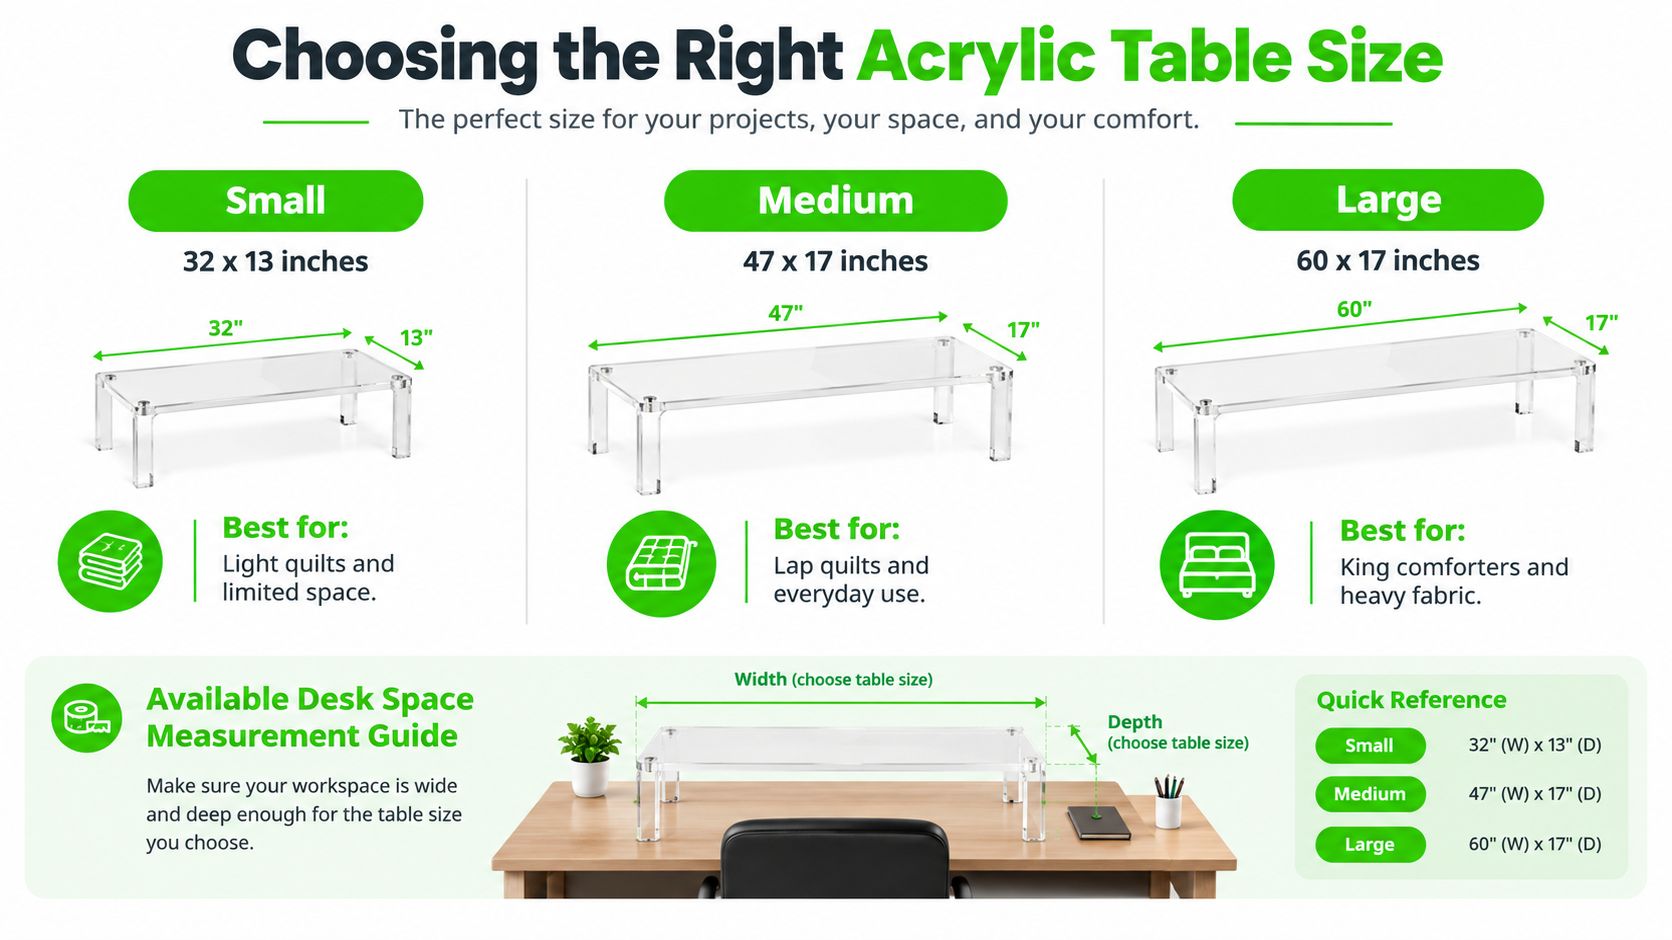
Match surface area to the project
The junior footprint suits a compact station used for garments, repairs, small panels, and lighter work. It adds support without taking over the desk. Large quilts remain possible, although more fabric hangs unsupported and requires frequent repositioning.
The large and big sizes give quilting and broad fabric pieces more support. The giant footprint suits a permanent setup where fabric support matters more than portability. Check that the furniture supports the machine and acrylic table together without flexing.
| Table class | Listed acrylic footprint | Practical fit |
|---|---|---|
| Junior | 11.5 x 15 inches | Compact stations and smaller projects |
| Large | 18 x 24 inches | General quilting and larger fabric panels |
| Big | 24 x 24 inches | Bulky quilts and broad work areas |
| Giant | 24 x 32 inches | Maximum support where furniture allows |
Understand the fabric moment arm
A heavy quilt pulls away from the needle as it extends across the work surface. More unsupported fabric increases the force on the operator's hands and the machine bed. A larger acrylic surface supports the quilt closer to the needle, reducing drag caused by its weight.
The largest table still may be the wrong choice. A giant surface can crowd a small room, block drawers, or force the operator farther from the needle. The practical target is the largest footprint that fits the furniture while preserving comfortable access to the machine controls.
Test the setup in person whenever possible. A dealer can reveal whether the table crowds the chair, limits fabric rotation, or makes the machine feel too far away. For a machine stored after each project, a smaller table may be easier to handle. For thick quilts or large home-decor panels, a compact surface can become frustrating. Planning a sewing table for a small space helps assess the furniture before ordering an acrylic accessory online.
Navigating Machine Compatibility and Fit
The most expensive mistake isn't always buying too small. It's buying an acrylic table whose cutout doesn't match the machine at all.
Manufacturers shape extension tables around the contours of a particular machine series. The opening may need to clear the free arm, bobbin cover, handwheel, hinges, controls, and bed edges. A manufacturer's own extension-table guidance states that buyers should select the table for the exact machine model, because the molded shape follows the contours of that series and the adjustable legs keep the surface level with the sewing area. The same principle applies to Sew Steady products.
Why “universal” causes trouble
Some listings use broad language such as “fits many machines,” but that doesn't prove compatibility with a specific variant. Two machines from the same family can differ around the free arm, bobbin access, bed shape, or hinge placement. A discontinued machine creates another complication because sellers may identify it by a nickname, an old series name, or an incomplete model reference.
Community discussions have documented confusion around whether a table is universal, which machines it fits, and whether a recut is possible. One discussion specifically raises concern that custom-made tables may not accommodate a Brother CP2160R and recommends checking an etched number or contacting Sew Steady to identify the intended machine. That makes model verification a purchase step, not an afterthought.
A table can look close enough in a photograph and still block the bobbin cover, leave a dangerous gap, or sit at the wrong height.
Before ordering, record the full model number from the machine body, manual, or service documentation. Don't rely on the appearance of the machine, the brand alone, or a seller's broad category. Ask whether the listing identifies the exact model, whether the table is new or previously modified, and whether the support legs and hardware belong to that table.
Check function, not just the outline
A good fit must preserve everyday access. The operator should be able to remove the bobbin, change the needle, raise the presser foot, use the free arm where applicable, and reach the handwheel without moving the table. The acrylic opening should also leave the machine stable rather than allowing it to rock inside the cutout.
A model-specific product page can provide a useful starting point. For example, the Baby Lock acrylic extension table for Triumph, Ovation, Acclaim, and Euphoria identifies a defined group of compatible machines rather than claiming that every machine will fit.
Secondhand purchases require extra caution. An etched number may identify the original machine, but it doesn't guarantee that the table was never recut, drilled, or paired with altered supports. If the machine is older, discontinued, or a variant model, a specialized dealer can often eliminate more risk by comparing the actual machine with the accessory before purchase.
Achieving Perfect Coplanarity During Setup
A table can be the correct model and still perform poorly if the acrylic surface sits higher or lower than the machine bed. Coplanarity means that the two surfaces form one level working plane. Independent product guidance describes Sew Steady tables as sitting level with the machine's flatbed, using adjustable or auxiliary legs to maintain that alignment across the span. See the Sew Steady large table product details for an example of this construction.
A careful leveling sequence
- Clean both contact surfaces. Remove lint, thread scraps, and dust from the machine bed and the table supports. Small debris can create a surprisingly obvious rocking point.
- Place and align the table. Position the acrylic opening around the machine without forcing the cutout against the body. Confirm that the table sits fully on its supports and that access panels remain usable.
- Check the transition. Run a fingertip across the machine bed and acrylic surface. A business card or thin feeler gauge can help reveal a gap, while a straightedge can show whether one side rises above the other.
- Adjust the support legs gradually. Turn the adjustable legs in small increments, alternating between supports instead of raising one corner dramatically. The aim is a stable, even plane, not merely a table that looks level from across the room.
- Test with scrap fabric. Sew a straight seam, then move the fabric across the transition in several directions. For quilting, test a small layered sample with the same batting and backing used in the project.
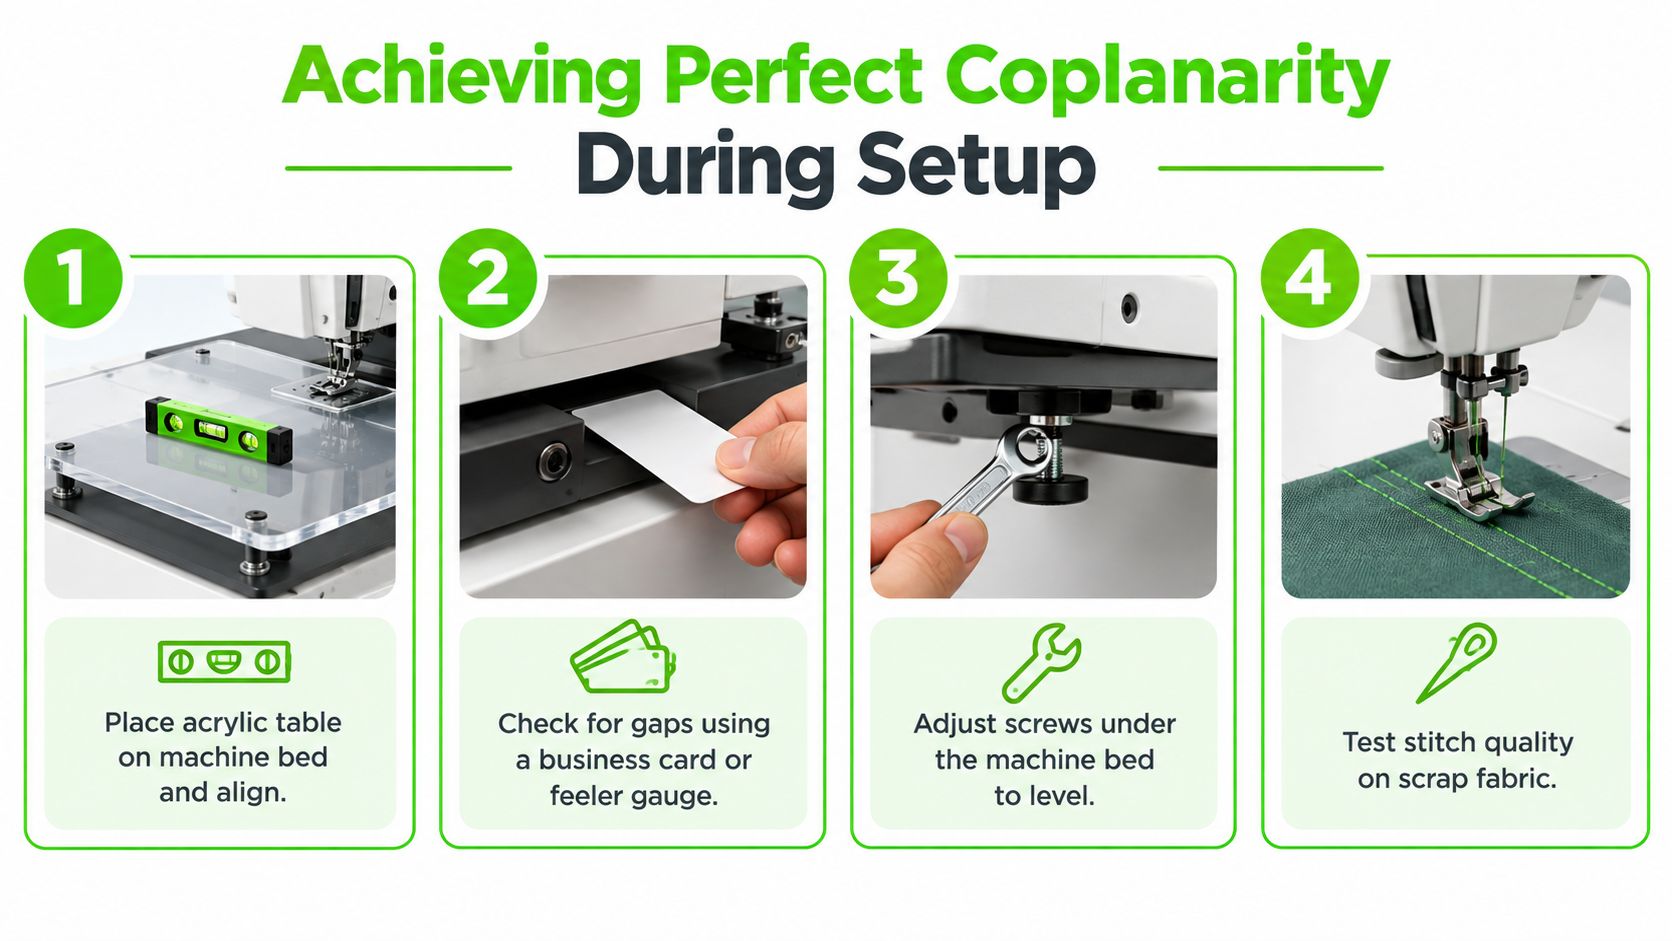
Read the test results
A dip near the stitch plate can pull fabric toward the gap. A raised acrylic edge can catch fabric or force the operator to lift it. Either condition can be more noticeable during free-motion quilting and ruler work, where the operator moves the fabric continuously rather than relying only on the machine feed.
The removable auxiliary leg found on some models deserves attention. It helps support the outer span, particularly when the table extends beyond the machine bed. If that leg isn't contacting the desk properly, the surface may flex or shift as a quilt moves across it.
A height-adjustable furniture system can make this setup easier to maintain. Height-adjustable sewing table guidance is relevant when the machine, table, and chair need to work together rather than being treated as separate purchases.
Optimizing Ergonomics and Long-Session Comfort
More acrylic support reduces fabric drag, but it doesn't automatically create a comfortable sewing station. A large table changes where the operator's forearms rest, how far the chair sits from the needle, and how much of the quilt remains on the surrounding furniture. If those relationships aren't corrected, the new table can solve one problem while creating neck, wrist, or lower-back strain.
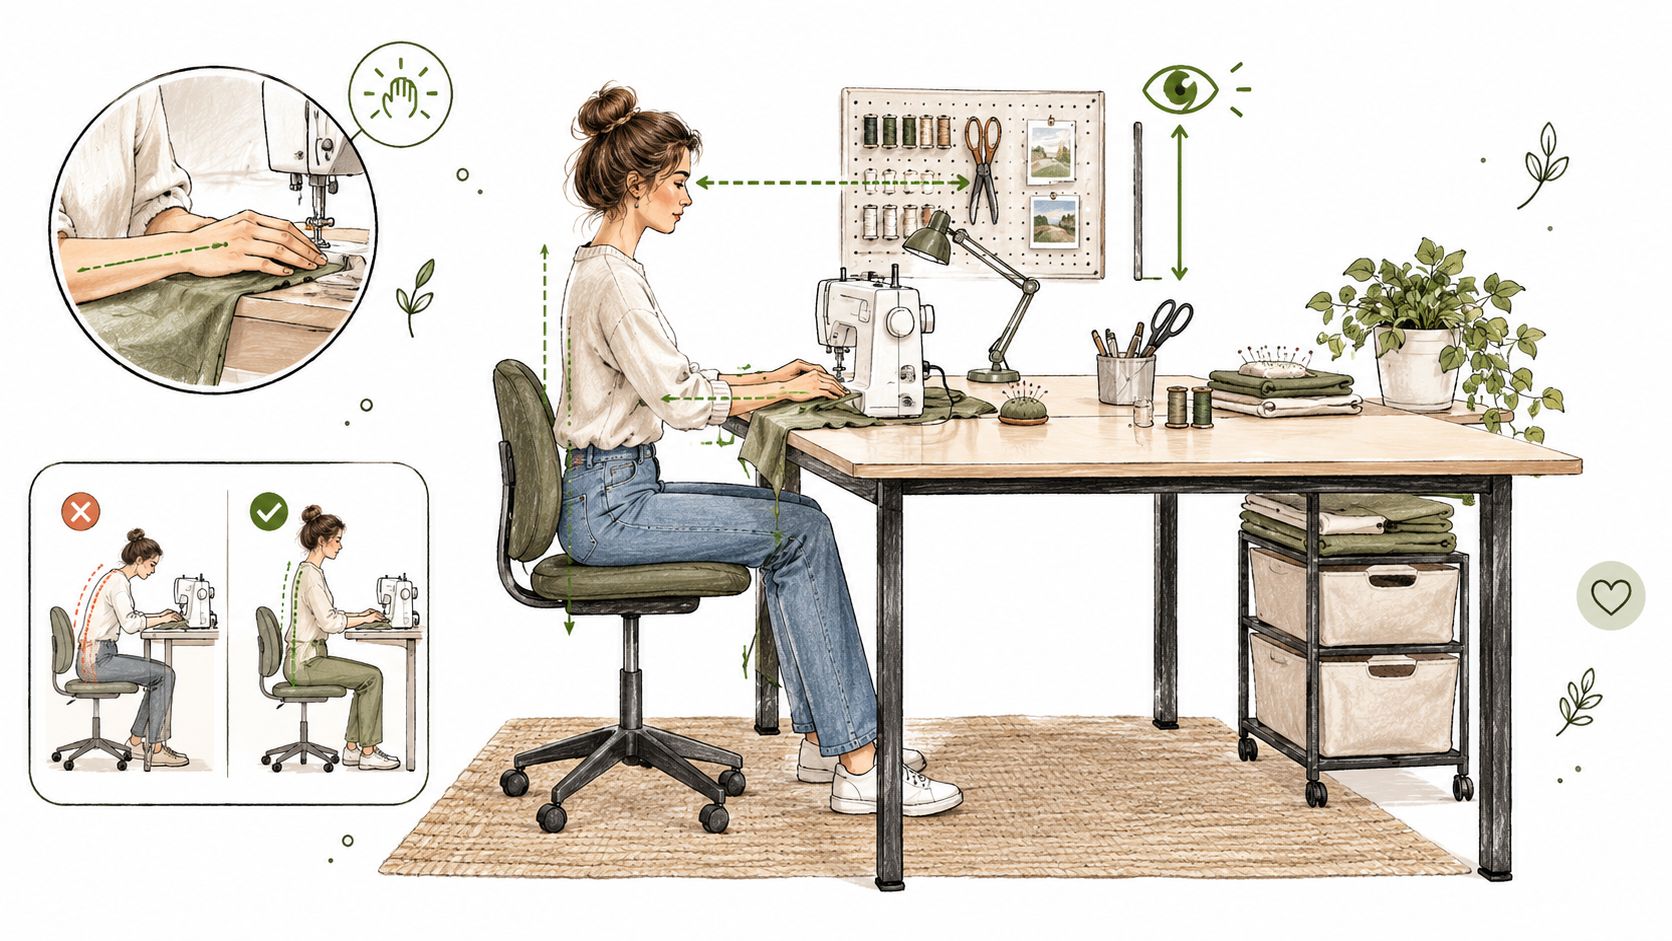
Adjust the person and the furniture
Start with the needle in front of the operator rather than reaching forward from the chair. The elbows should remain close to the body, with the forearms supported by the table or quilt surface. If the chair is too low, the operator may lift the shoulders to reach the machine. If it's too high, the wrists can bend sharply while guiding fabric.
A chair with adjustable height and appropriate support gives more flexibility when the extension table changes the working height. The Koala SewComfort Chair is one furniture option listed for sewing-room use, but the essential test is personal: the operator should be able to sit squarely, see the needle clearly, and keep the wrists neutral.
Control friction and movement
Acrylic is smooth, but quilts can still catch on a front edge or resist movement when batting creates friction. A glide mat can make the transition easier, particularly during free-motion work. It should sit securely without covering machine controls, blocking the bobbin area, or interfering with the feed dogs.
Table stability matters just as much. If the support leg stands partly on a desk edge, the table can shift under a heavy project. The desk should provide continuous support beneath the legs, and the machine should be centered so the quilt's weight doesn't torque the setup to one side.
| Symptom | Likely setup issue | Practical response |
|---|---|---|
| Quilt catches at the front | Abrupt edge or unsupported drop | Reposition the quilt, add suitable glide support, and check the table transition |
| Table shifts during quilting | Uneven support or overloaded furniture | Recheck the legs and place the full support footprint on a stable surface |
| Shoulders rise while sewing | Chair or table height mismatch | Adjust chair height and bring the work closer |
| Small projects feel awkward | Surface is larger than the workflow requires | Use a compact table or move the project support closer to the needle |
Project type changes the answer. A large quilt may benefit from a broad table, while bag-making can require clear access around bulky handles and seams. Workshop instructors should also check that students can reach the controls without leaning over the acrylic surface.
Testing Your Setup In Person at B-Sew Inn
Online photographs can't show whether a table edge catches a quilt, whether the chair leaves the operator too far from the needle, or whether a machine's bobbin cover remains easy to reach. Those details become obvious when the actual machine and table are placed together. That hands-on check is particularly valuable for older machines, variants, and purchases involving a significant machine investment.
B-Sew Inn is an authorized sewing, quilting, and embroidery machine dealer with retail stores in Tulsa, Oklahoma City, Springfield, Humble, and Fayetteville, plus an online store at bsewinn.com. The business sells and services machines from Baby Lock, Bernina, Bernette, Brother, and Janome, along with sergers, longarm quilting machines, embroidery designs, thread, stabilizer, notions, cabinets, and cutting tables.
What an in-person check should include
Bring the machine's exact model information, or bring the machine itself when the store advises that this is practical. A dealer can compare the cutout, inspect the bed contour, confirm access to the bobbin and free arm, and help adjust the support legs.
The fit test should use more than an empty machine. A useful evaluation includes:
- Fabric movement: Run a layered quilt sample across the bed and table to identify drag or snags.
- Posture: Sit at the machine long enough to notice shoulder lift, wrist bending, or excessive reaching.
- Controls: Operate the handwheel, presser-foot lifter, needle area, and bobbin access without removing the table.
- Furniture support: Check that the cabinet or sewing table supports the full acrylic footprint and auxiliary leg.
- Project match: Compare the table with the work planned, whether that's quilting, garments, bags, or embroidery.
B-Sew Inn doesn't manufacture machines or create custom machine designs. Its role as a dealer and service provider makes model identification, setup guidance, repair, trade-ins, and in-person machine mastery sessions part of the practical buying conversation. Readers can also ask about in-person classes at the retail locations rather than trying to solve every technique and fit issue alone.
The right extension table is the one that matches the machine, furniture, project, and operator. A larger surface can support a bulky quilt beautifully, but only after the table sits flush, remains stable, and allows comfortable control throughout a long session.
B-Sew Inn can help shoppers compare model-specific extension tables with Baby Lock, Bernina, Bernette, Brother, and Janome machines, then test the setup in person at stores in Oklahoma, Missouri, Texas, and Arkansas. Visit B-Sew Inn to browse available machine accessories, arrange service or a trade-in conversation, or book an in-person class and machine mastery session.

