

A quilter can sew carefully, press every seam, and still discover that a star point has vanished into the seam allowance. That frustration usually comes from tiny shifts in cutting, fabric stretch, or seam width. Foundation paper piecing gives the machine and the fabric a fixed reference, so the printed pattern controls the geometry while the quilter concentrates on accurate placement and steady stitching.
The method does require a different relationship between needle, stitch length, paper, and feed dogs. Once those mechanics make sense, complex blocks become much less mysterious. The following guide starts with the structure of the technique, then moves into machine setup, sewing order, troubleshooting, production planning, and the hands-on support available through B-Sew Inn.
Table of Contents
- Understanding Foundation Paper Piecing and Its Advantages
- Essential Supplies and Machine Setup for Precision
- Step-by-Step Foundation Paper Piecing Workflow
- Troubleshooting Common Paper Piecing Problems
- Scaling Up and Advanced Variations
- Next Steps and Finding Your Perfect Machine
Understanding Foundation Paper Piecing and Its Advantages
A traditional template may tell a quilter what shape to cut, but the fabric can still shift while the seam is sewn. A narrow triangle can stretch, a bias edge can wave, and a carefully matched point can move just enough to disappear. This is especially frustrating in a block built from repeated angles, where one small error affects every adjoining piece.
Foundation paper piecing changes the process by placing a printed paper foundation between the quilter and the fabric. The paper carries the block's seam lines and section numbers. Fabric is cut larger than the section, stitched through the paper on the printed line, then flipped and pressed into position. The foundation holds the geometry steady while each seam is formed.
The core method has deep roots. Historical accounts describe quilters in England using muslin, newspapers, letters, catalog pages, and other scrap paper as foundations for small fabric pieces during the 18th and 19th centuries. A quilt top displayed at the Virginia Quilt Museum was dated January 1889 and still retained its papers, evidence of both the method's use and the durability of the resulting artifact. The historical background is outlined in this history of paper piecing.
Why the paper changes the result
FPP works because the paper acts as both stabilizer and measuring surface. Each fabric piece extends beyond the intended seam, the seam is sewn directly on the printed line, and the excess is trimmed away afterward. This oversize-then-trim workflow is the mechanical reason the finished points can remain sharp, even when the pieces are small or the angles are unusual. The method's geometry is described in this foundation paper piecing guide.
That control offers several practical advantages:
- Consistent seam allowances: The foundation establishes the sewing line, while the outside edge is trimmed to the intended allowance.
- Reduced distortion: Paper supports fabric during stitching, particularly along narrow or bias-cut edges.
- Complex geometry: Flying points, sharp stars, curves made from segmented units, and miniature arrangements become more approachable.
- Repeatable blocks: When every unit follows a printed template, matching multiple sections becomes less dependent on freehand cutting.
Practical rule: The paper doesn't make inaccurate sewing irrelevant. It gives accurate sewing a stable surface to work against.
A quilter learning what patchwork quilting involves will find that FPP is best understood as a precision construction method, not just a different way to cut fabric. It rewards careful preparation, especially when the design contains points that must meet across several units.
Essential Supplies and Machine Setup for Precision
The machine setup determines whether the paper behaves like a useful stabilizer or turns into a shredded, curling obstacle. A quilter needs clear visibility, a needle that makes clean perforations, thread that forms a balanced seam, and paper light enough to remove without excessive force.
A sharp or Microtex-style needle can pierce fabric and paper cleanly, but the correct size depends on the fabric and thread being used. A needle that's too large can leave aggressive holes and increase paper damage. A needle that's too fine may deflect, bend, or struggle as layers build at intersections. Machine tension should remain balanced enough that the thread locks inside the seam rather than forming loops on either side.
Foot choice matters because the printed line must remain visible. An open-toe foot provides a broad view around the needle, while a clear quarter-inch foot helps a quilter monitor the fabric edge when joining completed units. The most useful choice depends on the machine's shank system and the quilter's preferred visibility.
A practical setup reference
| Component | Recommendation | Why It Matters |
|---|---|---|
| Stitch length | Begin around 1.0 to 2.0 mm | Short stitches perforate paper more closely, which supports clean removal and helps limit seam creep. |
| Needle | Use a sharp, fabric-appropriate needle | A clean point passes through paper and fabric without unnecessary tearing. |
| Paper | Choose lightweight foundation paper when possible | Thin paper generally releases more easily and creates less bulk beneath the foot. |
| Presser foot | Use an open-toe or clear quarter-inch foot | Better visibility helps the needle stay on the printed line and supports accurate unit joining. |
| Thread | Use quality piecing thread suited to the fabric | Balanced thread reduces bulky seams and keeps the stitched line stable. |
| Feed dogs | Keep feeding even and avoid pulling the paper | The feed system should move the layers consistently without stretching the foundation. |
| Iron | Press with controlled heat and no aggressive dragging | Excess heat or movement can curl paper and distort the unit. |
The 1.0 to 2.0 mm stitch-length range and the recommendation to trim each seam to a true 1/4-inch allowance are supported by expert FPP guidance at Quilt Fabrication. Shorter stitches aren't automatically better. They create more perforations, which can make removal easier, but excessive perforation can weaken the foundation before the block is complete.
Paper weight creates a similar trade-off. Standard printer paper is accessible, while lightweight copy paper, newsprint, and specialty foundation paper may tear away with less resistance. The right choice depends on the block's complexity, the number of seams crossing one area, and how firmly the machine's needle penetrates. Current guidance remains broad rather than based on controlled comparisons between paper types and machine settings, so testing on scraps is sensible.
A quilter can review a practical starter supply list through quilting supplies for beginners. B-Sew Inn carries sewing and quilting machines from Baby Lock, Bernina, Bernette, Brother, and Janome, along with needles, thread, stabilizer, notions, cutting tables, and related equipment. The company is a dealer and service provider, not a machine manufacturer or custom machine designer.
Step-by-Step Foundation Paper Piecing Workflow
FPP becomes easier when the printed side and fabric side are treated as separate work surfaces. The quilter sews from the printed side, but fabric placement happens on the unprinted side. That reversal is the source of most early confusion.
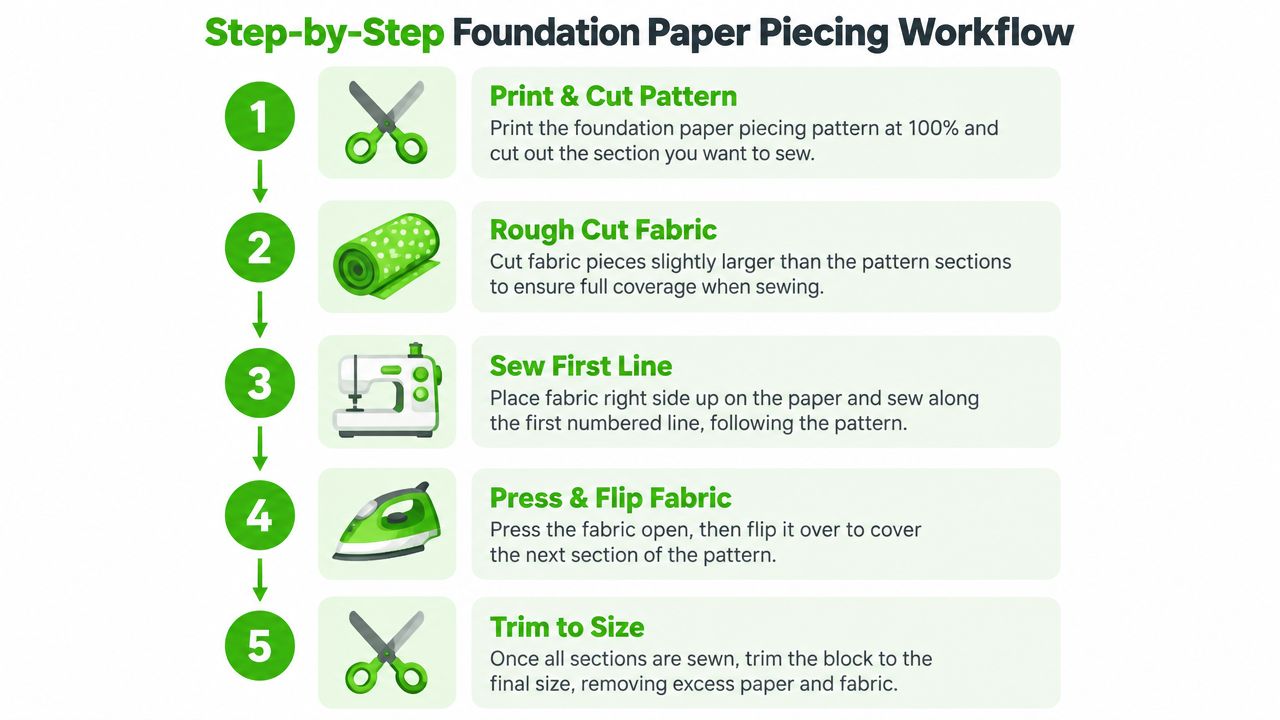
Prepare the foundation and fabric
- Print and inspect the template. Confirm that the pattern printed at its intended size before cutting fabric. Keep the printed side facing up while identifying the numbered sections.
- Cut fabric generously. Each piece should extend beyond its section and the seam line. The foundation method depends on having enough fabric to cover the next area after the piece is flipped.
- Place the first piece. Put the first fabric piece right-side up on the unprinted side of the paper. The fabric should cover its numbered section with extra beyond the surrounding seam lines. The placement principle is confirmed in this explanation of the anatomy of a paper piecing template.
Sew, flip, and press
- Add the next piece in order. Place the second fabric piece wrong-side up against the previous piece, so the fabric right sides face each other. The paper remains on top, with its printed side visible.
- Sew directly on the numbered line. Lower the needle just before the line, stitch across it, and continue slightly into the seam allowance. The line, not the fabric edge, controls the seam location.
- Flip the fabric away from the paper. Turn the new piece over the sewn seam and press it open. Check the coverage before proceeding. If the fabric doesn't reach the next section, the piece was either too small or placed at the wrong angle.
Trim after every seam
- Fold the foundation on the next seam line. A postcard or firm piece of card can protect the paper while creating a clean folding edge.
- Trim the exposed fabric. Use an add-a-quarter ruler to establish a true 1/4-inch seam allowance, then cut away the excess with a rotary cutter. This isn't merely tidying the block. It creates the straight edge that guides the next fabric placement.
- Repeat the sequence. Continue in numerical order: place, stitch, flip, press, and trim. The repeated rhythm prevents accumulated seam allowance errors.
The foundation paper piecing pattern template guide can help quilters organize printed foundations before beginning a complex block. Completed units are usually trimmed to the outside edge while the paper is still attached, then joined to other units with the foundation providing continued stability.
A quilter should resist the urge to remove paper early. Paper removal belongs after the unit's perimeter seams are secure, especially when a completed FPP unit will be joined to traditionally pieced sections. Pulling paper too soon can allow bias edges to stretch and make the final assembly less accurate.
Troubleshooting Common Paper Piecing Problems
“Use a small stitch” is useful advice, but it isn't a complete machine setting. Stitch length affects paper removal, seam strength, needle perforation, and the foundation's ability to survive repeated handling. A quilter who chooses the shortest available setting without testing may solve one problem while creating another.
The practical starting point is around 1.0 to 2.0 mm, with adjustments based on the paper and fabric combination. Short stitches create close perforations that help the paper tear away. Longer stitches leave stronger paper between needle holes, but they can make removal harder and may allow more movement along the seam. Expert guidance also recommends selective longer basting stitches at matching points when a quilter needs to reduce shifting during assembly. These relationships are described in paper piecing stitch and trimming guidance.
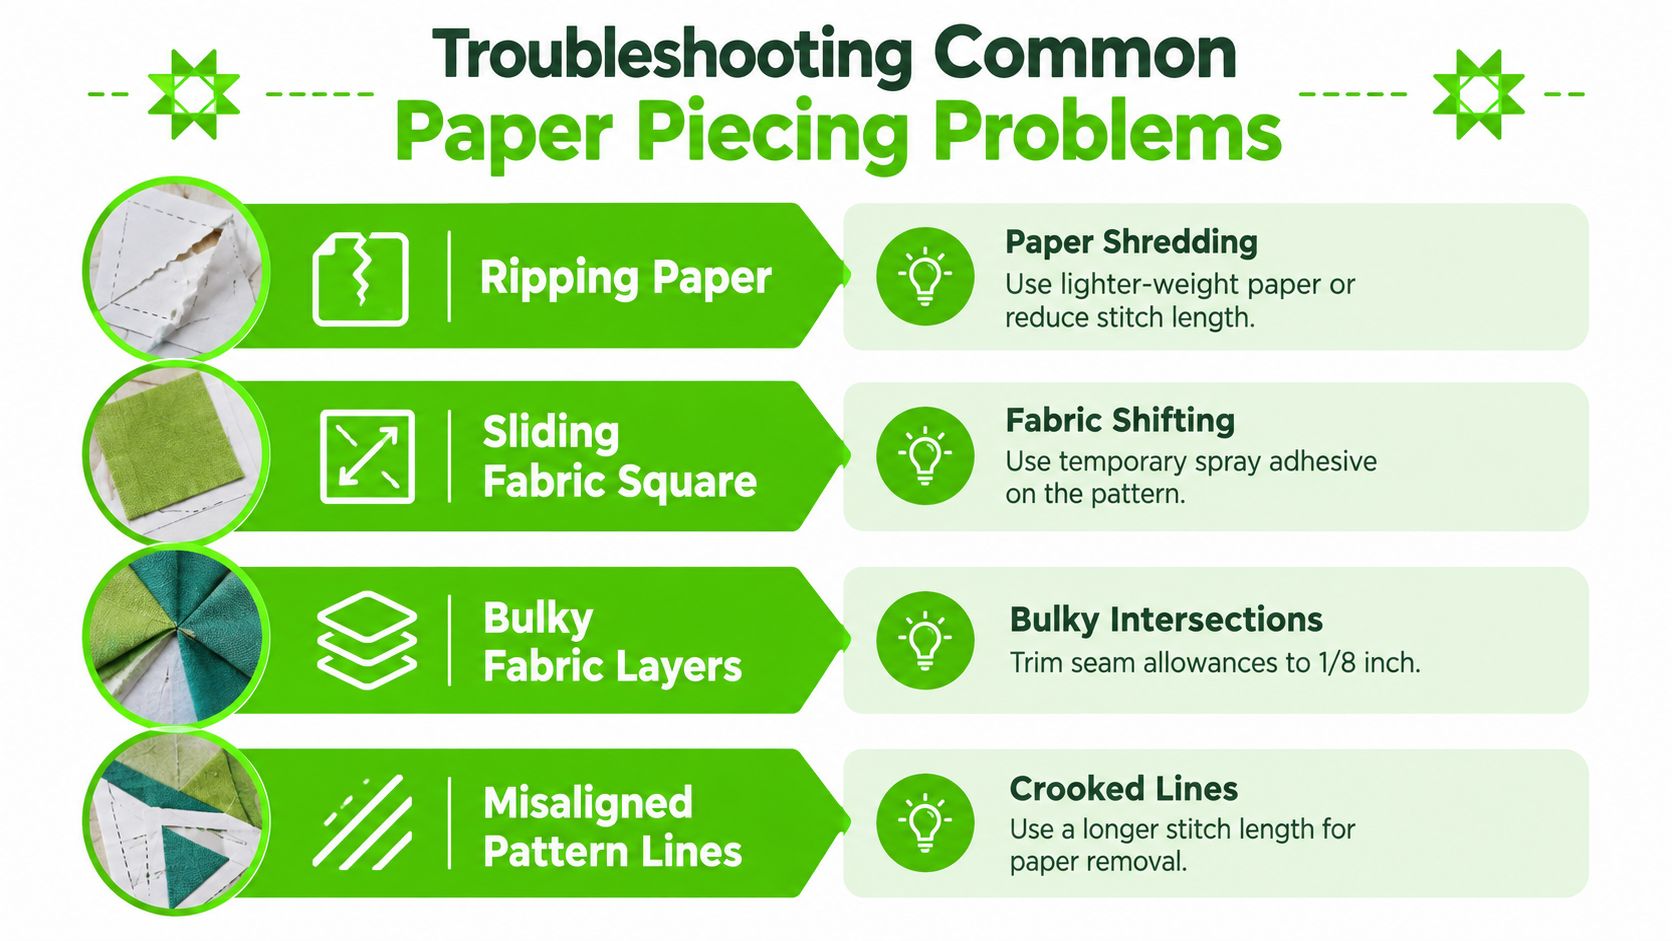
When the paper shreds
Paper shredding usually means the foundation is receiving more stress than it can tolerate. The combination may involve paper that's too heavy, a stitch setting that's too short, a needle that's dull, or repeated reverse stitching in the same area.
Try these checks:
- Change the paper: Test a lighter foundation sheet on a scrap unit.
- Inspect the needle: Replace a needle that feels dull, bends, or begins making inconsistent holes.
- Lengthen slightly: Move upward within the short-stitch range if the paper is disintegrating before the block is complete.
- Avoid unnecessary backstitching: Secure seams through controlled starts and stops rather than repeatedly perforating one point.
Paper dust can collect around the bobbin area as the foundation is stitched. A quilter should follow the machine manufacturer's cleaning and maintenance instructions, especially after a long paper-piecing session. If the machine develops skipped stitches, unusual noise, or feed problems, a service appointment is more appropriate than continuing to adjust tension.
When fabric shifts or seams creep
Fabric shifting often begins before the needle reaches the line. The first piece may not be secured, the overhang may be inadequate, or the quilter may pull the unit while the feed dogs are moving it. Seam creep can also accumulate when each unit is trimmed slightly differently.
Stabilize the process rather than forcing the fabric. A small amount of temporary adhesive can hold the first piece in place, provided it's compatible with the fabric and used sparingly. At matching points, longer basting stitches can temporarily anchor the alignment without creating a dense field of perforations.
Bulky intersections need careful trimming, but a quilter shouldn't remove seam allowance blindly. The printed foundation and the block's construction determine how much fabric can be safely reduced. Once a block is complete, the accuracy checks in how to square up quilt blocks can help identify whether the outside edges match the intended dimensions.
When lines and points don't align
Crooked lines may result from a misprinted foundation, a shifted fabric piece, or sewing beside the printed line. If the template was printed at the wrong scale, no machine adjustment can correct the finished dimensions. The foundation should be checked before fabric is cut.
At the machine, slow the feed and watch the needle enter the line. The open space around an open-toe foot can make this easier, while a clear foot provides a useful view of the fabric edge when units are joined. Precision comes from a compatible combination of paper, needle, stitch length, foot, and operator control.
Scaling Up and Advanced Variations
A single FPP block can feel efficient because the printed foundation removes much of the guesswork. A large quilt made from many small units reveals the hidden costs. Every unit consumes paper, cutting time, trimming time, pressing time, and later removal labor. Repeated paper removal can also strain hands and slow the project's momentum.
That doesn't make FPP a poor choice. It means the technique should be assigned to the parts of a quilt that benefit most from fixed geometry. A block with interlocking points, unusual angles, or small pieces may justify the additional handling. A repetitive design with straightforward rectangles may be faster to construct with conventional piecing.
Plan the project before production
A production-style workflow begins with organization rather than speed. Sort foundations by block, label fabric groups, and keep a dedicated trimming station near the machine. Batching similar operations can reduce repeated tool changes and mental switching.
A useful workflow may look like this:
- Prepare templates together: Print, inspect, and label a complete group before cutting fabric.
- Rough-cut by fabric group: Keep pieces associated with their numbered sections.
- Sew matching units in a batch: Chain piecing can help when foundations are similar, but different designs should remain separated to prevent orientation mistakes.
- Press and trim in a rhythm: A consistent sequence reduces variation between units.
- Remove paper in stages: Pull paper after structural seams are secure, not while the unit remains vulnerable to stretching.
The underserved planning question is whether FPP remains efficient at volume. Available tutorials generally focus on the single-block sequence rather than measuring throughput, waste, or labor against traditional patchwork. That leaves room for a practical conclusion: precision does not automatically equal efficiency. The paper, the labor, and the possibility of seam ripping all belong in project planning.
Combine techniques strategically
Advanced quilters can combine FPP with partial seams, appliqué, and traditionally pieced sections. The foundation can establish a precise central motif, while simpler borders or background areas are assembled conventionally. This hybrid approach limits paper use without giving up the control needed where points must meet.
Oversized blocks require special attention to handling. Larger paper foundations can flex, so supporting the unit during sewing and pressing becomes more important. A quilter may also need a larger work surface, a clear view of the needle area, and a machine with consistent feeding across the expanded layers.
B-Sew Inn offers machines, quilting equipment, notions, and furniture that can support different project scales. Since the retailer sells and services Baby Lock, Bernina, Bernette, Brother, and Janome machines, quilters can discuss their fabric, block size, foot preferences, and intended workload before selecting equipment. In-person testing matters when the choice involves several thousand dollars, because the quilter can feel the feed, inspect visibility, and test how the machine handles paper-backed seams.
Next Steps and Finding Your Perfect Machine
The first project should build control rather than test endurance. A simple geometric coaster, small wall hanging, or single compact block gives a quilter enough seams to practice the sew-and-flip rhythm without creating a large commitment. The important skills are easy to observe: keeping the needle on the printed line, checking coverage after pressing, and trimming each unit consistently.
Machine choice becomes more meaningful after those basics are understood. A quilter who struggles to see the line may benefit from a clearer foot or better needle-area lighting. Someone working with many small units may value smooth feeding, easy stitch-length adjustment, and a comfortable workspace. Those features matter because FPP asks the machine to move paper and fabric together while preserving a precise line.
The sewing machine for quilting guide can help frame that decision around quilting habits rather than brand labels. B-Sew Inn is an authorized sewing, quilting, and embroidery machine dealer with retail stores in Tulsa and Oklahoma City, Oklahoma, Springfield, Missouri, Humble, Texas, and Fayetteville, Arkansas, plus an online store. Readers can see, test, and try machines in person, ask about feet and needles, schedule service or repair, explore trade-ins, and attend in-person machine mastery sessions and classes.
A hands-on class can also resolve the spatial confusion that photographs can't always clarify. An instructor can watch how a quilter places the first piece, identify why a point is shifting, and help match the stitch length and needle to the paper and fabric combination. That practical feedback protects both the project and the machine investment.
Quilters can browse B-Sew Inn for quilting machines, needles, thread, feet, cutting tools, paper-piecing notions, and related supplies, or visit a retail store to test a machine with an instructor's guidance. To build confidence with foundation paper piecing, contact B-Sew Inn about an in-person class, machine mastery session, service appointment, or trade-in consultation.

