

A thread that keeps fraying, stitches that look crowded, or tiny holes appearing around a delicate design can make a simple embroidery project feel much harder than it should. Often, the problem isn't the thread or the fabric. The needle is creating the mismatch.
Size 7 embroidery needles are a useful middle-ground choice for many hand-embroidery projects. They have enough eye space for practical thread combinations, while the shaft remains fine enough for detailed work on common woven fabrics. The right choice still depends on three things: the thread, the fabric, and the level of detail.
This guide explains what size 7 means, how its anatomy affects stitching, when to use it, how it compares with nearby sizes, and what to check when thread breaks or stitches skip. For a broader foundation, the guide to choosing the right needle offers useful context for matching needle styles to sewing tasks.
Table of Contents
- Introduction to Size 7 Embroidery Needles
- What Makes a Size 7 Embroidery Needle Different
- Best Threads and Fabrics for Size 7 Needles
- How Size 7 Compares to Nearby Needle Sizes
- Troubleshooting Skipped Stitches and Thread Breakage
- Buying and Caring for Your Embroidery Needles
- Choosing Your Next Needle With Confidence
Introduction to Size 7 Embroidery Needles
At the worktable, a floral motif can start neatly with stranded cotton on woven fabric. After a few stitches, the floss may fuzz as it passes through the eye. The needle begins to drag, the fabric develops larger holes than expected, and the outline loses definition. Changing the thread may seem logical, but a better-matched needle often addresses the problem at its source.
Needle sizing feels backward at first. Higher numbers generally indicate finer needles, while lower numbers indicate thicker ones. Size 7 sits toward the finer half of the common hand-embroidery range, yet it still has enough body for everyday surface embroidery and several practical thread combinations. The number is not a quality grade, and it does not represent one universal measurement across every needle category.
Why the middle ground matters
Size 7 suits projects that need a needle to carry more than one strand of floss without making a bulky opening in the fabric. Expert guidance places it among versatile choices for 2 to 4 strands of stranded cotton on cotton and linen. Its larger eye gives the thread room to pass with less abrasion, while the slimmer shaft supports clean movement through woven fabric (Needle ’n Thread guidance).
That balance makes size 7 useful for general surface embroidery, including outlines, leaves, lettering, and filled motifs. It is not a universal answer. Very fine fabric, exceptionally fine thread, or dense material may work better with another size.
A helpful way to judge the fit is to treat the needle and thread like a key and its lock. The eye must give the thread enough room, while the shaft must pass through the fabric without forcing the weave apart.
Practical rule: The needle should pass through the fabric without force, and the thread should move through the eye without scraping, crowding, or excessive looseness.
For broader guidance on matching needle styles to sewing tasks, see B-Sew Inn's guide to choosing the right needle. With the sizing logic clear, match the eye and shaft to the thread already on your worktable.
What Makes a Size 7 Embroidery Needle Different
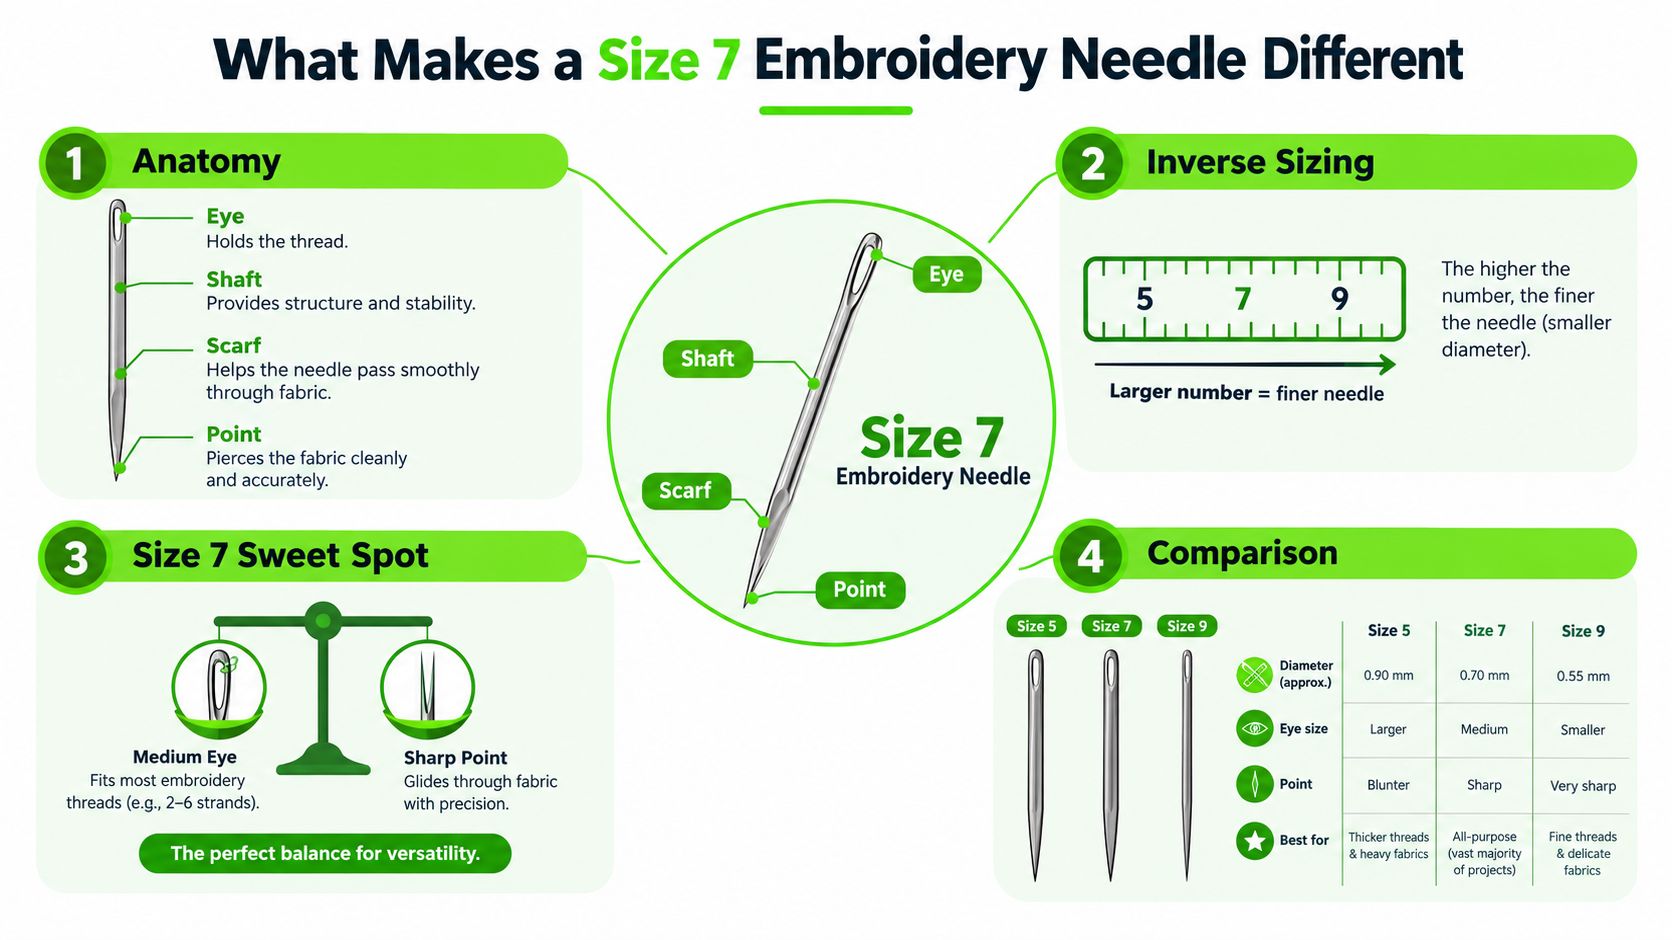
At the fabric counter, a size 7 is often the practical middle choice. It gives several strands of embroidery thread enough room to pass through the eye, while its shaft remains slim enough for ordinary woven fabric. To choose it well, look at the thread count and fabric together, rather than treating the number as a complete answer.
An embroidery needle has four working features. The eye holds the thread, the shaft travels through the fabric, and the point enters the weave. The scarf is the shaped area near the point. It matters most on machine-embroidery needles, where the design supports repeated movement and helps protect thread during dense stitching.
Size 7 belongs to a numbering system in which a larger number indicates a finer needle. Hand-embroidery sizing and machine-needle sizing use related ideas, but they are not interchangeable. A technical sewing needle chart describes machine-embroidery needles in the 70/10 to 90/14 range, including larger eyes and specially shaped scarfs intended to reduce thread breakage and shredding.
Reading the physical dimensions
Independent reference material places a size 7 crewel or embroidery needle at roughly 38 to 38.5 millimeters in length and about 0.69 to 0.70 millimeters in diameter (size 7 embroidery needle dimensions). Those dimensions give it enough body to open a path for fuller floss or textured thread, while the length offers comfortable control for surface stitches.
The proportions are easier to understand through a simple comparison. A size 7 is like a sturdy pin that remains fine enough for detail work. It is less delicate than very fine embroidery sizes, yet not a heavy, blunt tool. Its eye also accommodates multiple strands more comfortably than a slender needle with a smaller opening.
Why the scarf matters in machine embroidery
Hand and machine needles may carry similar-looking numbers, but their construction serves different jobs. Machine-embroidery needles use features such as a larger eye and shaped scarf to support repeated stitching through fabric. 40-weight thread is commonly paired with 75/11 needles, while finer threads often use 65/9 to 75/11.
That dual-number language can confuse shoppers. A hand-embroidery size 7 and a machine needle marked 75/11 are not automatically the same needle. Check the needle's length, eye, point, and intended use before substituting one for the other.
For a clearer breakdown of hand and machine choices, read this guide to the best needles for embroidery, then match the needle to the thread and fabric on your worktable.
Best Threads and Fabrics for Size 7 Needles
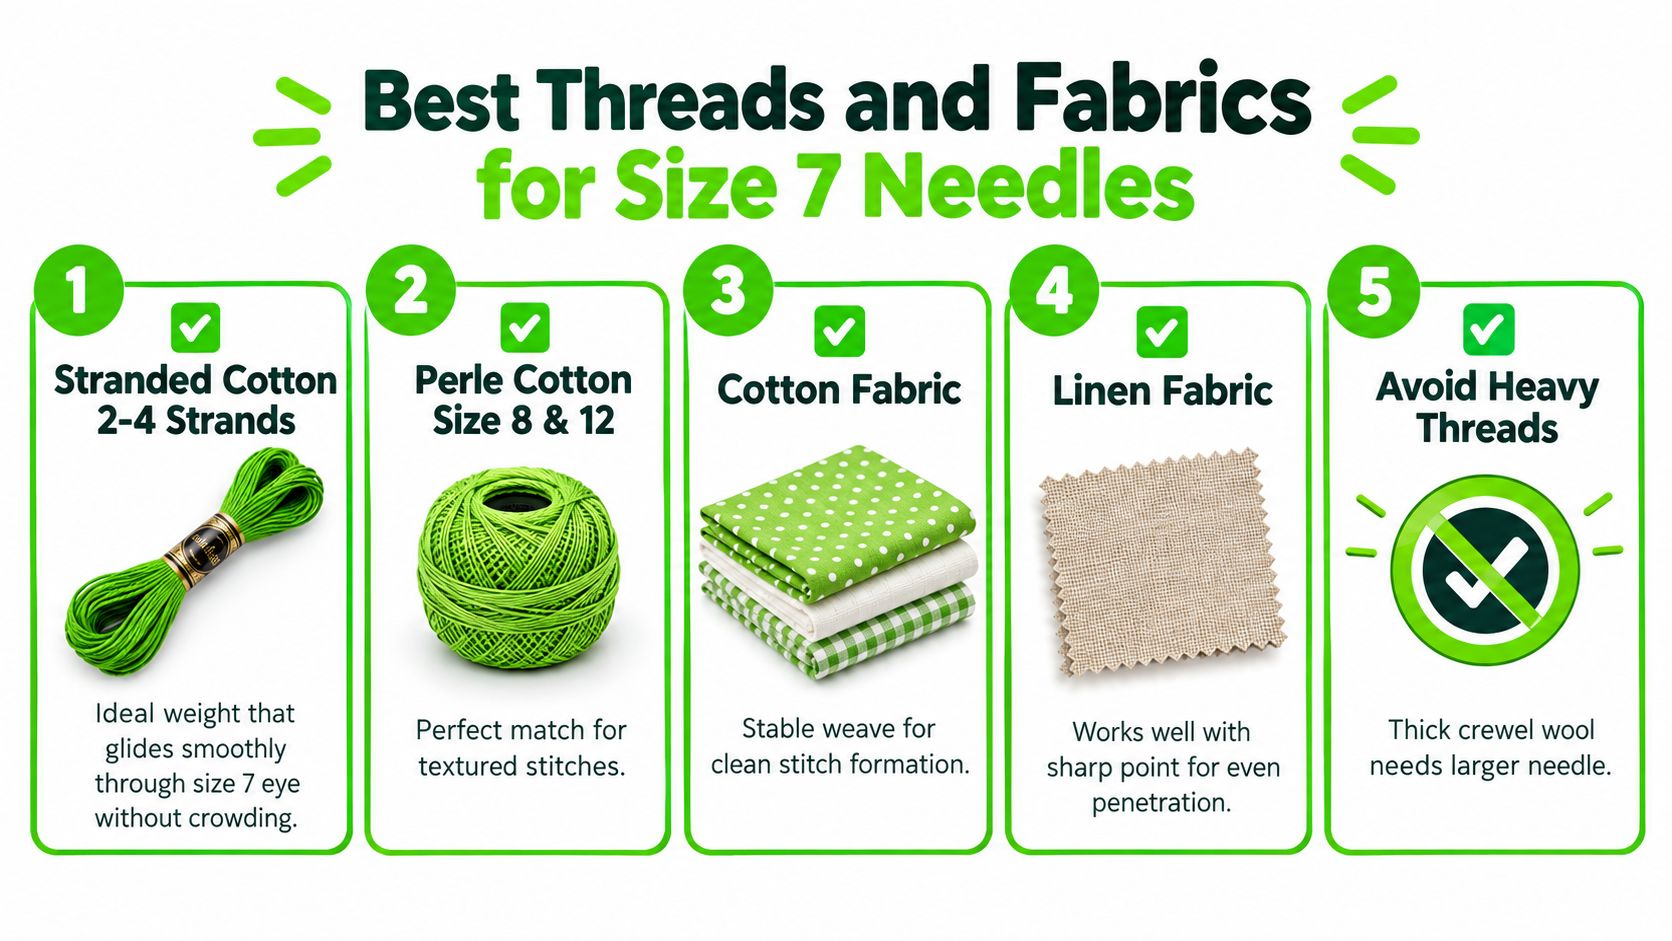
Start with the thread, then choose the fabric pairing. A size 7 needle that glides comfortably with two strands of stranded cotton may feel crowded with wool or another heavier thread. The eye should let the thread pass without scraping, while the shaft should open the fabric enough for the stitch to settle cleanly.
For everyday surface embroidery, size 7 works well with 2 to 4 strands of stranded cotton on cotton or linen, as described in this Needle ’n Thread selection guidance. Two strands suit fine outlines and small motifs. Three or four strands give larger shapes fuller coverage.
Match the strand count to the fabric
Lightweight fabric usually looks best with fewer strands. Two strands keep outlines delicate and reduce the chance of crowding the weave. Three or four strands add coverage for satin stitch and broader shapes, but they also put more thread through the needle eye and fabric.
Cotton provides a steady ground for size 7. Linen can work just as well when the point enters the weave cleanly. On a lighter fabric, begin with two or three strands, a pairing also shown in this embroidery needle type and size chart. If the thread drags or the fabric puckers, reduce the strand count before changing the needle.
Use the eye as a thread test
Thread the needle and pull it through a short section of the actual fabric. Resistance, fraying, or fuzz near the eye suggests that the thread and needle are rubbing too hard. A hole that remains visible after the thread settles suggests that the shaft is too large for that ground.
Manufacturer guidance pairs size 7 embroidery needles with Diamant thread, 1 to 4 strands of Mouliné Spécial, or Coton Perlé 5 to 8 (DMC embroidery needles). These combinations show the needle's useful middle ground. It can carry smooth floss, decorative metallic thread, and perle cotton when the fabric has enough structure to support them.
Know when the thread is too heavy
A bulky thread can outgrow size 7 even when the fabric seems suitable. Perle cotton, fine wool, or fuller floss may need the extra space created by a larger needle. On delicate or densely woven fabric, however, that opening may remain visible and distract from the stitches.
Use the thread's weight as the deciding factor. More coverage usually requires more room in the weave, while fine detail calls for fewer strands and a lighter path. A sewing thread size guide for matching thread weight can help clarify the relationship between thread thickness and needle choice. At a B-Sew Inn counter, you can also bring a fabric sample and test a few thread combinations before buying.
How Size 7 Compares to Nearby Needle Sizes
At the counter, a stitcher may hold size 7, then ask whether size 6, 8, or 9 would make the next line cleaner. The useful answer comes from the thread and fabric together. The needle number is only a starting point. Ask how much thread the eye must carry and how much space the shaft should open in the weave.
Size 7 sits close to size 6 in gauge. Both are listed at a similar length and thickness, while size 7 crewel needles are typically about 38.5 millimeters long and 0.69 millimeters in diameter. The small difference explains why changing between these sizes may produce only a subtle change in handling.
A practical side-by-side view
| Needle Size | Length and Diameter | Best Thread Pairing |
|---|---|---|
| Size 6 | Similar to size 7, approximately 38.5 millimeters long and 0.69 millimeters in diameter in one manufacturer listing (John James crewel needle specifications) | More substantial thread handling, including fuller floss combinations |
| Size 7 | Approximately 38 to 38.5 millimeters long and 0.69 to 0.70 millimeters in diameter | 2 to 4 strands of stranded cotton, plus suitable perle cotton or other compatible embroidery threads |
| Size 8 | Finer than size 7 within the common embroidery sequence | Fewer strands and lighter detail work on lighter fabric |
| Size 9 | Finer than size 7 and lighter in the shaft | Fine thread, small details, and fabrics that show larger needle holes readily |
A standard-purpose embroidery range commonly includes sizes 6 to 8. Size 7 suits two or three strands on lightweight fabric, while finer sizes support more delicate work (embroidery needle chart). That makes size 7 a useful middle-ground choice, especially when the project combines ordinary surface stitches with modest thread coverage.
Choosing up or down
Choose size 6 when the thread feels crowded in the eye or the fabric resists the shaft. It gives fuller combinations a little more working room. Move to size 8 or 9 when the design needs finer lines, the ground is delicate, or the needle holes remain visible after stitching.
Start with size 7 for general surface embroidery, then judge the pairing in the actual fabric. A short test line can show whether the thread slides freely and whether the openings close behind the needle. At a B-Sew Inn counter, bring a fabric sample and try a few hand-needle options before buying.
Machine embroidery uses a separate sizing system. The sewing machine needle chart can help keep machine recommendations separate from hand-needle choices when a project moves to a computerized embroidery machine.
Troubleshooting Skipped Stitches and Thread Breakage
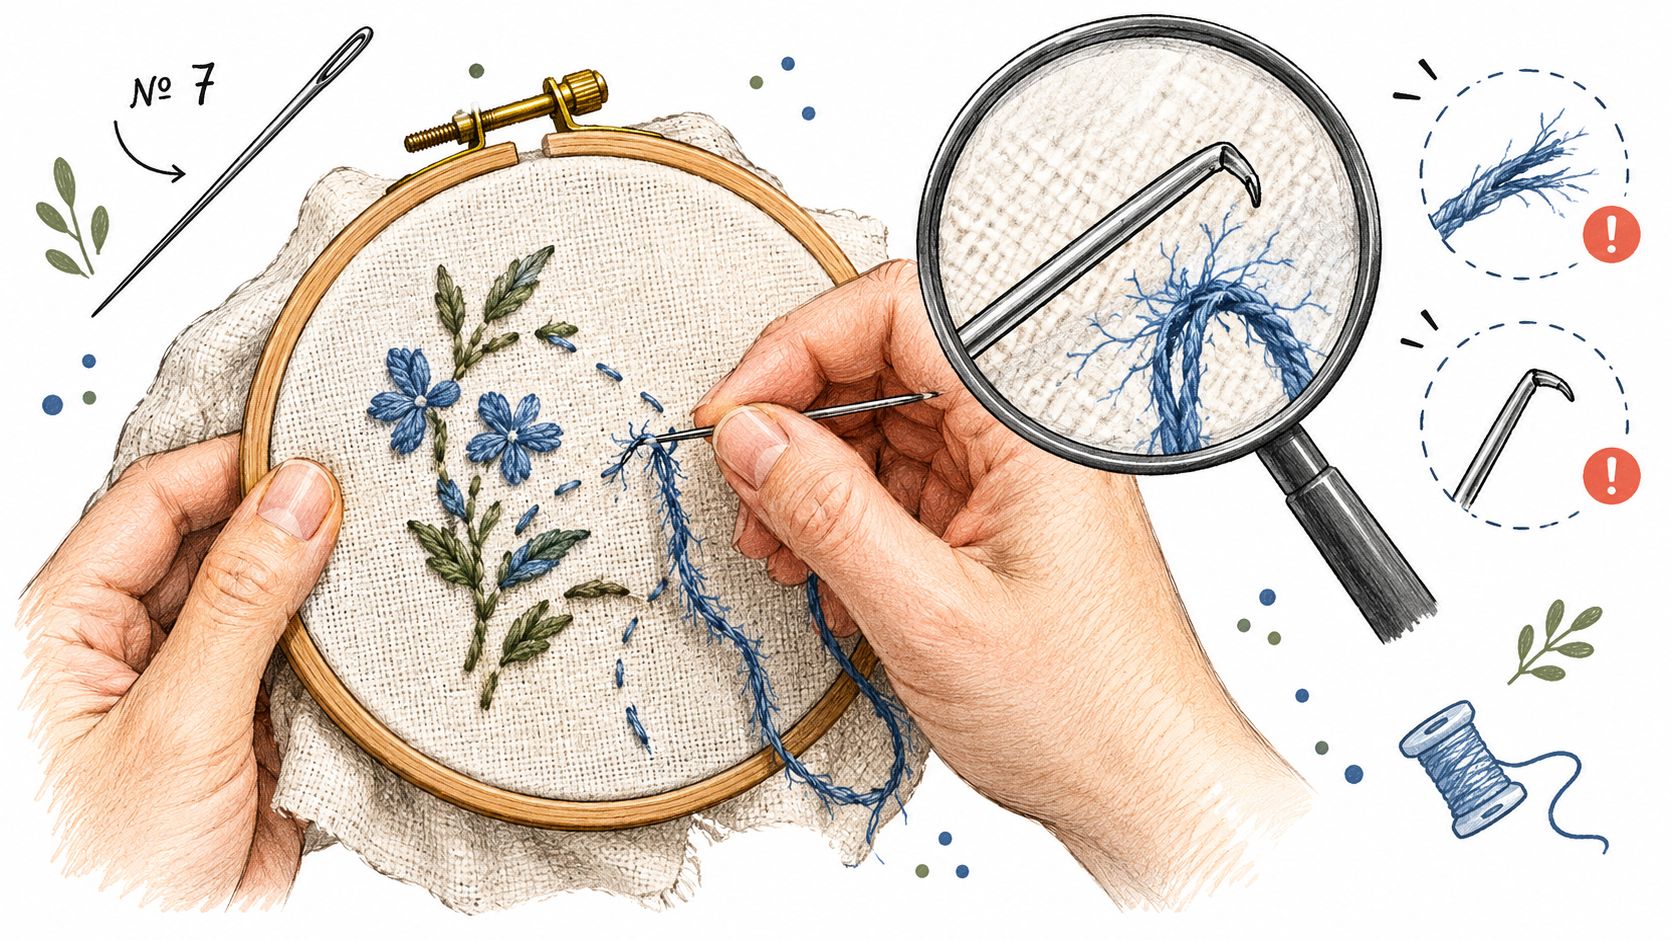
A size 7 needle can look right in the packet yet behave poorly in the project. Watch what happens at the eye, point, and fabric opening. Thread that frays near the eye usually meets too much friction. A needle that hesitates in the cloth may be too large, blunt, or mismatched to the weave. Holes that stay open suggest the shaft is spreading the fabric more than the design can disguise.
Read the symptom first
- Thread shredding: Run the thread through the eye and check for roughness. Replace the needle or try a finer thread pairing. Machine-embroidery needles use larger eyes and shaped scarfs to reduce friction during dense stitching, as explained in the needle anatomy guidance above.
- Skipped stitches: Inspect the point and replace the needle if it feels dull or catches while entering the fabric. A damaged point cannot follow a consistent path through the weave.
- Fuzzy thread: Pull a short length through the eye by hand. If the fibers lift or snag, the eye may be too small for the thread's strand count. Size 7 works best when the thread passes freely without crowding.
- Large visible holes: Choose a finer needle or reduce the thread volume. A size 7 shaft can leave more noticeable openings in delicate fabric, especially when the weave does not close readily after stitching.
Run three quick checks
First, remove the needle and examine the fabric opening. It should settle rather than remain stretched. Then pull the thread through a scrap of the same fabric. Linen and smoother cotton can make the same thread behave differently, so test the actual pairing instead of relying only on how it feels in your hand.
Change the needle before replacing several other supplies. A point can become dull while still appearing normal, and continued use may make good thread seem defective. If the problem continues on a machine, the sewing machine troubleshooting guide can help separate needle symptoms from tension, threading, hooping, or maintenance concerns.
A fresh, well-matched needle is often the simplest diagnostic tool. Replace it before assuming the machine has failed.
Buying and Caring for Your Embroidery Needles
You are halfway through a detailed project, and the needle beside your hoop has no visible size marking. A clearly organized pack prevents that small uncertainty from turning into uneven stitches. Choose packaging that identifies embroidery or crewel needles, shows each size clearly, and keeps the needles separated. Size 6 and size 7 may feel similar in the hand, so labeled storage helps you return to the intended middle-ground needle.
Build a simple storage routine
Keep size 7 needles in a small case or labeled compartment. Store finer and thicker needles separately, and remove used needles from a project pouch instead of leaving them mixed together. Good storage works like a quick reference at the counter. You can identify the needle before threading rather than guessing from its appearance.
Replace a needle when its point drags, the shaft bends, or the eye catches the thread. Unexplained fuzzing or new holes during stitching can also signal that the needle is no longer moving cleanly. Damage may be too small to see, so test it on a scrap of the project fabric. The needle should pass through without catching or requiring extra pressure.
If you want to compare needle packs in person, B-Sew Inn stores in Tulsa, Oklahoma City, Springfield, Humble, and Fayetteville let you test how each size feels before you buy. That hands-on check can clarify whether size 7 gives your thread enough room while still entering the fabric neatly.
You can also ask staff to help compare compatible supplies or discuss thread behavior, stabilizer choices, and machine-service questions. A short conversation before purchasing can prevent a mismatched needle from disrupting a larger project.
Choosing Your Next Needle With Confidence
At the fabric counter, a quick test often settles the choice more reliably than a size chart. Start by checking the thread, fabric, and stitch design. Fuller bundles, metallic thread, perle cotton, and fine wool need more eye room than a lighter thread. Stable cotton and linen usually accept size 7 neatly, while delicate fabric can reveal the opening left by a thicker shaft. Broad filled areas may also benefit from that extra eye space, whereas tiny outlines and close stitches often look cleaner with a finer needle.
Size 7 works as a versatile middle ground. Its eye gives practical room for the specialty threads covered in the thread-pairing section, while its shaft remains fine enough for many everyday embroidery fabrics. The balance matters: an eye that crowds the thread can cause fuzzing or breaks, while a shaft that is too thick can leave visible holes.
Make several stitches on a scrap of the project fabric. Check whether the thread stays smooth, whether the needle enters without force, and whether the fabric closes around the stitch path. A crowded eye means size up. Visible holes mean size down. Otherwise, stay at 7.
For machine embroidery, keep hand-needle sizing separate from machine-needle specifications. Machine work depends on the machine, thread weight, fabric, stabilizer, and design density. A store consultation or in-person machine mastery session can reduce repeated trial and error.
B-Sew Inn stocks embroidery supplies and offers service, in-person classes, and machine mastery sessions for machine embroiderers. Visit a store in Oklahoma, Missouri, Texas, or Arkansas to compare options and test how a needle feels before buying. Staff can also discuss thread behavior, stabilizer choices, and the setup that best suits your next project.

