

Let's bust a huge myth right off the bat: you absolutely do not need a massive, expensive long-arm machine to make a beautiful quilt. The sewing machine sitting in your craft room right now is a quilting powerhouse just waiting for you to unlock its potential. At B-Sew Inn, we're passionate about empowering crafters with our custom sewing machine designs and extensive support, showing you just how capable your machine truly is.
Your machine already knows how to stitch through fabric. The trick is simply giving it the right accessories and guidance to handle the three layers of a quilt sandwich. This guide is all about showing you how to do just that, turning your trusty machine into a tool for everything from classic straight lines to fun, free-motion designs that you can replicate on your own projects.
So many quilters, myself included, started (and still do all their quilting) on a regular domestic machine. It’s not about the machine's limitations; it’s about learning the skills to work with it. We’re going to walk through everything you need, from the essential tools and machine setup to the core techniques that will get you quilting today.
Embrace the Craft With Confidence
Learning how to quilt with a regular sewing machine is a rewarding journey that opens up a whole new world of creativity. Here at B-Sew Inn, our entire mission is to empower crafters like you. We provide the support, tools, and know-how to grow your skills with total confidence through our custom sewing machine designs and extensive resources.
Your home sewing machine is more than capable of producing professional-quality quilts. The real secret isn't a high price tag; it's mastering the fundamentals of prep, setup, and fabric control with the right support.
This guide is your roadmap. We truly believe that with a little guidance, anyone can become a fantastic quilter. That’s why we offer so many resources to help you along the way:
- Custom Sewing Machine Designs: Find tangible project examples and patterns specifically designed to shine on domestic machines.
- Online Classes and Training: Our expert-led online classes and training cover everything from the absolute basics to fancy free-motion work, so you can learn at your own speed.
- Extensive Resources and Support: Connect with other quilters, get answers to your questions, and find all the supplies you need to bring your creative vision to life.
Let's get started. We'll break everything down into clear, actionable steps you can follow to turn those quilt tops into treasured, finished quilts.
Gathering Your Essential Quilting Tools
Before you even think about making that first stitch, let’s talk about setting yourself up for success. Having the right tools on hand isn't about buying every shiny gadget in the quilting aisle; it’s about knowing which items will genuinely make your life easier and prevent a world of frustration.
Think of it like this: you wouldn't try to bake a delicate cake with a soup ladle. In the same way, using the wrong needle or thread can cause a domino effect of skipped stitches, broken thread, and puckered fabric. Investing in just a few key supplies truly makes all the difference, turning a potential struggle into a smooth, enjoyable process.
Needles, Threads, and Other Notions
Choosing the right needle is one of those small details that has a massive impact on your final quilt. While a universal needle might work in a pinch, a dedicated quilting needle is your best friend here. It’s designed with a slightly tapered point that pierces through all those layers—top, batting, and backing—without shredding the fibers. This little design tweak is what drastically cuts down on skipped stitches.
Just as critical is your thread. A high-quality, 40 or 50-weight cotton thread is the gold standard for a reason. It's strong enough to handle the tension of machine quilting but fine enough that it sinks into your quilt top and looks beautiful. Trust me, grabbing old or cheap thread is a recipe for constant breakage and a machine full of lint.
Beyond needles and thread, a few other items are non-negotiable for getting your quilt prepped accurately and easily:
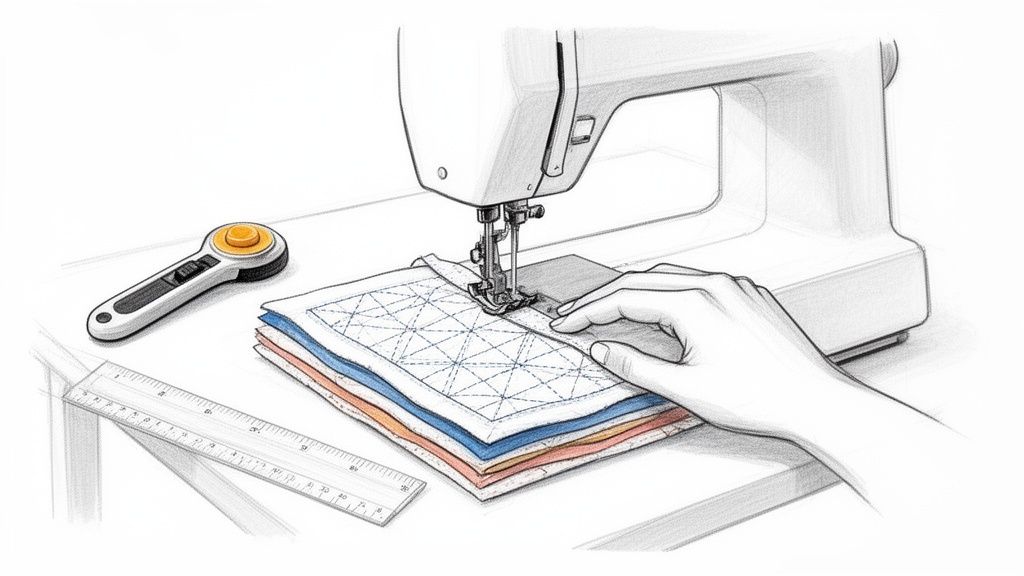
- Rotary Cutter and Self-Healing Mat: This power couple lets you cut fabric with a speed and precision that scissors just can't compete with. A sharp blade is an absolute must for clean, crisp edges.
- Quilting Rulers: You'll want clear acrylic rulers in a few different sizes for squaring up blocks and cutting straight lines. If you're just starting, a 6" x 24" ruler is the perfect workhorse.
- Basting Supplies: Whether you’re a fan of safety pins, prefer a temporary spray adhesive, or want to hand-baste, you need a reliable way to keep that quilt sandwich from shifting.
The right tools do more than just make the job easier—they actively prevent common problems. A quilting needle, quality thread, and a walking foot are your first line of defense against puckering and shifting.
The Most Important Machine Accessories
While everything we've talked about is important, two specific presser feet will absolutely transform your regular sewing machine into a quilting workhorse. You simply can't get high-quality quilting results without them. These are the walking foot (also called an even-feed foot) and the darning foot (or free-motion foot). They are not interchangeable; each has a distinct and vital job.
Getting a handle on what each foot does is central to learning how to quilt on a home machine. One gives you incredible control for straight, linear patterns, while the other offers total creative freedom for literally drawing with thread. For a complete rundown of what to look for, check out our guide on quilting supplies for beginners.
Let's break down exactly what these essential feet do and why you need both.
Essential Feet For Machine Quilting
These two presser feet are the real game-changers. The walking foot masters control and precision for straight-line work, while the darning foot unlocks your inner artist for free-motion designs.
| Feature | Walking Foot (Even-Feed Foot) | Darning Foot (Free-Motion Foot) |
|---|---|---|
| Primary Function | Feeds the top and bottom fabric layers through the machine at the same rate. | Allows the quilter to move the fabric in any direction to create designs. |
| Best For | Straight-line quilting, stitch-in-the-ditch, gentle curves, and grid patterns. | Meandering, stippling, feathers, loops, and any free-hand quilting designs. |
| How It Works | Has a set of built-in feed dogs that grip the top fabric, preventing shifting and puckering. | Hovers or "hops" over the fabric, providing clearance for multi-directional movement while the feed dogs are disengaged. |
| Why It's Essential | Guarantees perfectly even stitches and eliminates puckers, which are common when quilting multiple layers. | Unlocks the potential for artistic, free-form quilting that isn't possible with a standard foot. |
Having both of these feet in your toolkit means you’re ready for any quilting project you can dream up, right on the machine you already own.
How to Prepare Your Quilt for Stitching
I'm going to let you in on a little secret. The difference between a beautifully flat, professional-looking quilt and a lumpy, puckered one is often decided before you even sit down at your machine. It all boils down to creating the perfect "quilt sandwich."
Getting this three-layer combo of your quilt top, batting, and backing just right is hands-down the most critical step. Get this right, and you'll avoid the frustrating shifting and bunching that can happen when you quilt with a regular sewing machine. Think of it as laying a solid foundation—everything you build on top of it will be stable and secure.
Assembling the Quilt Sandwich
First things first, you need some space. A large, clean floor or a couple of tables pushed together will do the trick. You need a surface that's bigger than your quilt top.
Start by spreading out your backing fabric, wrong side facing up. Using painter's tape, tape it down so it's taut, but don't stretch it out of shape. The goal here is a perfectly smooth, wrinkle-free surface.
Next, lay your batting right on top of the backing, smoothing it out from the middle towards the edges. Finally, place your quilt top, right side up, over the batting. Here's a key tip: your backing and batting should be at least 4 inches larger on all sides than your quilt top. This extra room is your safety net, giving you space to work and preventing the edges from shifting out of alignment as you quilt.
This prep stage is where your essential tools come into play, from the initial cutting to the specialized feet that bring your quilting vision to life.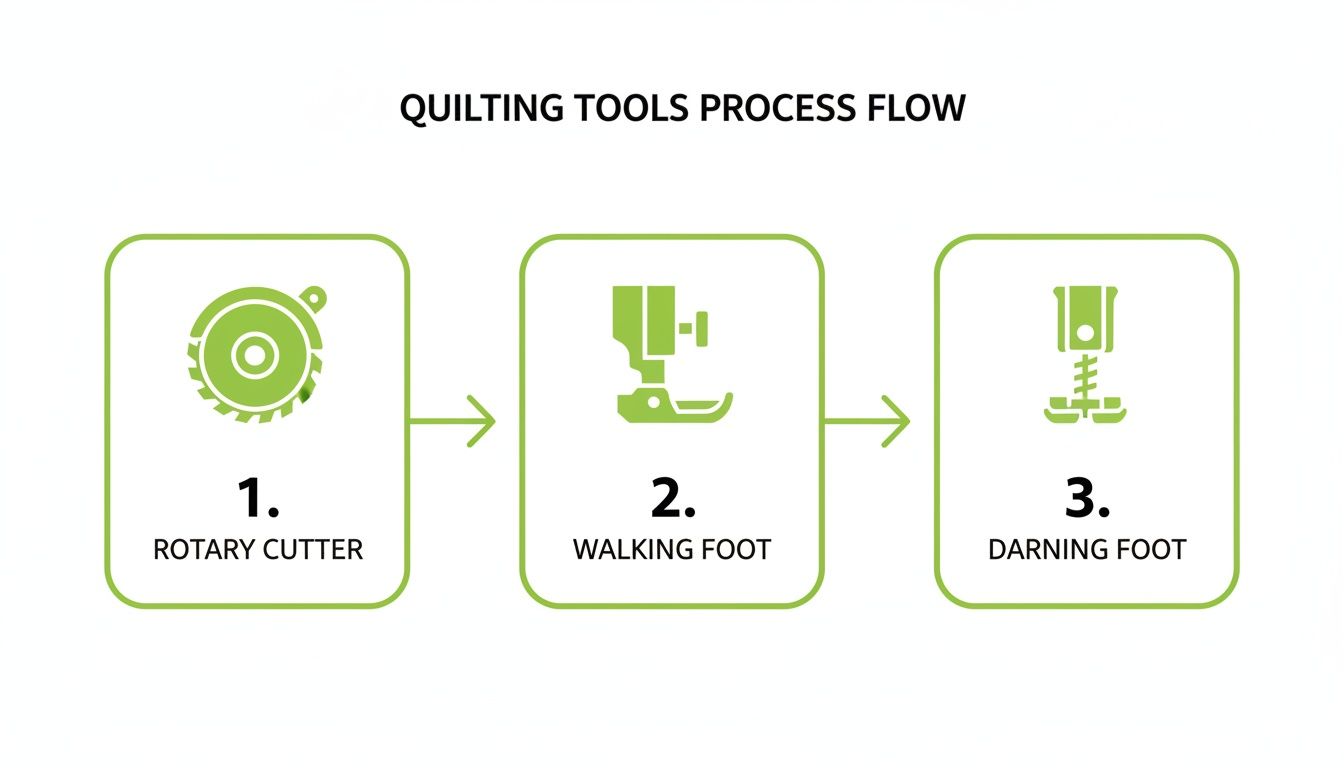
As you can see, precision starts with that rotary cutter and is carried all the way through the process by choosing the right foot for your machine.
Choosing Your Basting Method
Once everything is layered, you have to secure it all together so it acts like a single piece of fabric. We call this basting. There are a few ways to tackle this, and each has its fans.
Pin Basting
This is the classic, tried-and-true method using special curved safety pins made just for quilting. That curve makes them so much easier to open and close than regular safety pins.
- How it works: Start from the very center of your quilt and work your way out, placing a pin every 4-6 inches. A good rule of thumb is about a fist's width apart.
- Best for: Anyone who wants to avoid chemical sprays or prefers a reusable, wallet-friendly option.
- Pro Tip: Just remember, you’ll have to stop and remove each pin as your needle gets close, which can interrupt your sewing flow.
Spray Basting
Using a temporary spray adhesive has become super popular, and for good reason. It creates a nice, even hold across the entire quilt without the bulk of pins.
- How it works: Gently peel back half of your quilt top, give the batting a light, even spritz of spray, and smooth the top back down. Do the same for the other half. Then, flip the whole sandwich over and repeat the process with the backing.
- Best for: Getting a super smooth, pucker-free finish in a hurry. It's fantastic for small- to medium-sized projects.
- Pro Tip: Always use this stuff in a well-ventilated area—outside on a calm day is perfect. And definitely protect your floors with an old sheet or drop cloth!
Thread Basting
This old-school technique uses a needle and thread to sew long, running stitches by hand to hold the layers in place.
- How it works: Grab a contrasting thread color (so it’s easy to see later) and sew large stitches, about 1-2 inches long, in a grid pattern across your quilt.
- Best for: Heirloom projects or for quilters who want absolute control without any risk of spray residue.
- Pro Tip: It's definitely the most time-consuming method, but it provides an incredibly secure hold. You just have to remember to snip and pull all those threads out when you're done quilting.
No matter which road you take—pins, spray, or thread—the destination is the same: making three separate layers behave as one. A well-basted quilt is your best defense against wrinkles and puckers when you start stitching.
Trust me, taking your time with the prep work is non-negotiable for getting results you'll be proud of. A little patience now saves a ton of frustration later. And if you're looking for some hands-on guidance, B-Sew Inn offers online classes and training that dive deep into these foundational skills, helping you create with confidence.
Setting Up Your Machine for Quilting Success
Okay, your quilt sandwich is basted and ready to go. Now it's time to turn our attention to the star of the show: your sewing machine. Getting your everyday machine ready for quilting isn't complicated, but a few key adjustments make all the difference. These little tweaks are what separate a frustrating wrestling match with your quilt from a smooth, creative flow.
Think of this as prepping your workspace. A good setup ensures beautiful stitch quality and nips common problems in the bud before they even start. Let's walk through exactly how to get your machine dialed in so you can start stitching with total confidence.
First Things First: The Right Needle and Foot
Let’s start with the two most important pieces you’ll physically attach to your machine. As we’ve mentioned, a fresh quilting needle is non-negotiable. It has to pierce through three layers cleanly, and a dull needle just won't cut it. Make it a habit to start every new quilting project with a new needle—it’s a tiny investment that prevents a world of skipped stitches and pulled threads.
Next up is the presser foot, and your choice here depends entirely on the style of quilting you're planning to do.
-
For Straight-Line Quilting: You’ll want to attach your walking foot. This thing is a quilter's best friend. It has its own set of feed dogs that grip the top layer of your quilt, moving it along in perfect time with the bottom layer. No more shifting or puckering! We have a whole guide on how to use a walking foot if you want a deeper dive.
-
For Free-Motion Quilting: For this, you'll need a darning foot or a free-motion foot. This type of foot hovers just above the fabric instead of holding it down. This gives you the freedom to move your quilt in any direction you please, creating those lovely, curvy, hand-drawn designs.
Dialing in Your Machine Settings
With your needle and foot in place, it’s time to tweak the settings. This is how you tell your machine what you expect it to do.
For Straight-Line Quilting (with a Walking Foot):
The main thing to adjust here is your stitch length. A slightly longer stitch looks so much better on a quilt. I recommend setting it somewhere between 2.5 mm and 3.5 mm. This allows the stitch to sit beautifully on top of the fabric layers without pulling them down too tightly.
For Free-Motion Quilting (with a Darning Foot):
This is where you make a bigger change. You have to disengage the feed dogs. On most modern machines, there’s a simple switch or button. On some older models, you might have to cover them with a special plate. Dropping the feed dogs is what gives you control of the movement, not the machine.
Before a single stitch goes into your actual quilt, always test on a small practice sandwich. Use scraps of the same fabric and batting you're using in your project. This is the single best way to spot any tension issues before they become a headache.
The Art of Perfect Thread Tension
Nothing screams "homemade" (and not in a good way) like wonky tension. When the tension is off, you’ll see little knots of thread on either the top or the bottom of your quilt. The goal is a perfect marriage between the top and bobbin threads, where they meet right in the middle of your batting, completely hidden.
Take that practice sandwich and sew a line of stitches. Now, play detective. See little dots of your bobbin thread on the top? Your top tension is too tight. See loops of your top thread on the back? Your top tension is too loose. Make tiny, one-at-a-time adjustments to your machine’s tension dial, stitching and checking again until it's just right.
Taming the Quilt Bulk
One of the biggest hurdles when you learn how to quilt with a regular sewing machine is simply managing the size and weight of the project. If you let the quilt hang off the side of your machine, its own weight will create drag. That drag fights against you, leading to distorted stitches, sore shoulders, and even broken needles.
This is where an extension table becomes invaluable. It creates a large, flat surface that supports the quilt's weight, allowing it to glide smoothly as you stitch. If you don't have one, no worries! You can rig a similar setup by surrounding your sewing machine with other tables of the same height. The key is to keep the quilt supported.
Mastering Fundamental Quilting Techniques
You've got your quilt sandwich basted and your machine is humming—now for the fun part. This is where you actually quilt, stitching through all those layers to bring your project to life and give it that gorgeous texture we all love.
We’re going to walk through the two main ways you can quilt on your regular sewing machine, with tangible design examples you can replicate. First up is the wonderfully precise world of straight-line quilting with a walking foot. After that, we'll dip our toes into the creative freedom of free-motion quilting.
Each one creates a totally different look and feel. Getting comfortable with both will open up a world of possibilities for any quilt you dream up.
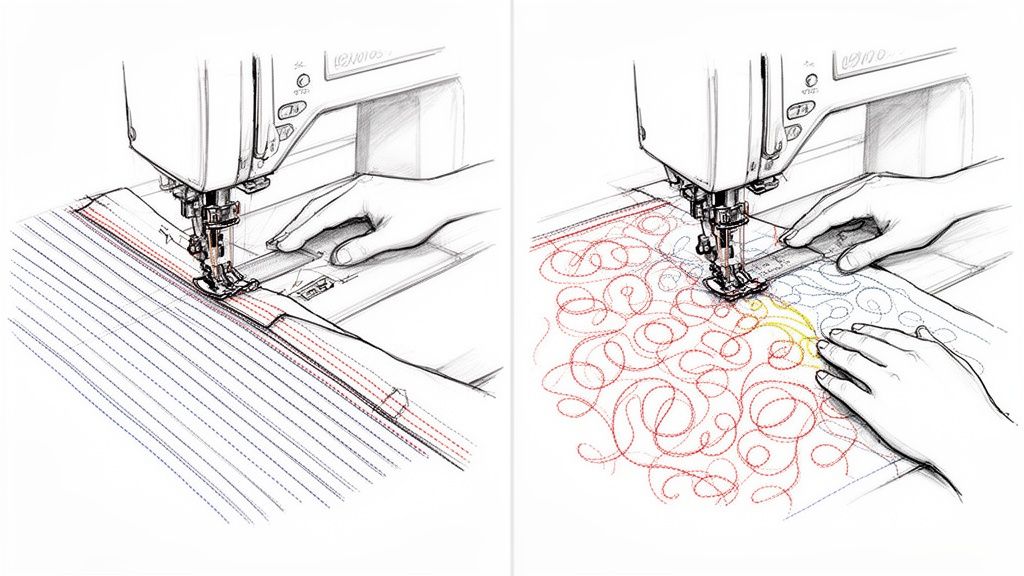
Straight-Line Quilting with a Walking Foot
If you're just starting out, straight-line quilting is your best friend. It’s structured, predictable, and gives a crisp, professional finish that’s hard to beat. The absolute star of this show is your walking foot. As we mentioned earlier, this foot is a game-changer, making sure all three layers of your quilt move together perfectly. No more puckers!
Don't mistake "straight-line" for boring, though! Here are some tangible examples you can replicate:
- Stitching in the Ditch: This is exactly what it sounds like. You quilt directly in the "ditch" of your seams where the different fabric pieces meet. It’s a super subtle way to secure your layers when you want the piecing to be the main attraction.
- Echo Quilting: A personal favorite! You stitch lines parallel to your seams, usually about a quarter-inch away. This creates a beautiful ripple or "echo" effect that really makes your piecing pop.
- Grid Patterns: You can never go wrong with a classic crosshatch or a simple grid of lines running across the quilt top. It’s timeless, adds great texture, and makes for a really durable quilt.
For perfectly straight lines, use the seam guide that attaches to your walking foot. Another great trick is to lay down painter's tape on your quilt top to create a visual path to follow. Just stitch alongside the edge of the tape!
Embracing Free-Motion Quilting Basics
Once you've got straight lines down, you might feel the itch to try something a little more... fluid. Welcome to the wonderfully creative world of free-motion quilting (FMQ)! Think of it as drawing or doodling with your sewing machine. It can feel a little wild at first, but with some practice, it is incredibly rewarding.
Your first move, as we covered in the setup section, is to pop on your darning foot and drop those feed dogs. This is huge—it means you are now in total control of the fabric. You're not just guiding it anymore; you're the artist directing every stitch.
The biggest learning curve with FMQ is finding the rhythm between your hands and your foot. You're coordinating how fast you move the fabric with how fast the needle is stitching.
- Move your hands too fast for the needle speed? You’ll end up with long, giant stitches.
- Move your hands too slow for the needle speed? You’ll get tiny, dense stitches that can almost perforate your fabric.
The sweet spot is a smooth, even motion that produces consistent stitches. It’s pure muscle memory, so don’t get frustrated if it feels clunky at the start. Everyone goes through that phase!
Simple Patterns to Build Your Confidence
The secret to learning FMQ is starting simple. Please don't try to stitch out intricate feathers on day one! Instead, make a few practice quilt sandwiches and just play with these tangible starter designs.
Get a feel for the motion with these classic, forgiving designs that you can easily replicate:
- Meanders (or Stippling): This is the quintessential FMQ pattern. It's a continuous, curvy line that wanders all over the fabric but never crosses itself. Think of a winding river or a puzzle piece. It’s a fantastic way to cover a lot of ground and practice moving the quilt smoothly in all directions.
- Loops: This is similar to a meander, but you let your lines cross over to create playful, loopy circles. It’s a great next step for getting comfortable with changing directions on the fly.
While you practice, consciously try to relax your shoulders. Keep your hands in a soft "C" shape, gently guiding the fabric instead of gripping it for dear life. The more you relax, the smoother your stitches will be. For a deeper dive into this amazing skill, check out our article on what is free-motion quilting.
Both straight-line and free-motion quilting are cornerstones of quilting on a home machine, and we're here to help you nail them. Our B-Creative membership gives you access to exclusive online classes and tutorials designed to build your skills from the ground up, helping you master these techniques and tackle new designs with confidence.
Answering Your Top Quilting Questions
Even when you do everything right, a few little hiccups are just part of learning a new skill. As you get the hang of quilting on your home sewing machine, you're bound to run into a few common questions. Let's tackle them head-on with some practical, real-world advice to keep you stitching confidently.
Think of these less as problems and more as rites of passage. Every single quilter has asked these questions, and trust me, the solutions are often way simpler than you'd think.
How in the World Do I Handle a Big Quilt on My Little Machine?
Wrangling the sheer bulk of a large quilt in a small throat space is probably the #1 challenge quilters face, but it's totally doable once you get the strategy down. It all comes down to two things: support and control.
First up, support that quilt's weight. Don't ever let it just hang off your sewing table. That drag will pull on your needle, cause skipped stitches, and generally fight you every inch of the way. An extension table is a game-changer here, but you can get the same effect by building a little fortress of books or small tables around your machine, making sure they're the same height.
Next, you have to control the bulk. Tightly roll up the part of the quilt that needs to go through the machine's throat space. You can hold it together with quilting clips or even those big binder clips from an office supply store—whatever works! Always, always quilt from the center of your project outwards. This pushes all the fabric fullness toward the edges as you go, and the quilt gets easier and easier to handle with each pass.
What’s Causing These Awful Puckers, and How Do I Stop Them?
Puckering is the arch-nemesis of a beautifully flat quilt, but it’s almost always preventable. It usually boils down to one of three culprits: your basting isn't secure, your tension is off, or your fabric layers are shifting around while you sew.
Your first line of defense is a rock-solid quilt sandwich. Whether you're using pins or a spray adhesive, make sure they are applied evenly every 4-6 inches across the entire quilt top. If those layers have any room to move around on their own, believe me, they will.
A walking foot isn't just a "nice-to-have" accessory for straight-line quilting; it is the solution to puckering. It has its own set of feed dogs that grip the top layer of fabric, making sure all three layers move through the machine as one perfect unit. This simple tool virtually eliminates the shifting that causes puckers in the first place.
Finally, take a minute to double-check your thread tension on a practice scrap before you touch your actual quilt. If the top tension is cranked up too high, it will pull on the fabric and create tiny, frustrating gathers. A quick test swatch can save you from a whole evening with your seam ripper.
Can I Really Do Free-Motion Quilting on a Regular Sewing Machine?
Yes, you absolutely can! The magic of free-motion quilting (FMQ) isn't reserved for fancy, expensive machines. If your sewing machine has two basic features, you're ready to start drawing with thread.
You just need to be able to:
- Lower or cover the feed dogs. This is what disengages the machine's normal fabric-moving parts and puts you in the driver's seat.
- Attach a darning or free-motion foot. This special foot hovers just above the fabric, which is what allows you to move it freely in any direction you want.
Getting good at FMQ is all about practice and building muscle memory. It's a bit of a dance between how fast your hands are moving the quilt and how fast your machine's needle is going. I always tell beginners to start with small practice sandwiches and doodle simple, flowing designs like meanders or loops to get a feel for it.
Here at B-Sew Inn, we're all about empowering crafters just like you. Our custom sewing machine designs, online classes, and huge library of resources are all here to help you build these skills with total confidence. The B-Creative membership is a fantastic way to get expert-led training and join a community that will cheer you on every step of the way.
Are you ready to turn your regular sewing machine into a quilting powerhouse? Explore our selection of machines, accessories, and online classes at B-Sew Inn and start creating the beautiful quilts you've always dreamed of.

