

Before you even think about fabric, every quilt pattern starts with a solid idea. This is the fun part—the creative spark where you find your inspiration, sketch out a design, play with a color palette, and decide on the quilt's final size and layout. At bsewinn.com, we believe in empowering crafters like you to turn those sparks into tangible, beautiful projects you can replicate at home. Think of this initial phase as the blueprint for your entire project, supported by our extensive resources every step of the way.
Finding Your Unique Quilt Inspiration
Every quilt I’ve ever loved started not with a stack of fat quarters, but with a flicker of an idea. The journey to a custom quilt pattern is a personal one, and the first real step is learning to see the world with a quilter’s eye. It’s about looking past existing patterns and finding inspiration all around you.
Inspiration can pop up in the most unexpected places. I’m talking about the crisp geometry of a tiled floor in a coffee shop, the way colors bleed into each other during a sunset, or even a cherished memory that just feels warm and cozy. I once designed an entire quilt based on the layout of my grandmother's garden, turning the rows of flowers and winding paths into different quilt blocks. When you do this, you’re not just making a blanket; you’re telling a story with thread and fabric.
Turning Concepts into Concrete Designs
Once an idea takes hold, the next step is to get it down on paper. Don't worry about making it perfect! This stage is all about playing and exploring. Grab a sketchbook, a napkin, a piece of scrap paper—whatever is handy—and just start doodling.
- From Abstract to Concrete: Is your inspiration a feeling, like "calm"? Think about what shapes and colors bring that to mind. Maybe it’s gentle curves and a palette of soft blues and grays. A tangible example would be to create a simple "wave" block using half-circle templates.
- From Structure to Shape: If you're inspired by architecture, start breaking down buildings into basic shapes. A windowpane can easily become a four-patch block. An arched doorway could inspire a block with beautiful curves, like a Drunkard's Path block.
- From Memory to Motif: For a quilt based on a memory, sketch out the key elements. A day at the beach might translate into wavy lines for water, sandy-colored blocks, and a bright yellow circle for the sun. You could replicate this using simple strip-piecing for the waves and a single large circle appliqué for the sun.
This is the moment your unique pattern really begins to emerge, as you turn thoughts into tangible block designs. It’s such an empowering part of the process, giving you complete creative freedom. Here at bsewinn.com, we’re all about championing that creative spark through our custom sewing machine designs, online classes, and extensive resources, helping quilters gain the confidence to design from scratch.
Building Your Blueprint Before You Cut
With a few sketches in hand, you can start building your blueprint. Think about what this quilt will be used for. A sprawling bed quilt? A small wall hanging? The final size will have a big impact on how large or complex your blocks can be.
This is also the perfect time to think about your color palette. The right colors can make a good design absolutely stunning, while the wrong ones can make it fall flat. Having a handle on color theory is a huge advantage here. You can learn more about how to effectively use the quilting color wheel in our dedicated guide.
The most successful patterns I've seen are always born from a clear and thoughtful plan. When you take the time to really develop your idea, choose your colors, and map out a layout, you set yourself up for a much smoother and more enjoyable quilting experience.
This planning stage is a big part of why so many people are falling in love with crafting. The passion is real—the global quilt market was valued at USD 5.61 billion in 2025 and is projected to hit USD 9.67 billion by 2035. That growth is fueled by makers just like you who want to create personal, heirloom-quality pieces. North America is leading the charge, embracing a rich quilting heritage and the simple joy of making something truly one-of-a-kind. This first step of finding your inspiration is your entry into this vibrant world.
Drafting Your Pattern with Confidence
You’ve got your inspiration, your sketches are looking good, and you have a color palette you love. Now for the fun part: turning that creative spark into an actual, usable quilt pattern. This is where the magic of quilting math comes in, and trust me, it’s not as scary as it sounds. Breaking it down step-by-step is empowering and, honestly, just as rewarding as pulling the finished quilt out of the dryer.
Think of drafting as creating the blueprint for your quilt. It’s the crucial step where you make sure every single piece will fit together perfectly. This is also when you figure out exactly how much fabric to buy, saving you from those frustrating mid-project runs to the fabric store.
From Block Size to Seam Allowance
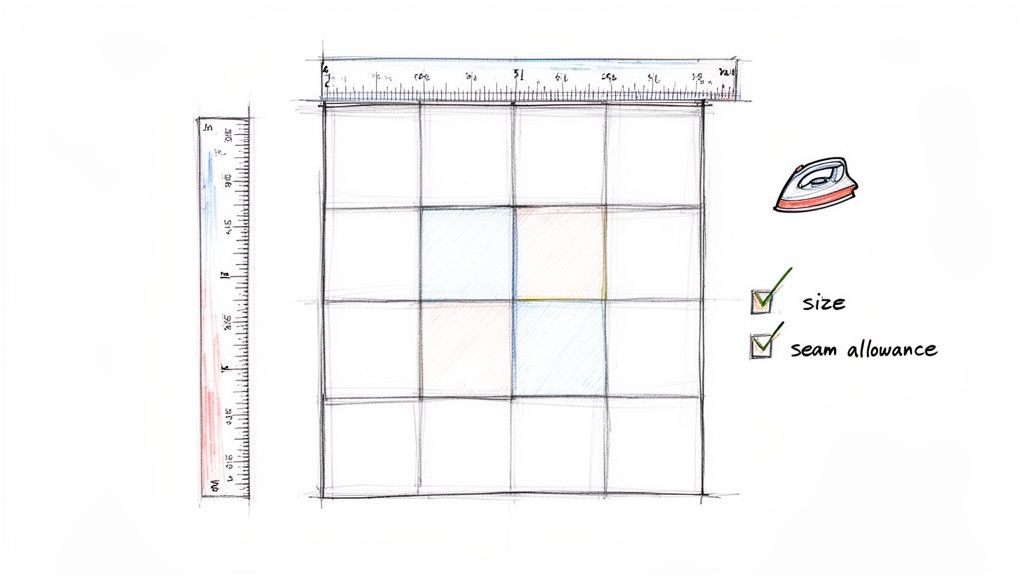
First things first, you need to decide on your finished block size. This is how big your block will be once it’s all sewn into the quilt top. From there, every piece you cut needs a seam allowance—that little bit of fabric that gets hidden in the seams.
The gold standard in quilting is a scant quarter-inch (1/4") seam allowance on all sides of every piece. So, for a simple square, you’ll add a total of a half-inch to both the height and the width. That’s 1/4" for the left side + 1/4" for the right, and 1/4" for the top + 1/4" for the bottom.
- If you want a finished piece that is 4" x 4" in your quilt top...
- You need to cut a 4.5" x 4.5" square to account for those seams.
Getting this simple calculation right is absolutely essential. It’s the foundational math that makes all the points meet and the blocks line up. This rule applies to any straight-edged shape you’re working with, whether it’s squares, rectangles, or triangles.
The Quilt Pattern Drafting Process
This is the fundamental flow: from a flicker of an idea to a concrete plan that you can actually sew.

Your journey from idea to sketch to color palette is the creative engine. It fuels the more technical drafting phase and makes sure your final pattern has a solid artistic heart.
Calculating Your Total Yardage
Once you know the cutting dimensions for every piece in your block, you can figure out how much fabric you’ll need for the whole quilt. This usually breaks down into three main parts: the quilt top, the backing, and the binding.
Let's walk through a quick example for a lap-sized quilt made of simple nine-patch blocks.
Example: A Lap Quilt with Nine-Patch Blocks
- Quilt Top Layout: Let's say we’re aiming for a quilt around 48" x 60". If we use finished nine-patch blocks that are 12" x 12", we'd need a grid of 4 blocks across and 5 blocks down. That’s 20 blocks total.
- Fabric per Block: A nine-patch has, you guessed it, nine small squares. If you're using three different fabrics (we'll call them A, B, and C), you can count how many squares of each you need for one block, then multiply by 20 to get the total for the quilt top.
- Figuring Yardage: Next, you calculate how many of your cut pieces you can get from a single width of fabric (WOF), which is typically 40-42 usable inches. A word to the wise: always add at least 10-15% extra to your final yardage number. This little buffer covers you for squaring up fabric or the occasional cutting slip-up.
Don't forget the backing and binding! For your backing, measure the finished quilt top and add at least 4 inches to every side. For binding, a good rule of thumb is to calculate the quilt's perimeter in inches, divide by 40, and then round up to the nearest quarter yard.
To make things a bit easier, here's a quick reference chart for some common quilt sizes. Remember, these are just estimates—a really complex pattern might need more fabric!
Quilt Size and Yardage Estimation Guide
| Quilt Size | Dimensions (inches) | Fabric for Top (yards) | Fabric for Backing (yards) | Fabric for Binding (yards) |
|---|---|---|---|---|
| Crib | 36" x 52" | 2 - 3 | 1.5 | 0.5 |
| Throw/Lap | 50" x 65" | 3 - 4 | 3.5 | 0.5 - 0.75 |
| Twin | 70" x 90" | 5 - 7 | 5.5 | 0.75 |
| Queen | 90" x 108" | 8 - 10 | 8.5 | 1 |
| King | 110" x 108" | 10 - 12 | 9.5 | 1 |
This table should give you a solid starting point for planning your next project and your next trip to the fabric store.
Traditional vs. Digital Drafting Methods
When it's time to draw your pattern, you have two main options: go old-school with pencil and paper or embrace the digital age with design software.
- Pencil and Graph Paper: The classic method. It's accessible, affordable, and gives you a real hands-on feel for the design process. You can draw your blocks to scale, play with colored pencils, and do all the math yourself. It’s a fantastic way to really understand the nuts and bolts of quilt geometry.
- Quilting Design Software: For quilters who love efficiency, specialized software like Electric Quilt 8 (EQ8) is a total game-changer. These programs can automatically add seam allowances, generate cutting diagrams, and calculate yardage with pinpoint accuracy.
Here at bsewinn.com, we’ve seen how these digital tools can completely remove the guesswork and build a quilter’s confidence. You can audition dozens of colorways in minutes, resize blocks with a click, and print flawless, error-free patterns. Our commitment to empowering crafters includes offering online classes and training and extensive resources to help you find the method that clicks with your creative style.
Whether you're a traditionalist or a tech enthusiast, the goal is the same: to create a clear, accurate, and reliable roadmap for your beautiful quilt.
Selecting the Right Tools and Fabric
A brilliant quilt pattern idea is one thing, but bringing it to life? That all comes down to the materials you choose. Your fabric and tools are where the design you drafted on paper starts to become a real, tangible quilt. Making smart selections now makes the whole process more fun and ensures your finished quilt will be something you treasure.
The fabric is the soul of your quilt. It sets the mood, creates the texture, and determines how it will feel draped over a couch or snuggled around your shoulders. From crisp quilting cottons that hold a perfect seam to cozy flannels that beg to be touched, every type of fabric brings its own personality to your project.
Choosing Your Fabric Wisely
For most quilters, the go-to is quilting cotton. There's a good reason for that! This fabric is made specifically for our craft, with a tight, stable weave that minimizes stretching and fraying. That makes it a dream to work with for precise piecing.
But once you step into the world of quilting cotton, the options are endless.
- Solids vs. Prints: Solids are fantastic for making your piecing the star of the show, creating bold, graphic quilts. Prints, on the other hand, add personality, tell a story, and build texture. The real magic happens when you find a balance, letting the prints elevate your pattern without overwhelming it. Try mixing large-scale, small-scale, and tonal prints to give your quilt depth.
- Color and Value: Pay attention to how your colors play together. A quilt with a good mix of light, medium, and dark values—the relative lightness or darkness of a color—will have so much more visual pop. A great quilter's trick is to squint at your fabric pull or snap a quick black-and-white photo on your phone. It instantly helps you see the values without being distracted by the colors themselves.
- Fabric Quality: I can't stress this enough: investing in high-quality fabric makes a huge difference. It feels better in your hands, it holds up over time, and you won't have to worry as much about colors bleeding in the wash. To learn more about what to look for, check out our detailed guide on quilting cotton fabric.
Choosing fabric is an art in itself. My best advice is to trust your gut. If a stack of fabrics makes you happy just looking at it, chances are it will become a beautiful quilt that you’ll love for years.
The quilting world is booming, which is great news for us! The quilting fabric market was valued at USD 3.5 billion in 2023 and is projected to hit USD 5.7 billion by 2032. This means we're seeing more amazing options than ever, including sustainable materials like organic and recycled cottons that feel good to use and make your pattern shine.
Equipping Your Studio for Success
Beyond the fabric, there are a few tools that are simply non-negotiable for turning your pattern into a beautifully pieced quilt top. When it comes to quilting, accuracy is the name of the game, and these are your MVPs.
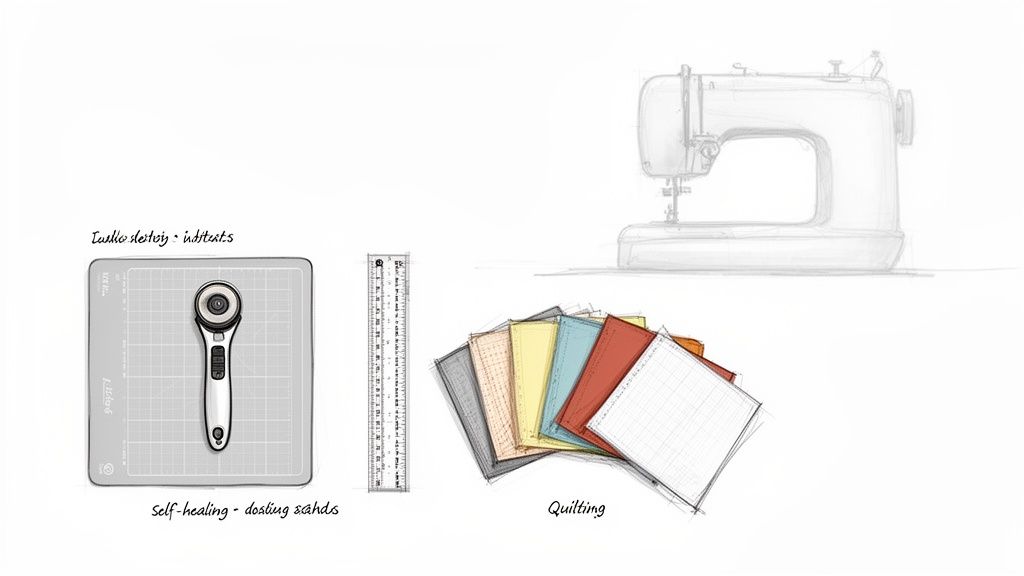
The Cutting Trio
- Rotary Cutter: This is so much faster and more accurate than scissors for cutting straight lines. A fresh, sharp blade is your best friend for clean, effortless cuts.
- Self-Healing Mat: This mat protects your table and keeps your rotary blade from dulling too quickly. Get one with a clear grid—it's a huge help for squaring things up.
- Quilting Rulers: You can't quilt without clear acrylic rulers. A 6" x 24" ruler is the workhorse of my studio for cutting long strips from yardage, and I'm always reaching for smaller square rulers for trimming up blocks.
As you get more comfortable, you might start thinking about how better equipment could take your work to the next level. Here at bsewinn.com, we love empowering quilters with custom sewing machine designs that make complex projects feel easy. Machines from brands like Baby Lock offer features made just for quilters, and specialized cutting systems can completely change your workflow, letting you create intricate patterns with professional precision. Our online classes and training are always here to help you get the most out of your tools and your talent.
Making a Test Block to Perfect Your Pattern
Before you slice into that precious fabric stack you’ve spent weeks dreaming about, there's one small step that can save you a world of frustration: the test block.
Think of it as a dress rehearsal for your quilt. It's your chance to see how your pattern works in real life, not just on paper. This isn't about second-guessing yourself; it's about quilting smarter.
By making just one sample block, you get to confirm all those careful calculations. Is your quarter-inch seam allowance really a perfect quarter-inch? Do your pieces come together to create the exact size you planned? Now's the time to find out, before you have a whole stack of miscut fabric on your hands.
This hands-on process is something we really emphasize in our classes at bsewinn.com. It builds so much confidence and skill, turning the process to make quilt pattern from an idea into something you can actually hold. It’s your chance to work out any kinks before it really counts.
The Value of a Practice Run
Your test block is so much more than a measurement check—it’s a trial run for your entire process. You’ll see how your fabrics play together, figure out the best way to press your seams, and make sure your piecing order makes sense. This is where you might discover that a tricky seam needs to be pressed open instead of to the side to reduce bulk.
It's also your first line of defense against those classic quilting headaches. A test block will immediately show you problems that are a real pain to fix later on.
- Blunted Points: If the tips of your stars or triangles are disappearing into the seams, your test block will tell you. It often means your seam allowance isn't quite a scant quarter-inch.
- Wavy Seams: Puckering or wavy seams can be a sign of tension issues or stretched fabric. Better to spot it on one block than on twenty!
- Wrong Block Size: Does your finished block actually match your pattern’s dimensions? If not, you can figure out why before cutting anything else. If you need a refresher on this, you can learn more about how to square up quilt blocks in our detailed guide.
This single block is your quality control. It's the moment you get to fine-tune your technique, tweak your machine's settings, and prove to yourself that your custom pattern is a home run.
Once your test block is pieced, give it a good press and measure it one last time. Does it match your intended finished size? If it does, you can move forward and cut the rest of your fabric knowing everything will fit together just as you planned.
Pressing for Perfect Flatness
How you press your seams has a massive impact on your block’s final accuracy and appearance. The goal is a perfectly flat, precise block. When your blocks are flat, joining them together later is a breeze.
Common Pressing Techniques
- Set the Seam: Before you do anything else, press the seam flat just as you sewed it. This little step helps meld the threads into the fabric and gives you a much crisper fold when you press it open or to the side.
- Press to the Dark Side: It's a classic for a reason. As a general rule, press your seam allowances toward the darker fabric to prevent it from shadowing through to the front of your quilt.
- Nesting Seams: When you're joining rows, press the seam allowances in opposite directions for each row. This lets the seams lock into each other, which is the secret to getting those perfectly matched points every time.
This small but mighty step of making a test block is what separates good quilters from great ones. It's a simple habit that saves time, fabric, and headaches, making sure your final quilt is something you'll be incredibly proud of.
Bringing It All Together with Quilting
Once your quilt top is beautifully pieced together, a whole new layer of artistry begins. The quilting itself—those stitches that bind the top, batting, and backing—is what breathes life into your project. It’s the magic that transforms a flat top into a true three-dimensional quilt, adding texture, emphasizing your design, and giving it that one-of-a-kind character.
This is where you decide how the final texture will play with the pattern you worked so hard to create. You can go one of two main ways: quilting on a domestic sewing machine or using a specialized long-arm machine. Each path opens up its own world of creative possibilities.
Quilting on a Domestic Machine
Quilting on your home sewing machine is not just accessible—it's incredibly empowering. With just a few key accessories, like a walking foot for straight lines and a darning or free-motion foot, you can get some seriously professional-looking results. It’s a fantastic way to keep your hands on the entire process, controlling every single stitch from start to finish.
There are several go-to techniques that work beautifully on a domestic machine:
- Stitch-in-the-Ditch: This is a subtle but super effective method where you stitch right in the "ditch" your seam lines create. It secures the layers without competing with your design, making your piecing the undeniable star of the show.
- Straight-Line Quilting: Grab a walking foot and you can create a gorgeous grid of straight or gently curving lines. This adds a modern, graphic feel that can either follow your piecing or create a striking new pattern right on top of it.
- Free-Motion Quilting (FMQ): This is where the real fun begins. You drop the feed dogs on your machine, pop on a special foot, and essentially "draw" with thread. It definitely takes some practice, but it unlocks endless creative designs, from simple meanders to intricate feathers and florals.
Feeling a little intimidated? Don't be. At bsewinn.com, we are committed to empowering crafters, and our online classes and training are specifically designed to build your confidence with these exact techniques. Our expert instructors will walk you through mastering tension, controlling your speed, and using all the right machine feet to make your quilting journey a success.
Tapping into the Power of a Long-Arm Machine
For bigger quilts or for those who want to dream up more expansive quilting designs, a long-arm quilting machine is a total game-changer. These machines stretch your quilt on a large frame, and you guide the machine head over the fabric. Suddenly, wrangling a king-sized quilt sandwich feels completely effortless.
With a long-arm, your main choice is between an all-over design or custom quilting.
An all-over pattern, often called an edge-to-edge design, covers the entire quilt with a single, repeating motif. It’s a fast, beautiful, and budget-friendly way to finish a project. Custom quilting, on the other hand, involves using different designs in specific areas of the quilt to highlight certain blocks or shapes in your piecing.
This is where the pattern you designed can truly sing. You could use dense quilting in the background to make your main design pop, or you could echo the shapes of your piecing to add another layer of incredible detail. When you pair this with specialized software and multi-needle machines, the possibilities for intricate, stunning quilting are practically limitless.
This versatility is a huge reason quilting for every season is booming. In fact, the Four Seasons Quilt market segment grew from USD 3,714.85 million in 2021 and is projected to hit USD 4,797 million by 2025, as quilters adapt patterns for everything from spring florals to cozy winter motifs. You can dive deeper into this specialized market's growth and trends.
Tips for a Pucker-Free Finish
No matter which machine you choose, good preparation is the absolute key to a smooth, beautiful finish. A poorly basted quilt sandwich is a recipe for puckers, tucks, and a whole lot of frustration.
- Get Your Backing Ready: Make sure your backing fabric is at least 4-6 inches larger than your quilt top on all four sides. Trust me, you'll be glad to have that extra room for the quilting process and for squaring up your quilt at the end.
- Baste Securely: Basting is just temporarily holding your quilt sandwich layers together. You can use curved safety pins (I like to place one every 4-6 inches) or a spray baste adhesive. The goal is simple: stop anything from shifting while you quilt.
- Pick the Right Thread: Don't let your thread be an afterthought! Think about both its color and weight. A thread that blends in will let the quilting texture shine, while a contrasting thread turns your stitches into a bold design element all on their own.
Got Questions About Making Your Own Quilt Patterns? We've Got Answers.
Stepping into the world of designing your own quilt patterns is such a thrill, but it's totally normal to have a few (or a lot of!) questions. It’s a journey, and part of the fun is building your skills and confidence. Let's tackle some of the most common hurdles quilters face when they first decide to make quilt pattern designs from scratch.
This is where all that hard work you've put into learning about drafting, choosing fabrics, and testing your blocks really pays off. Think of this as your final check-in before diving headfirst into that gorgeous, one-of-a-kind design you've been dreaming up.
What Is the Best Software for Designing a Quilt Pattern?
Honestly, the "best" software is the one that clicks with you and your creative process. There are several fantastic options out there, and each has its own personality.
If you’re just starting out, a program like Electric Quilt (EQ8) is a quilter’s best friend. It has enormous built-in libraries of quilt blocks and digital fabrics, so it does a lot of the heavy lifting for you. It can figure out all the tricky math, calculate your yardage, and even generate cutting diagrams, which is a massive confidence booster when you're new to this.
On the other hand, if you're a more experienced designer or already know your way around graphic design tools, you might love the total creative freedom of something like Adobe Illustrator. This route means you'll be doing more of the math yourself, but the trade-off is limitless design possibilities.
My best advice? Start with software that has a strong, active community of users and tons of tutorials you can watch. The right program is the one that lets you get your ideas from your head to the screen without feeling like you're fighting the technology.
Here at bsewinn.com, we're all about empowering you with the right tools for the job. We offer training and support for several top-notch quilting design programs. Through our online classes, we can help you get comfortable with the software that fits your style, making sure it becomes a creative partner, not a roadblock.
How in the World Do I Calculate Yardage for a Complex Pattern?
Figuring out fabric needs for a pattern full of curves, funky angles, or odd shapes can feel like a pop quiz you didn't study for. But trust me, a methodical approach makes it totally doable. The secret is to break your quilt down into its individual little pieces.
First, focus on one unique piece at a time. Calculate its finished size, then carefully add your quarter-inch seam allowances to every single side. Then, figure out how many of that specific piece you can cut from a standard 42-inch width of fabric (WOF). A non-negotiable rule I live by is to always round up to the nearest quarter or half yard. That little bit of extra fabric is your safety net against squaring up mistakes, mis-cuts, or wonky fabric widths from the bolt.
For those really unusual shapes, I find it helpful to make a life-sized template out of paper first. You can physically lay that template on a piece of fabric to see exactly how much you'll need and how to arrange it to minimize waste.
Of course, this is another area where quilting software is a game-changer. It spits out a precise yardage chart for every fabric in your design, saving you a ton of time and preventing those heartbreaking trips back to the store for more fabric.
What Are the Most Common Mistakes When Making a First Quilt Pattern?
When quilters jump into designing their own patterns, I see the same few mistakes pop up time and again. Just knowing what they are is half the battle in avoiding them.
- Forgetting Seam Allowances: This is, hands down, the most common slip-up. It's so easy to get excited about your design and forget to add the seam allowances when you're drafting and calculating. This always leads to blocks that are too small. Burn this into your brain: always add a half-inch to both the height and width of your finished piece measurements to account for that quarter-inch seam on all four sides.
- Underestimating Fabric Needs: It’s easy to get tunnel vision on the quilt top and completely forget you need enough fabric for the backing and binding. It is always, always better to have a little extra fabric left over than to run out before you're finished. A good rule of thumb is to add at least 4 inches to every side for your backing fabric.
- Designing Something Too Ambitious: Your imagination is a wonderful thing, but sometimes it writes checks your current skillset can't cash. It's awesome to have big ideas, but starting with simple shapes like squares, rectangles, and half-square triangles builds a really strong foundation. You'll master the fundamentals of pattern creation before you tackle tricky curves or foundation paper piecing.
Like we talked about earlier, making a test block is the single best way to catch any of these problems before they become big problems. It's a low-stakes way to make sure your math is right, your cutting is accurate, and your piecing comes together perfectly—before you've cut into all that precious fabric. This little cycle of design, test, and tweak is the heart and soul of becoming a confident pattern designer.
At bsewinn.com, we believe every quilter and crafter has a unique story to tell. Our mission is to empower you through our custom sewing machine designs, tools, education, and support to bring that story to life. From advanced Baby Lock machines to our huge library of online classes and resources, we're here for you on every step of your creative journey. Explore everything we have to offer at https://www.bsewinn.com.

