

Ask any seasoned quilter their secret to crisp points and perfect seams, and they’ll likely point to their collection of trusty acrylic rulers and templates. These simple guides are the real workhorses of the craft, turning a creative vision into a tangible, beautiful quilt. They’re the foundation for accuracy and consistency in every single project.
Your Foundation for Perfect Quilts
Imagine cutting every piece of fabric for your next quilt with perfect, repeatable accuracy. That kind of precision isn't just for the pros; it's what happens when you have the right tools in your hands. Quilting rulers and templates are those tools—clear acrylic guides that serve as the bedrock for flawless patchwork and stunning designs. They truly are the difference between a frustrating process and a joyful, creative one.
Think of them as more than just measuring devices. They are your partners in creativity, unlocking the ability to confidently tackle complex geometric patterns, flowing curves, and perfectly sized blocks. Here at B-Sew Inn, we're committed to empowering crafters by not only providing the best custom sewing machine designs and tools but also by offering the expert support you need to master them. Our extensive resources, including hands-on training and online classes, are designed to help you bring any vision to life.
From Cardboard to Acrylic: A Shift in Precision
It’s easy to take our clear, gridded rulers for granted, but the quilting world wasn't always this way. The rise of quilting rulers and templates as we know them happened alongside the boom of rotary cutters in the late 1970s and 1980s. This was a massive shift away from the traditional method of tracing hand-cut cardboard patterns onto fabric and snipping away with scissors.
This change was a game-changer. Beginner-friendly tools like square and strip rulers suddenly made cutting accurate pieces not just easier, but faster—saving quilters as much as 30–50% more time compared to the old ways. As machine-piecing grew in popularity, these acrylic guides became a non-negotiable part of every quilter’s toolkit.
Think of this guide as your first lesson in building a beautiful quilt, starting with the most crucial step: a perfect cut. Every straight line and every perfect curve begins right here, with the right ruler in your hand.
Building Your Skills with the Right Support
Getting started on your quilting journey means gathering the right supplies and, just as importantly, the right knowledge. A reliable set of quilting rulers and templates is a critical first step, but knowing how to use them effectively is what truly makes a difference. This is where dedicated support and education come into play, helping you move from basic cuts to intricate designs with ease.
To get started on the right foot, check out our complete guide on essential quilting supplies for beginners. At B-Sew Inn, we're here to support every stitch you make, ensuring you have the confidence to bring any creative idea to life.
Before we dive deeper into the specific types of rulers and templates, let's get a quick snapshot of what sets them apart. While they often work together, they serve distinct purposes in the quilting studio.
Quilting Rulers vs. Templates at a Glance
This table gives you a quick overview of the main jobs for each tool and when you'd reach for one over the other.
| Tool Type | Primary Function | Best For | Example Project |
|---|---|---|---|
| Rulers | Cutting straight lines and geometric shapes (squares, rectangles, triangles) with a rotary cutter. | Strip piecing, squaring up blocks, cutting borders, creating basic patchwork units. | A simple nine-patch block quilt or a log cabin design. |
| Templates | Cutting specific, often non-standard or curved shapes; can also be used for marking. | Appliqué, Dresden plates, clamshells, drunkard's path blocks, and other intricate designs. | A floral appliqué quilt or a complex curved-piecing pattern. |
As you can see, rulers are your go-to for the straight-line work that forms the backbone of most quilts, while templates are for those special shapes that add flair and personality. Most quilters end up with a healthy collection of both
Decoding the Different Types of Quilting Tools
Stepping into the quilting section of a craft store can feel a little like learning a new language. You’re hit with a wall of clear acrylic rulers, oddly shaped templates, and all sorts of gadgets, and it’s easy to feel overwhelmed. I want to be your personal guide here, breaking down the essentials without all the jargon so you can pick the right tool for your next project with total confidence.
Think of the most common tool you’ll see, the long rectangular ruler, as the chef's knife in your quilting kitchen. It's the versatile workhorse you'll grab over and over for most of your basic, everyday cuts. But just like a chef needs more than one knife to create a masterpiece, a quilter’s creativity really opens up with a few specialty tools.
The Foundational Rulers for Every Quilter
Before we get into the fun specialty stuff, every quilter needs a few core rulers. These are the tools that handle the bread-and-butter tasks: cutting fabric strips, squaring up blocks, and creating the basic geometric shapes that are the backbone of most quilts. Getting comfortable with these first is the key to building a solid quilting foundation.
- Long Rectangular Rulers (e.g., 6" x 24"): This is your go-to for cutting long strips of fabric right off the bolt. It’s perfect for sashing, borders, and cutting the strips you need for techniques like strip piecing.
- Square-Up Rulers (e.g., 12.5" x 12.5" or 6.5" x 6.5"): Think of these as a pastry cutter for your quilt blocks. After you've pieced a block, a square-up ruler is what you'll use to trim it to the perfect size with clean, crisp 90-degree corners. It's a non-negotiable for accuracy.
- Half-Square Triangle (HST) Rulers: Now, you can make HSTs with a regular square ruler, but a specialty HST ruler makes the job so much easier. It usually has a diagonal line marked right on it, making it a breeze to trim these super common quilt components accurately after you’ve sewn them.
These tools are your starting point, but the real creative magic happens when you add specialty quilting rulers templates to your collection.
Specialty Templates for Creative Designs
Once you’re ready to move beyond basic squares and rectangles, specialty templates open up a whole new world. These tools are designed to create specific, often curved or unusual shapes, with perfect consistency every single time. They're basically the cookie cutters of the quilting world.
This is where you see how these tools become the foundation for quilting success—they connect directly to your precision, speed, and creativity.
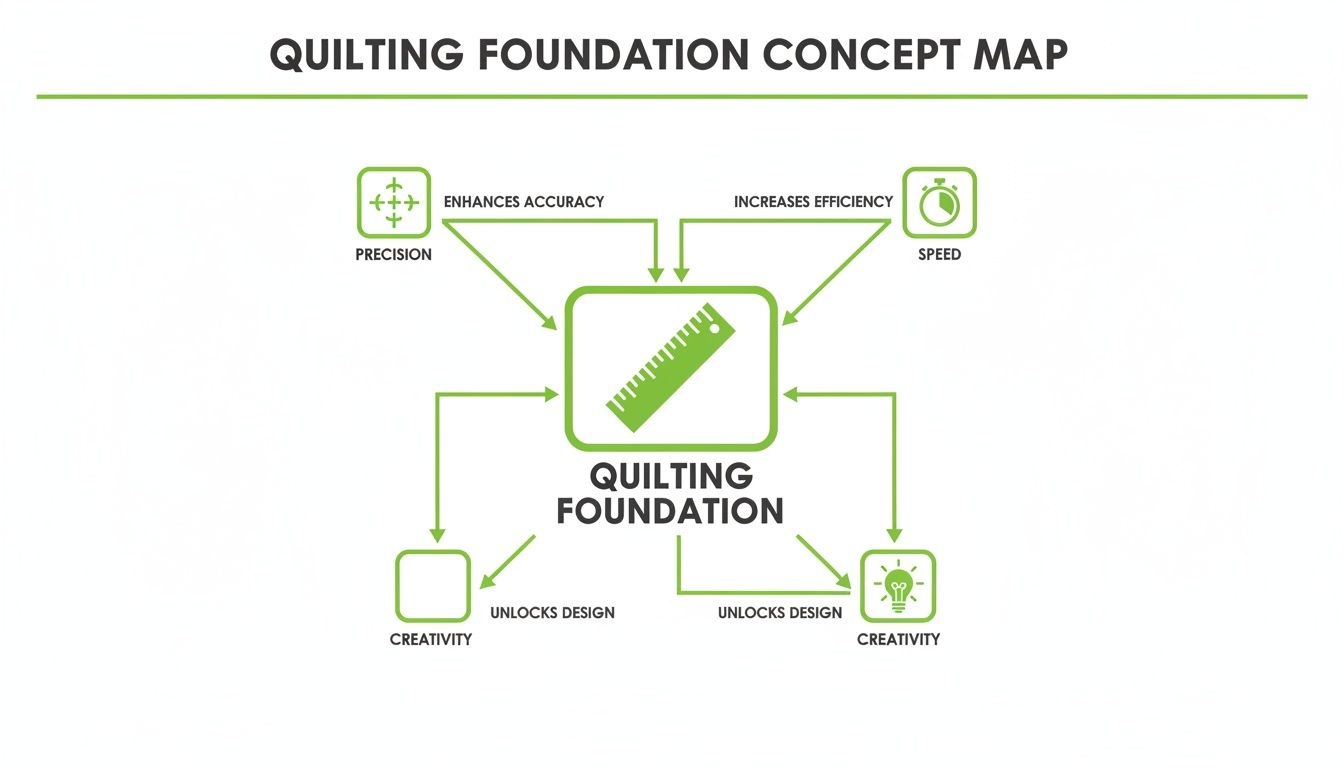
As you can see, rulers aren't just for measuring. They’re instruments that make your cuts more accurate, shave off a ton of cutting time, and give you the structure you need to bring your creative ideas to life flawlessly.
Have you ever admired a quilt with beautiful, interlocking curves and wondered how they did it? I can almost guarantee it was made with a template. These tools are essential for patterns that would be a nightmare to cut accurately by hand. They let you focus on the fun part—the sewing—instead of stressing over imperfect cuts.
At B-Sew Inn, we see these tools as more than just plastic. They are instruments that empower crafters. With the right template and guidance from our online classes, a complex design like a Drunkard's Path becomes an achievable and enjoyable project for anyone.
Here are a few tangible examples of designs you can replicate with templates:
- Drunkard's Path Blocks: Use a set of two templates—one convex and one concave—to create this classic quarter-circle design, perfect for making intricate, curving pathways in your quilts.
- Dresden Plates: A wedge-shaped template helps you cut the "petals" that form a gorgeous circular, plate-like block. This design is a stunning centerpiece for pillows, table runners, or full quilts.
- Apple Core and Orange Peel: These fun, traditional patterns rely on specific templates to create playful, tessellating curves that fit together perfectly, resulting in a visually dynamic quilt top.
Once you start connecting a specific tool to a creative outcome, you can build a collection that truly serves your artistic goals. The idea is to feel confident that for any project you can dream up, there's a quilting ruler or template ready to help you make it happen.
Choosing the Right Quilting Rulers for Your Projects
Building your ruler collection shouldn't be about just grabbing whatever looks interesting. It’s a process that should grow right along with your skills. When you’re thoughtful about your choices, you end up with a toolkit where every single piece has a purpose—empowering your creativity instead of just cluttering your sewing room.
Walk into any quilt shop, and you'll see that nearly every ruler is made from clear acrylic. That’s not just a design choice! It’s essential for seeing the fabric underneath, which is a lifesaver for fussy cutting or lining up seams perfectly. A quality ruler will also have markings that are easy to read and, more importantly, won't rub off after a few projects.
Understanding Ruler Thickness and Markings
One of the first things you'll need to get a handle on is ruler thickness, because it's directly tied to how you'll use it (and your safety!).
For rotary cutting, the vast majority of quilting rulers and templates you'll come across are 1/8-inch thick. This is the sweet spot—sturdy enough to guide your rotary cutter but still lightweight and easy to manage.
But if you're diving into the wonderful world of rulerwork on your sewing machine, the game changes. For this, you absolutely need rulers that are 1/4-inch thick. That extra thickness creates a safe wall for your machine's ruler foot to glide against, which keeps the foot from hopping over the edge and breaking a needle. Trust me, it's a mistake you only make once!
Here at B-Sew Inn, we're big believers in investing in quality tools that last. A good ruler pays for itself over and over in accuracy and less frustration. Choosing the right thickness for the job isn’t just a recommendation; it's a crucial step for getting beautiful results and sewing safely.
Markings are just as important as thickness. Look for rulers with clear, high-contrast lines (black and yellow is a popular combination for a reason) and etched-in guides for common angles like 30, 45, and 60 degrees. Having those angles built right in saves a ton of time and guesswork when you're cutting geometric shapes.
Building Your Essential Ruler Toolkit
If you're just starting, the goal is to build a core set of rulers that will cover you for countless projects. Think of these as your must-haves, the foundation of your collection. You can always add specialty rulers for complex patterns down the road.
Here's a breakdown of the essential rulers that will give you the most bang for your buck.
| Ruler Type | Common Size | Primary Use | Why It's Essential |
|---|---|---|---|
| Long Rectangle | 6" x 24" | Cutting long fabric strips from the bolt, squaring up large quilts, and trimming borders. | This is the workhorse of your collection. You'll reach for it constantly. |
| Large Square | 12.5" x 12.5" | Squaring up finished quilt blocks to make sure they're perfectly uniform. | Accurate blocks are the secret to a quilt that lies flat with points that match. |
| Small Square | 6.5" x 6.5" | Trimming smaller units like half-square triangles (HSTs) and squaring up smaller blocks. | Its size makes it much easier to handle for precise work on small pieces. |
This trio gives you a fantastic starting point. For a deeper dive, we have a whole guide dedicated to helping you select the perfect ruler for fabric where we explore different markings and features in more detail.
The quilting world is bigger than ever. The global market for quilting fabric is expected to jump from about $3.5 billion in 2023 to an incredible $5.7 billion by 2032. Industry data also shows that tools and notions—which is where all our rulers and templates fall—typically account for 10–20% of a quilter's yearly spending. For us at B-Sew Inn, this just underscores how important it is to offer great education around tools, especially for techniques like rulerwork, so quilters can feel confident and get the most out of their craft.
Mastering Your Technique for Flawless Cuts
Having a great collection of quilting rulers and templates is one thing, but the real magic happens when you know how to use them. This is where your skills truly shine, turning piles of fabric into perfectly cut pieces ready for your next masterpiece. It really all boils down to control, posture, and a little bit of practice.
Think of rotary cutting as a partnership between your hands. Your cutting hand steers the rotary blade, sure, but your non-cutting hand is the anchor. Its job is to keep that ruler absolutely still. A tiny slip can throw off an entire block, so making stability your top priority is a game-changer.
Fundamentals of Safe and Accurate Rotary Cutting
Before you even think about making a cut, take a second to set yourself up for success. Good posture isn't just about avoiding a sore back; it has a huge impact on your accuracy. Stand up straight with your cutting mat at a comfy height, which lets you look directly down at the ruler's markings. This simple step prevents what's known as parallax error—that tricky illusion where looking from an angle makes the lines appear shifted.
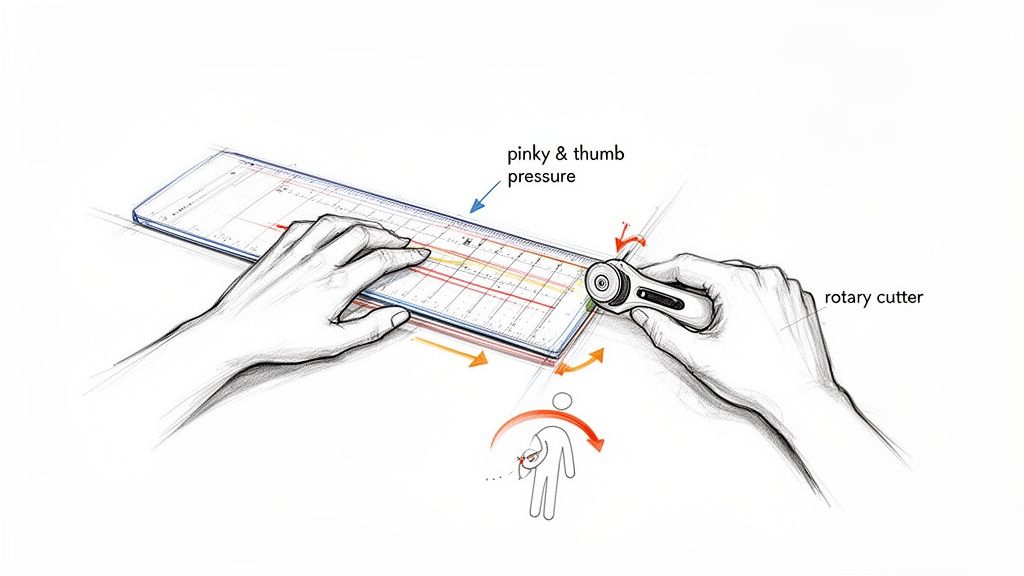
Where you put your hands matters, too. Spread the fingers of your non-cutting hand wide across the ruler. This distributes the pressure evenly and creates a solid, stable base.
At B-Sew Inn, our expert educators teach a simple but incredibly effective trick called the 'pinky and thumb' pressure method. You anchor your pinky finger just off the fabric onto the mat and place your thumb firmly on the ruler. This creates a powerful clamp that pretty much eliminates any chance of the ruler slipping.
This tiny adjustment can make a world of difference in your confidence and help you get those clean, straight cuts every single time. And of course, always remember the golden rules of safety: cut away from your body and snap that blade guard shut the moment you're done.
Cutting Specialty Shapes with Templates
Once you’ve got straight lines down, you’ll want to start playing with specialty templates for shapes like triangles, hexagons, and all those fun curves. The same ideas about stability apply here, but you'll tweak your technique just a bit for these unique forms.
When you're cutting around a curved template—think Drunkard's Path or Apple Core blocks—slow and steady is the name of the game. Don't try to slice the whole curve in one go. Instead, make a series of smaller, controlled cuts. As you move around the template, reposition your hand to keep firm pressure right next to where the blade is cutting.
Here are a few pro tips for cutting with specialty quilting rulers and templates:
- Hold the Blade Upright: Keep your rotary cutter handle perpendicular to the cutting mat. If you tilt it, the blade can sneak under the ruler's edge, giving you a beveled, inaccurate cut.
- Use the Lines, Not the Edge: Your fabric should always align with the printed lines on the ruler, not just the physical edge of the acrylic. Those lines are your true north for precision.
- Start Before the Fabric: Begin your cut just a little before the fabric starts and roll it slightly past the end. This guarantees a clean, complete cut from start to finish.
If you want to dig even deeper into these fundamental skills, our guide on how to use quilting rulers is packed with step-by-step instructions and photos to help build your confidence.
Introduction to Rulerwork on a Domestic Machine
Guess what? The same principles of control and stability are key when you switch from cutting fabric to quilting with rulers on your home sewing machine. This technique, called rulerwork, uses thick, 1/4-inch rulers to guide your machine’s special quilting foot. It’s how you get those perfectly straight lines, gorgeous arcs, and intricate designs that crafters can easily replicate.
To get started, you'll need two things: a ruler foot for your machine and rulers made specifically for this purpose. The process feels a lot like tracing. You'll gently guide the ruler and your quilt sandwich together, keeping the ruler foot's edge pressed firmly against the ruler's edge. This lets you stitch beautiful, repeatable designs that look incredibly professional. With the right gear and a little guidance from our B-Sew Inn online classes, you can turn your trusty sewing machine into a quilting powerhouse.
Common Ruler Mistakes and How to Fix Them
We’ve all been there. That sinking feeling when your ruler slips, or you look down and realize your freshly cut fabric strip is wonky. It’s frustrating, but it’s a rite of passage for every single quilter, from day one to year twenty. The good news is that these little hiccups are almost always easy to fix once you know what to look for. Let's walk through the most common mistakes and get you back to cutting with confidence.
One of the sneakiest culprits of an inaccurate cut is something called parallax error. It sounds technical, but it just means you're looking at the ruler’s measurement lines from an angle instead of straight on. When you peek from the side, a line might look like it’s perfectly on the mark, but it could be off by just enough to cause headaches later.
The fix for this is surprisingly simple: change your viewpoint! Make sure your eyes are directly over the line you intend to cut. I find it helps to stand up while I'm at my cutting mat; it gives me that true bird's-eye view. This one tiny shift in your posture can make a huge difference in the accuracy of your quilting rulers templates.
Stopping the Dreaded Ruler Slip
There’s nothing quite like the jolt of a ruler sliding across your fabric mid-cut. It’s startling, and it almost always ruins the piece you’re working on. This usually happens when there's not enough friction between the slick acrylic ruler and your fabric.
To get a better handle on things, literally, change how you hold your ruler. Instead of planting your palm in the center, spread your fingers out wide like a starfish. This simple trick distributes the pressure more evenly across the ruler's surface. If you’re working with slippery fabrics like sateen or batiks, adding a few non-slip adhesive grips to the back of your rulers is a game-changer. Those little silicone dots create just enough tack to keep everything locked in place.
At B-Sew Inn, we know that control is everything. That’s why our online classes dig into these small but mighty techniques. Learning how to properly anchor your ruler is just as foundational as mastering a half-square triangle—it’s a skill you’ll use on every single quilt you make. We are committed to empowering crafters with the support and extensive resources needed to perfect these skills.
Avoiding the Fabric 'Snowplow'
Have you ever tried cutting through a few layers of fabric, only to watch the top layers bunch up and push forward against your ruler? I call this the fabric "snowplow." It’s a classic sign that your rotary blade is dull, or you aren’t applying firm, even pressure.
A dull blade doesn't slice; it pushes. This forces the fabric forward instead of cutting cleanly through. Here’s how to fix it:
- Change Your Blade: A fresh, sharp rotary blade is non-negotiable. It should feel like it's gliding through butter, even with a few layers.
- Apply Even Pressure: Use that "starfish" hand position we talked about to hold the ruler down firmly and consistently from end to end.
One last tip: always start with a perfectly straight edge. Before you even think about cutting strips, take a moment to "true up" your fabric. Fold it neatly and trim a clean line along that folded edge. This gives you a reliable reference point for every other cut and sets you up for success right from the start.
Caring for Your Quilting Tools
Your collection of quilting rulers and templates is a serious investment in your craft, and I know you want them to last. Think of them like any other precision instrument in your life. A little bit of care goes a long way, ensuring they perform perfectly for years—maybe even a lifetime. When you depend on them for accuracy, keeping them in top shape is non-negotiable.
Taking care of your tools means they’ll be ready to go the second inspiration hits. This is a huge part of the B-Sew Inn philosophy. We've seen it time and time again: quilters with well-loved, well-cared-for tools create the most beautiful work.
Keeping Your Rulers Clean and Clear
After a few projects, you’ll notice your rulers collecting lint, dust, and maybe some oils from your hands. This gunk can easily obscure the lines you rely on. Cleaning them is simple, but you have to use the right stuff to avoid scratches that will ruin the markings for good.
Put down the abrasive cleaners and harsh chemicals! Things like alcohol can actually cause the acrylic to crack or craze over time, leaving a spiderweb of tiny fractures. The best solution is usually the simplest: a soft, lint-free microfiber cloth does wonders.
For a quick dusting, a dry microfiber cloth is all you need. If it’s time for a deeper clean:
- Mix a tiny drop of mild dish soap with some lukewarm water.
- Gently wipe the ruler with your damp cloth, paying special attention to any grooves where lint loves to hide.
- Rinse it off with clean water and immediately dry it with another soft cloth to keep water spots from forming.
Smart Storage to Prevent Damage
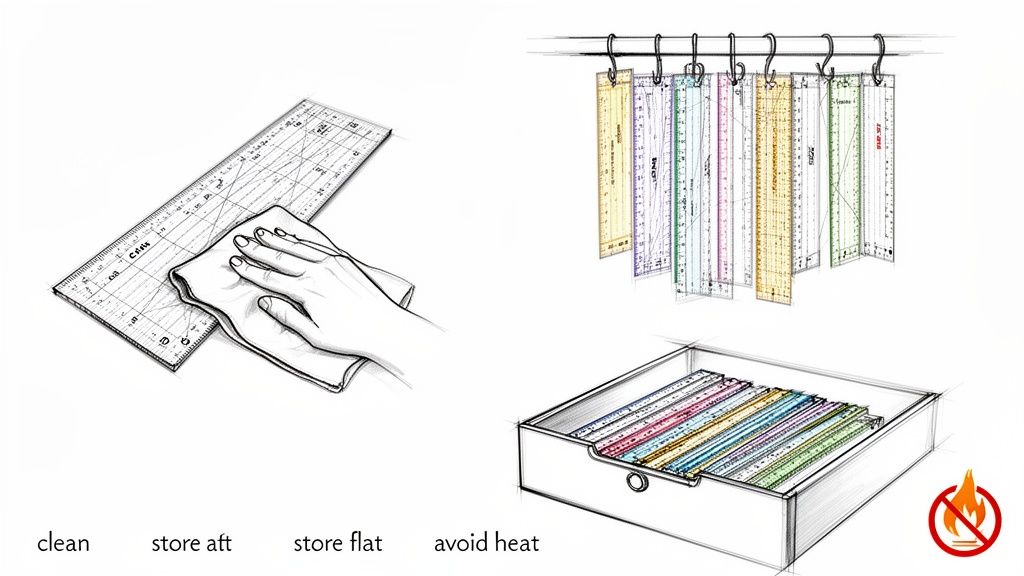
How you store your rulers is just as critical as how you clean them—maybe even more so. Improper storage is the number one reason I see rulers warp, chip, or break. The golden rule here is to either keep them perfectly flat or hang them straight up and down. And always, always keep them away from direct sunlight and heat.
Trust me on this one: leaving an acrylic ruler in a hot car or setting it too close to your iron is a recipe for disaster. The heat can cause it to warp permanently. Once a ruler loses its flatness, you might as well toss it, because its accuracy is gone forever.
Here are a few storage methods that quilters swear by:
- Hanging Racks: So many rulers come with a little hole for hanging. A pegboard or a dedicated ruler rack is a fantastic way to keep them organized, visible, and safe from harm.
- Flat Storage: This is my personal go-to. I store mine flat in a shallow drawer, but an artist's portfolio works great, too. This prevents any bowing or stress on the acrylic.
- Slotted Racks: You’ve probably seen these wooden or acrylic stands. They keep your tools upright and separated, which stops them from scratching each other and makes them super easy to grab when you're in the zone.
By building these simple habits, you’re not just protecting your tools; you're making sure your favorite quilting rulers and templates are always ready for your next creative adventure.
Common Questions About Quilting Rulers
Let’s be honest, when you’re starting out in quilting, the sheer number of tools can feel a bit much. Questions are totally normal! Having some quick answers ready can really boost your confidence and keep your projects from stalling out. Here are a few of the questions I hear all the time from fellow quilters.
What Are the Three Most Essential Rulers for a Beginner?
If you're just dipping your toes into the quilting world, you don't need to buy every ruler on the wall. I always recommend starting with a core set of three that will see you through the majority of your first projects. This little trio is the foundation of a great quilting toolkit.
- A 6" x 24" rectangular ruler: This is your workhorse, no question. It's the perfect size for cutting long strips right off the bolt of fabric and for squaring up the edges of your finished quilts.
- A 12.5" x 12.5" square ruler: You absolutely need this for squaring up your finished quilt blocks. It's the key to making sure everything fits together perfectly when it's time to assemble your quilt top.
- A smaller 6.5" x 6.5" square ruler: I find myself reaching for this one constantly. It’s fantastic for trimming smaller units like half-square triangles and gives you much better control when squaring up smaller blocks.
Why Are Some Quilting Rulers So Much Thicker?
You've probably noticed that rulers come in different thicknesses, and that’s not just a random design choice—it's all about safety and function. Your standard rotary cutting rulers are usually 1/8 inch thick. This gives you a nice, sturdy edge to guide your blade.
But when you see those thicker rulers, they’re almost always designed for rulerwork on a sewing machine and are 1/4 inch thick. That extra thickness is critical! It acts as a safe wall for the machine's hopping foot, allowing it to glide right alongside the ruler's edge without any chance of slipping over the top. A slip-up could break a needle or, even worse, damage your machine.
How Do I Stop My Ruler from Slipping When I Cut?
Ah, the dreaded ruler slip! It happens to all of us, but it's thankfully easy to fix. The trick is to apply firm, even pressure with your non-cutting hand. Don't just press down in one spot—spread your fingers out wide like a "starfish" for the best stability. This distributes the pressure and helps lock the ruler down.
If you're still struggling, especially with slicker fabrics, go grab some adhesive non-slip grips for the underside of your rulers. These little sticky dots or rings are a game-changer. They add just enough friction to hold everything securely in place for a perfect cut, every single time.
Can I Use Any Ruler for Machine Quilting?
This is a big one, and the answer is a firm no. You must only use rulers specifically made for machine quilting, which are always 1/4 inch thick. Trying to use a standard 1/8-inch cutting ruler for rulerwork is incredibly dangerous.
The machine’s hopping foot can easily jump right over that thin edge. When that happens, the needle will slam into the ruler, break, and send shards flying. It could seriously damage your machine or your quilt. Always, always double-check that your ruler is labeled for rulerwork before you bring it anywhere near your machine.
Here at B-Sew Inn, we know that having the right tools—and the confidence to use them—is what turns a hobby into a passion. We are committed to empowering crafters on their creative journey with custom sewing machine designs and the support of online classes, training, and extensive resources.
Come explore our collection and find exactly what you need at https://www.bsewinn.com.

