

A lot of sewists reach the same moment. Regular sewing is going well, quilts are getting finished, garments fit better, and gift projects look polished. Then the next thought shows up: what if one machine could also add names, quilt labels, appliqué outlines, baby gifts, jacket backs, or simple shop branding?
That's where a sewing machine with embroidery function starts to make sense.
For some buyers, the goal is modest. They want monograms on towels and a neater way to make labels for quilts. For others, embroidery is becoming part of the weekly workflow, and the question isn't whether to add it. The question is whether a combo machine will keep up without becoming frustrating.
That buying decision gets confusing fast because the machine brochure usually makes everything sound easy. Real life is different. Hoop size limits design size. Rehooping affects placement. Faster stitching isn't always cleaner stitching. And a machine that looks affordable at first can still need extra hoops, stabilizers, needles, thread, or software before it feels complete.
Table of Contents
- Introduction to Sewing Machines That Also Embroider
- How a Sewing Machine with Embroidery Function Actually Works
- Combo Machines Versus Add On Units and Needle Configurations
- Key Features to Evaluate Before You Buy
- Basic Setup and First Embroidery Workflow
- Troubleshooting Stitches and Keeping Your Machine Maintained
- Choosing Your Path and Next Steps at B-Sew Inn
Introduction to Sewing Machines That Also Embroider
A sewing machine that also embroiders combines two jobs in one machine body. In sewing mode, it handles regular construction, piecing, hemming, and decorative stitches. In embroidery mode, it uses a hoop and a digital design file to stitch a motif while the machine moves the hooped fabric for you.
That sounds simple, but the fit depends on how someone sews.
The buyer who wants one machine, not a room full of gear
A hobbyist making gifts may love the convenience of switching from hemming a kitchen towel to embroidering a name on it without setting up a second machine. A quilter may want to add labels and corner motifs without giving up sewing space. A growing side-business may need to ask harder questions about production time, thread changes, and whether the embroidery area is large enough for the work being sold.
Those are different needs. They shouldn't lead to the same purchase.
A combo machine works best when the sewing side and the embroidery side both match the projects that actually happen most often.
What usually causes regret
Most disappointment doesn't come from the machine being “bad.” It comes from a mismatch between expectation and workflow.
Common examples include:
- Designs that are too large: The machine may embroider beautifully, but only within its embroidery field.
- Too much rehooping: Large motifs broken into multiple hoopings take more time and demand more careful alignment.
- Accessory surprises: Stabilizer, extra hoops, embroidery needles, thread, and sometimes software are part of the setup.
- Small-business overload: A machine that feels perfect for occasional gifts may feel slow when filling repeated orders.
The category itself is substantial, not a tiny niche. One market estimate places the global sewing and embroidery machine market at US$6.833 billion in 2025 and projects US$8.871 billion by 2032, with a 3.8% CAGR from 2026 to 2032, while another market breakdown projects US$10,706.12 million in 2025 with embroidery machines accounting for US$3,189.91 million, or 29.80% of total revenue according to this sewing and embroidery machines market report.
That steady demand makes sense. Many buyers want one machine that handles practical sewing and decorative work in the same space.
How a Sewing Machine with Embroidery Function Actually Works
The easiest way to understand embroidery mode is to think of a printer. A printer moves paper under a print head. An embroidery machine moves hooped fabric under a needle.
The difference is that thread, tension, needle penetration, and fabric stability all have to stay controlled while the design is stitched.
From sewing motion to computer control
In regular sewing mode, feed dogs move fabric forward while the needle forms stitches. In embroidery mode, the machine stops relying on that normal fabric feed. Instead, the fabric is secured in a hoop, and the embroidery system moves that hoop in different directions while the needle stitches according to a digital design.
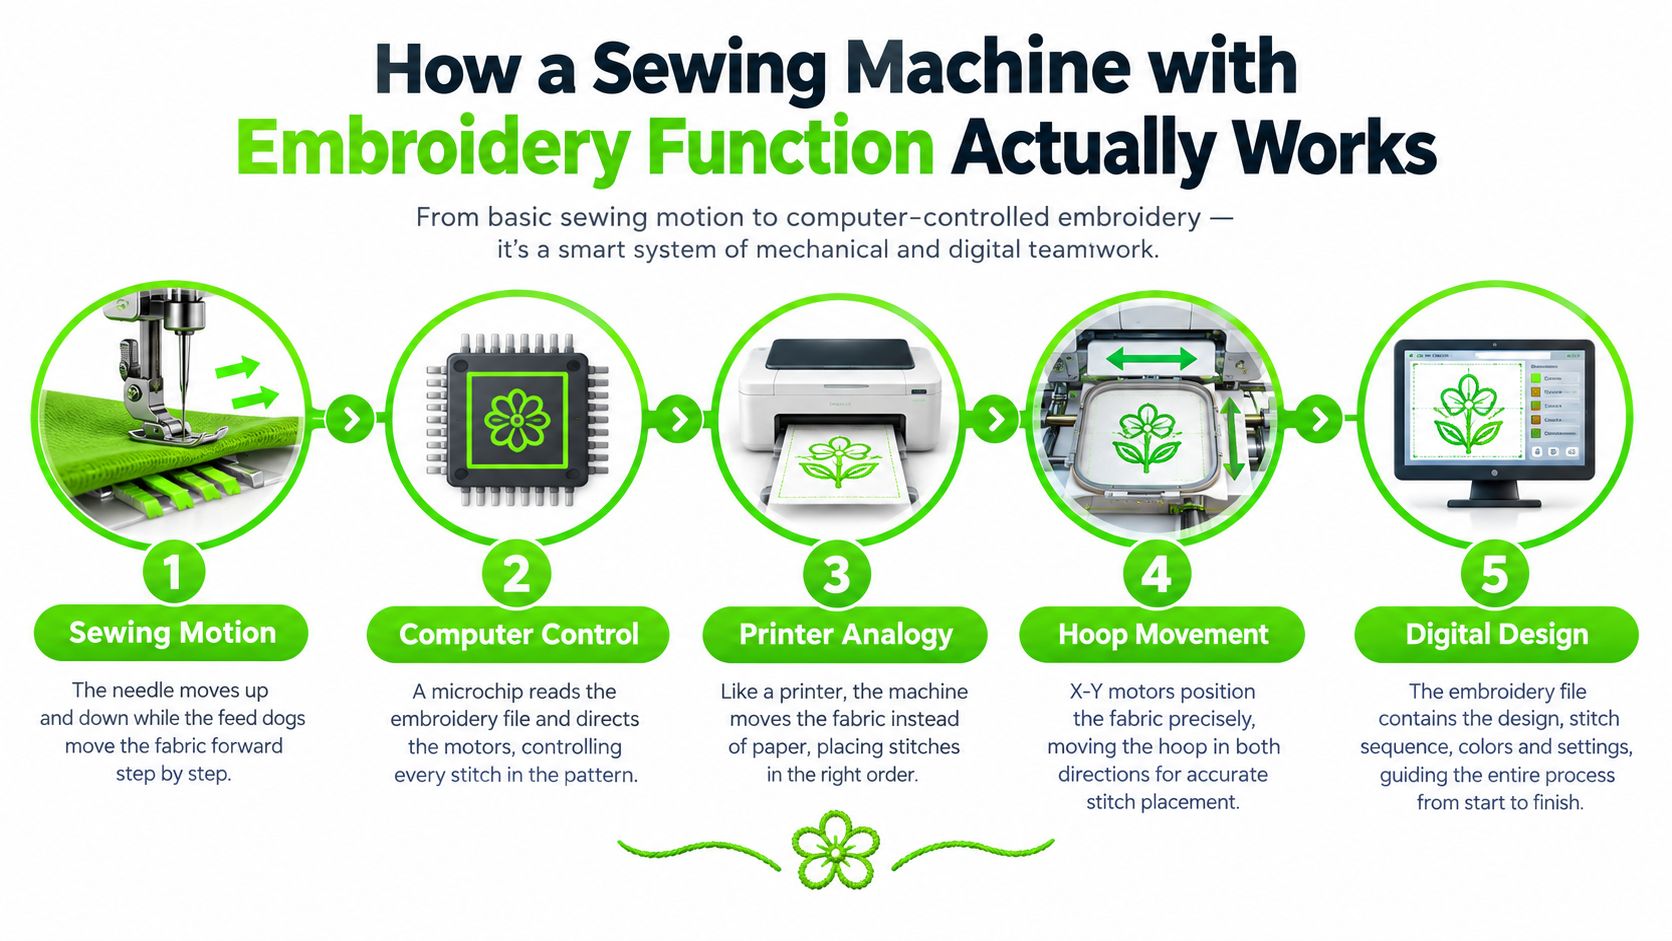
The design itself comes from built-in motifs or an imported file. On many machines, the user can place, rotate, resize, or combine designs on the screen before stitching. Anyone learning the basics of machine setup will also benefit from understanding the role of the embroidery foot on a sewing machine, because that foot is part of how the machine handles thread and stitch formation during embroidery.
Why files, hoops, and software matter
Modern embroidery became possible because machine control moved from mechanical systems to digital ones. A key historical shift came when the first computerized embroidery machines were introduced to the home market in 1980, following industrial milestones such as Tajima beginning automatic embroidery machine production in 1964 and a 6-needle full-automatic color-change model in 1973. The same timeline also notes that Pulse Microsystems introduced Stitchworks in 1982 as the first PC-based embroidery software, while Wilcom introduced the first computer graphics embroidery design system around 1980 in this machine embroidery history overview.
Those dates matter because they explain why embroidery today is tied to digital files, machine memory, on-screen editing, and software.
Practical rule: The machine doesn't “draw” freely. It follows stitch instructions in a file while the hoop positions the fabric under the needle.
That's also why stabilizer matters so much. The machine can only place stitches accurately if the fabric stays stable enough for the file to sew as intended.
Combo Machines Versus Add On Units and Needle Configurations
Some buyers already know they want embroidery. The harder question is which hardware path fits the room, the budget, and the volume of work.
A single answer doesn't fit everyone. The right machine for occasional towel gifts isn't always the right machine for repeated personalization orders.
Combo machines and add on embroidery units
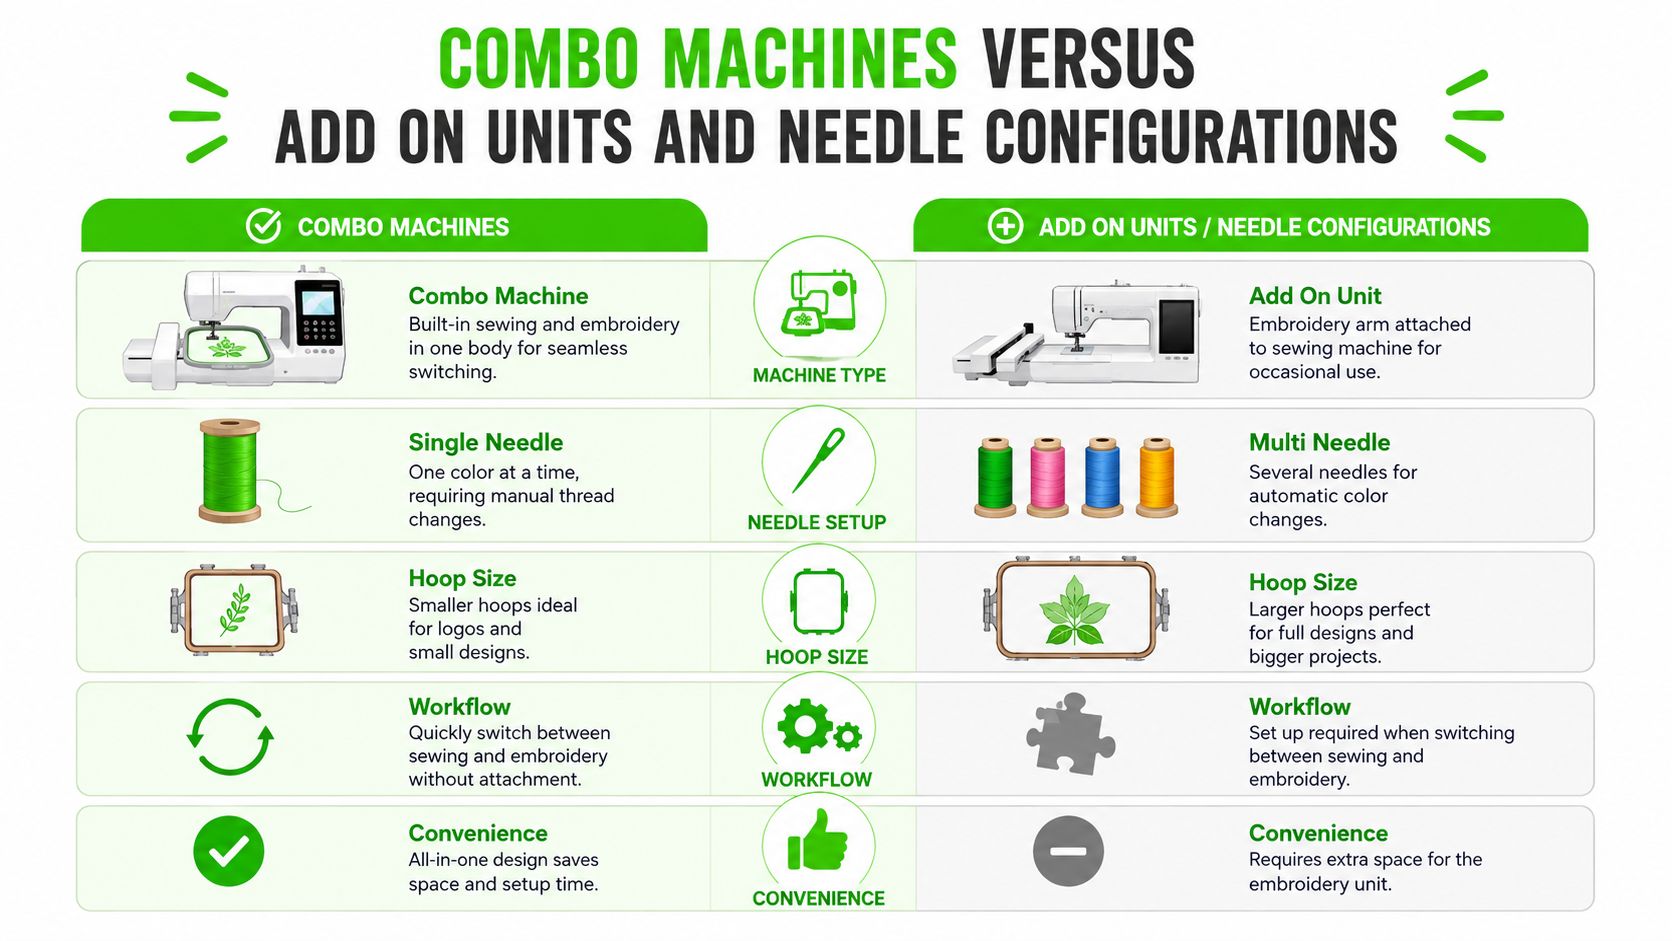
A combo machine keeps sewing and embroidery in one system. That's convenient for home users who want one main machine and a cleaner workspace. Switching modes is usually straightforward, and there's less sense of managing separate equipment.
An add on embroidery unit takes a sewing machine and extends it for embroidery work. For some sewists, that can be a practical middle path. It may preserve sewing capability while adding embroidery only when needed. It can also mean more setup steps, more storage thought, and more awareness of how the unit attaches and where it needs clearance.
Helpful comparison reading is available in this guide to sewing and embroidery combo machines.
Single needle and multi needle realities
Single-needle embroidery means one needle stitches one thread color at a time. When the design changes color, the operator changes thread manually or follows the machine's prompts. For gifts, labels, and occasional decorative work, that may be completely fine.
Multi-needle machines reduce thread-change interruption because several thread colors can stay loaded at once. That matters more when the same logo, name set, or repeated design is stitched often.
One market report highlights this practical buying gap directly and notes the need to weigh file-transfer friction, thread-change downtime, service interruptions, and extra software or accessory purchases. The same report projects the embroidery machine market at USD 1.27 billion in 2026 and USD 1.7 billion by 2030 in this embroidery machine market analysis.
A simple fit guide
| Machine path | Usually fits best | Main tradeoff |
|---|---|---|
| Combo sewing and embroidery machine | Home sewists who want one machine for both tasks | Shared machine time between sewing and embroidery |
| Sewing machine with add on embroidery unit | Sewists who embroider occasionally and value flexibility | More setup and storage considerations |
| Single-needle embroidery setup | Gifts, labels, monograms, lower-volume personalization | More manual color changes |
| Multi-needle embroidery setup | Repeated designs and growing personalization workflow | Larger footprint and a stronger production focus |
The real question isn't only “Can this machine embroider?” It's “How many interruptions will this workflow create in a normal week?”
Key Features to Evaluate Before You Buy
Specifications can look technical until they're tied to actual projects. Then they become much easier to judge.
A buyer comparing any sewing machine with embroidery function should focus on five areas first. Those five tell far more than a long feature list.
Embroidery field and hoop size
Every embroidery machine has a maximum design size it can stitch at one time, and in industry language that limit is usually called the hoop size, even though the label is really a rounded value for the actual stitching field as explained in this hoop size guide.
That point trips up a lot of shoppers. A labeled hoop size isn't always the exact stitchable area.
| Marketed Hoop Size | Actual Stitching Area | Best Use Case |
|---|---|---|
| 4 × 4 | 3.94 × 3.94 inches, or 100 × 100 mm | Monograms, quilt labels, small motifs |
| 5 × 7 | About 5.12 × 7.09 inches | Medium designs on towels, bags, garment fronts |
| 6 × 10 | Varies by machine setup | Larger decorative motifs with fewer rehoops |
The specific actual areas above for 4 × 4 and 5 × 7 come from this overview of common embroidery machine hoop sizes.
Why larger fields matter
A larger embroidery field means more of the design can stitch before the fabric has to be repositioned. That reduces alignment risk on larger motifs.
One representative sewing-and-embroidery machine offers a maximum embroidery area of 200 x 360 mm (7.9 x 14 in) and supports direct editing such as resize, rotate, duplicate, and sewing-order control. It also includes features like automatic thread trimming and automatic return after thread break, which can reduce downtime and rework in longer runs on this product specification page.
Editing tools and design handling
Built-in editing saves time. A machine that lets the user move, rotate, duplicate, or reorder elements on screen is easier to live with than one that forces every adjustment outside the machine.
This matters most when placing names, combining simple motifs, or adjusting a quilt label at the last minute. Reviews and buying notes in this roundup of embroidery machine reviews can help shoppers identify which editing tools matter most for their project style.
Speed, precision, and control
Many buyers assume more speed is always better. In embroidery, that isn't always true.
A typical sewing-and-embroidery machine may sew standard stitches at 850 stitches per minute while embroidery runs at roughly 650 to 1,050 stitches per minute depending on model. The speed difference exists because embroidery requires coordinated needle penetration, frame movement, and thread control. Higher speeds can increase the risk of thread breaks and registration issues, which is why adjustable embroidery speed and thread-color-change sequencing matter in this sewing and embroidery machine specification example.
Clean embroidery usually comes from controlled speed, stable hooping, and the right setup. Not from racing the machine.
Included accessories and the hidden shopping list
The machine price is only part of the decision. Buyers should ask what's included on day one.
Useful questions include:
- Which hoops come in the box: One hoop may handle basics, but a second size often improves flexibility.
- What transfer method is built in: Imported files are easier when the transfer workflow feels simple.
- What does the machine need immediately: Thread, stabilizer, embroidery needles, and bobbins are usually part of the first purchase.
- Is software optional or necessary: Some users can work with built-in editing. Others will want fuller design control later.
One practical hooping guideline is to choose the smallest hoop that fits the design plus margin, leaving about 1/4 inch (6 mm) from the outermost stitch to the hoop's inner edge to help maintain stability and avoid puckering according to this embroidery hoop sizing guide.
That's why in-store testing matters so much. Shoppers in Oklahoma, Missouri, Texas, and Arkansas can learn more in one hands-on session than from hours of comparing online spec sheets.
Basic Setup and First Embroidery Workflow
The first embroidery project goes much smoother when the setup follows a simple order. Most problems begin before the machine starts stitching.
The process should stay calm and mechanical. Fabric first. Then stabilizer. Then needle. Then hooping. Then design placement. Then a careful test run.
Start with the fabric, not the design
A dense design on a stretchy fabric causes trouble faster than beginners expect. The fabric has to support the stitching.
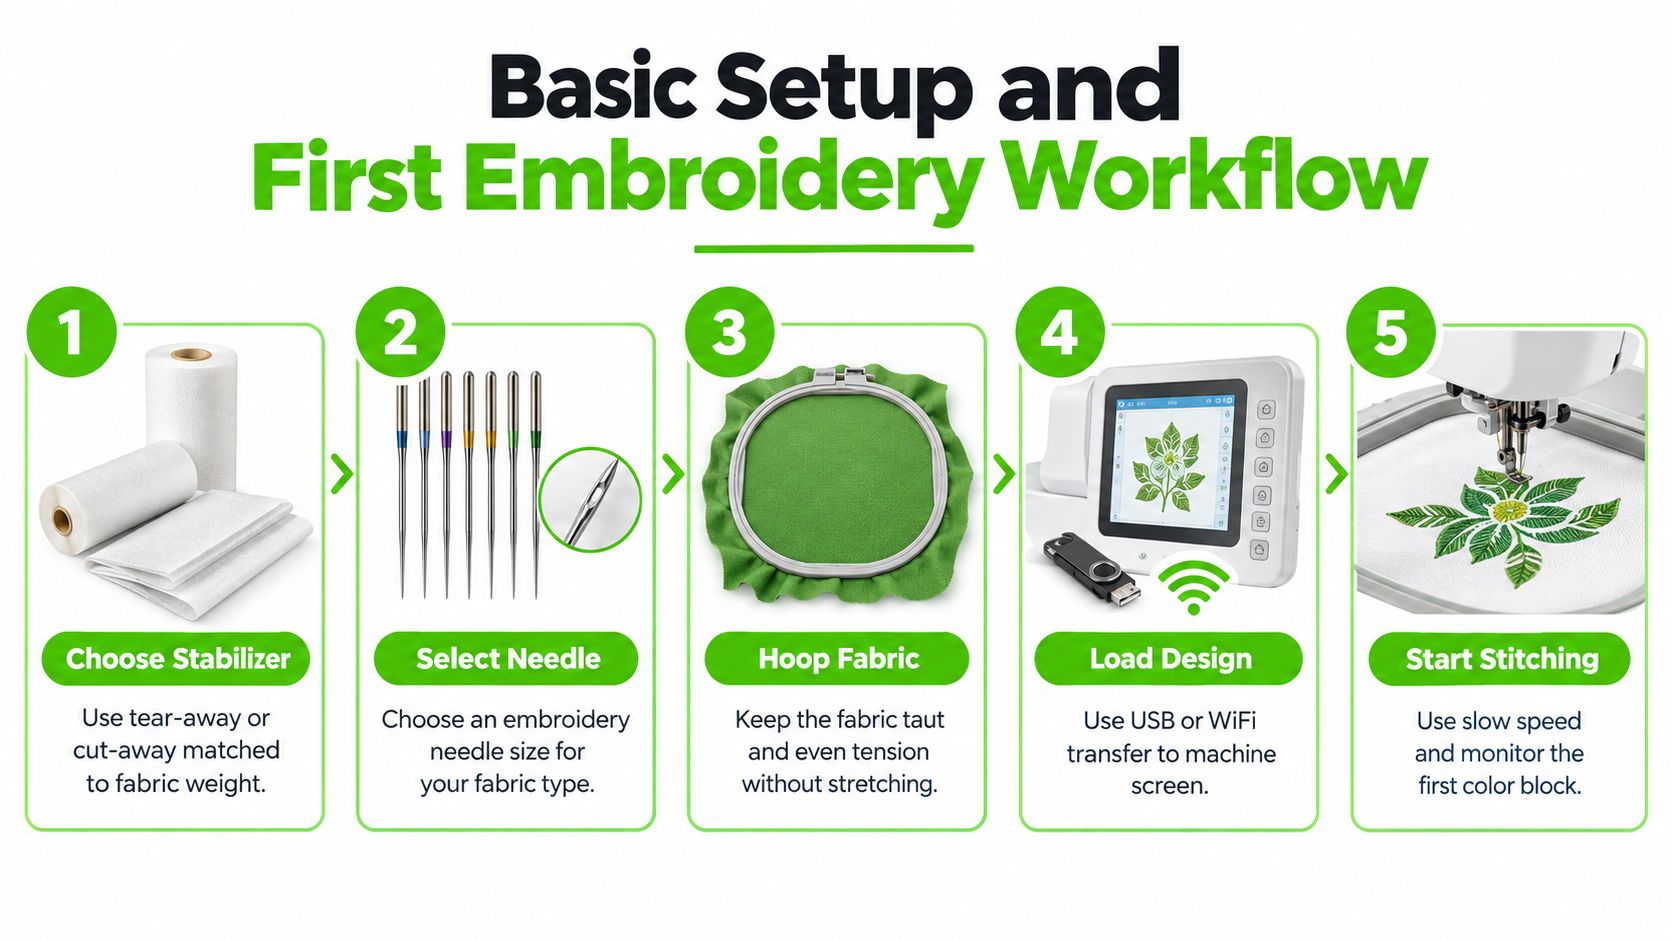
For stabilizer and needle selection, one technical guide recommends:
- Cutaway stabilizer for knits and unstable fabrics
- Tear-away stabilizer for stable wovens
- Water-soluble topping for napped fabrics such as terry cloth or fleece
- Needle sizes 75/11 or 80/12 depending on thread type and stitch density
Those recommendations appear in this technical reference on machine embroidery thread, stabilizer, and needle selection.
A practical supply checklist is also useful before the first project. This overview of an embroidery machine starter kit helps identify the common extras new machine owners usually need.
Hoop the project correctly
The fabric should be taut in the hoop but not stretched out of shape. Distortion in the hoop often shows up later as puckering or poor registration.
A simple first-project sequence works well:
- Cut stabilizer to suit the fabric Stable woven cotton and stretchy knit garments usually need different support.
- Insert a fresh embroidery needle A worn or slightly damaged needle can create skipped stitches or frayed thread.
- Mark design placement before hooping Center marks save frustration later.
- Hoop with even tension Smooth and secure is the goal. Over-tightening can be as troublesome as loose hooping.
Before seeing that sequence on a machine screen, some learners find it helpful to watch the workflow in motion:
Load the design and run the first stitch out slowly
The machine may allow transfer by USB, built-in memory, or another digital method. Once the design appears on screen, placement should be checked again before stitching begins.
For a first project, slower is usually smarter. Watch the first color block. Confirm thread is feeding cleanly. Make sure the hoop moves freely and nothing catches around the machine arm.
A careful test stitch on a similar fabric sandwich often saves the real project.
This is also where in-person machine mastery sessions help. Learning how a machine loads files, places the design, and begins a stitch-out is much easier when someone can see each step done live and then repeat it.
Troubleshooting Stitches and Keeping Your Machine Maintained
Most embroidery frustration falls into a short list of repeat problems. The good news is that those problems usually have clear causes.
When the stitches look off, the smartest move is to pause and diagnose the setup before changing a dozen settings at once.
Common problems and likely causes
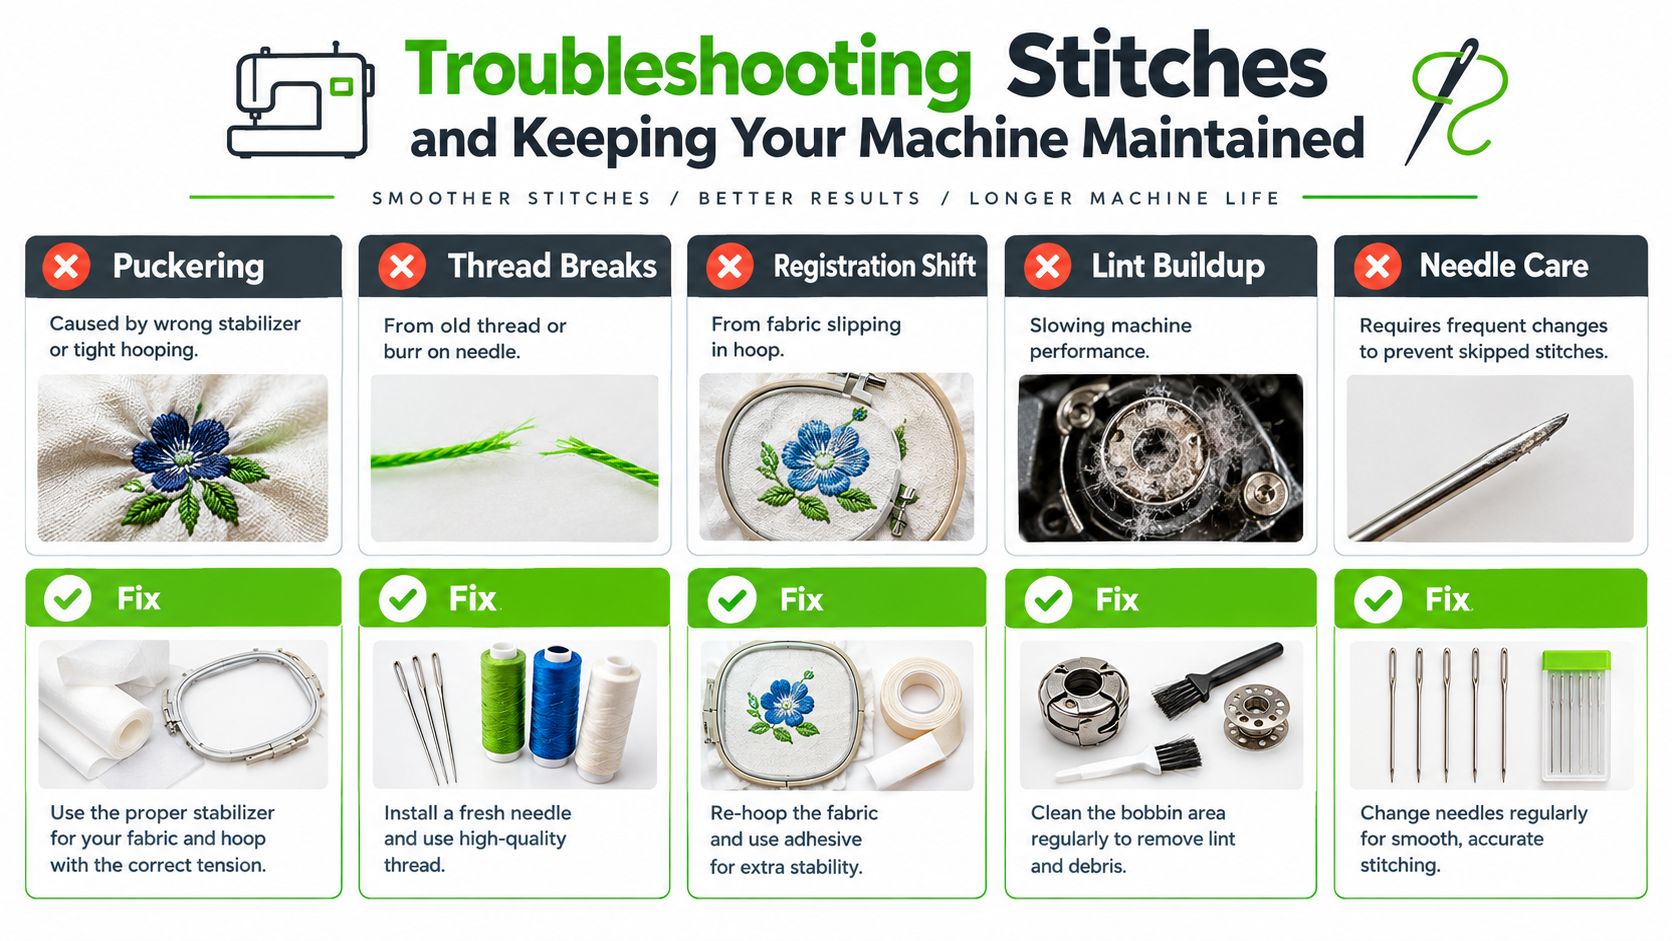
- Puckering after stitching: This often points to the wrong stabilizer, poor hooping, or a hoop that was too large for the design.
- Thread breaks: Old thread, a damaged needle, or speed that's too aggressive for the fabric and design can all contribute.
- Registration shifts: If parts of the design don't line up, the fabric may have moved in the hoop or the project may need firmer support.
- Skipped stitches: Needle condition is a common culprit, especially after several dense stitch-outs.
- Messy underside or tension worries: Bobbin area lint and threading issues should be checked before assuming a major machine problem.
Basic care that prevents bigger issues
Routine maintenance doesn't have to be complicated. It just has to be regular.
A practical home routine includes:
- Clean lint from the bobbin area after embroidery sessions
- Change needles often when doing dense decorative stitching
- Use good-quality thread and replace thread that has become brittle
- Store hoops and accessories together so setup stays consistent
For deeper care, timing and professional adjustment matter. Buyers who want guidance on what to handle at home versus what belongs on a technician's bench can review this overview of sewing machine maintenance and repair.
If the same problem repeats across different fabrics and designs, the issue may be mechanical rather than setup-related.
That's the point to book service instead of fighting the machine through another project.
Choosing Your Path and Next Steps at B-Sew Inn
The right path gets clearer when the machine choice matches the actual workflow.
An occasional monogrammer usually does well with a sewing machine with embroidery function that keeps sewing and decoration in one place. A quilter adding labels, corner motifs, and gift details often benefits from that same convenience, especially if the machine offers editing tools and hoop options that reduce extra setup. A hobbyist moving toward regular personalization work should look harder at thread-change interruption, embroidery field size, and whether a single-needle workflow still feels comfortable after repeated orders.
Hands-on testing matters because these differences are easier to feel than to read about. Screen layout, hoop attachment, design transfer, machine noise, and switching between sewing and embroidery all shape whether a machine feels natural or tiring.
B-Sew Inn is an authorized sewing, quilting, and embroidery machine dealer with retail stores in Tulsa, Oklahoma City, Springfield, Humble, and Fayetteville, plus an online store at bsewinn.com. It sells and services machines from Baby Lock, Bernina, Bernette, Brother, and Janome, along with sergers, longarm quilting machines, embroidery designs, thread, stabilizer, notions, cabinets, and cutting tables. It doesn't manufacture machines and it doesn't create custom machine designs.
In-person classes, machine mastery sessions, service, repair, and trade-ins are part of the decision process too. For many buyers, that support matters just as much as the machine itself.
A confident purchase usually comes from seeing the machine sew, loading a design, trying a hoop, and asking the practical questions that don't show up in a product title.
Shoppers who are ready to compare machine types, test embroidery workflow, or pick up the right stabilizers and needles can visit B-Sew Inn to browse current machines and supplies. A store visit is the strongest next step for anyone who wants to try Baby Lock, Bernina, Bernette, Brother, or Janome in person, book an in-person class, or schedule service before making a machine decision.

