

If you've ever looked at a perfectly quilted project and wondered, "How did they get those stitches so straight?" or struggled to keep a stretchy knit fabric from turning into a wavy mess, the secret is probably the walking foot. This handy attachment is the key to evenly feeding multiple layers of fabric, putting an end to the shifting, puckering, and mismatched patterns that can frustrate even the most patient crafter. With this guide, you'll learn not just what it does, but how to use it to create beautiful projects you can replicate at home.
The Secret to Flawless Fabric Feeding
Let's think about how a standard sewing machine works for a second. Under the needle plate, there’s a set of little teeth called feed dogs. Their job is to grab the bottom layer of your fabric and pull it through the machine. This works just fine for a single piece of cotton, but what happens when you’re sewing a thick quilt sandwich or a slippery, slinky knit? The top layer often gets pushed around by the presser foot and doesn't keep up with the bottom layer, creating tiny ripples and uneven seams.
A walking foot solves this with a simple yet brilliant design. It has its own set of feed dogs on top that work in perfect harmony with your machine's feed dogs below.
The best way I can describe it is to imagine your own two feet walking. They move together, one after the other, in perfect time. That's exactly what a walking foot does with your machine. The top 'foot' and the bottom feed dogs step together, making sure every layer glides through at the exact same pace.
This synchronized movement is what gives you those professional-looking results on otherwise tricky projects. Here at bsewinn.com, we’re committed to empowering crafters by not just offering custom sewing machine designs but also by providing the support you need to master them through our extensive online classes and resources. In fact, for heavy-duty sewing, a walking foot can boost your seam accuracy by over 25% compared to a standard presser foot. This little add-on is a real game-changer, and you can learn more about how sewing machine innovations improve fabric handling on our blog.
To give you a clearer picture, I've put together a quick table outlining the common sewing headaches a walking foot is designed to solve. It's a great reference for figuring out when you should reach for this amazing tool.
Problems Solved by a Walking Foot
| Common Sewing Problem | How a Walking Foot Solves It |
|---|---|
| Puckering on Quilts | Grips the quilt top, batting, and backing simultaneously, preventing layers from shifting. |
| Stretched-Out Knits | Feeds stretchy fabrics smoothly without pulling or distorting the material. |
| Slippery Fabrics Sliding | Provides a firm, even grip on silky or slick materials like satin, velvet, or vinyl. |
| Mismatched Plaids/Stripes | Ensures patterns on the top and bottom layers stay perfectly aligned at the seam. |
| Uneven Topstitching | Delivers consistent feeding for crisp, straight topstitching lines, especially on thick layers. |
Once you start using a walking foot for these tasks, you'll wonder how you ever managed without it. It truly takes the struggle out of some of sewing’s biggest challenges.
How a Walking Foot Actually Works
So, how does this game-changing tool actually do what it does? It’s not just a clunky piece of metal you snap onto your machine; it's an active partner in your sewing. A walking foot has its own set of feed dogs that grip the top layer of your fabric from above.
At the same time, a little fork or lever on the walking foot hooks over your machine’s needle clamp. This connection is the secret sauce. As your needle moves up and down, it powers that little fork, which makes the foot 'walk' the top layer of fabric forward at the exact same speed your machine's own feed dogs are moving the bottom layer.
The Power of Synchronized Motion
This perfectly synchronized motion is what prevents all those sewing headaches. Instead of the top fabric getting dragged along for the ride (which often causes stretching and shifting), it's actively moved in perfect time with the bottom fabric.
Historically, this invention came about because sewers needed a better way to handle multiple layers or really heavy materials that standard machines just couldn't manage. This innovation was a lifesaver in industries like upholstery and sailmaking, where wrestling with fabric just wasn't an option. You can actually read more about the history of heavy-duty sewing machines on sailrite.com.
At bsewinn.com, we're all about giving you this level of control. We believe that empowering you with the right tools and knowledge is the key to creative success. That's why we pair our custom sewing machine designs with extensive training, ensuring you can tackle challenging projects with professional-looking results. Our goal is to give you both the tools and the know-how to sew with total confidence.
This diagram is a great visual for the three main sewing problems a walking foot is designed to fix.
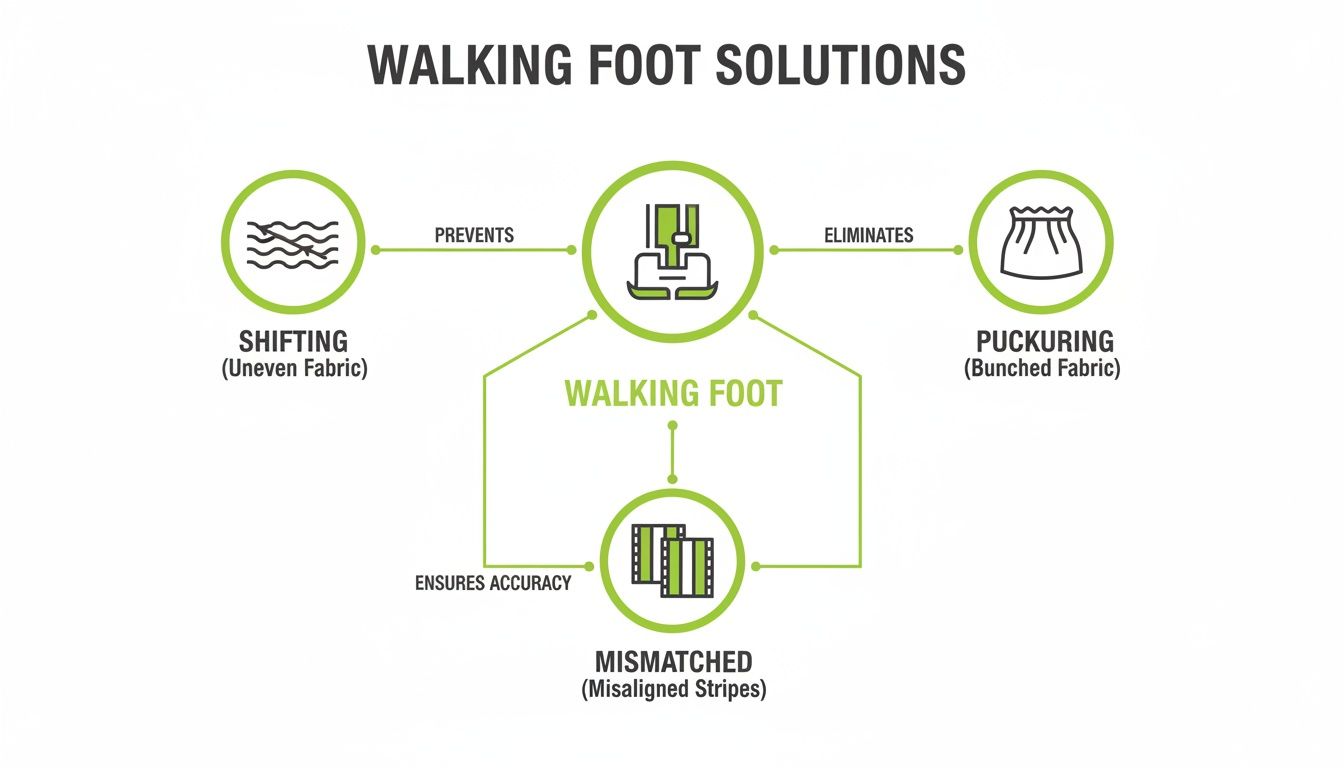
You can see exactly how the foot's mechanical action directly solves those frustrating feeding issues.
Think of it as teamwork. The machine’s built-in feed dogs are one team member pushing from below, and the walking foot is another, pulling from above. When they work together, your fabric sandwich moves like a single, solid piece, eliminating any chance for the layers to slip and slide out of place.
This simple but brilliant mechanism is the key to getting beautiful results when you're quilting, matching plaids, or sewing with tricky fabrics.
When To Use A Walking Foot For Perfect Results
Okay, now that we know how it works, let's get into the fun part: when this clever attachment will save your project. This section is designed as a "how-to" guide, showcasing tangible examples you can replicate. Knowing when to swap your standard foot for a walking foot is often what separates a project that screams "homemade" from one with a clean, professional finish.
Some sewing tasks are just plain frustrating with a regular presser foot. But pop on a walking foot, and they suddenly become a breeze.
Whether you're wrangling a bulky quilt or trying to tame slippery silk, this is your go-to tool for getting it right. Think of it as your secret weapon for tackling some of sewing's biggest challenges.
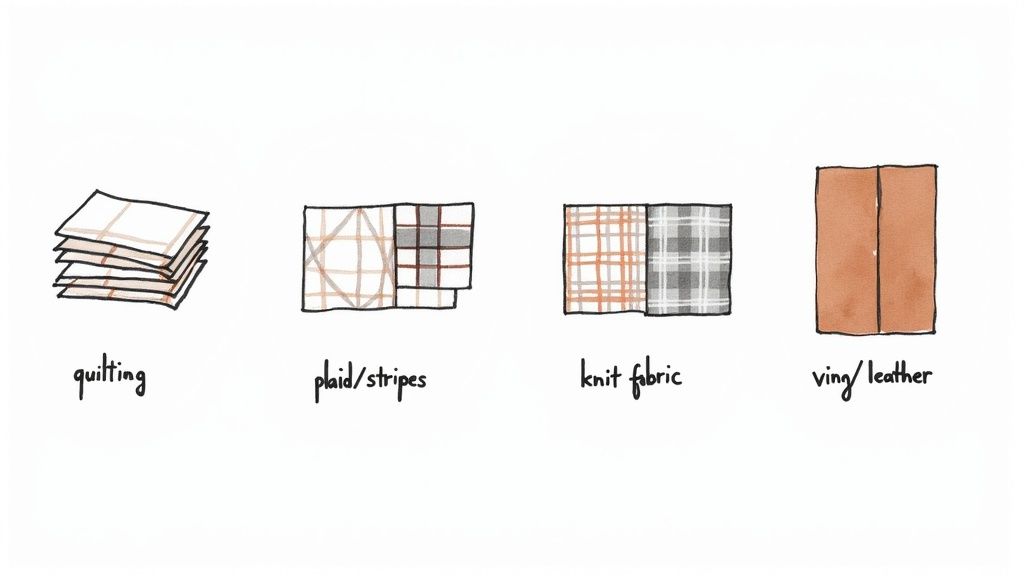
Taming The Quilt Sandwich
If you're a quilter, a walking foot isn't just nice to have—it's essential. When you layer your quilt top, batting, and backing, you create a "quilt sandwich." The problem? Each of these layers wants to shift and slide around on its own. A tangible project where this shines is creating a simple baby quilt with straight-line quilting.
This leads to the dreaded 'quilt creep,' where the top layer moves faster than the bottom, bunching everything up and leaving you with puckers and pleats. It's a quilter's nightmare.
A walking foot stops this completely. By gripping and feeding all three layers together in perfect sync, it ensures your quilt stays flat and aligned from start to finish. It’s an absolute game-changer for straight-line quilting or "stitching in the ditch," where even the smallest shift is obvious.
A great tip from pro quilters is to start quilting in the middle of your project and work your way out. This method, paired with a walking foot, gently pushes any extra fullness toward the edges, guaranteeing a beautifully smooth finish.
Perfectly Matching Plaids And Stripes
Lining up plaids, checks, or stripes is a true mark of quality craftsmanship. But trying to get those lines to meet perfectly at the seam? With a standard foot, it can feel downright impossible. A perfect example is sewing a plaid flannel shirt—the side seams and collar points must align.
This is exactly where you grab your walking foot. It makes sure both pieces of fabric feed through the machine at the exact same speed, locking them in place. The result is crisp, continuous lines that flow across your seams for that polished, high-end look.
Conquering Knits And Stretchy Fabrics
Let's be honest, sewing with knits can be intimidating. That comfy stretch is great to wear but can make for wavy, stretched-out seams when you sew. A regular presser foot often pushes and pulls the fabric, distorting it as you go. Imagine sewing a simple knit t-shirt hem.
A walking foot is the solution. It gently guides the fabric without stretching it out of shape. You can finally say goodbye to that annoying "lettuce edge" on your hems and sew t-shirts, leggings, and other stretchy clothes with beautifully stable, flat seams. If you want to dive deeper, we have a whole guide on how to sew stretch fabrics.
Handling Difficult And Specialty Materials
The magic of the walking foot doesn't stop there. It's your best friend for a whole range of other tricky materials that tend to slip, stick, or creep. For instance, when making a faux leather tote bag, a walking foot is indispensable.
- Slippery Fabrics: Think silk, satin, and charmeuse. These fabrics love to slide around, but a walking foot gives you the gentle, firm control you need to keep seams straight.
- Sticky Materials: Vinyl, faux leather, and oilcloth have a tendency to stick to a standard metal foot, causing skipped stitches and jerky feeding. A walking foot literally "walks" right over the surface, no sticking involved.
- Velvet and Corduroy: Fabrics with a nap or pile can be a real headache. The fibers can cause the layers to creep against each other. The walking foot moves both layers together, keeping the nap perfectly aligned.
Deciding between your trusty standard foot and a walking foot can be tricky, but it really comes down to what you're asking your machine to do. Here’s a quick comparison to help you choose the right tool for the job.
Walking Foot vs Standard Presser Foot Applications
| Sewing Task | Best Choice: Walking Foot | Best Choice: Standard Foot |
|---|---|---|
| General Seaming | Bulky layers (e.g., denim flat-felled seams). | Most single-layer or simple two-layer seams on woven fabrics like cotton. |
| Quilting | Straight-line quilting, stitch-in-the-ditch, attaching binding. | Free-motion quilting (requires a darning or free-motion foot). |
| Topstitching | On thick layers, quilts, or spongy fabrics to prevent puckering. | On most garments where layers are stable and not prone to shifting. |
| Pattern Matching | Absolutely. Essential for plaids, stripes, and large prints. | Not recommended; layers will likely shift and misalign. |
| Knit and Stretch Fabric | A must-have for preventing wavy seams and stretching. | Only with careful technique (like using tissue paper) or for very stable knits. |
| Delicate/Slippery Fabric | Excellent for controlling silks, chiffon, and satin to prevent shifting. | Can cause slipping and puckering; requires very careful handling. |
| Vinyl/Leather | The best choice to prevent sticking and ensure even feeding. | Not ideal; fabric will stick. A non-stick or roller foot is a better alternative. |
Ultimately, the standard foot is your workhorse for everyday sewing on well-behaved fabrics. But the moment you introduce multiple layers, slippery textures, or stretchy materials, the walking foot becomes your most valuable player, ensuring every stitch is as perfect as the last.
Walking Foot or Dual Feed System: What Is the Difference?
When you start diving into the world of sewing machines, you'll quickly hear people talk about "walking feet" and "dual feed systems." They both tackle the same problem, but they go about it in completely different ways. Knowing the difference is a game-changer when you're picking a machine that'll keep up with your creative ambitions.
A walking foot is a separate, attachable presser foot. It’s a bit bulky, but it's a workhorse accessory you snap onto your machine when a project calls for it. A dual feed system, on the other hand, is built right into the guts of the machine, always there and ready to go with the flip of a switch.
Here’s a good way to think about it: a walking foot is like putting snow chains on your tires. You add them when you hit a slippery patch, and they give you incredible traction. A dual feed system is more like having a car with built-in all-wheel drive—it’s always part of the machine, working seamlessly in the background.
Attachments vs. Integrated Systems
So, which one's better? Honestly, it comes down to what you sew. A walking foot is a fantastic, affordable way to give just about any sewing machine serious feeding power. For quilters or anyone wrestling with tricky fabrics now and then, it’s the perfect solution.
But, you'll often find that the integrated systems pack more of a punch. Big names like Pfaff, with their famous IDT System, and Janome, with their AcuFeed system, have engineered these to be incredibly powerful. They can muscle through thicker layers with less fuss and give you a better view of the needle since they aren't as clunky as an external foot.
At bsewinn.com, we are committed to empowering you with real knowledge. We believe that understanding your tools—from a simple presser foot to a high-end machine feature—is what helps you pick the right gear for your passion projects. That's why we offer extensive resources and training to support you.
The technology isn't all the same, either. Most walking feet work with a simple lever that rides on the needle bar. But some premier systems found in high-end machines offer something called differential feeding. This lets you tweak the speed of the top and bottom feed dogs independently, giving you unmatched control over stretchy or spongy fabrics that love to shift around. You can learn more about the nitty-gritty from an expert take on advanced walking foot technology on sewingmachineman.substack.com.
Making the Right Choice for Your Sewing
At the end of the day, deciding between a walking foot and a built-in dual feed system really boils down to your budget, your main sewing focus, and what feels most convenient to you.
- Walking Foot (Attachment): This is the more affordable route. It's compatible with a huge range of machines and works beautifully for most quilting and fabric-wrangling tasks. It’s perfect if you only occasionally need that extra feeding power.
- Dual Feed (Integrated): This is a premium feature, so it comes with a higher price tag. But for sewists who constantly tackle quilts, bags, or tricky garments, the superior power, convenience, and better visibility are absolutely worth it.
Both options will stop your fabric layers from sliding around. Your choice just depends on how often you need that help and the level of performance you're looking for. To get a better feel for all the different feet out there, be sure to check out our comprehensive sewing machine feet guide.
Getting Your Walking Foot Set Up and Ready to Sew
Alright, you know what a walking foot is for, so let's get that bad boy on your machine. This "how-to" section will walk you through the process step-by-step. Once you do it a time or two, you’ll be swapping it out like a pro. This is your first real step toward taming those tricky fabrics and getting seams you can be proud of.
This is a great example of the kind of clear, empowering instruction you'll find in our bsewinn.com library of tutorials and online classes and resources. We are committed to giving you the skills to use your tools confidently, turning potential frustration into a moment of success.
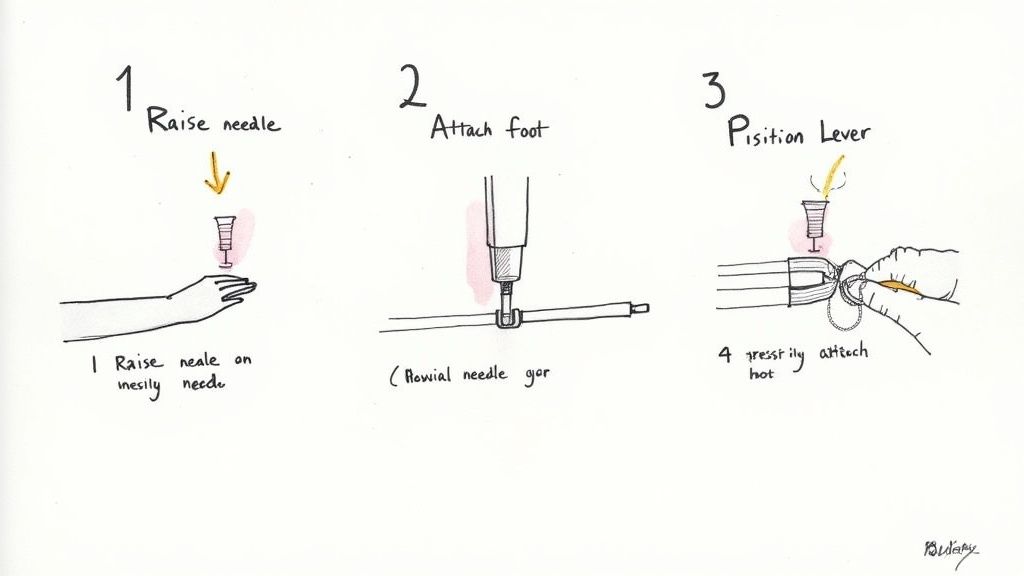
A Step-by-Step Guide to Installation
Getting this foot on correctly is absolutely essential. If it’s not attached right, you’ll get all sorts of grief—skipped stitches, weird clunking noises, or it just plain won't feed your fabric.
- Safety First: Please, please turn off your machine. The last thing you want is for it to jump to life while your fingers are in there.
- Needle Up: Use the handwheel (the big knob on the side) to crank the needle all the way to its highest point. This just gives you more room to maneuver.
- Off With the Old: Take off the presser foot you have on there now, and also unscrew the ankle it snaps onto. Your walking foot is a beefy one—it attaches straight to the presser bar itself.
- Attach the Walking Foot: You’ll see a C-shaped clamp on the walking foot. Slide that around the presser bar and tighten the screw so it’s snug and secure.
- Position the Lever: This is the most important part, so pay attention! That little fork or lever sticking out from the walking foot has to sit on top of the needle clamp screw. This is how the foot gets its power to "walk"—it's a direct connection to the needle's up-and-down motion.
A Few Pro-Tips for Perfect Stitches
Once the foot is on, take a second to tweak a couple of settings on your machine. It’s these little adjustments that really make a difference between "homemade" and "handmade."
“When you're ready to begin quilting, start in the center of your quilt. Roll up half of the quilt so it will fit through the throat of the machine and stitch your first line down the center. Continue to quilt, working outward.”
This is fantastic advice from seasoned quilters. It keeps your quilt from getting all bunchy and puckered by pushing any extra fabric out toward the edges instead of trapping it in the middle.
- Lengthen Your Stitch: Especially for quilting and topstitching, a longer stitch just looks better. It’s cleaner and more professional. Try a setting somewhere between 3.0 mm and 4.0 mm to start.
- Check Your Tension: When you’re sewing through a thick quilt sandwich (top, batting, and backing), you might need to ease up on your top tension a bit. Always do a test run on a scrap piece to get it just right.
- Keep It Simple: A walking foot is built for one thing: moving forward. Don’t try to use fancy decorative stitches that go backward or side-to-side. You could end up damaging the foot or, even worse, your machine.
Mastering these steps will have you getting amazing results every single time. And if you want an even deeper dive, we have a complete guide on how to use a walking foot that breaks down more advanced techniques.
Troubleshooting Common Walking Foot Problems
Let's be honest, even the most trusted sewing tools can have an off day. When your walking foot suddenly starts acting up, it’s usually not a big deal. More often than not, it's a simple fix that’ll get you back to your project in no time.
Think of these little hiccups as learning opportunities. Figuring out what went wrong builds your confidence and makes you a much more capable sewist.
One of the most common headaches is skipped stitches. Before you even think about rethreading your entire machine, check the basics. Is your needle fresh? A dull, bent, or incorrectly sized needle is the number one cause of skipped stitches. Also, take a peek at the walking foot itself—is that little fork-like lever sitting securely over the needle clamp screw? If it’s not making proper contact, it can’t do its job.
Another tell-tale sign of trouble is a loud, rhythmic clunk-clunk-clunk as you sew. This noise is almost always a dead giveaway that the foot wasn't installed quite right. That clunking is the sound of the lever hitting the needle clamp instead of resting gently on top of it. A quick reinstall, making sure that connection is snug and correct, usually silences the noise immediately.
At bsewinn.com, our goal is to empower you to solve these small hurdles on your own. Our extensive resources and online training are designed to make you the expert, turning troubleshooting into just another part of your creative process.
Quick Troubleshooting Checklist
If your stitches look wonky or your fabric layers are shifting, run through this quick mental checklist. The solution is often hiding in plain sight.
- Is the foot secure? Give the walking foot a gentle wiggle. If it feels loose, tighten the screw that holds it to the presser bar. A wobbly foot is an unhappy foot.
- Is your tension correct? When you're sewing through bulky layers, you might need to lower your top tension a bit. Always test on a scrap of your project fabric to find that perfect balance.
- Is the stitch length appropriate? For quilting, a longer stitch is your best friend. I usually go for something around 3.0-3.5 mm. Using a stitch length that’s too short can cause the fabric to pucker and bunch up.
Your Walking Foot Questions, Answered
Alright, let's wrap this up by tackling some of the most common questions I hear from sewists and quilters when they first get their hands on this amazing little attachment.
Can I Use a Walking Foot on Any Sewing Machine?
Most of the time, yes! The majority of modern, low-shank sewing machines will happily accept a generic walking foot. That said, it's always a smart move to double-check your machine's manual first. High-shank machines and some specialty models are a bit pickier and need a foot made just for them. Getting the right fit is everything—it's what makes the magic happen.
Why Is My Walking Foot So Noisy?
That loud, clunking sound is almost always a sign that something's not quite right with the installation. Nine times out of ten, it means the little C-shaped lever on the foot isn't sitting properly on the needle clamp screw. Just turn your machine off, take a deep breath, and reinstall the foot. Make absolutely sure that lever is hugging the screw securely.
Can I Sew in Reverse with a Walking Foot?
I really would not recommend it. A walking foot is built to march forward, and trying to backstitch can jam up the works, potentially causing damage to both the foot and your machine. If you need to lock your stitches, a much safer bet is to sew a few stitches with your stitch length set to zero. It does the same job without risking your gear.
Here at B-Sew Inn, we know that truly understanding your tools is the secret to unlocking your creativity. We are committed to empowering every crafter with our custom sewing machine designs and the support to master them. Whether you're looking for a new machine or want to sharpen your skills with our online classes and extensive training, we're here to support you on every step of your sewing adventure.
Come see our full lineup of sewing machines, accessories, and educational materials over at https://www.bsewinn.com.

