

A hobbyist sits at the sewing table with a tablet propped beside the machine, scrolling past botanical sprigs, abstract arches, clean lettering, and colorful jacket patches. One design looks perfect on screen, but a practical question soon appears: will it fit the hoop, hold its shape on denim, and stitch without turning a delicate line into a tangled knot?
That question sits at the heart of modern embroidery patterns. Modern isn't one fixed look. It's a family of styles built around simplified shapes, clean lines, restrained color, negative space, and personal meaning. The visual appeal matters, but the engineering matters just as much. A pattern's density, stitch direction, file format, and finished size determine whether the design works on a home embroidery machine.
Table of Contents
- What Modern Embroidery Patterns Actually Look Like
- Common Motifs and Visual Languages You Will Recognise
- From a Picture to a Stitch File
- Adapting and Combining Designs Without Losing the Look
- Three Ways to Source a Modern Pattern
- Matching the Pattern to Your Hoop, Thread, and Stabilizer
- Modern Embroidery for Repair, Reuse, and Upcycling
- Try a Pattern on a Real Machine
What Modern Embroidery Patterns Actually Look Like
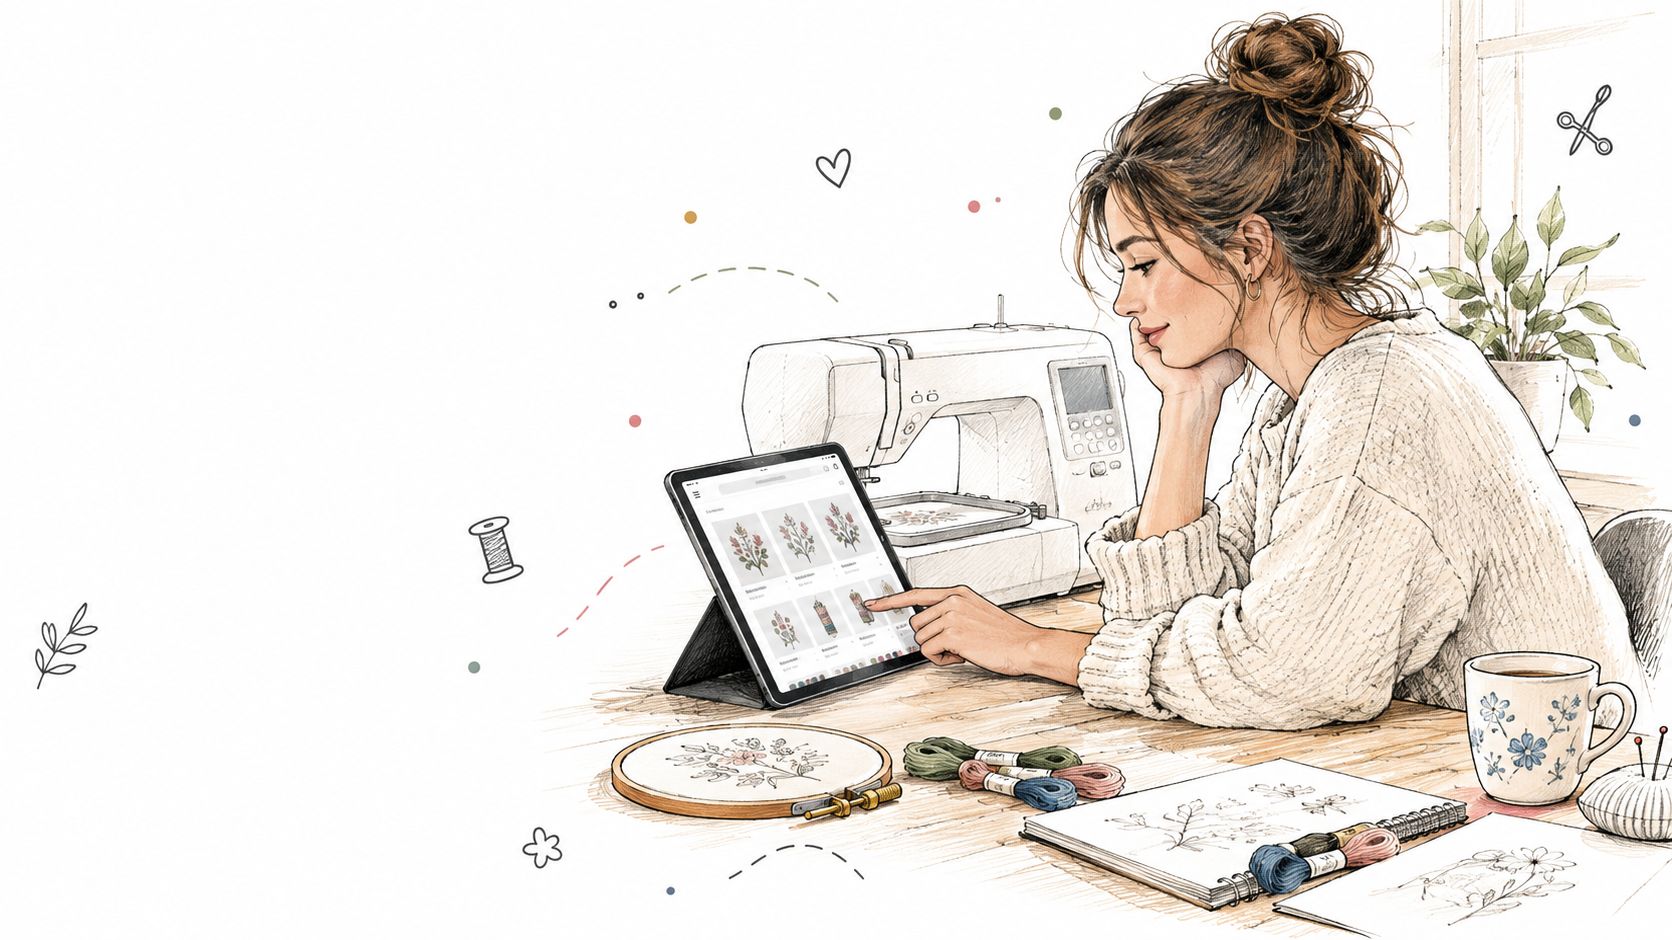
The sewist at that table might describe the traditional designs she grew up seeing as dense samplers, formal borders, and richly filled flowers. A modern pattern may show only one eucalyptus stem, an irregular geometric shape, a continuous-line face, or a short phrase surrounded by open fabric. The design feels lighter because the maker has chosen what to leave out.
That doesn't make modern embroidery less meaningful. A small botanical on a pocket can mark a favorite place. A simple moon can suit a child's sweatshirt. A deliberately visible repair can turn a worn elbow into the most personal part of a garment.
The category also reflects a long change in production. A 2017 study of embroidery production in southwestern Nigeria reported that 78.72% of 235 surveyed practitioners used machine embroidery, while 21.28% still used hand embroidery. The same study records that Josué Heilmann developed an early hand-embroidery machine in 1828, marking a transition toward mechanised production. The findings are documented in this study of embroidery production in southwestern Nigeria.
Practical rule: A modern look starts with visual restraint, but a successful result starts with a file and setup suited to the fabric.
A style family rather than a single trend
Modern patterns often share several traits:
- Clean contours: Outlines remain readable instead of being buried under dense fills.
- Simplified motifs: A flower may be reduced to a stem, a few leaves, and one curved petal.
- Limited palettes: Two or three thread colors can create a calm, graphic result.
- Useful negative space: Unstitched fabric becomes part of the composition.
- Personal placement: A motif may sit on a pocket, cuff, tote corner, or repaired seam.
A buyer's preferred style should guide machine choices. Monograms make lettering controls valuable. Broad jacket designs make a larger embroidery field useful. Satin stitching rewards good tension control and suitable stabilization. Anyone drawn to geometric layouts can find additional visual ideas in fabric geometric patterns, then consider how those shapes would translate into stitched outlines or fills.
Common Motifs and Visual Languages You Will Recognise
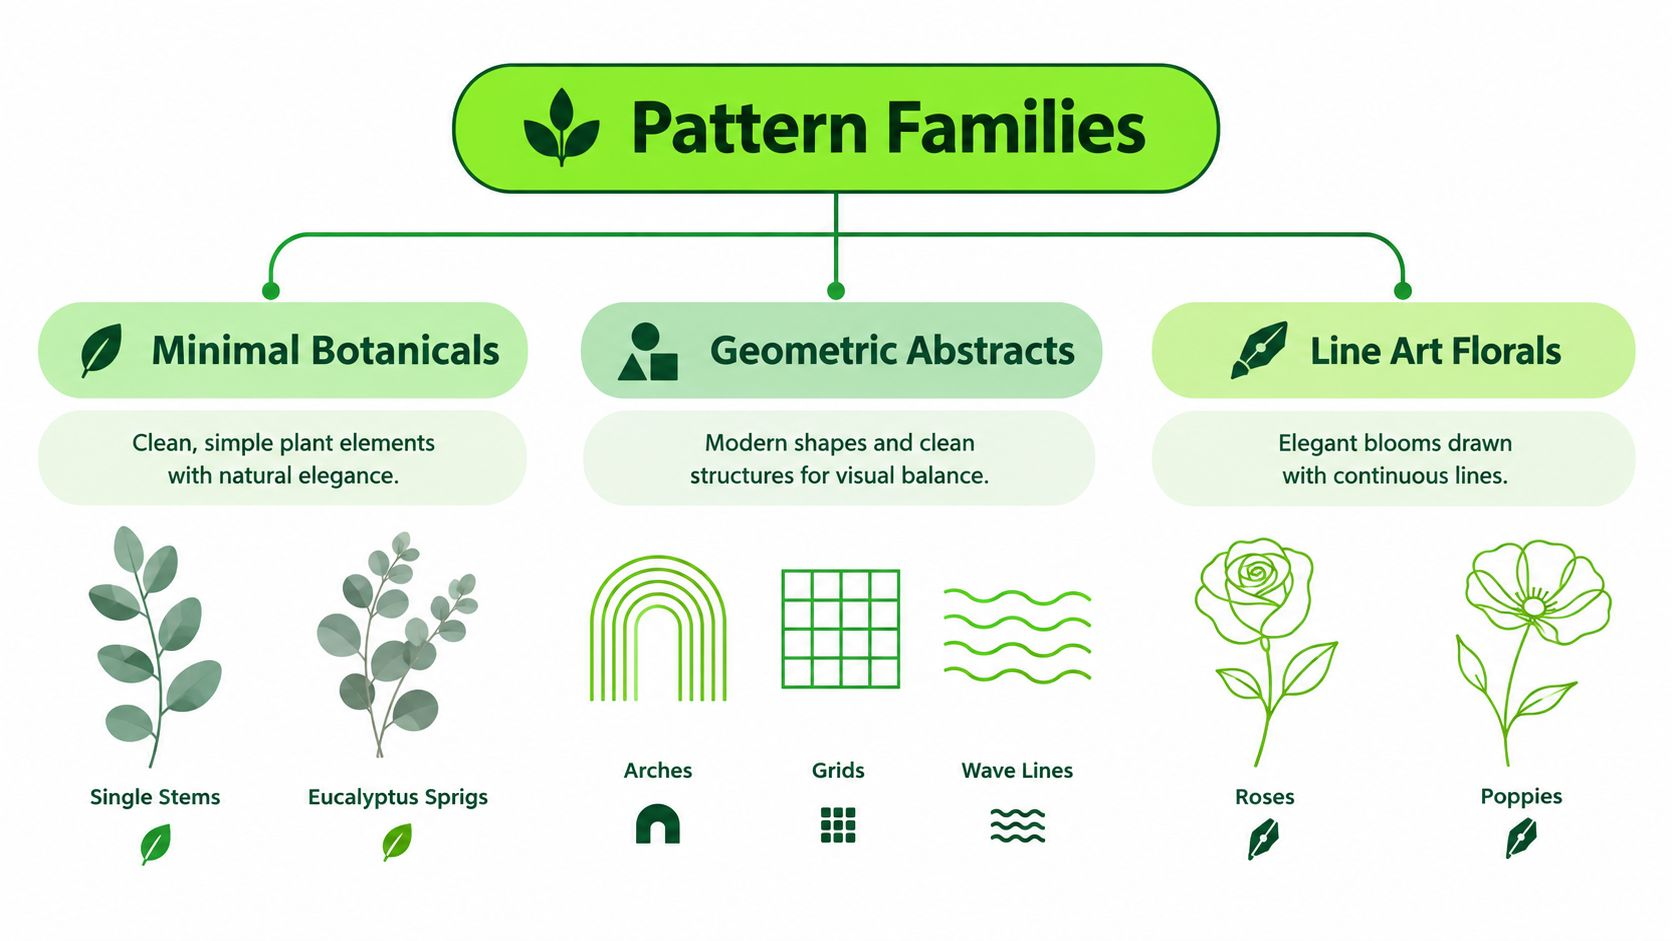
Pattern libraries become easier to browse once a maker can name the visual language in front of them. A few broad families cover much of what appears in contemporary embroidery.
Minimal botanicals
These designs use single stems, pressed-leaf silhouettes, eucalyptus sprigs, lavender, or a small poppy. They work well on linen napkins, shirt pockets, quilt labels, and light jackets. Their open structure usually leaves more fabric visible, so placement and registration become important.
Abstract geometry
Arches, squares, irregular grids, wave lines, and stacked curves create a graphic appearance without relying on a recognizable object. A geometric border can frame a tote, while a small series of arcs can decorate a sweatshirt cuff. The design may look simple, but sparse line art can reveal even a small alignment error.
Celestial and nature themes
Moons, mountains, oceans, clouds, stars, and sunbursts appeal to makers who want a symbol rather than a realistic picture. A crescent moon can become a quiet chest motif, while a mountain outline suits a canvas bag. Dense mountain scenes require more planning because layered fills can build considerable stitch coverage.
Monograms and letter-based designs
Initials, names, hand-lettered sayings, and small dates turn embroidery into a personal mark. These designs benefit from dependable lettering functions, clear satin columns, and a hoop that accommodates the intended text without forcing it into an awkward size.
Statement patches
Patches for denim jackets, backpacks, and totes often combine bold lettering with a botanical, animal, or abstract shape. A patch can also cover a damaged area, making the design both decorative and useful.
Modern composition uses negative space differently from a fully filled sampler. A line-art rose may contain only a few running stitches, while a patch may use a dense background to create a strong silhouette. Research published in 2025 analyzed 11,054 Qing Dynasty embroidery artifacts and described classification, feature extraction, vectorization, generation, and restoration as part of a modern digital workflow. A related study reported average classification accuracy of 0.97 for recognizing handmade embroidery patterns from images. The research on Qing Dynasty embroidery pattern relationships shows how visual motifs can become structured, searchable design information.
For broader visual planning, a maker might also browse vinyl wall décor for flowers to compare how floral shapes work in another decorative medium. The useful question remains the same: does the motif depend on open outlines, solid areas, or a deliberate balance between the two?
From a Picture to a Stitch File
A JPG or PNG can show a flower, but an embroidery machine can't stitch the picture merely because the picture exists. The machine follows an ordered path. A digitized file tells it where to move, when to pierce the fabric, which stitch to use, how long each stitch should be, and when to change thread.
What the file contains
Digitising software converts artwork into ordered stitch objects. Those objects can contain:
- Needle coordinates
- Stitch types
- Stitch lengths
- Stitch densities
- Stitch direction
- Underlay structures
- Color changes
- Machine commands
A raster image is made of pixels. To prepare it for embroidery, the artwork usually needs to be simplified, reduced in color, converted into editable vector or embroidery objects, and assigned stitch behavior. A tiny leaf detail that looks clear on a tablet may need to disappear or become a broader shape at embroidery scale.
Embroidery machines execute paths rather than interpret pixels.
The resulting design is exported in a machine-specific format such as PES, JEF, DST, or EXP. The correct extension depends on the machine and its supported files. A combination sewing and embroidery machine may accept one format while another platform requires a different one, so downloading a beautiful preview isn't enough.
A download checklist
Before purchasing or loading a design, a maker should check:
- Machine compatibility: Does the file match the machine brand and supported format?
- Finished dimensions: Does the design fit the intended hoop without splitting?
- Stitch information: Does the listing show size, stitch count, and color changes?
- Fabric suitability: Is the design intended for stable woven fabric, stretch material, denim, or another substrate?
- License terms: Can the finished item be sold if the project is for a small business?
A custom digitizing service may help when a logo or original drawing needs professional preparation. A general explanation of that workflow appears alongside embroidery digitizing services, which can help a maker understand what artwork preparation involves before deciding whether to learn the process independently.
The guide to digitizing embroidery designs can also help clarify the difference between editing an image and building a stitch sequence. The distinction prevents a common disappointment: a file can be technically compatible yet poorly digitized, with crowded stitches, weak underlay, or sequencing that causes distortion.
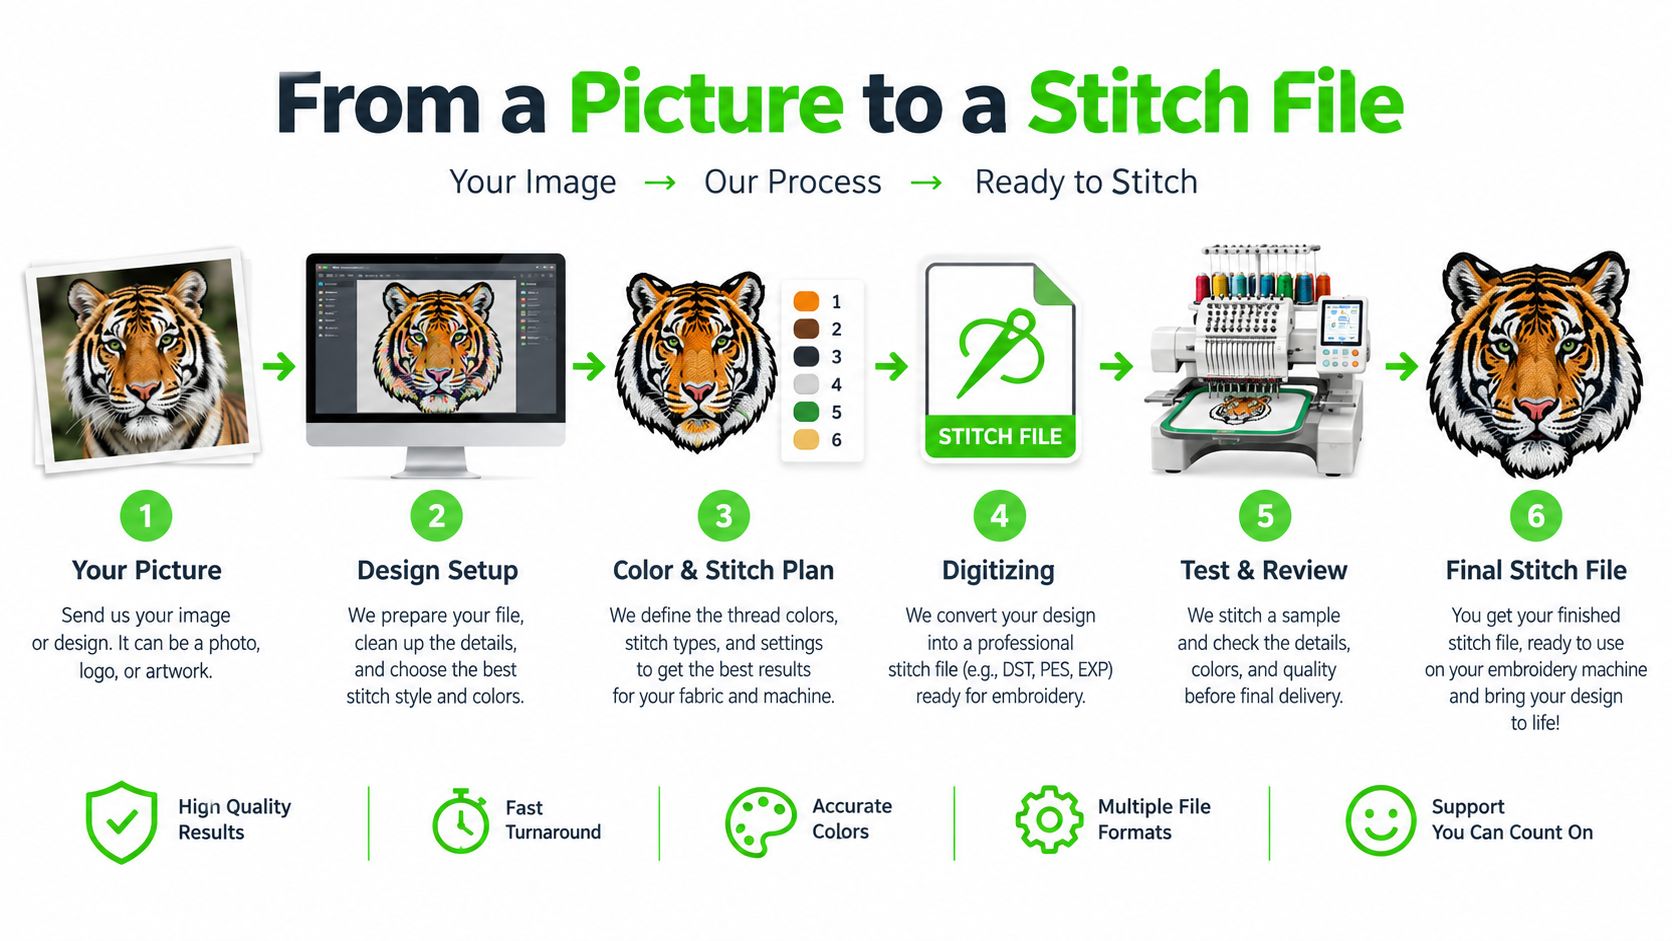
The file's quality becomes visible only when the machine stitches it on the intended fabric. A preview can't reveal every tension, registration, or puckering problem.
Adapting and Combining Designs Without Losing the Look
A purchased design doesn't have to remain exactly as shown in its preview. Recoloring is the most approachable modification because it changes the thread plan without changing the underlying stitch geometry. A black line-art botanical can become deep green, rust, or navy. A bright patch can shift to a quiet palette that suits an existing jacket.
Combining designs requires more judgment. Two motifs may look compatible on screen but stitch with conflicting directions. Satin columns that reflect light one way can sit awkwardly beside a neighboring shape stitched in a different direction. Matching scale, spacing, and visual weight helps the combined layout feel intentional.
Start with small edits
A practical adaptation exercise uses one simple botanical:
- Scale it to fit a jacket pocket.
- Replace one bright thread with a muted shade.
- Change a second color to match the garment.
- Stitch the edited file on scrap fabric.
- Check the result before hooping the jacket.
The sample reveals more than the screen preview. It shows whether a fine stem remains visible, whether the color contrast is strong enough, and whether the fabric needs additional support. A maker can then adjust placement or color without risking the finished garment.
Keep cultural context in the design
Modern styling doesn't give permission to copy culturally specific symbols without context. Inspiration can come from a general visual quality, such as repeating leaves, balanced borders, or a restrained palette. Copying a distinctive heritage motif while removing its meaning or attribution is a different act.
A respectful approach includes research, credit, and attention to the community connected to the design. One useful personal test is simple: would the maker feel comfortable wearing the adapted symbol in front of the source community and explaining where it came from?
A 2025 PubMed-indexed study proposed the Sustainable Textile Repair through Indigenous Embroidery method. Its structure includes defect assessment, artisan engagement, repair execution, and quality assurance, showing how contemporary embroidery can support cultural respect and garment longevity rather than focusing only on new blanks. The study on sustainable textile repair through Indigenous embroidery gives repair work a framework that joins technical decisions with human relationships.
Three Ways to Source a Modern Pattern
A maker usually reaches a modern design through one of three routes. The right route depends on how quickly the project needs to start, how much control the maker wants, and whether the machine will stitch a ready-made file or a newly digitized design.
| Path | Typical cost | Time to first stitch | Skill level | Best for |
|---|---|---|---|---|
| Ready-made file | Lower purchase commitment | Short | Beginner to intermediate | A hobbyist who wants to stitch a tested style quickly |
| Licensed designer file | Varies by design and license | Moderate | Intermediate | A maker who needs a distinctive layout or permission for commercial work |
| Self-digitized artwork | Software and learning investment | Longer | Intermediate to advanced | A creative user who wants control over original artwork and stitch behavior |
Ready-made files
A ready-made file is the simplest starting point. The maker chooses a design, confirms the machine format, checks the hoop dimensions, and tests it on a fabric sample. This path suits a new machine owner who wants to practice hooping, stabilization, thread changes, and placement before learning digitizing.
The limitation is control. A ready-made file may not be editable beyond basic color changes or resizing, and excessive resizing can damage stitch quality.
Licensed designs
A licensed design can be useful for a small business, branded garments, or a specific visual identity. The key question isn't only whether the file looks right. The maker should read whether the license allows finished products for sale, alterations, or repeated production.
This route can provide more flexibility, but the maker still needs to verify the machine format, hoop size, fabric recommendation, and stitch density. A license doesn't guarantee that a design will suit every substrate.
Self-digitized artwork
Self-digitizing offers the greatest creative control. The maker can decide which lines become running stitches, which areas become fills, how colors change, and how the design travels through the hoop. The learning curve is steeper because a good result requires more than tracing an image.
A class can shorten the trial-and-error stage by demonstrating file preparation, underlay, sequencing, and test stitching in person. B-Sew Inn offers machines, embroidery designs, thread, stabilizer, notions, and in-person classes, so a maker can connect the pattern decision with the equipment needed to stitch it.
Matching the Pattern to Your Hoop, Thread, and Stabilizer
A modern pattern can look minimal and still be technically demanding. The setup determines whether an open botanical stays crisp, whether lettering holds its edges, and whether a dense patch pulls the fabric out of shape.
Start with the embroidery field
The embroidery field is the largest continuous area the machine can stitch without repositioning the project. It isn't the same as the machine's physical footprint. Janome documentation for one embroidery-machine platform lists hoops measuring 14 by 14 cm, 14 by 20 cm, and 20 by 20 cm. These dimensions are detailed in the Janome machine documentation.
A small hoop can suit pocket motifs and monograms. A larger field makes broad lettering, borders, and jacket designs more practical. If a pattern exceeds the hoop, the design may need multiple hoopings and careful alignment.
Buying checkpoint: Choose the maximum hoop size according to the projects the maker expects to stitch, not according to the machine's outside dimensions.
Select support according to the fabric
Stabilizer keeps the fabric from shifting as the needle repeatedly enters and leaves the surface. The wrong choice can produce puckering, tunneling, or a design that loses its shape after laundering.
- Cut-away stabilizer: A lasting support for knits and other stretchy fabrics.
- Tear-away stabilizer: A removable option for stable woven fabrics when a clean reverse matters.
- Water-soluble stabilizer: Useful when no stabilizer residue should remain, including stand-alone lace.
The machine embroidery supplies guide provides a useful shopping framework for stabilizer, thread, needles, and related notions.
Match needle and thread to the project
40-weight polyester embroidery thread is identified in BERNINA's embroidery guidance as the most commonly used embroidery thread. The same guidance recommends choosing a needle suited to both thread and fabric and replacing the needle for each project. The BERNINA embroidery workbook also specifies a size 11 needle for fine fabrics and a size 14 needle for medium- to heavy-weight fabrics.
A compact setup checklist belongs beside the machine:
- Hoop: Confirm the design fits the continuous embroidery field.
- Fabric: Identify stretch, weight, and surface stability.
- Stabilizer: Choose cut-away, tear-away, or water-soluble support.
- Needle: Match the size to the fabric and thread.
- Thread: Use an embroidery thread appropriate to the design.
- Sample: Stitch on the same fabric and stabilizer before production.
Modern Embroidery for Repair, Reuse, and Upcycling
A modern design doesn't need a new blank garment. Visible mending, patched elbows, repaired denim, and reworked canvas bags fit the current preference for objects that show care and history. A botanical patch over a worn area can look more considered than a brand-new decoration placed without a reason.
The first decision is whether the damaged fabric still has enough strength to hold stitches. A thin hole edge may need a patch or backing before embroidery. A stable denim area can support a denser design, while a stretchy knit needs permanent support and careful handling.
Choose the setup for the material
A maker should assess the garment before choosing the pattern:
- Denim: Stable areas can support a patch or outline, but thick seams may require a suitable needle and slower testing.
- Knits: Stretch changes during stitching, so cut-away stabilizer can provide lasting support.
- Canvas: A firm surface may accept stronger motifs, although thick layers still need a test.
- Lightweight fabric: Open line art and lighter coverage are often safer than dense fills that can distort the surface.
Stitch density should change with the substrate. A dense fill that works on firm denim may overwhelm a delicate garment. A sparse outline that looks elegant on linen may lack enough structure on a loosely woven surface.
The guide to transferring embroidery patterns can help a maker plan placement before stitching. A short sample also exposes problems with thread tension, needle choice, and stabilizer security.
A repair project with a clear finish line
A botanical patch over a worn elbow makes a manageable afternoon project. The maker can reinforce the weak area, choose a small leaf or stem design, test it on matching scrap, and stitch the repair with a thread color that either blends with the garment or announces the mending.
A visit to a B-Sew Inn store in Tulsa, Oklahoma City, Springfield, Humble, or Fayetteville gives a maker the opportunity to bring the garment and discuss needle, thread, and stabilizer choices with staff. The retailer carries machines and embroidery supplies from brands including Baby Lock, Bernina, Bernette, Brother, and Janome, along with thread, stabilizer, notions, and designs.
Try a Pattern on a Real Machine
Modern embroidery is a family of styles, from minimal botanicals and abstract geometry to lettering and visible repairs. The finished result depends on more than the artwork. The machine format, hoop field, stabilizer, thread, needle, stitch density, and fabric all need to agree.
A sensible next step is a hands-on test. A reader can visit a B-Sew Inn store in Tulsa OK, Oklahoma City OK, Springfield MO, Humble TX, or Fayetteville AR to see and try machines from Baby Lock, Bernina, Bernette, Brother, and Janome. In-person testing makes it easier to compare embroidery fields, threading, controls, and the feel of a machine before making a significant purchase.
The embroidery machine starter kit guide can help organize the first supplies. A maker can also browse embroidery designs, thread, stabilizer, and notions at the online store, then book an in-person class or machine mastery session for hands-on help with setup and digitizing.
The patterns are ready, the machines are ready, and the next move can be a short drive to a store or a single click to begin.
B-Sew Inn sells and services sewing, quilting, and embroidery machines from Baby Lock, Bernina, Bernette, Brother, and Janome, along with embroidery designs, thread, stabilizer, notions, and in-person classes. Visit B-Sew Inn to browse supplies, arrange service, book a class, or test a machine in a store before choosing the setup for modern embroidery patterns.

