

The quilt sandwich is under the needle, the regular presser foot is off, and the first stitches have already turned into tiny knots on the underside. That moment is familiar. Most beginners assume the tension dial is wrong, but free-motion quilting usually goes wrong earlier, when needle speed and hand movement fall out of sync.
A free-motion quilting foot doesn't feed the quilt for you. Once the feed dogs are lowered or covered, the quilter controls direction, pace, and stitch length by moving the quilt beneath the needle. The setup matters, but so does the rhythm. This guide explains how to use a free motion quilting foot, how to prepare a compatible machine, and how to diagnose stitch problems before changing tension.
Table of Contents
- Understanding the Free Motion Quilting Mindset
- Setting Up Your Machine for Free Motion Quilting
- Mastering Hand Movement and Stitch Length
- Troubleshooting Common Free Motion Quilting Issues
- Building Skills with Practice Patterns
- Next Steps for Your Free Motion Quilting Journey
Understanding the Free Motion Quilting Mindset
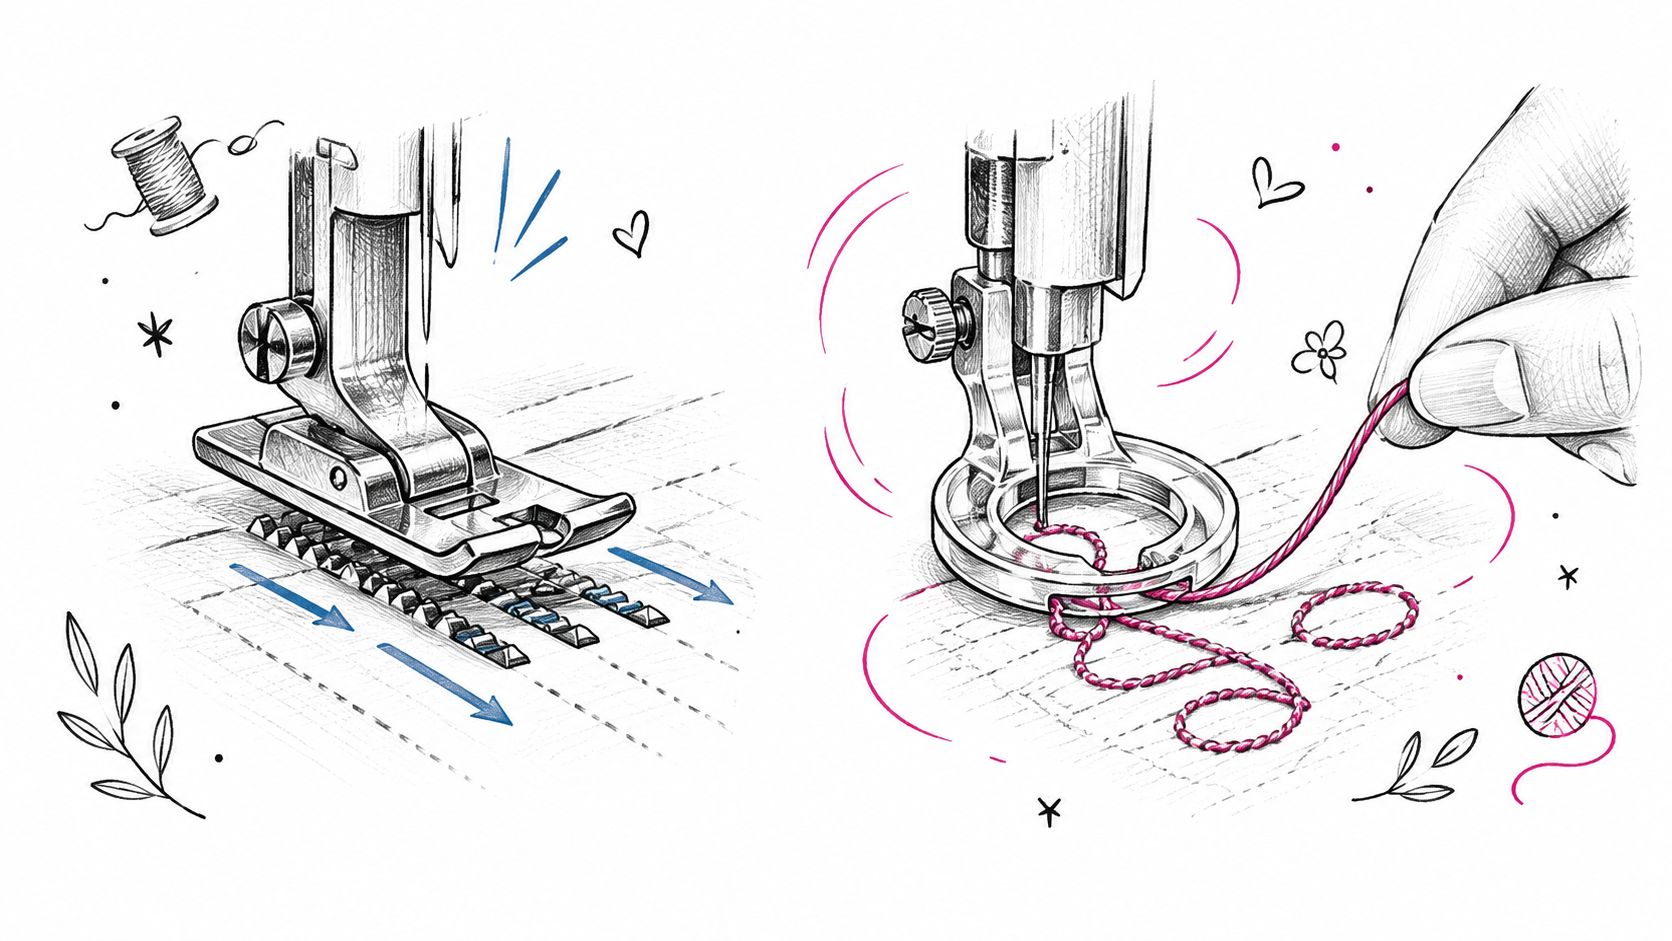
Regular sewing gives the fabric a predictable forward motion. The feed dogs grip the layers and advance them under the presser foot, while the operator mainly controls direction and seam placement. Free-motion quilting reverses that relationship. With the feed dogs disengaged, the quilter becomes the feeding mechanism and moves the quilt sandwich manually in any direction.
That change feels awkward at first. A beginner may press the pedal, hesitate with both hands, then move the quilt suddenly to catch up. The needle keeps cycling during the pause, producing short stitches. When the hands lurch forward, the next stitches stretch out. The machine hasn't necessarily malfunctioned. The hands and needle have stopped working as one system.
The machine becomes a drawing tool
The needle moves up and down, while the quilt moves beneath it. Straight lines, curves, stippling, spirals, and feathers come from the path created by the operator's hands. A conventional machine foot can hold the layers down, but it can't provide the clearance and movement needed for this technique.
A free-motion, darning, or quilting foot usually has a rounded or open toe that sits just above the quilt surface. That opening improves visibility and gives the sandwich room to travel sideways, backward, or around a curve. Foot styles vary by machine, so a foot that fits one shank or attachment system may not fit another.
Practical rule: Treat the first practice sample as a coordination exercise, not a test of artistic talent.
The earliest known machine-sewn quilt identified in a historical study was a crib-size quilt made in 1879 by Joseph Granger of Worcester, Massachusetts. That history matters because the central idea hasn't changed. Conventional quilting relies on controlled fabric feeding, while free-motion work transfers directional control to the quilter. A useful introduction to the broader technique appears in B-Sew Inn's guide to free-motion quilting.
Setting Up Your Machine for Free Motion Quilting
Correct setup prevents many problems that later get blamed on thread tension. Before touching the finished quilt, prepare a practice sandwich from the same fabric, batting, backing, needle, and thread planned for the project. The test piece should behave like the quilt itself, especially if the layers are thick or have an uneven surface.
Prepare the machine and foot
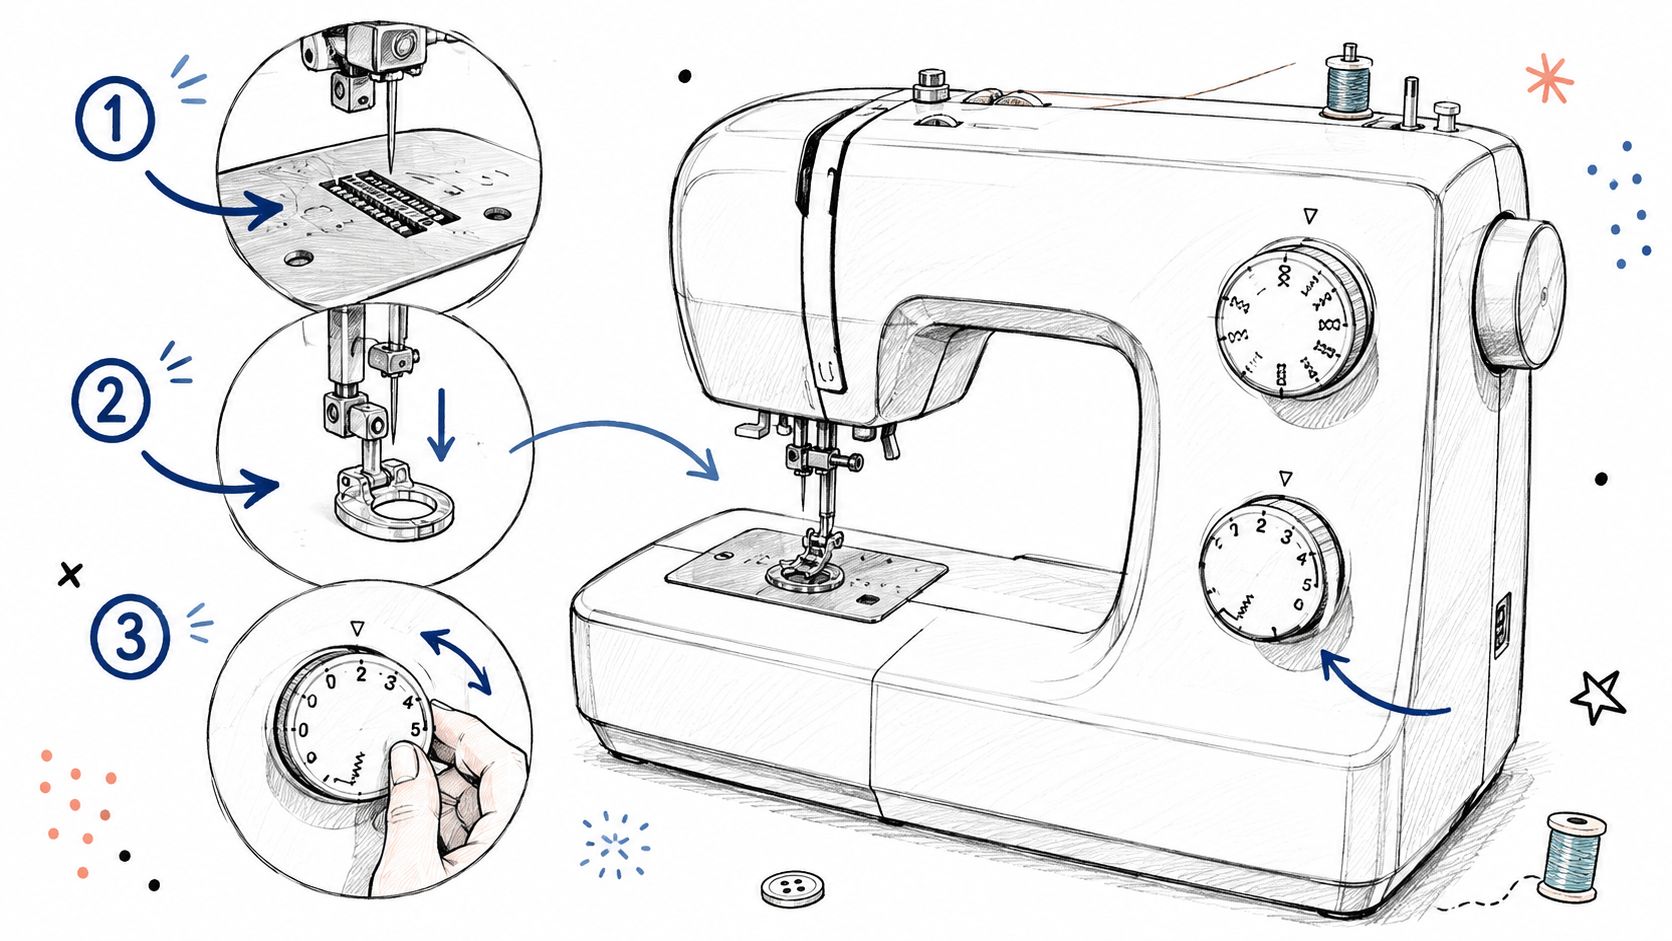
- Raise the needle completely. Turn the handwheel toward the operator until the needle reaches its highest position. This gives the foot attachment room and reduces the chance of striking the needle during installation.
- Remove the regular presser foot. Install a compatible spring-loaded, preferably open-toe, free-motion or darning foot. The foot must match the machine's shank and attachment system. Some machines use a hopping foot, while others use a foot that hovers close to the quilt surface.
- Check the alignment. On compatible machines, the foot holder or hopping bar must align correctly with the needle bar. The needle must pass through the opening without touching the foot, holder, or needle plate. Turn the handwheel through a complete stitch cycle before sewing.
- Lower or cover the feed dogs. Brother's machine documentation describes lowering the feed dogs, attaching the optional quilting foot, and aligning its pin over the needle-clamp screw before tightening the holder. Older machines may require a separate cover plate instead of a lever or button.
- Select a straight stitch. If the machine requires a stitch-length setting, use zero or the lowest available setting. With the feed dogs disengaged, the setting doesn't determine feeding. Hand movement and needle speed create the stitch length.
- Thread carefully. Use a fresh needle suited to the thread weight, thread the upper path and bobbin correctly, and bring the bobbin thread to the quilt surface. Hold both thread tails for the first few stitches, then secure them with short stitches or bury them later.
Set clearance without guessing
Lower the presser foot and slide the practice sandwich beneath it. The layers should move smoothly with both hands, without bouncing, dragging, or catching. Excessive height can reduce control and contribute to skipped stitches or thread breaks, while insufficient clearance can restrict movement.
A simple model-neutral check is to keep the foot close enough to control the quilt while allowing the sandwich to pass freely through a complete needle cycle. If the machine uses a spring-loaded foot, verify that its movement is appropriate for the quilt thickness. Always consult the machine manual before modifying foot height or installing a generic attachment. More height isn't automatically better.
For additional background on pressure and fabric movement, use B-Sew Inn's guide to adjusting presser-foot pressure. The exact control and compatible foot depend on the machine, so model-specific instructions take priority over general settings.
Mastering Hand Movement and Stitch Length
Free-motion stitch length comes from a relationship, not a dial. When the needle cycles at a steady rate, moving the quilt faster creates longer stitches. Moving it more slowly creates shorter stitches. If the machine runs quickly while the hands barely move, stitches may become tiny and form thread nests. If the hands rush ahead, stitches become elongated and needle deflection or thread breakage becomes more likely.
A Janome manual gives a practical learning benchmark of no more than 3 millimeters, or one-eighth inch, per stitch. That isn't a rigid rule for every motif, but it gives beginners a physical reference for a controlled, even rhythm. A production-oriented guideline places a common target around 2.0 to 2.5 millimeters per stitch, or about 10 stitches per inch, while allowing variation for motif scale and batting thickness. The free-motion quilting procedure published by the Art Quilt Association also connects stitch size to coordinated machine and hand movement.
Build a steady rhythm
Start at a slow or moderate machine speed. The goal isn't to crawl so slowly that each stitch becomes a separate decision. A steady pedal sound gives the hands a consistent needle rhythm to follow. Repeatedly starting and stopping makes coordination harder because the hands must reset after every pause.
Begin with a straight line on the practice sandwich. Move the quilt at a calm, continuous pace and watch the stitches rather than the needle. Then make gentle waves, keeping the machine speed unchanged. If the waves produce short stitches at the crest and long stitches in the valleys, the hands are changing speed even if the pedal feels steady.
The cleanest stitches usually come from a consistent rhythm, not from the fastest possible machine setting.
For a useful comparison, sew one line while moving the quilt slowly, a second with a faster hand movement, and a third after reducing the machine's maximum speed. The contrast makes the cause visible. If the machine lacks speed control, use lighter pedal pressure, a more gradual pedal stroke, or a machine with a more manageable speed response.
An electronic stitch regulator can help some quilters coordinate movement, but it changes the equipment decision and doesn't replace hand control. Readers comparing machine features can review B-Sew Inn's information on stitch regulators for sewing machines. A regulator may assist consistency, while a standard free-motion setup teaches the underlying relationship directly.
Troubleshooting Common Free Motion Quilting Issues
The tension dial is often the first control beginners reach for. It shouldn't be. Stitch problems frequently begin with movement, foot installation, threading, or needle condition. Change one variable at a time, and test each adjustment on the practice sandwich.
Use this diagnostic order
- Uneven stitch length: Listen to the pedal and watch the quilt movement. Tiny stitches mean the needle is cycling while the hands move too slowly. Long stitches mean the hands are moving too quickly for the needle speed. Adjust only one of those motions first.
- Thread nests underneath: Stop with the needle up and check that the presser foot was lowered before sewing. Confirm that both thread tails were held for the opening stitches, then inspect upper threading, bobbin insertion, and hand speed. A fast machine with a nearly stationary quilt can create dense stitches and nesting.
- Skipped stitches: Check that the foot clears the sandwich through a full stitch cycle, the hopping bar aligns correctly, and the needle is fresh and appropriate for the thread. Reduce foot height or sewing speed if the setup allows it. A straight-stitch plate may also help when the machine supports one.
- Thread loops on either side: Keep the upper tension near the machine's normal piecing setting while testing. Balanced tension leaves no obvious bobbin thread on top and doesn't pull the upper thread excessively to the underside. Make gradual changes only after movement and threading have been checked.
- Thread breakage: Reduce abrupt hand movement, loosen an overly tight grip, and inspect the needle for damage. A quilt held too firmly creates drag, while a foot that catches the sandwich can interrupt the stitch cycle.
Lowering the presser foot matters because an incompletely lowered foot can produce poor tension and irregular fabric control. Keep both hands on either side of the needle, supporting the quilt without stretching it. The B-Sew Inn troubleshooting guide can support broader machine checks when the practice sample still fails after the free-motion setup has been verified.
Inspect both faces before changing settings
Quilt several inches of the intended motif, then turn the sample over. Reject the setup if stitch length varies visibly, loops form on either face, or the foot catches the quilt. Correct speed coordination first, then hand pressure, needle and thread choice, foot installation, and tension. That order keeps the diagnosis clean and prevents a series of unrelated adjustments from hiding the original cause.
Building Skills with Practice Patterns
A practice sandwich should match the finished quilt as closely as possible. The same batting, backing, top fabric, needle, thread, and foot reveal problems that a lightweight scrap won't show. A small sample also gives the quilter a manageable surface, so hand movement can stay relaxed rather than fighting a large rolled quilt.
Follow a gradual pattern sequence
Start with straight lines spaced comfortably apart. Focus on keeping the pedal sound even and the quilt moving continuously. The line doesn't need to be perfectly straight. It needs to show whether the stitch rhythm stays consistent.
Move next to gentle arcs and waves. These patterns expose hesitation because the hands must change direction without stopping. After that, practice spirals and meanders, keeping the spacing deliberate and avoiding tight corners until the machine speed feels predictable.
Stippling comes after those basic movements. It combines curves, direction changes, spacing, and continuous motion. A dedicated explanation of stippling for quilting from B-Sew Inn can help with the design concept, but the physical skill still develops on the machine.
Keep the practice controlled
Use the same sample to compare one change at a time. Try a slower machine speed without changing hand movement, then try the original speed with a slower hand pace. Examine both sides after each test. This makes it easier to identify whether a problem comes from coordination, foot clearance, thread choice, or tension.
Practice with both hands supporting the quilt on either side of the needle. Keep the surface taut enough to prevent folds, but don't stretch the layers. Quilting gloves, a larger flat support surface, and a smooth table extension can make handling more comfortable, particularly as the quilt grows. These accessories improve control, but they can't correct an inconsistent rhythm.
Before quilting the finished piece, make one final test using the intended motif. If the stitches look even, the thread remains balanced, and the foot travels without catching, the setup is ready. If not, return to the last variable changed instead of assuming the finished quilt will behave differently.
Next Steps for Your Free Motion Quilting Journey
Free-motion quilting becomes easier when the equipment matches the quilter's habits. A machine with controllable speed can help a beginner establish rhythm. An open-toe foot improves visibility. A spring-loaded foot may suit uneven thicknesses, while a hovering foot may provide smooth movement across a more consistent sandwich. Needle size, thread weight, batting, and foot clearance must be evaluated as a group.
That combination is difficult to judge from a product listing alone. At an in-person store, a quilter can place hands beneath the foot, check the clearance, test the pedal response, and ask whether a specific attachment fits the machine's shank. This matters when choosing among mechanical, computerized, serger, embroidery, or longarm equipment for a growing sewing room.
B-Sew Inn is an authorized sewing, quilting and embroidery machine dealer with retail stores in Tulsa OK, Oklahoma City OK, Springfield MO, Humble TX, and Fayetteville AR, plus an online store at bsewinn.com. The company sells and services machines from Baby Lock, Bernina, Bernette, Brother, and Janome, along with sergers, longarm quilting machines, embroidery designs, thread, stabilizer, notions, cabinets, and cutting tables. B-Sew Inn doesn't manufacture machines or create custom machine designs.
In-person classes and machine mastery sessions give quilters a chance to receive hands-on guidance while practicing with different machines and feet. Service, repair, and trade-in support also become useful when a machine needs model-specific attention or a quilter is ready to change equipment. Readers can see, test, and try machines at stores in Oklahoma, Missouri, Texas, and Arkansas before making a significant purchase.
Visit B-Sew Inn to browse compatible free-motion feet, needles, thread, and quilting notions, then contact a store about an in-person class or machine mastery session. Bring a practice sandwich if possible, so the staff can help assess foot clearance, pedal control, and stitch quality before a purchase or service appointment.

