

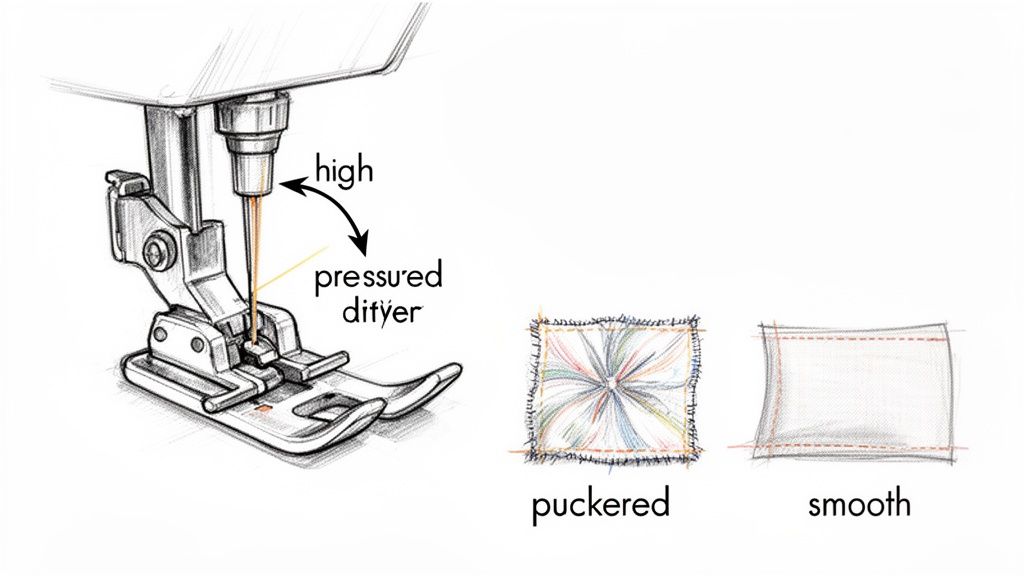
Ever wonder why your stitches look flawless on one fabric but turn into a puckered, stretched-out mess on another? The answer usually isn't your tension. It's one of the most overlooked settings on your sewing machine: the presser foot pressure.
Finding and adjusting this control—it might be a dial, a screw, or a setting in a digital menu—is the real secret to how your fabric feeds under the needle. A quick turn to a higher number adds more pressure, while a lower number eases it up. This single adjustment can stop fine materials from puckering and help bulky layers glide through smoothly, empowering you to create any design you can imagine.
The Secret to Perfect Stitches: Your Machine's Pressure Dial
Perfect stitches don't just happen. They're the result of a machine that's properly tuned for the specific fabric you're using. Presser foot pressure is the key to that perfect harmony, solving problems that even the most meticulous tension adjustments can't touch.
Here at B-Sew Inn, our passion is empowering crafters with the skills to bring their custom sewing machine designs to life. We know that mastering your machine is what truly unlocks your creativity. Think of this guide as a hands-on workshop, giving you the confidence to fix those frustrating issues yourself—from skipped stitches on slinky knits for a custom blouse to seams that jam up on a multi-layered denim tote bag. By the end, you'll see that little dial not as a complicated feature, but as your go-to tool for achieving beautiful, professional results on every single project.
Why This Setting Is Your Sewing Superpower
The default pressure on most machines is set to a "one-size-fits-most" level, which works okay for a basic piece of cotton. But we're not aiming for "okay," are we? We want seams that lay perfectly flat, stitches that don't wave, and fabric that feeds without a fight, whether we're quilting a family heirloom or sewing a child's first Halloween costume.
When you adjust the pressure, you're taking direct control of the relationship between the presser foot and the feed dogs. It’s all about balance.
- Too much pressure can be a disaster. It can crush the pile on delicate fabrics like velvet for a luxe throw pillow, leave ugly imprints on a silk scarf, or stretch out your knit fabric into wavy, distorted seams on a t-shirt.
- Too little pressure is just as bad. It lets the fabric "float" over the feed dogs, leading to skipped stitches, uneven stitch lengths, and a general feeling that you're wrestling with the material instead of guiding it.
Think of this adjustment as your first line of defense. It’s a proactive step that manages the fabric's behavior before it turns into a stitching nightmare.
The Most Underused Control on Your Machine
For all its power, the presser foot pressure dial is often ignored. I've talked to countless sewers who stick to the "auto" modes, never realizing what they're missing. It's backed by the numbers, too. Consumer surveys show that a staggering 60–70% of machine owners rarely, if ever, touch this control, even when jumping between projects as different as chiffon blouses and denim jackets.
But here’s the kicker: training data shows that once sewists are taught how to use it, over 80% report better results on problem fabrics just by tweaking the pressure. They didn't even have to touch their tension or change a needle! You can discover more insights about these common sewing habits and how to break them.
At B-Sew Inn, our whole mission is to empower you with the knowledge to use every single feature of your machine. Through our extensive resources, training, and online classes, we teach that understanding presser foot pressure isn't just a random tip; it's a fundamental skill that takes your sewing from looking homemade to truly handcrafted. It's the difference between fighting your fabric and dancing with it.
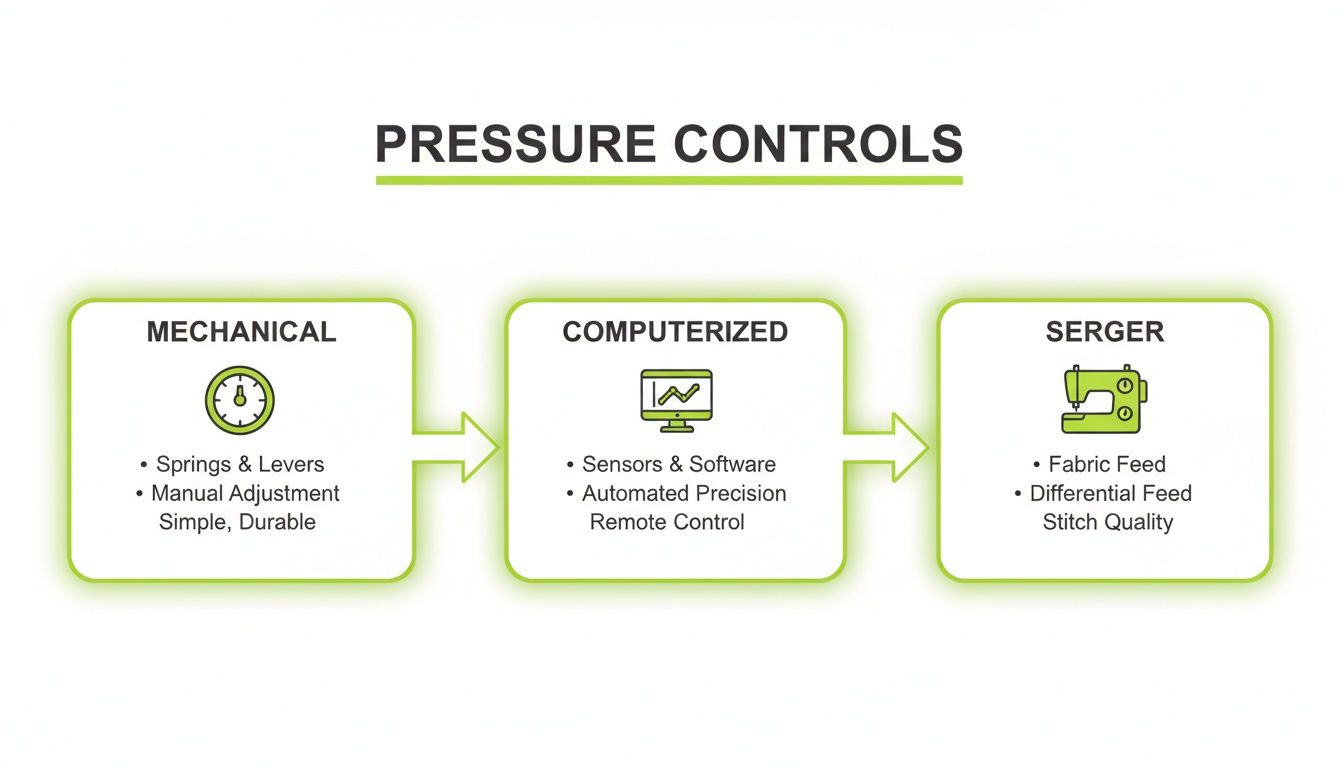
Finding the Pressure Controls on Any Sewing Machine
Ready to take control of your stitching? The first step is simply finding the control itself. Depending on your sewing machine's design and age, this critical feature might be a big, obvious dial, a subtle little screw, or even a setting tucked away in a digital menu.
Think of this section as your map. We'll walk through the different types of machines you'll find at B-Sew Inn, from classic mechanical workhorses to sleek computerized models and specialized sergers. I'll show you exactly where to look so you can start making adjustments with confidence.
Locating Controls on Mechanical Machines
On most traditional mechanical sewing machines, finding the pressure adjustment is usually pretty easy. Take a look at the top left side of your machine, right above the needle bar assembly. You're looking for a physical dial or knob.
This control is almost always marked with numbers or symbols. Generally, a higher number means more pressure, while a lower number means less pressure. Some older machines might have a simple screw instead—turn it clockwise for more pressure and counter-clockwise for less. It’s a very direct, hands-on way to feel how the foot interacts with your fabric.
If you're just getting started with these foundational features, our complete guide on sewing machine basics for beginners is a great resource to get you comfortable with all the essential parts of your machine.
Navigating Computerized and Digital Machines
Hop over to a modern computerized machine, like a feature-packed Baby Lock Brilliant, and you'll find the pressure control has gone digital. Instead of a physical dial, the adjustment is built right into the digital interface, usually on a touchscreen or accessed with navigation buttons.
Look for an icon that resembles a presser foot, often with a little arrow pointing down at it. When you tap that icon, it'll likely bring up a slider or a numeric control. From there, you can dial the pressure up or down digitally.
B-Sew Inn Pro Tip: The real magic of digital adjustments is their precision and repeatability. You can note a setting that works perfectly for your favorite t-shirt knit and come back to it every single time, which is a huge help for consistent results. Our B-Sew Inn online classes and training videos are packed with tips for exploring your machine's settings menu to unlock its most powerful features.
Understanding Serger and Coverstitch Controls
Sergers and overlockers play by their own rules. Their pressure controls are designed to work hand-in-hand with the differential feed—another key adjustment that stops stretchy fabrics from getting wavy or puckered.
You'll often find the pressure dial on top of the serger, much like on a mechanical machine. Getting this setting right is the secret to creating perfectly flat, professional seams on knits. When you dial back the pressure, you give the differential feed room to work its magic, letting it gently ease the fabric through without stretching it all out of shape.
Specialized Controls on Long-Arm Quilting Machines
Long-arm quilting machines are a different beast entirely, but foot pressure still plays a huge role, especially when dealing with a quilt's fluffy loft. On these machines, we talk about a "hopping foot," and its height adjustment is what controls the pressure.
Your goal is to set the foot so it just barely skims the surface of the quilt. This is a technique quilters call "setting the float."
- Foot too low? It will press down too hard, dragging on the quilt. This can cause frustrating skipped stitches or even thread breaks.
- Foot too high? The fabric layers can bounce around and shift (we call this "flagging"), which leads to messy, inconsistent stitches.
Finding that sweet spot is key. It ensures the needle can form a perfect stitch loop without fighting against the fabric. The adjustment is usually a screw or knob right on the hopping foot assembly. Mastering this is a cornerstone of achieving those beautiful, even quilting stitches you see on large projects.
Matching Pressure Settings to Your Fabric
Getting your presser foot pressure right isn't a "set it and forget it" kind of deal. It's more like a delicate dance between your machine and your material. The real goal is to apply just enough force to keep the fabric moving along smoothly, but not so much that you stretch, damage, or distort it. This is where you really start to feel in control of your machine, turning pretty good results into truly professional ones.
Think of it like the difference between holding a delicate wine glass and gripping a heavy brick. You’d never use the same amount of force, right? It's the exact same idea with sewing. Every fabric has its own personality, and learning to adjust the presser foot pressure is how you start speaking its language.
Feather-Light Pressure for Delicate Fabrics
When you're working with those beautiful, fine materials like silk, chiffon, organza, or charmeuse, a gentle touch is everything. Too much pressure will leave ugly tracks from the feed dogs, cause puckering along your seam line, or—worst-case scenario—snag the delicate fibers. It's a quick way to ruin expensive fabric for a custom formal dress or lingerie.
For these projects, you'll want to dial the pressure way down. Lightening the load lets the fabric glide effortlessly under the needle instead of being crushed or forced. This prevents the material from stretching out of shape and helps your stitches lay perfectly flat, preserving that gorgeous drape you bought the fabric for in the first place.
This quick-reference image shows you the most common places to find pressure controls, so you can easily spot the right dial or button on your own machine.
Whether you're on a mechanical, computerized, or serger model, this visual guide makes it simple to find what you're looking for.
Firm Pressure for Heavy-Duty Materials
Now, let's talk about the other end of the spectrum: the tough stuff. Think denim, canvas, wool, or multiple layers of quilting cotton. These materials need firm, confident pressure to keep all the layers moving together as one cohesive unit.
If the pressure is too light, the top layer can start to slip and slide around. That leads to mismatched seams, wonky stitches, and a whole lot of frustration when creating a sturdy tote bag or reupholstering a chair. By cranking up the pressure, you give the feed dogs a solid grip to consistently pull that bulky material through the machine. It’s absolutely essential for creating strong, durable seams that can actually handle some wear and tear.
At B-Sew Inn, we often see crafters struggling with thick seams on bags or jeans. The solution is rarely about forcing the fabric through. Instead, it's about increasing the presser foot pressure to give the machine the control it needs to do the work for you. Our online resources are full of examples showing how this simple change makes all the difference.
Navigating Tricky Textiles like Knits and Minky
Some fabrics just love to throw a curveball, and only a pressure adjustment can solve the puzzle. Stretchy knits and slippery minky are two perfect examples that can intimidate even seasoned sewists.
- Stretchy Knits: The number one complaint with knits is the dreaded wavy, "lettuce-edge" seam on a custom t-shirt or pair of leggings. This happens when the fabric gets stretched out as it’s being sewn. Reducing the presser foot pressure is the perfect fix! It stops the foot from pushing down too hard and distorting the material, giving you beautifully flat, professional-looking hems and seams.
- Slippery Minky or Velvet: These fabrics have a pile that likes to "creep" and shift all over the place when making a plush baby blanket. While a walking foot is an amazing tool here, adjusting your pressure is the first thing you should try. A slightly lower pressure setting can stop the foot from mashing the pile down, which is often what causes the layers to slide against each other.
The magic really happens when you combine the right pressure with the right tool. For a deeper look at pairing your project with the perfect accessory, check out our comprehensive sewing machine feet guide. Understanding how different feet distribute pressure can take your skills to a whole new level.
Recommended Presser Foot Pressure Settings by Fabric Type
Ready to take the guesswork out of it? This quick-reference guide is a fantastic starting point for finding the ideal pressure level for your project. These are our go-to recommendations here at B-Sew Inn to help you get started.
| Fabric Type | Common Projects | Recommended Pressure Level | Pro Tip from B-Sew Inn |
|---|---|---|---|
| Lightweight Fabrics (Silk, Chiffon, Voile) | Blouses, Linings, Scarves | Low (1-2) | Decrease pressure to prevent feed dog tracks and puckering. Use a fine needle. |
| Medium-Weight Fabrics (Cotton, Linen) | Quilts, Dresses, Shirts | Medium (3-4, default) | The standard setting works well for most projects. Adjust if you notice slight pulling. |
| Heavyweight Fabrics (Denim, Canvas) | Jeans, Bags, Upholstery | High (5-6) | Increase pressure to ensure all layers feed evenly without shifting. |
| Stretch & Knit Fabrics (Jersey, Spandex) | T-shirts, Leggings, Activewear | Low to Medium-Low (2-3) | Reduce pressure to prevent seams from becoming stretched-out and wavy. |
| Pile & Slippery Fabrics (Velvet, Minky) | Blankets, Stuffed Animals, Robes | Medium-Low (2-3) | Lower pressure prevents crushing the pile and helps manage fabric creep. |
| Sheer & Delicate Fabrics (Organza, Tulle) | Formalwear, Veils, Overlays | Very Low (1) | Use the lightest pressure possible to avoid snagging or damaging fragile fibers. |
Remember, these settings are a guide! Always, always test on a scrap piece of your actual project fabric first. Your specific fabric and thread combination might need a minor tweak to get it just right.
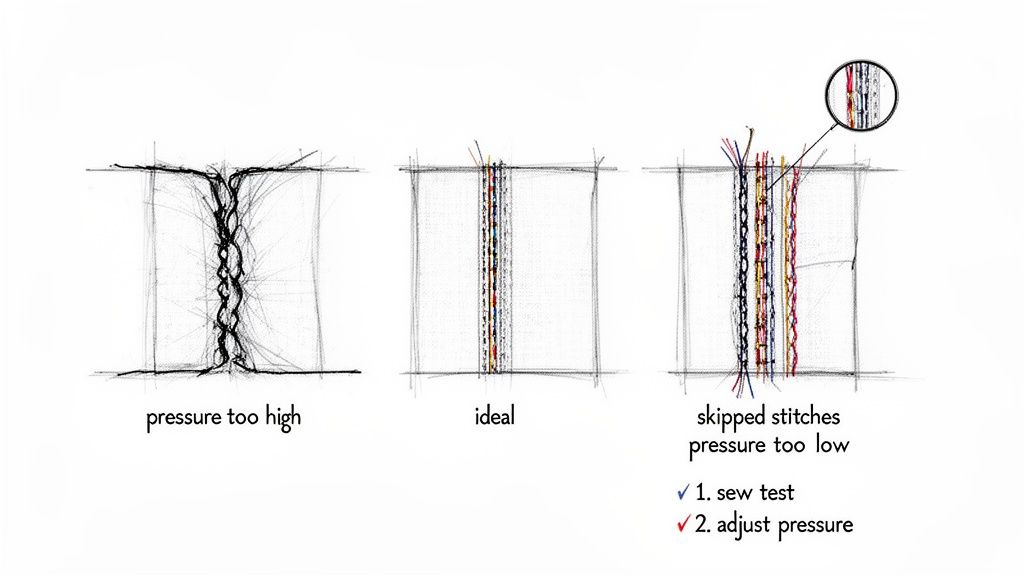
How to Test Your Settings for Perfect Results
Using a chart to guess your presser foot pressure is a decent start, but it's just that—a guess. The real proof is in the pudding, or in this case, on a scrap piece of your project fabric. This quick test is something we preach at B-Sew Inn because it lets you play detective and sort out any issues before you touch your actual project.
Honestly, learning to spot the clues in your stitches will save you hours of frustration and unpicking down the line. It's a skill that separates the beginners from the confident pros.
Your Two-Step Testing Method
The whole process is incredibly simple but makes a world of difference. All you need is a scrap of your fabric, folded over so it’s the same thickness as your final seam.
First up, just sew a test seam about four to six inches long. Make sure you’re using the same thread and needle you’ll be using for the real deal. I always recommend sewing a few straight lines and some gentle curves, because pressure problems love to show up when you're turning a corner.
Next, it’s time to play detective. Pull the scrap out and give it a good look, front and back. What are the fabric and stitches telling you? This is where you really learn how to adjust presser foot pressure for whatever you're working on.
Reading the Clues in Your Stitches
That little test scrap holds all the secrets. Once you know what to look for, making the right adjustment is a piece of cake.
Here are the usual suspects and how to fix them:
- Puckering and Tiny Stitches: If your fabric looks wavy or gathered along the seam and your stitches are weirdly small, your pressure is too high. The foot is practically strangling the fabric, so the feed dogs can't move it along properly.
- Skipped Stitches or Floating Fabric: Is your machine skipping stitches? Does the fabric feel like it’s just drifting under the foot? That means your pressure is too low. The feed dogs can't get a good enough grip to pull the material through evenly.
- Perfect, Flat Seams: If the stitches look great, the seam is lying flat, and there’s no stretching or puckering, you’ve nailed it. Your pressure is just right.
When you master this quick little test, you're doing more than just fixing a problem—you're getting to know your machine on a deeper level. That's what turns a hobbyist into a truly confident sewist, and it’s a mindset we encourage in every single B-Sew Inn class.
The Appliqué Pivot Test
Working on something with appliqué or sharp corners? There’s a special little test for that. It's called the "pivot test," and it's my go-to for making sure I get crisp, clean points every time when creating a custom quilt block or decorative patch.
Here's how you do it: lower your needle into the fabric right at a corner point, then lift the presser foot. Now, try to pivot the fabric. Does it turn easily? If so, you're golden. If you feel any drag or the fabric feels stuck, you’ll need to lighten the pressure a bit. This tiny check ensures you can create those sharp, professional-looking corners without a struggle.
Solving Common Stitching Problems with Pressure Adjustments
Have you ever been locked in a seemingly endless battle with your tension dial, absolutely convinced it's the root of all your sewing problems? It’s a classic frustration, but here's a little secret from years of experience: a lot of the time, the tension isn’t the real culprit. Many of the most stubborn stitching issues are actually presser foot pressure problems in disguise.
This is the kind of know-how we love sharing every day in our B-Sew Inn classes and online training. We help sewers reframe these common headaches to find the true—and often much simpler—solution. Once you learn to spot the signs, you'll save yourself so much time and frustration.
When Tiny Stitches Signal Too Much Pressure
Let’s set the scene: you're hemming a sturdy pair of jeans. Everything is going great until you hit that thick, folded side seam. Suddenly, your machine starts to complain. The stitches get tiny, almost sewing on top of each other, and the machine might even grind to a halt. The knee-jerk reaction is to mess with the tension, but the real issue here is way too much pressure.
The presser foot is clamping down so hard on that bulky seam that the feed dogs underneath can’t get a good grip to move the fabric along. The machine is trying its best, but the denim is pinned in place.
- The Problem: The foot’s intense grip is physically stopping the fabric from moving.
- The Solution: Just reduce the presser foot pressure. This lightens the load, letting the feed dogs do their job and pull those thick layers through smoothly, maintaining your stitch length.
It’s a simple fix that prevents skipped stitches, broken needles, and ensures your seams look consistent and professional, even over the bumpiest parts of a project.
Why Delicate Fabrics Jam at the Start
Now, let's flip the script. You're starting a seam on a beautiful, slippery piece of silk charmeuse for a bespoke camisole. The moment your foot touches the pedal, the fabric gets sucked right down into the needle plate, creating a tangled, jammed-up mess. This isn't your machine failing you; it's a classic case of overly aggressive pressure.
The default pressure setting on most machines is geared for medium-weight cottons, which is far too heavy-handed for fine materials. It literally shoves the delicate fabric down into the machine before the first stitch can even form properly. This is where knowing how to adjust presser foot pressure becomes a total game-changer.
By simply dialing down the pressure, you allow the fabric to glide smoothly over the needle plate instead of being forced into it. This one small tweak can completely eliminate those frustrating false starts on silks, chiffons, and other lightweight beauties.
This is an incredibly common issue that gets misdiagnosed all the time. In fact, dealer service departments often report that a huge chunk of what customers call “tension problems” are directly related to presser foot pressure. Service log analysis shows that in roughly 25–35% of cases involving wonky stitches or fabric jamming, the fix was a simple pressure adjustment, not a complicated mechanical repair.
The Connection Between Pressure and Tension
Understanding how pressure and tension work together is key. Think of them as a team working to create the perfect stitch. Tension controls the balance of your top and bobbin threads, but pressure is what controls how the fabric moves through that whole process.
If your pressure is off, no amount of fiddling with the tension dial will ever fully solve the problem. For instance, if you're sewing a knit and getting wavy, stretched-out seams, you might think your tension is too tight. More often than not, the real problem is too much presser foot pressure stretching the material as it feeds. For a deeper look at this partnership, check out our guide on sewing machine tension adjustment to see how these two settings are linked.
Learning to look at problems through the lens of pressure first will help you solve issues faster and get back to what you love—creating. It's a foundational skill that gives you the confidence to tackle any fabric that comes your way.
Your Presser Foot Pressure Questions, Answered
Even after you’ve got the basics down, questions about presser foot pressure always seem to pop up. It’s one of those sneaky settings that has a ripple effect on so many other parts of your sewing. Here at B-Sew Inn, our team gets asked about these tricky situations all the time, so we’ve put together some answers.
We'll dig into how different presser feet change the game, what to do if your machine doesn't have a pressure control dial, and—most importantly—when to stop fiddling and call in a pro.
Does My Choice of Presser Foot Affect the Pressure Setting?
Yes, absolutely! This is such a great question because it gets to the heart of how your machine really works.
Think of it this way: a wide, all-purpose foot spreads that downward force over a big surface area, kind of like wearing snowshoes. But a narrow zipper foot concentrates that exact same force onto a tiny spot, more like a stiletto heel. This means you might need to dial back the pressure a bit when using narrower feet, especially on delicate fabrics, to keep them from getting crushed or puckered.
So what about those specialty feet?
- A Walking Foot: This foot is a game-changer because it has its own feed dogs. Your machine's pressure setting still matters, but the walking foot does a ton of work to keep slippery or thick layers from shifting around. You'll still want to test on a scrap, but you'll find it's much more forgiving.
- An Open-Toe Foot: Perfect for appliqué, right? But that open design can sometimes catch on delicate fabrics if the pressure is cranked up too high. A slight decrease can smooth things out beautifully.
Our best advice at B-Sew Inn is simple: every time you switch your presser foot, take a second to run a test stitch on a scrap of your project fabric. It's a quick habit that guarantees the foot, fabric, and pressure are all playing nicely together.
What if My Machine Has No Pressure Adjustment Control?
Don't panic! Many fantastic entry-level or basic mechanical machines come with a preset or "auto-adjusting" pressure. While it simplifies things for beginners, it doesn't mean you're out of options when you run into a challenging fabric. You just have to be a little more creative.
Your best friend here is a specialty presser foot. These accessories are engineered to solve specific problems and can often do the work of a pressure dial.
For instance:
- A walking foot is practically essential for managing knits, velvets, or tricky plaids. It adds a top-feeding mechanism that syncs with the machine's feed dogs to move everything through evenly.
- A roller foot or a non-stick (Teflon) foot works wonders on sticky stuff like vinyl, leather, or laminated cotton. They let the fabric glide right under the needle instead of getting stuck.
If you’re consistently fighting your machine on different fabrics, it might just be a sign that your skills have outgrown its features. Our experts at B-Sew Inn would be happy to help you explore models, like those from the Baby Lock line, that offer this crucial feature and can grow with you.
When Do I Need a Professional Technician for a Pressure Issue?
Most of the time, pressure adjustments are simple fixes you can handle right at your sewing table. But there are definitely times when it's better to step away and call for backup. Knowing when to stop tinkering can save you from turning a small problem into a big, expensive one.
It’s time to call a certified technician, like our experienced team here at B-Sew Inn, if you spot any of these red flags:
- The dial spins freely or does nothing. If you turn the knob or change the setting on your screen but see zero difference in your stitches, the internal mechanism could be worn out or disconnected.
- The pressure seems stuck on high or low. Is your machine crushing every fabric or letting everything slip, no matter what you set it to? This could point to a problem with an internal spring or the regulating assembly itself.
- You hear grinding or weird clicking noises when you try to make an adjustment. That’s a clear sign something isn’t right inside.
These aren't user-serviceable issues and really need an expert's touch. Of course, regular machine maintenance can help prevent these problems from happening in the first place, and our service team is always ready to keep your machine humming along for years to come.
Ready to take your sewing to the next level with a machine that gives you total control? At B-Sew Inn, we offer a curated selection of sewing machines from top brands like Baby Lock, complete with the features you need to grow your skills. Explore our online classes, extensive resources, and expert support to unlock your full creative potential. Visit us online to find the perfect machine for your crafting journey.

