

So, you want to create your own embroidery designs? It’s an amazing feeling to take an idea—a simple drawing or a cool graphic—and turn it into a textured, threaded piece of art. The basic path is pretty straightforward: you dream up your art, digitize it into stitches with special software, and then test it out on your machine.
This guide is here to walk you through that entire journey, from the first spark of an idea to a gorgeous, finished stitch-out.
Your Guide to Creating Custom Embroidery Designs
Welcome to the incredibly rewarding world of digital embroidery! Whether you're a long-time crafter looking to add a new skill to your toolbox or you're just starting out, this comprehensive how-to guide will demystify the entire process, breaking down every step from concept to the final stitch.
Here at bsewinn.com, we are committed to empowering crafters by showcasing tangible examples you can replicate. We genuinely believe that every sewing enthusiast has a designer inside them, and our mission is to provide the support to bring your unique vision to life on fabric. With our extensive resources, online classes, and training, we’re here to help you succeed in creating your own custom sewing machine designs.
Why Learn Embroidery Digitizing Now?
Embroidery isn't just a cozy hobby anymore; it's a booming industry packed with creative and business opportunities. Thanks to modern technology, anyone can create professional-quality patterns right from home.
The numbers don't lie. The global embroidery market jumped from $2,572.16 million in 2021 and is expected to hit $3,712.1 million by 2025. That's a growth rate of about 9.6% per year! This tells us that designing for embroidery is a seriously in-demand skill, and there’s never been a better time to dive in.
The heart of it all is digitizing—the art of turning an image into a set of instructions your embroidery machine can read and follow. Think of yourself as a translator, telling the machine exactly where to put each stitch to bring your design to life.
Before we get into the nitty-gritty, let's look at the big picture. Creating an embroidery design is a multi-stage process, and understanding each phase helps you plan your project and troubleshoot any issues that pop up.
Core Stages of Embroidery Design Creation
| Stage | Key Objective | Essential Tools |
|---|---|---|
| Concept & Planning | Finalize your artwork, choose colors, and decide on the final size and placement. | Sketchbook, design software (like Adobe Illustrator), inspiration boards. |
| Digitizing | Convert the artwork into a stitch file using specialized embroidery software. | Embroidery digitizing software (e.g., Hatch, Embrilliance). |
| Stitch-Out & Testing | Run a test stitch on a scrap piece of the target fabric to check quality. | Embroidery machine, thread, stabilizer, fabric scraps. |
| Refinement | Adjust stitch settings, density, or pull compensation in the software and re-test. | Digitizing software, embroidery machine. |
Each step is crucial for getting that professional, polished look. Rushing the planning or skipping a test stitch-out is a recipe for frustration later on.
The real magic of custom embroidery isn't just in the final product, but in the power to create something truly unique that can't be found in any store. It’s about personalizing your world, one stitch at a time.
Once you get the hang of digitizing, a whole world of creativity opens up. You can start making things like:
- Personalized Gifts: Think one-of-a-kind presents for birthdays, weddings, and holidays.
- Custom Apparel: Design logos for hats and jackets or cool graphics for t-shirts.
- Home Decor: Embellish towels, pillows, and wall art with your own signature style.
- Small Business Ventures: Sell your digital design files or your finished embroidered goods online.
And these design skills can even branch out. If you're interested in other creative outlets, what you learn here can be a great foundation for learning how to design for print on demand. This guide is your starting point for unlocking all that potential.
Getting Your Artwork Ready for Stitches
Every great embroidery project starts long before a single thread is stitched. It all begins with your artwork. This first step is absolutely crucial and has a huge impact on the final quality. Think of it like a chef prepping ingredients before they start cooking; if you start with clean, well-chosen elements, you’re going to get a much better result. This is where you have to start thinking like a digitizer, making sure your creative vision can actually be translated into thread.
Embroidery isn't like printing. With printing, colors can blend and fade into each other seamlessly. But with embroidery, you're using solid threads to physically build an image. This means that the best designs are the ones with clear lines, distinct blocks of color, and a manageable level of detail. You've got to simplify your mindset, and in turn, simplify your art.
Picking the Right Kind of Artwork
The first big decision you'll make is whether to use vector or raster graphics. Understanding the difference here will save you hours of frustration down the road.
- Raster Images: These are your typical JPEGs, PNGs, and GIFs. They're built from a grid of tiny pixels. The problem is, when you zoom in on them, they get all blurry and jagged. This pixelation makes it really tough for digitizing software to trace the edges accurately. Photos are the ultimate example of a complex raster image, and they're notoriously difficult to convert directly.
- Vector Images: This is the ideal format. Vector files, like AI, SVG, or EPS, are made from mathematical paths, lines, and curves instead of pixels. You can scale them up to the size of a billboard or down to the size of a postage stamp, and they’ll stay perfectly crisp. That clean, scalable nature makes them the absolute best choice for digitizing. The software can easily lock onto those sharp edges and shapes, creating a precise path for the stitches.
So what do you do if your design is a photograph? Your best move is to trace the most important parts in a vector program like Adobe Illustrator or the free tool Inkscape. Isolate the main subject, simplify the color palette way down, and create a new graphic based on the photo. Trying to use an "auto-digitize" feature on a detailed photograph almost always ends in a dense, muddy mess.
Here's the bottom line: embroidery can't really handle gradients, subtle shadows, or photographic detail. Your goal is to turn your art into a series of solid, stitchable shapes before you even launch your embroidery software.
Fine-Tuning Your Design for Embroidery
Once you’ve got a solid vector graphic, the next job is to optimize it. This is all about simplifying shapes, getting a handle on your colors, and thinking about the final size of the embroidered design.
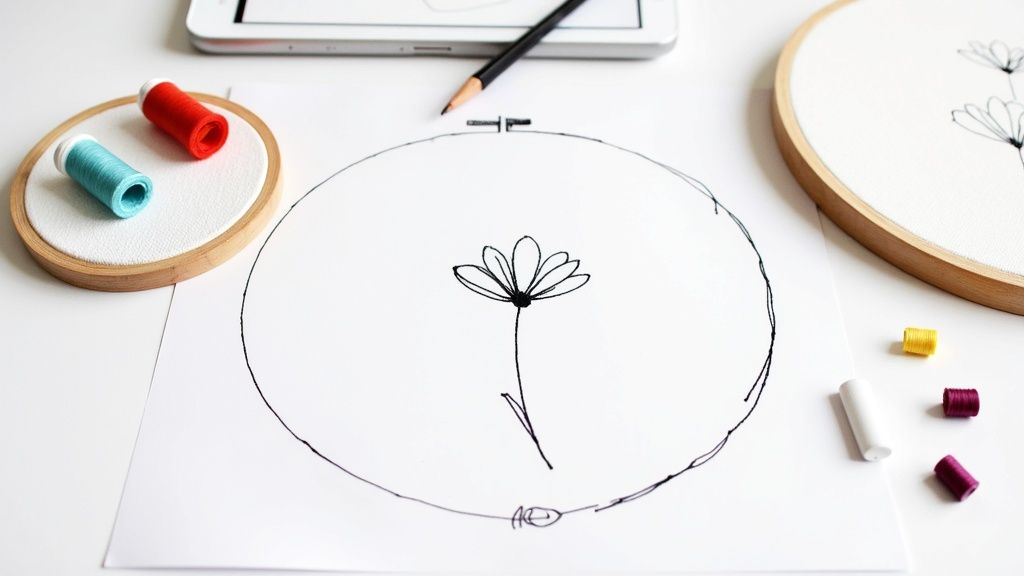
Let's imagine you have a beautiful, complex botanical drawing with dozens of tiny leaves and delicate color shifts. As a drawing, it's gorgeous. As an embroidery design, it would be a nightmare.
To get it ready, here's a tangible example of what you'd do:
- Cut the Clutter: Combine some of those smaller leaves into larger, more defined shapes. Get rid of any tiny, floating details that would be too small for the needle to stitch cleanly.
- Limit Your Color Palette: Look for similar shades and group them together. Instead of five different greens, pick two or three that give you enough contrast. Most home embroidery machines have a limited number of needles anyway, so planning your color changes is just smart.
- Beef Up Your Lines: Thin lines are one of the most common points of failure. A line might look perfectly fine on your screen, but it can be too skinny for a proper satin stitch, leading to a weak, wobbly outline. Make sure any outlines are thick enough to become a stable column of stitches.
At bsewinn.com, our extensive online classes and training materials really hammer this foundational skill home. We are committed to showing crafters tangible examples of how to take a concept—like a simple line drawing of a flower—and prep it for digitizing. Our resources show you exactly how to thicken the stem so it becomes a bold satin stitch and how to simplify the petals into clean shapes that can be filled in nicely. This prep work is truly what separates amateur-looking projects from professional-quality custom sewing machine designs.
Turning Your Art Into Stitches with Digitizing Software
Alright, your artwork is prepped and ready to go. Now for the fun part—actually turning those clean lines and shapes into a real, stitchable design. This is where the magic really happens, and it all takes place inside your digitizing software.
Think of this software as the translator between your creative idea and your embroidery machine. It takes your drawing and converts it into a language of stitches that the machine can follow.
The first thing you’ll do is import your artwork into the software. From there, it's not an automatic process. You’ll be manually tracing over your design, but instead of drawing, you're telling the software what kind of stitch to put where. This is a skill that blends art with a bit of technical know-how, and your choices here will make or break the final embroidered piece.
Getting your art ready beforehand makes this stage so much smoother.
This little workflow is your key to an easier digitizing session. Simple art, simplified further, and exported correctly is the name of the game.
Understanding the Essential Stitch Types
At the heart of digitizing, you've really only got three main tools in your toolbox. Knowing which stitch to use and when is what separates a clean, professional-looking design from a lumpy, amateur mess.
- Running Stitch: This is your most basic stitch, just a simple line of stitches like you'd do by hand. It's perfect for tiny details, delicate outlines, or for laying down an underlay, which we'll get to in a minute.
- Satin Stitch: Think of those smooth, shiny borders on patches or crisp lettering—that's a satin stitch. It’s made of tight, parallel stitches that form a solid column. The trick is not to make the columns too wide, or the long stitches can snag later on.
- Fill Stitch (or Tatami Stitch): Got a big area of color to cover? This is your go-to. A fill stitch lays down rows of stitches to create a textured, woven look. You can play with the angle and pattern to change how it looks completely.
If you want to go a little deeper, we break this down with more hands-on examples in our guide on how to digitize embroidery designs.
Key Settings That Define Your Design
Choosing the stitch type is just the first step. The real art comes from tweaking the settings. These technical details give your design its structure, texture, and that polished, professional finish. Honestly, getting these right is a game-changer.
Modern software is a massive help here. We can now simulate stitches on screen, which can cut down production time by as much as 50% and lets us create incredibly complex designs. Across the industry, you'll see pros using satin stitches for outlines at a very specific 0.4mm width to get sharp edges, then filling with a tatami stitch around 60% density for solid coverage on cottons.
Let's look at the three big settings you'll be constantly adjusting.
Stitch Angle
This is simply the direction your stitches will run. It sounds minor, but changing the angle of a fill stitch can completely change how light hits the thread, giving it a different texture and shine. For instance, if you're stitching a leaf, setting the angle to follow the veins makes it look so much more realistic than just a flat horizontal fill.
Pro Tip: Try to avoid using the same stitch angle for two fill areas that touch. By shifting the angle just a bit (say, one at 45 degrees and its neighbor at 135 degrees), you create a subtle definition between the shapes that looks fantastic.
Density
Density is all about how close together your stitches are. Higher density means more stitches are packed in, which creates a very solid, thick feel. Lower density gives you a lighter, more see-through effect.
Finding the sweet spot is crucial. Too much density, and your design will feel like a bulletproof vest, causing the fabric to pucker and maybe even breaking a needle. Too little, and you'll see the fabric peeking through the stitches.
Underlay
Underlay is a hidden layer of stitches that goes down before the main design. It's like the foundation of a house—you don’t see it in the finished product, but it’s absolutely essential for stability.
Here’s what underlay does:
- Stabilizes the Fabric: It lightly tacks the fabric to the stabilizer, so nothing shifts or stretches while the machine is running at full speed.
- Provides Loft: It creates a little bit of lift, giving your top stitches a raised, rounded surface to sit on. This is what makes satin stitches look so full and beautiful.
- Prevents Puckering: By securing the fabric first, underlay fights against the pulling forces of dense fill and satin stitches.
Here at bsewinn.com, our training empowers you to create custom designs that are not only beautiful but also durable and professional. Our extensive online classes and resources drill down on these technical skills, because we believe this knowledge is what truly empowers you. Once you master these settings, you're no longer just clicking buttons—you're in complete artistic control.
Mastering Stitch Settings for Different Fabrics
Having powerful digitizing software is one thing, but the real artistry comes from knowing how to match those digital settings to your physical materials. A perfect design for a sturdy denim jacket will turn into a puckered, distorted mess on a stretchy knit polo. This is where your hands-on experience and technical skill really shine, taking your custom sewing machine designs from just "good" to truly professional and durable.
The magic is all in how the thread and fabric interact under the stress of a high-speed machine. One of the first and most critical concepts you’ve got to get your head around is pull compensation.
Picture it: as your machine lays down a column of satin stitches, the thread tension naturally pulls the fabric inward from both sides. This "pull" can make the fabric bunch up, creating ugly gaps between color blocks or letting the base fabric show through. Pull compensation is your secret weapon—it intelligently widens your stitch columns just enough to counteract that pull, giving you perfectly filled, solid-looking results every time.
The Critical Role of Stabilizer
Let me be blunt: you can digitize the most flawless design in the world, but if you put it on the wrong foundation, it’s going to fail. That foundation is your stabilizer. It is a non-negotiable part of every single embroidery project.
Think of stabilizer as a temporary support system that keeps your fabric from stretching, shifting, and puckering while it's being hammered with thousands of needle penetrations. The one you choose depends entirely on the fabric you're stitching on.
- Cut-Away Stabilizer: This is your best friend for anything unstable, like t-shirts, sweatshirts, knits, and fleece. It provides permanent support because a layer remains on the back of the design after you’ve trimmed away the excess. This stops the design from stretching out of shape when it's worn and washed.
- Tear-Away Stabilizer: I reach for tear-away when working with stable, woven fabrics—think denim, canvas, or sturdy twill. Just like the name says, you simply tear the extra stabilizer away when the machine is done, leaving a crisp, clean finish.
- Wash-Away Stabilizer: This stuff is perfect for delicate fabrics like organza or for special projects where you can't have any stabilizer showing, like freestanding lace. It completely dissolves in water, leaving nothing behind.
Getting this choice right from the start solves so many common embroidery headaches. For a really deep dive into the nitty-gritty of what to use and when, check out our detailed guide on how to use embroidery stabilizer.
At bsewinn.com, our experts and online classes consistently emphasize that mastering stabilizer selection is one of the most impactful skills a crafter can develop. Our support resources and training show you tangible examples for every fabric type, because it’s the secret ingredient that solves a huge percentage of common embroidery problems before they even start.
Before we dive into pairing stabilizers with different fabrics, here’s a quick-reference table I put together to help you make the right call on your next project.
Stabilizer and Fabric Pairing Guide
| Fabric Type | Recommended Stabilizer | Hooping Tip |
|---|---|---|
| T-Shirts & Knits (e.g., Jersey) | Cut-Away (Medium Weight) | Use a light tack adhesive spray to prevent stretching while hooping. |
| Denim & Canvas | Tear-Away (Medium to Heavy) | Hoop it drum-tight. These fabrics can handle the tension. |
| Fleece & Towels | Cut-Away + Wash-Away Topper | The topper prevents stitches from sinking into the high pile. |
| Performance Wear (Stretchy) | Cut-Away (Lightweight, soft) | Avoid over-stretching! The fabric should be taut but not distorted. |
| Silk & Organza | Wash-Away or Tear-Away | Hoop carefully to avoid snags. Consider using a no-show mesh cut-away. |
This table is a great starting point, but always remember to run a small test stitch-out on a scrap piece of your actual project fabric!
Hooping Techniques and Thread Selection
Proper hooping is just as vital as your stabilizer choice. Your goal is to get the fabric "drum taut"—that means it's smooth and firm, but not stretched. If you stretch the fabric in the hoop, it's going to spring back to its original shape the second you unhoop it, causing instant puckering and a distorted design. Always hoop your fabric and stabilizer together as one unit.
The thread you choose matters, too. For the most part, you'll be working with two main types:
- Polyester Thread: This is the workhorse. It’s incredibly strong, holds its color beautifully, and stands up to just about anything, including bleach. I use polyester for any item that’s going to see a lot of wear and tear or frequent washing.
- Rayon Thread: Rayon is all about the looks. It has a gorgeous, high-sheen finish that gives designs a silky, luxurious feel. While it's not quite as tough as polyester, it's the go-to choice for decorative pieces where that beautiful shine is the top priority.
Finally, let's talk about stitch order, or the sequence of your design. Your software gives you complete control over the machine's path. A smart sequence makes the machine run more efficiently, cuts down on annoying jump stitches, and minimizes color changes.
As a rule of thumb, always digitize from the background elements to the foreground. It also helps to work from the center of the design outward, which helps push any minor fabric distortion to the edges where it's less noticeable. A little planning here makes for a much smoother stitch-out and a cleaner final product.
How to Test and Refine Your Embroidery File
A digitized design on your computer screen is pure potential. The real test—the moment of truth—is when the needle actually hits the fabric. I can't stress this enough: never skip the test stitch-out. This final, critical phase is what elevates your work from a digital concept to a flawless embroidered reality. It's a hands-on cycle of testing, analyzing, and tweaking that truly separates hobbyists from professional designers.
Before your creation can come to life, you need to speak your machine's language. Your digitizing software saves a "master file" in its native format, which is great because it preserves all your editing capabilities. But your embroidery machine can't read that. It needs a specific stitch file to do its job.
This means you have to export your design into the correct format for your specific machine brand. Some of the most common formats you'll run into are:
- PES for Brother, Babylock, and Bernina machines.
- JEF for Janome machines.
- DST for Tajima and many commercial machines.
- HUS for Husqvarna/Viking machines.
When in doubt, check your machine's manual to confirm the exact format it needs. Once you've exported it, load the file onto a USB drive and get ready for the most important step in the whole process.
Conducting the Test Stitch-Out
Your first stitch-out should never, ever be on your final garment or project piece. Always use a scrap piece of fabric that is identical—or as close as you can possibly get—to your target material.
To get a true preview, you need to replicate the final conditions exactly. Use the same stabilizer, hoop size, thread, and needle you plan to use for the real thing. If you need a hand picking the right hoop, we have a detailed guide on how to navigate an embroidery hoop size chart.
As the machine runs, watch it closely. I like to take notes on how the design is forming, paying attention to the machine's path and even its sound. Once it's finished, unhoop it and really inspect the results.
Don't view a flawed test stitch-out as a failure. See it as data. Every mistake—a gap, a pucker, a loose thread—is valuable information telling you exactly what to adjust in your software to perfect the design.
What to Look For in Your Test Run
Create a mental checklist and look at your test piece with a critical eye. You're hunting for specific issues that point directly back to settings in your digitizing software.
Your Quality Control Checklist:
- Stitch Density: Does the design feel stiff and "bulletproof," or can you see fabric peeking through the stitches? Overly dense designs cause puckering and needle breaks, while sparse designs just look cheap.
- Gaps and Registration: Are there ugly gaps between different color blocks? This is a classic sign that your pull compensation needs to be increased.
- Tension Issues: Flip the embroidery over. You should see about one-third bobbin thread and two-thirds top thread. If you see too much bobbin thread on the top (what we call "looping"), your top tension is likely too loose.
- Clean Outlines: Are your satin stitch borders crisp and smooth, or are they jagged and uneven? This could be an underlay issue or a problem with your density settings.
- Puckering and Distortion: Is the fabric around the design wavy or bunched up? This usually points to issues with your choice of stabilizer, your hooping technique, or way too much stitch density.
The whole refinement process is about optimizing these different factors. For a broader look at getting great results in apparel decoration, you can explore some tips for improving overall print quality, as many principles of handling materials and adjusting settings apply across different crafts.
Making Precise Adjustments
Based on what you found, head back to your digitizing software. If you saw gaps, increase the pull compensation on those objects. If the design felt like a piece of cardboard, slightly decrease the density of your fill stitches. You might even need to re-sequence the stitch order to cut down on unnecessary jumps or to make one element stitch more cleanly on top of another.
This back-and-forth process of stitching, analyzing, and adjusting is the real heart of creating high-quality embroidery designs. It might take two or three test runs to get it just right, but trust me, this attention to detail ensures your final product is something you can be proud of. Here at bsewinn.com, we are committed to empowering you by providing not just the tools, but also the support through our extensive online classes and resources to master these essential skills.
Common Questions About Creating Embroidery Designs
As you dive into making your own embroidery designs, you're bound to hit a few snags or have some questions pop up. It happens to everyone! Think of this as a little cheat sheet for the most common puzzles embroiderers face. Getting these sorted out early will give you the confidence to really start playing and finding your own style.
What Is the Best Software for Beginners to Create Embroidery Designs?
When you're just starting out, you want software that doesn't feel like you need an engineering degree to use it. That's why programs like Hatch or Embrilliance are so often recommended. They manage to pack in a ton of powerful tools without being overwhelming, and they're backed by huge communities and endless tutorials.
Of course, there are powerhouse programs like Wilcom that the pros use, but their complexity can honestly be a creativity-killer for a newcomer. At bsewinn.com, our advice is always to start with software that has a strong support system online. Our extensive resources and training are here to help you get the hang of whichever software you choose.
My best tip? Take full advantage of free trials. Nearly every major software offers one. It’s the perfect, no-risk way to get a feel for the workflow and see if it clicks with how your brain works before you invest a dime.
Can I Turn Any Picture Into an Embroidery Design?
Technically, yes, you can import almost any image. But the real question is, should you? Not every picture is destined to become a great embroidery design. The ones that work best have clean lines, solid blocks of color, and aren't loaded with tiny details or smooth gradients. Think logos, simple cartoons, or line art.
Photographs are the toughest challenge. All those beautiful, subtle details and color shifts get lost when you try to translate them into thread. Hitting the "auto-digitize" button on a photo is almost guaranteed to give you a dense, muddy mess that looks nothing like the original.
The secret to a high-quality design is simplifying the artwork before you even bring it into your software. Focus on the core shapes and colors. That little bit of prep work makes all the difference.
Why Is My Embroidery Design Puckering the Fabric?
Ah, puckering. It's the bane of every embroiderer's existence at some point, but thankfully, it’s almost always fixable. It usually boils down to a mismatch between three key things:
- The Wrong Stabilizer: This is the number one culprit. The stabilizer you use has to match the fabric's weight and stretch. A thin, stretchy t-shirt, for example, needs a solid foundation like a cut-away stabilizer to keep it from pulling and warping.
- Stitch Density is Too High: Sometimes the design itself is the problem. If you've packed way too many stitches into a small area, the thread literally pulls the fabric inward, causing it to bunch up.
- Hooping is Off: Your fabric needs to be taut in the hoop—smooth like a drumhead—but not stretched out of shape. If you stretch it when you hoop it, the fabric will just relax back to its normal size once you're done, taking your beautiful stitches with it and causing puckers.
Nail these three elements—stabilizer, density, and tension—and you'll solve the vast majority of your puckering problems before they even start.
What Is the Difference Between a Fill Stitch and a Satin Stitch?
Think of fill and satin stitches as the bread and butter of your digitizing toolkit. They're the two foundational stitches you'll use constantly, and knowing when to use each one is a game-changer.
- Fill Stitch (or Tatami Stitch): This is your go-to for coloring in large, wide areas. It lays down rows of stitches back and forth to create a solid, textured field of color with a matte-like finish. It's for filling in the big shapes.
- Satin Stitch: This is a series of straight stitches packed tightly together to create a smooth, shiny column of thread. It's perfect for borders, outlines, and pretty much all lettering.
The choice is all about the shape and the effect you want. A good rule of thumb is that satin stitches are for lines and narrow columns, while fill stitches are for covering bigger patches of ground. Getting that right is a huge step toward creating professional-looking designs.
Ready to bring your creative vision to life in thread? At bsewinn.com, we're here to help you on your journey with the best machines, expert advice, and all the supplies you need. Check out our wide selection of embroidery machines, software, and online classes to get the support you deserve. Start creating with B-Sew Inn today!

