

The first seam looks straight, but the folded allowance won't quite cover the fraying edge. Another pass under the presser foot won't solve that problem. For a sewist learning how to sew a flat felled seam, the main challenge is often the allowance left before the folding starts, not the quality of the stitching.
A successful flat-felled seam starts with measurements that work together: the starting allowance, the trimmed allowance, and the fabric needed to turn under the remaining raw edge. With a suitable needle, a reliable straight stitch, and careful pressing, a home sewing machine can produce a neat finish without a serger.
Table of Contents
- Tools and Settings for a Flat-Felled Seam
- Seam Allowances for Bags, Décor and Fine Fabrics
- Exposed vs Enclosed Flat-Felled Seams
- How to Sew a Flat-Felled Seam Step by Step
- Fixing Flat-Felled Seam Problems and Your Next Step
Tools and Settings for a Flat-Felled Seam
The minimum kit is straightforward: a straight-stitch sewing machine, standard presser foot, seam guide or marked needle plate, and seam gauge. Small sharp scissors help trim the allowance without catching the garment underneath.
A seam ripper belongs nearby for corrections before trimming. Fine pins or clips hold the folded allowance, while chalk or a fine water-soluble marker makes the trimming line easier to follow. An iron and press cloth are equally important, particularly on fabrics that develop shine under direct heat.
Match the setup to the fabric
Needle, thread, stitch and foot by fabric weight
These are practical starting settings, not substitutes for a sample. Needle selection should follow the fabric's weave and thickness, with thread that passes freely through the needle eye.
| Setting | Lightweight to medium fabric | Heavy fabric |
|---|---|---|
| Needle | Fine sharp needle for light woven fabric; medium universal needle for ordinary cotton | Denim needle sized for the fabric and thread |
| Thread | All-purpose polyester matched to fabric | Heavy-duty polyester for denim |
| Stitch length | Regular straight stitch, adjusted until the sample lies smooth | 3 mm for heavy layers |
| Presser foot | Standard foot with 5/8 inch guide | Walking foot for layered or slippery fabric |
The sewing machine needle guide helps distinguish needle types before changing machine tension to compensate for an unsuitable needle. Heavy-duty thread also needs a compatible needle and machine setup; forcing thick thread through a small eye can cause trouble rather than add useful strength.
A walking foot helps feed shifting layers, but it doesn't replace accurate folding. Compatibility matters, so the machine model should be checked before purchasing an attachment.
Prove the setup on scraps
A practice seam should use scraps from the project fabric, including the same grain direction and layer arrangement. The sample needs the intended needle, thread, stitch length, and allowance, not whatever happens to be installed.
- Check the guide: Measure from the needle's stitching position, not merely from the presser foot's edge.
- Inspect both faces: Balanced stitches shouldn't leave loose loops or pull the fabric into a ridge.
- Press the sample: A seam that looks acceptable under the foot may reveal puckering after pressing.
Ready to proceed: The machine holds a consistent seam width, the stitches look balanced on both sides, and the pressed scraps lie flat.
Seam Allowances for Bags, Décor and Fine Fabrics
The garment default leaves enough fabric for both trimming and enclosure. Seamwork's flat-felled seam tutorial starts with a 5/8-inch (15 mm) allowance, trims the underside to approximately 1/4 inch (6 mm), and notes that a 1/2-inch allowance is workable for bags and home décor but provides less folding margin.
Those measurements are a connected set. Reducing the starting allowance while keeping a generous trimmed allowance makes the remaining edge harder to wrap. A perfectly straight final stitch can't compensate for fabric that no longer reaches around the inner layer.
Seam allowance and trim width by project
The combinations below apply those garment and smaller-project allowances. The fine-fabric option uses the narrower trim described by the same construction tutorial, which warns that cutting closer increases fraying and seam-line damage risks.
| Project | Starting allowance | Trimmed side | Notes |
|---|---|---|---|
| Garments such as jeans, shirts and sportswear | 5/8 inch (15 mm) | 1/4 inch (6 mm) | Standard width with enough margin to fold |
| Bags and totes | 1/2 inch (about 12 mm) | 1/4 inch (6 mm) | Less folding margin, so press the fold carefully |
| Home decor pieces | 1/2 inch (about 12 mm) | 1/4 inch (6 mm) | Use a walking foot for thick layers |
| Fine fabric where bulk shows | 5/8 inch (15 mm) | 1/8 inch (3 mm) | Higher fraying risk; test on a sample first |
Set the measurements before cutting
The seam guide controls the joining seam. A ruler and marked trim line control the narrower allowance. A seam gauge checks whether the folded finish remains consistent along its length, especially where the fabric stretches or changes direction.
For denim and canvas, retaining the full garment allowance gives more room to manage thick folds. Lightweight cotton may need a less bulky finished fold, but aggressive trimming isn't automatically better. Loosely woven cloth can fray even when it feels thin.
The guide to pressing seams is useful when a fold springs open or develops a rounded ridge. Lifting and lowering the iron preserves the measured fold better than sliding it along and stretching the fabric.
Choose the allowance before cutting, then record it on the pattern. Changing the seam width at the machine changes both the available folding fabric and the project's finished size.
Exposed vs Enclosed Flat-Felled Seams
All true flat-felled seams enclose their raw edges. The practical choice is whether the folded allowance sits on the outside as a visible design feature or on the inside for a quieter finish.
Starting orientation matters. Coblaith's flat-felled seam guide describes wrong-sides-together and right-sides-together approaches, with the folded allowance secured from the appropriate face. The placement should be decided before sewing, rather than treated as a finishing choice after the allowances have been trimmed.
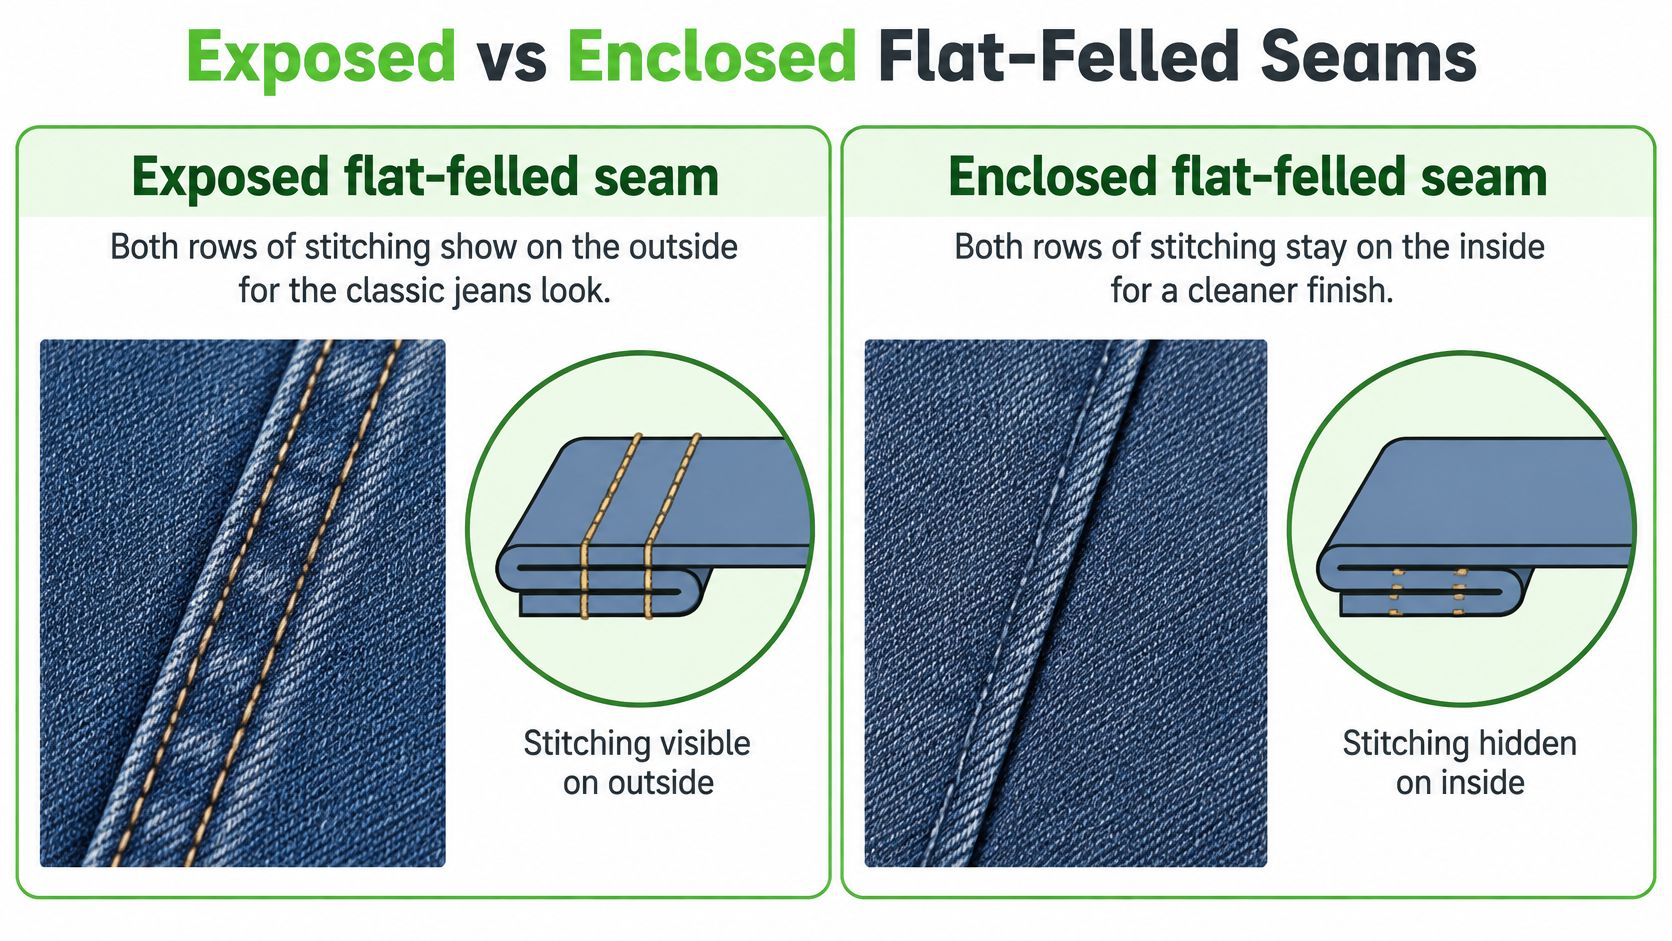
Compare the outside appearance
- Outside-felled finish: Wrong sides begin together, leaving the allowances outside for folding and stitching. This suits denim, workwear, and bags when the parallel lines form part of the design.
- Inside-felled finish: Right sides begin together, placing the allowances inside. Matching thread and a neatly controlled fold make this useful for shirts and blouses.
- Visibility limitation: Moving the folded allowance inside doesn't hide every stitch. The securing stitch passes through the garment and generally remains visible on the outside.
That last distinction matters when comparing samples. An inside-felled seam isn't the same as an invisible finish, and it shouldn't be chosen on the assumption that the outer face will have no stitching. The guide to finishing seams helps compare alternatives when visible topstitching doesn't suit the design.
Let the fabric decide
On heavy cloth, an outside fold makes the edge easy to watch while stitching, although the extra thickness still needs careful pressing. On lightweight fabric, the allowance may show through or cast a ridge regardless of which face carries the fold.
A useful comparison sample uses matching thread on one portion and contrasting thread on another. The sewist can then judge both the construction and its appearance without confusing a bold thread choice with a bulky seam.
Before committing, the sample should be viewed from the garment's intended outside and handled as it will be worn. For a washable project, laundering the sample also helps reveal whether the chosen finish remains satisfactory.
How to Sew a Flat-Felled Seam Step by Step
This sequence uses the wrong-sides-together method, with the folded allowance visible outside. The garment-construction discussion at Anna's Rome describes the enclosing construction using an initial allowance of approximately 1.5 cm (about 5/8 inch), a lower allowance trimmed to roughly 5 mm, and final stitching about 2 mm from the fold.
There's more than one workable trimming combination. Closet Core's construction guide uses a 1/4-inch trimmed allowance with a 5/8-inch start, which is the combination used below. The important point is to follow a complete combination rather than mix dimensions from different methods.
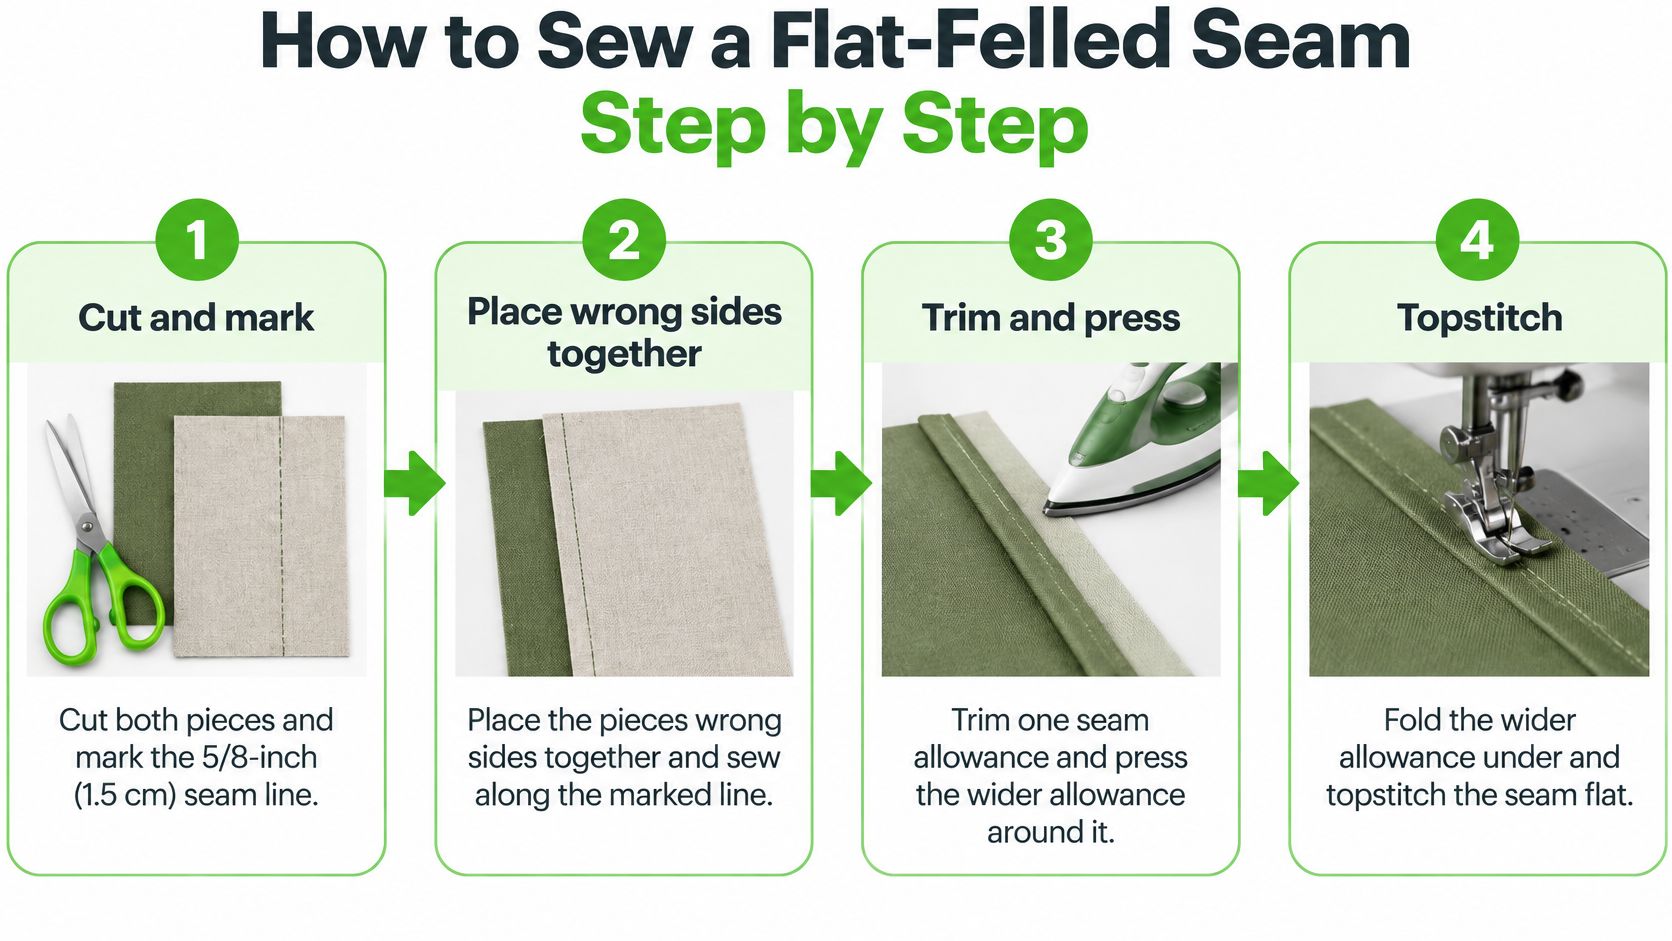
Join, trim and wrap
- Cut both pieces and mark the joining line. Use the selected full allowance on both edges, checking that the pattern already includes it before adding more. A common mistake is treating the fabric edge as accurate without checking a frayed or uneven section.
- Place wrong sides together and align the raw edges. Sew along the marked line, securing the beginning and end where they won't later be crossed by another seam. Drifting inward or outward changes the fabric available for folding, so corrections belong here, before any trimming.
- Press both allowances toward the chosen side. The pattern may specify a direction, often toward the back piece on a garment. Pressing inconsistently along the seam makes it easy to trim the wrong layer or create a twist.
- Trim only the underside allowance. This is the allowance lying beneath the other after pressing, on the side toward which the seam has been directed; the wider allowance stays intact to wrap over it. Small, controlled scissor cuts are safer than lifting a large section and accidentally catching the garment or joining stitches.
- Turn the wider raw edge under and around the trimmed allowance. Its raw edge should finish close to the original joining line without projecting beyond the enclosure. A turn-under that consumes too much fabric leaves too little width to cover the inner allowance, while an undersized turn-under can leave the edge insecure.
Press and secure the fold
- Press the wrapped allowance flat, then pin, clip, or baste it. The fold should remain straight without needing to be stretched into position. Skipping this pressing stage encourages the edge to roll as it reaches the needle.
- Edgestitch through the folded allowance and garment. Keep the stitching close to the fold with a consistent margin, using the tested setup rather than chasing the edge with abrupt steering. The common slip is watching the needle instead of watching the fold against a fixed reference on the foot.
The guide to sewing straight seams offers useful practice for maintaining that reference. A standard foot works, while an edge guide or compatible walking foot can help with alignment or feeding.
The completed seam should have no exposed raw edges, parallel stitching, and a flat fold running consistently along its length. Inspection from both faces matters because a tidy top can conceal an unsecured section underneath.
Fixing Flat-Felled Seam Problems and Your Next Step
If a flat-felled seam reveals a raw edge, check the starting allowance and how the layers were folded before changing the machine settings. The Sewing & Craft Alliance flat-felled seam guide explains how the starting allowance, trimming, and pressing direction work together. Test the full sequence on a scrap of the project fabric before sewing the garment.
Flat-felled seam symptoms, causes and fixes
| Symptom | Likely cause | Fix |
|---|---|---|
| Raw edge shows at the fold | Wide allowance not folded far enough | Unpick the affected stitching, re-press the enclosing fold, then restitch |
| Puckering along the edgestitch | Upper tension too tight or fabric pulled while sewing | Test a slightly looser upper tension and guide the fabric without stretching |
| Seam pulls apart after washing | Edgestitch missed or failed to secure the folded allowance | Inspect the layers, repair damage, and restitch close enough to catch the fold |
| Frayed trimmed edge | Trim cut too narrow or too close | Remove loose fibers cautiously; reconstruct if insufficient sound fabric remains |
| Uneven or bulky fold | Allowances trimmed unevenly or pressed the wrong way | Unpick as needed, correct the allowance, and press toward the trimmed side |
Separate geometry problems from machine problems
Start by checking that the seam allowance still provides enough fabric to enclose the trimmed edge. Then check whether trimming was even and the fold pressed in the right direction. Extra stitching can secure a fold, but it cannot supply fabric that is no longer there.
If the allowance and fold are sound but the fabric puckers, compare the result with your practice sample. Use the guide to sewing machine tension adjustment to help assess tension. Check the needle, threading, and fabric feed before making large adjustments.
For curves, hand-basting or fabric-safe temporary glue-basting can hold the fold in place. At bulky intersections, a hump-jumper or leveling tool helps keep the presser foot level. Let the feed mechanism move the fabric; pulling from behind can distort the seam.
Repair threshold: If trimming has removed the fabric needed to enclose the edge, pressing harder will not restore it. Reconstruct the seam, choose a different finish, or replace the fabric.
Choose support that matches the problem
A flat-felled seam does not require embroidery features. If you are also considering a machine for quilting and embroidery, the Baby Lock Radiance Sewing & Embroidery Machine offers both functions. Test on your project fabric, since the result depends on how the machine handles that fabric and seam.
B-Sew Inn sells presser feet for sewing, serger, and long arm quilting machines, along with sewing and quilting thread, embroidery thread, and serger thread. Its machine range includes sewing, embroidery, serger and coverstitch, and long arm quilting machines, as well as preowned machines. Persistent skipped stitches or drifting tension after basic checks may call for help beyond routine adjustments.

