

A new serger sits on the table, four cones are lined up beside it, and the first knit project is already cut. Then the threading diagram comes out, the loops look uneven, and every dial suddenly seems suspicious. That's a normal starting point. Learning How to Use a Serger Machine for Beginners works best as a sequence of small, checkable experiments, not as a race to sew the garment on day one.
Table of Contents
- What a Serger Does and Why Beginners Use One
- Needle, Stitch and Feed Settings by Fabric
- How to Thread a Four-Thread Serger
- Adjust Tension and Differential Feed Without Guessing
- Practice Samples That Build Serger Skill
- Book a Hands-On Serger Session Before You Buy
What a Serger Does and Why Beginners Use One
A knit hem moves under the foot, the needles form the seam, a knife trims the excess allowance, and loopers wrap thread around the raw edge before the fabric leaves the machine. That single pass explains the appeal. A serger, also called an overlocker, combines sewing, trimming and edge wrapping so seams on knits, stretch fabrics and lightweight garments stay flexible while fraying is reduced.
An overview of serger and overlock differences from regular sewing classifies overlock stitching in ISO 4915 as stitch class 500, distinct from the class 300 lockstitch made by a conventional machine. Household models commonly use two to four threads, one or two needles and one or two loopers, so the stitch diagram and thread path in the manual matter before sewing starts.
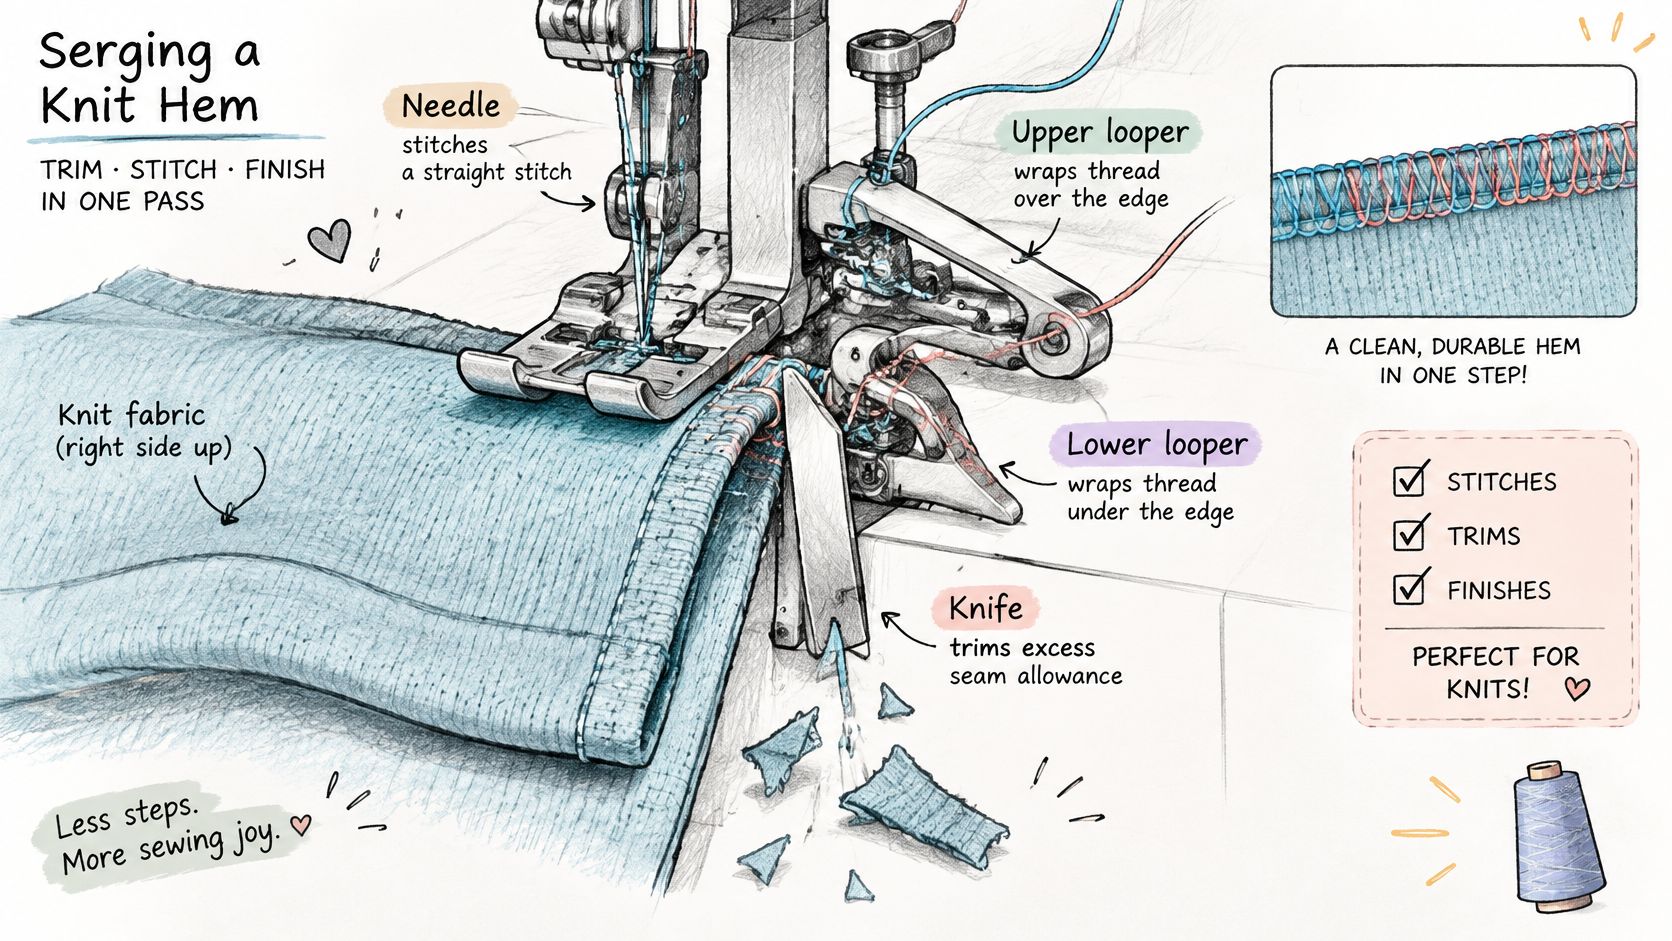
A four-thread overlock is the practical starting seam for garments because two needle threads and two looper threads give flexibility with edge coverage. It doesn't replace a regular machine for zippers, buttonholes or conventional topstitching, which still need a lockstitch. Readers looking for suitable first makes can browse serger project ideas for seams and finished edges and match projects to those strengths.
Three Starting Rules
- Test first: Sew every new setup on a scrap before touching project fabric.
- Stay clear: Keep fingers away from the cutting knife and needles.
- Guide, don't pull: Let the feed dogs move the fabric through.
If most projects involve knits, seams and raw edges, a serger earns its place. If closures and topstitching dominate, the regular machine stays close at hand.
Needle, Stitch and Feed Settings by Fabric
A seam that looks wrong does not automatically need a tension change. The needle, threading, or fabric feed may be the cause, so treat each scrap seam as a repeatable pass-or-fail test: keep the fabric and settings consistent, inspect the result, then change one setting at a time.
| Fabric | Needle size | Stitch length | Differential feed start |
|---|---|---|---|
| Light woven, such as voile or lawn | Below 80, for example 70 | 2.5–3.0 mm | Below 1.0 if the seam puckers |
| Medium woven cotton | 80 | 2.5–3.0 mm | 1.0, neutral |
| Heavy nonstretch, such as denim or canvas | 90 | 2.5–3.0 mm, up to 4 mm | Start at 1.0, then test |
| Stretch knit | 80 | 2.5–3.0 mm | 1.2–1.5, then test |
| Highly elastic knit | 80 | 2.5–3.0 mm | Increase gradually toward 2.0 |
These are general starting ranges, not fixed settings for every machine or fabric. The library serger guide describes a differential-feed setting of 1.0 and a stitch length around 2.5–3.0 mm as common starting points, with a maximum stitch length of 4 mm.
How to Read the Rows
Light woven fabric can pucker, so try a finer needle and, if the scrap seam gathers, reduce differential feed below neutral. Medium cotton is a useful comparison fabric: begin at neutral feed and check whether the seam lies flat.
For heavy denim or canvas, choose a stronger needle. Start with neutral feed and test on a scrap rather than turning differential feed off automatically. For knits, a setting above neutral can help limit rippling by feeding more fabric into the seam. Highly elastic knits may need a higher setting, adjusted in small steps. These checks matter on hoodie seams, including styles worn as an everyday layer for Los Angeles living.
The basic four-thread setup uses four cones of serger thread. An 80/12 universal needle and a 2.5 mm stitch length are useful starting points, but match the needle to the fabric and check the machine's manual for its specified needle system. The guide to serger machine needles and matching thread choices explains how to choose needles and thread for serging.
Routine before sewing: Choose a fabric row, set the needle, stitch length and feed, then sew a scrap seam. Inspect it without stretching the fabric. If the stitch fails, check that the needle is suitable and correctly installed, the thread follows the machine's paths, and the fabric feeds evenly before changing tension. Adjust one setting, sew another scrap, and compare.
A serger with more stitch options still needs a fabric-by-fabric test. B-Sew Inn sells serger and coverstitch machines, including combination sergers such as the Baby Lock Splendor 8-Thread Combination Serger, Classroom Model.
How to Thread a Four-Thread Serger
Set aside time to thread without a project deadline. The first pass can be slow because each thread follows its own guides and looper path. Start with the needle selected for your fabric. If you are practicing without trimming, disengage the cutting knife as the machine manual directs.
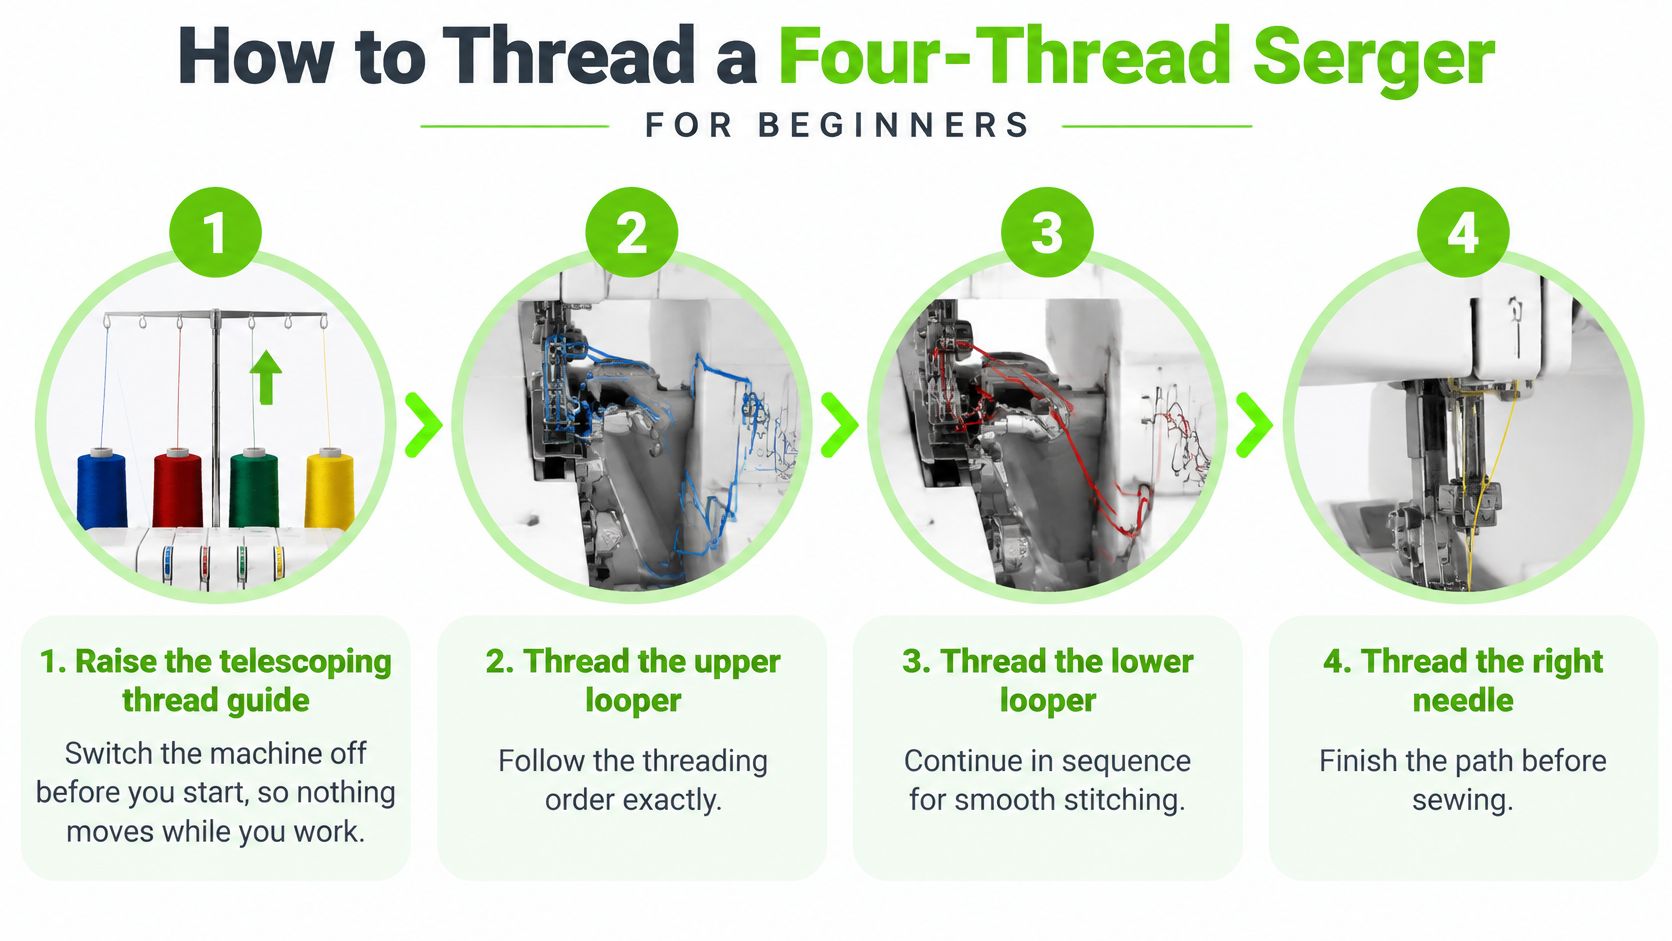
Thread in Sequence
- Raise the telescoping thread guide and switch the machine off. Keep the presser foot up while threading so the tension discs can accept the thread properly. With the machine off, your hands can work safely near the loopers and needles.
- Thread the upper looper first. Follow the path shown in the manual for your model. A thread that skips even one guide can stop the stitch from forming.
- Thread the lower looper next. Keep to the order rather than jumping ahead to a needle. The looper threads need to pass each other correctly to create the stitch.
- Thread the right needle, then the left needle. The University of Kentucky serger curriculum gives this sequence and instructs users to guide the threads behind and below the presser foot.
- Arrange the cones so thread feeds smoothly. Matching thread colours to the machine's colour-coded paths makes it easier to see which thread follows each route. Keep thread lengths clear of the table so they do not snag.
- Lower the presser foot and draw the threads toward the back. Check that both looper threads are in place, then sew a test chain. Continue onto a scrap to inspect the stitch on both sides.
What Each Thread Is Doing
The test chain is your first pass-or-fail check. Threading is complete when the chain forms cleanly and both sides of a scrap seam look balanced.
In a typical four-thread overlock, the left needle forms one row of stitching and the right needle forms the other. If one row is missing, check that needle's thread path before changing anything else. The looper threads should interlock around the fabric edge, holding the needle stitches in place.
A chain that fails to form can point to a missed guide, thread that has not seated properly, or threads left in front of the presser foot. Follow the sequence again and rethread fully if needed. This is often quicker than searching for one hidden slip.
For the scrap seam, check that the needle threads meet at the edge and the looper threads do not hang off either side. The edge should lie flat, without tunneling. If the chain forms but the seam fails one of these checks, use the threading path and needle position as your first clues before adjusting tension.
Adjust Tension and Differential Feed Without Guessing
Most beginner frustration starts with a tension dial turned too early. A seam looks loopy, a dial moves, then another dial moves to compensate, and soon nobody knows what the original setting was. The fix is an order of operations. Check threading first, then needle condition and size, then differential feed and stitch length, and only then touch one tension dial.
Run the Test Seam Like an Experiment
Start from the machine's documented default tension. A guide to serger threading and tension recommends beginning with a 15 cm test seam using the intended fabric and thread, testing stable woven fabric at approximately 1.0 and a knit around 1.2-1.5, then inspecting the relaxed seam. Use the same fabric, thread type, needle size and number of layers as the project. A sample sewn on woven cotton can't predict how a sheer fabric, bulky layers or an elastic knit will behave.
Change only one control at a time. Move tension by no more than 0.5 of a tension number per adjustment, sew another sample, and write the setting on a scrap label. Different thread colours make the experiment easier to read because each colour reveals which thread is too loose, too tight or missing from its proper place.
One change, one test seam, one line written down. A notebook beside the machine prevents the same mistake from being diagnosed three different ways.
Thread choice can also change how a seam looks and feels, particularly on stretch fabrics. The explanation of wooly nylon thread for softer, more flexible serged seams is useful after basic tension is balanced with standard serger thread. Specialty thread shouldn't be introduced while the basic setup is still unstable.
Understand Differential Feed Before Tension
Differential feed coordinates the front and rear feed dogs. At 1.0, feeding is neutral. Below 1.0, front-feed travel is reduced and fabric can gather. Above 1.0, front-feed travel increases and helps prevent rippling in stretch materials.
If a knit seam ripples, raise differential feed in small steps before altering needle tension, because the feed ratio is often the controlling variable. Very elastic material may need a setting moving toward 2.0. If fabric gathers when gathering isn't wanted, reduce the ratio toward 1.0. If a lightweight woven puckers, move below 1.0 and test again.
There's no universal number. Fabric composition, recovery, thickness, presser-foot pressure, stitch length and cutting width all affect the result. The pass check is physical, not numerical. A successful seam lies flat and retains the fabric's relaxed shape after stitching.
Match the Symptom to the First Fix
| Symptom | Likely cause | First fix |
|---|---|---|
| Skipped stitches | Threading error, or a damaged or wrong-size needle | Re-thread in sequence, change the needle, then sew a test chain |
| Looper thread breaks | Looper threading path | Re-thread the loopers before the needles |
| Lightweight seam puckers | Differential feed too high for the fabric | Move differential feed toward 1.0 in small steps |
| Knit seam ripples | Differential feed too low | Raise differential feed above 1.0 in small steps |
| Loops on top or underneath | Tension changed before threading was checked | Confirm the threading path, then change one tension dial by no more than 0.5 |
| Edge tunnels or threads hang off the seam | Threading or tension | Re-check threading, then adjust one control at a time |
| Seam uneven after several inches | Incomplete thread path or a test on the wrong fabric | Re-check the full path and retest on the actual fabric |
Many apparent tension problems are threading, needle, presser-foot, or fabric-preparation problems. That distinction saves time. A bent needle won't be cured by a tension dial, and a knit stretched by the feed dogs won't flatten because a looper dial moved.
Bold changes create confusing evidence. Small changes create readable evidence. After each adjustment, let the sample relax, compare it with the previous labelled scrap, and record needle, stitch length, differential feed and tension beside it. Returning to a known baseline then becomes a matter of reading notes, not guessing.
Practice Samples That Build Serger Skill
Practice works best as a ladder. Each sample isolates one skill, gives a visible pass check, and tells beginners when to move on. Starting with stable woven fabric removes stretch from the equation while threading and balanced loops become familiar. Rolled hems, decorative flatlock seams and highly elastic knits can wait until the basic overlock is repeatable.
| Practice sample | Skill it builds | Pass check | Move on when |
|---|---|---|---|
| Woven cotton straight seam | Threading and balanced loops | Flat seam with interlocked loopers | Three clean seams in a row |
| Knit seam strip | Differential feed on stretch fabric | Seam relaxes with no waves | Two matching knit seams |
| Lightweight woven puckering test | Gathering control with differential feed below 1.0 | Seam lies flat with no pucker | Puckering is gone on two passes |
| Edge trim practice | Knife placement and guiding the fabric | Trimmed edge is even and clear of the needle | Trim stays even while guiding, not pulling |
Climb One Rung at a Time
The woven cotton seam comes first. Three clean seams in a row prove that threading wasn't luck. Loops should interlock at the edge, the seam should lie flat, and the result should look consistent from beginning to end.
The knit strip adds feed control. Test around 1.2 to 1.5, then let the strip relax before judging it. Waves mean the feed setting needs attention, while two matching flat seams show control. Next, the lightweight woven test teaches the opposite direction, with feed below 1.0 used to remove puckering.
Edge trim practice finishes the ladder. The knife should take an even sliver while hands guide the fabric and keep the edge aligned. Pulling distorts the seam and makes knife placement look worse than it is. Readers curious about guiding different seams can review serger presser feet and their uses after the standard foot feels familiar.
Keep the evidence: Label each scrap with fabric, needle, stitch length, differential feed and tension, then store the samples in a binder as a personal settings reference.
A first project should use the practised skills without adding five new ones. Simple knit pajama pants or a fleece pillowcase can combine one knit seam and one straight seam while keeping construction manageable. Success looks modest at this stage, and that's fine. Repeatable seams matter more than ambitious fabric.
Book a Hands-On Serger Session Before You Buy
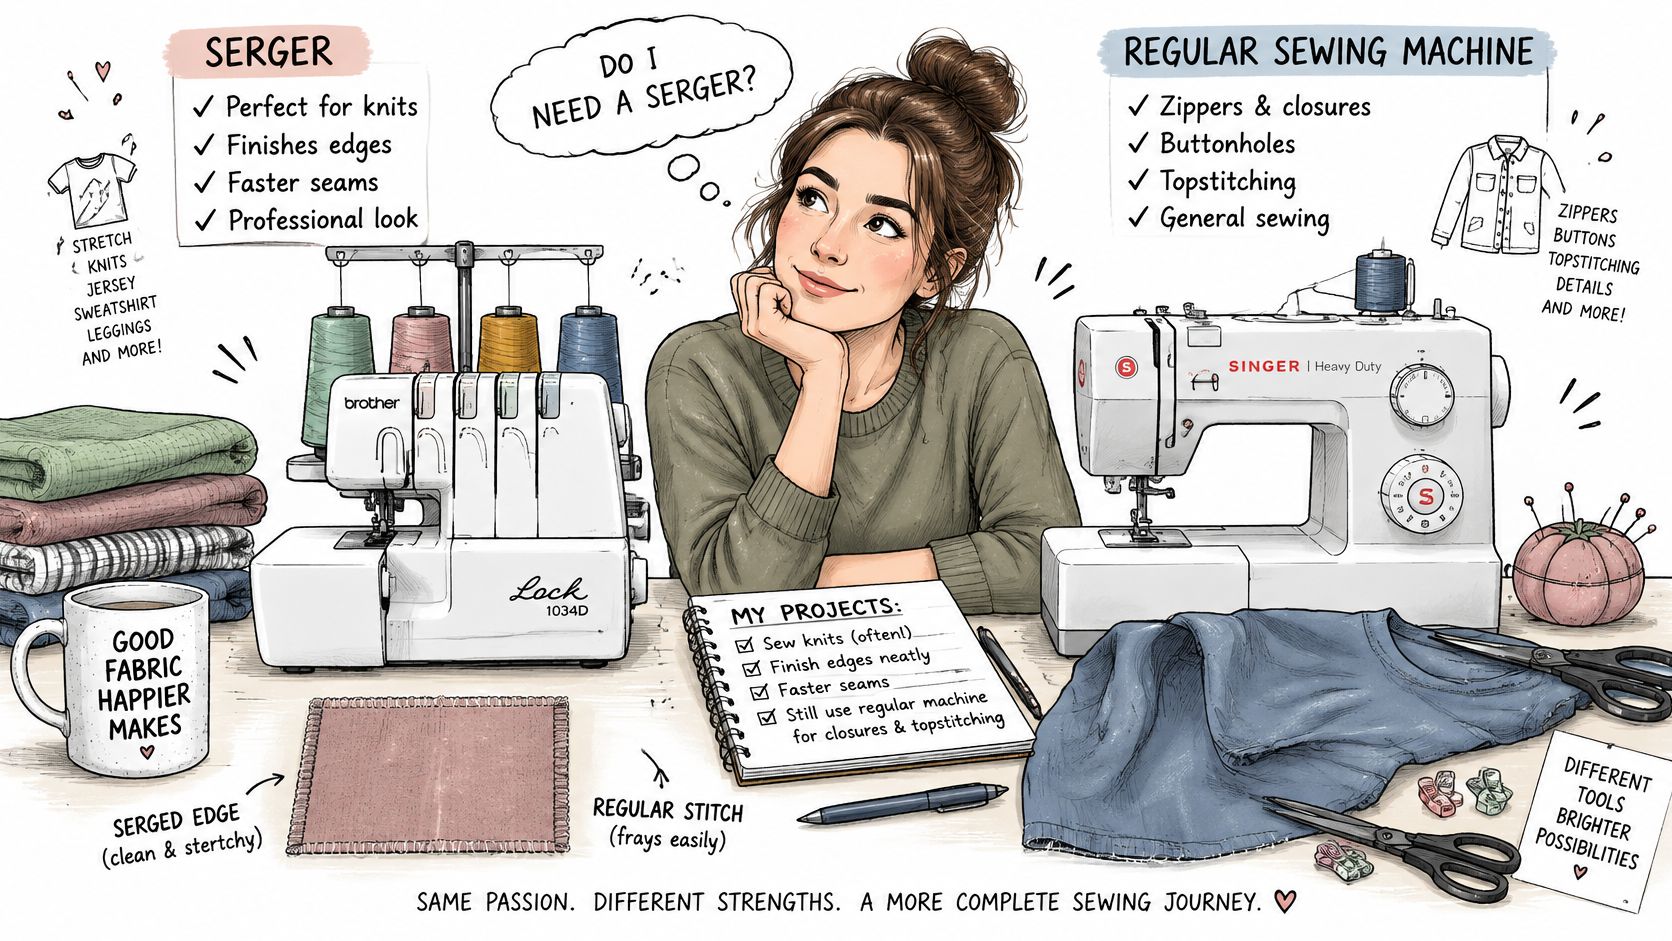
A knit project is waiting, but you are unsure whether a serger will earn its place beside your regular sewing machine. A serger adds a specialist for seam finishing and construction, while a regular machine handles tasks such as closures and topstitching. Before choosing, consider how often those jobs come up in your projects and how much space you have.
The image below frames the comparison between a specialist serger and a general-purpose sewing machine.
B-Sew Inn sells 2/3/4 thread sergers and coverstitch and combination sergers, along with serger presser feet and serger thread. A hands-on session can help you see how a machine is threaded and how its test seam behaves. Use the guide to what to look for when buying a serger to prepare questions about machine features and fit.
The short video below offers another view of serger setup.
For owners of manual-threaded machines, B-Sew Inn offers Serger – Getting Started (Manual-Threaded) 101, a class covering proper threading, corners, curves, gathering, stabilising seams, ribbing and locking stitches. Check with B-Sew Inn about class arrangements before booking. You can also browse the serger collection or contact the business to ask about options for seeing a machine in person.
A test seam is useful before and after buying: treat it as a pass-or-fail check. If the loops do not interlock neatly, check threading, needle condition and fabric feeding before changing tension. For a visit or class, contact B-Sew Inn.

