

A serger owner can stand in front of a notions wall with a perfectly reasonable question and still leave with the wrong pack: Which needle belongs in this machine? The size may look right, the shank may appear to fit, and the package may mention overlock sewing, yet the result can be skipped stitches, damaged knitwear, or a needle striking a looper.
The fix isn't another tension adjustment. It starts with identifying the needle system, then matching the size, point style, and replacement condition to the machine, fabric, and thread. This guide turns that confusing shelf into a practical buying decision, with recommendations useful for Baby Lock, Bernina, Bernette, Brother, and Janome owners. Readers can also review what a serger is used for before choosing accessories or upgrading equipment.
Table of Contents
- Why the Right Serger Needle Changes Everything
- Serger Needle Anatomy in Plain English
- Needle System Compatibility by Serger Brand
- Choosing the Right Needle Size for Fabric and Thread
- A Decision Tree for Wovens, Knits, and Stretch Fabrics
- How to Install a Serger Needle the Right Way
- When to Replace a Serger Needle and How to Extend Its Life
- Find Your Needle and Test It in Person
Why the Right Serger Needle Changes Everything
A customer brings a sample to the counter with three problems: skipped stitches, tiny pulls along a jersey edge, and a sharp tap when the seam crosses a thick join. They have already rethreaded the serger, changed tension, adjusted differential feed, and started blaming the machine.
Check the needle first.
A serger needle works within a precise loop-forming system. The needle and loopers must meet at the right position to form a secure stitch. A mismatched scarf, groove, shank, or point can interrupt that relationship, leaving tension adjustments unable to solve the core issue.
The four decisions that prevent wasted purchases
- System first: Confirm the machine's needle system before choosing a size. Common household and industrial systems include ELx705, ELx705 CF, ELx705 CR, SY 2022, and DCx1. A needle that fits the clamp may still be wrong for the machine.
- Size second: Size 80/12 suits many household serger projects. Move to 90/14 for heavier material when the fabric and thread require more support.
- Point style third: Match the tip to the fabric. A ball point helps protect knit structures, while a universal or slightly rounded point works for many woven fabrics. For stretch knits, start with the correct system and point before touching tension.
- Replacement timing fourth: Install a fresh needle after skipped stitches, a bent shaft, fabric pulls, or impact noise. A damaged tip can keep producing faults even after every setting looks correct.
Practical rule: Physical fit is not proof of safe compatibility.
Use a fabric-and-stitch test to confirm the choice. On stretch fabric, test the actual overlock or coverstitch formation on a scrap, then inspect the seam for skipped stitches, snags, and uneven loops. Do not blame tension until the needle system, point, and condition are right.
B-Sew Inn retail teams help customers sort these choices in Tulsa, Oklahoma City, Springfield, Humble, and Fayetteville. The right pack costs less than repeated trial-and-error purchases, damaged fabric, or a service visit caused by a preventable mismatch. For a broader introduction, read what a serger is used for.
Serger Needle Anatomy in Plain English
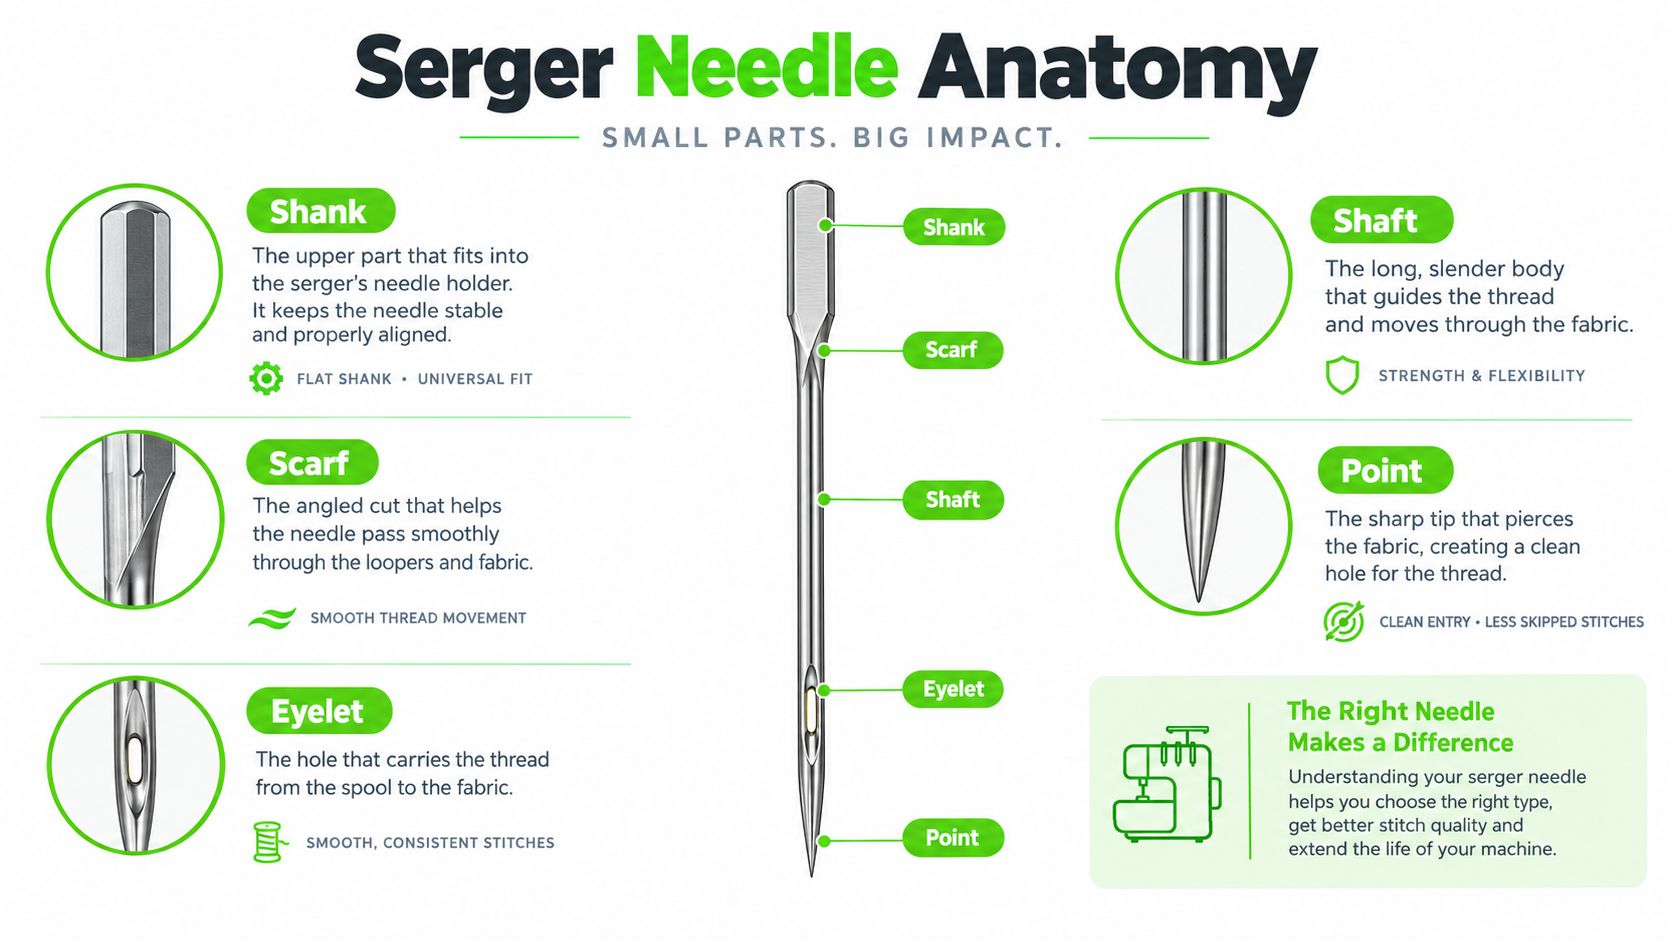
A needle's markings describe how it enters fabric, carries thread, and helps form the stitch. Read those details before buying a replacement, then compare them with the specification in your machine manual. The wrong shape can waste time on tension adjustments that will never solve the problem.
Read the needle from top to bottom
- Shank: The upper section sits in the needle bar. Many domestic sergers use a flat shank for consistent positioning. Industrial machines can require another design, so follow the manual rather than assuming a physical fit is safe.
- Shaft or blade: This long section passes through the fabric. Its diameter corresponds to the size marking, while its reinforcement affects penetration and resistance to deflection.
- Groove: The long channel directs thread toward the eye. ELx705 designs have grooves on both the front and back, a geometry intended for specialized overlock and coverstitch work, as described by SCHMETZ.
- Scarf: This indentation near the eye gives the looper space to catch the thread loop. A mismatched scarf can produce skipped stitches even when the needle enters the fabric correctly.
- Eyelet: The eye carries thread through the fabric. Thread that is too large can fray or break, and a poor needle-and-thread match adds friction.
- Point: The tip controls fabric entry. A rounded or ball point moves between knit yarns, while a universal point penetrates woven threads more directly.
ELx705 needles include a flat shank, reinforced blade, second thread groove, and specialized scarf geometry. The second groove supports chain-stitch and coverstitch formation. These details make ELx705 a system-specific needle, not a universal substitute for every serger.
Use this order at the shelf: identify the system, check the size, then confirm the point. ELx705 CF 80/12 identifies the ELx705 system, a chrome-finished option, and a metric size to match with fabric and thread. For a clear comparison with ordinary sewing-machine terminology, review this guide to needles for sewing. If the machine manual calls for another system, choose that specification instead of relying on appearance alone.
Needle System Compatibility by Serger Brand
A serger that suddenly skips stitches, refuses to form a chain, or lets the needle touch the looper does not always have a tension problem. The needle system may be wrong. ELx705 is common, but it isn't universal, and similar-looking labels can hide different dimensions, scarf shapes, and needle-bar requirements.
Modern domestic sergers commonly specify ELx705, ELx705 CF, ELx705 CR, or SY 2022. Industrial overlock machines may call for DCx1, also listed in industrial references as 88x1, 16x231, 16x257, 2053, or 1738. Other industrial systems include BLx1, DBx1, and JLx1. Do not mix these families because the needle fits the clamp. Physical fit does not prove stitch compatibility.
Serger Needle System Compatibility at a Glance
| Needle System | Common Serger Brands | Safe Substitution | Wrong-System Symptom |
|---|---|---|---|
| ELx705 | Many modern domestic overlock and coverstitch machines from brands carried by B-Sew Inn, including Baby Lock, Bernina, Bernette, Brother, and Janome models that specify it | Use ELx705 CF or ELx705 CR only when the machine manual accepts the same ELx705 family | Skipped stitches, poor loop formation, or needle and looper interference |
| SY 2022 | Selected domestic overlock models whose manuals specify SY 2022 | Use another designation only after the exact model manual confirms compatibility | Failure to form stitches or unreliable loop capture |
| ELx705 CF | Compatible ELx705 machines, with a chrome-finished design intended to reduce heat and wear | ELx705 or ELx705 CR only when the manufacturer allows it | Heat-related wear, skipped stitches, or poor formation when the system itself is wrong |
| ELx705 CR | Compatible ELx705 machines requiring the reinforced version | ELx705 CF or standard ELx705 only if the machine specification permits it | Needle deflection, skipped stitches, or damage from incorrect geometry |
| DCx1 | Industrial overlock machines specified for the DCx1 family | Equivalent industrial designations such as 88x1 or 16x231 only when the machine documentation confirms them | No stitch formation, timing trouble, or needle and looper contact |
| BLx1, DBx1, JLx1 | Particular industrial machines specified for those systems | No automatic substitution. Confirm the model and manual | Stitch failure, deflection, or mechanical interference |
| 130/705 H | Standard household sewing machines, not a universal serger substitute | Use only when the serger manual explicitly specifies it | Skipped stitches, failed loop formation, or unsafe clearance |
The badge on the machine does not settle the question. A Baby Lock, Bernina, Bernette, Brother, or Janome serger can require a different system from another model in the same brand. Older, imported, and industrial machines need the same model-specific check.
Similar labels aren't automatic equivalents
A frequent shelf mistake is treating 2022, SY 2922, 2054, and 16x75 as interchangeable. They are not automatic equivalents. Manufacturer documentation separates these families: some 14U-class overlock manuals specify 2054 needles, while selected Quantumlock and Ultralock models specify Chromium 2022 needles. The practical lesson is simple: read the exact model specification instead of buying from a generic “serger needles” label.
Use this confirmation process every time:
- Locate the exact machine model.
- Check the manual or needle plate documentation.
- Match the complete needle system designation.
- Select size and point only after confirming the system.
- Test a scrap of the project fabric for clean loop formation.
For stretch fabrics, do not blame tension first. Confirm the system, then use the correct point and size for the fabric. A wrong system can create skipped stitches, unreliable loop capture, or needle-to-looper interference that looks like poor threading or incorrect tension. Stop sewing, remove the questionable needle, and verify the specification before changing machine settings.
For a model-focused reference, see how the Baby Lock Acclaim compares to other sergers, then confirm the needle system for the exact machine you are considering. The right needle belongs on the shelf only after the manual confirms it.
Choosing the Right Needle Size for Fabric and Thread
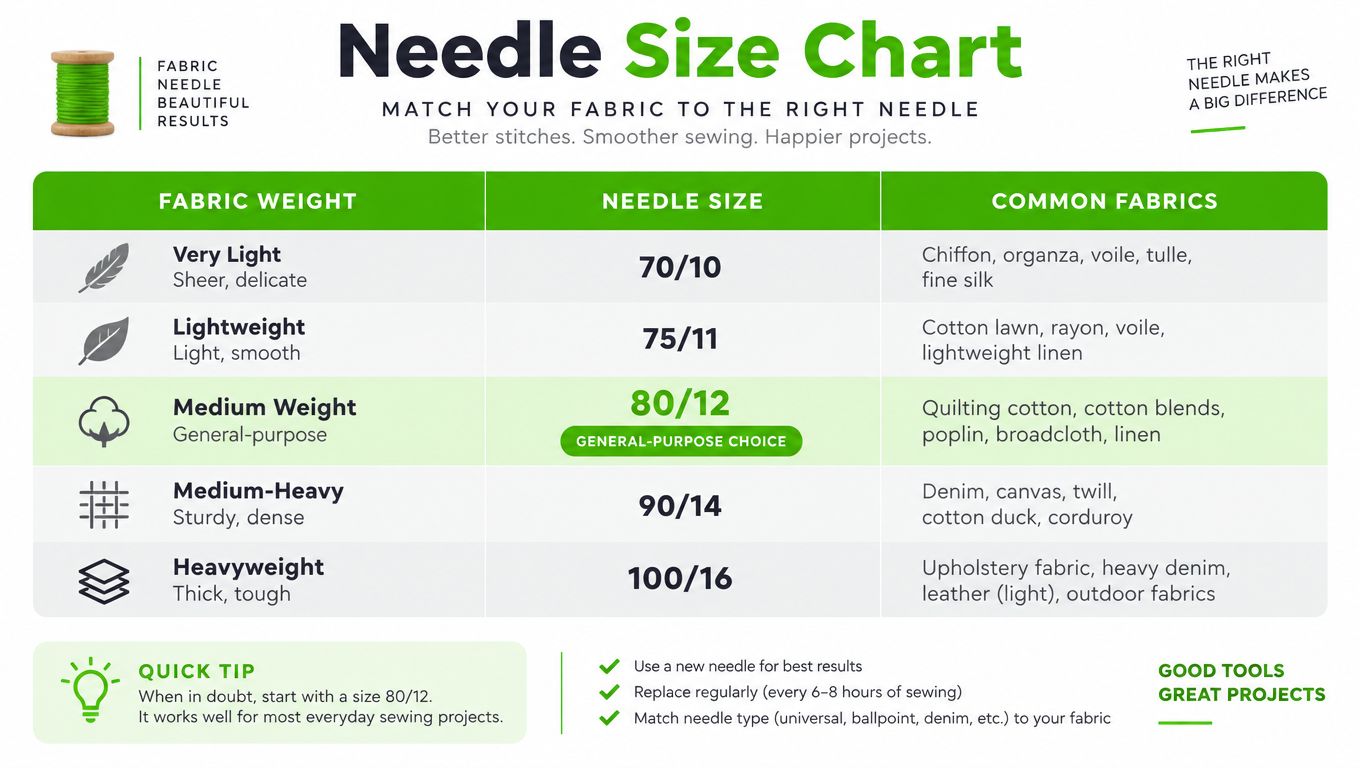
Needle size is the blade diameter, expressed in hundredths of a millimeter. Size 80 is approximately 0.80 mm, size 90 is approximately 0.90 mm, and size 100 is approximately 1.00 mm. Size controls fabric penetration, but the needle system comes first. An ELx705 80/12 and a DCx1 size 80 are not interchangeable just because both carry the number 80.
A practical size guide
- 70/10: Choose this for fine knits and lightweight fabrics when your serger system permits it. It limits unnecessary holes, but a fine eye and shaft can struggle with heavier thread.
- 80/12: Start here for many everyday household serger projects. A Bernette 4-series manual specifies ELx705 sizes from 70/10 through 90/14 and includes an 80/12 needle in its operating manual.
- 90/14: Use this for heavier fabric, denim-like material, canvas, or several layers, provided the machine accepts the size.
- 100/16: Reserve this for machines and projects whose specifications support it. It is not a routine upgrade for household serging.
Thread and fabric must agree with the needle. Heavy thread forced through a 70/10 eye can drag, fray, break, or disturb loop formation. A needle that is too large can leave visible holes in delicate fabric. Choose the smallest compatible size that carries the thread cleanly and enters the fabric without bending or deflecting.
Check the sewing machine needle sizes guide for sizing conventions, then confirm your serger's system and permitted range. Use this sewing thread size guide to match thread bulk to the needle eye. If stitches skip on stretch fabric, verify the needle system, point, and size before touching tension settings. A needle mismatch wastes more time than a fresh needle costs.
A Decision Tree for Wovens, Knits, and Stretch Fabrics
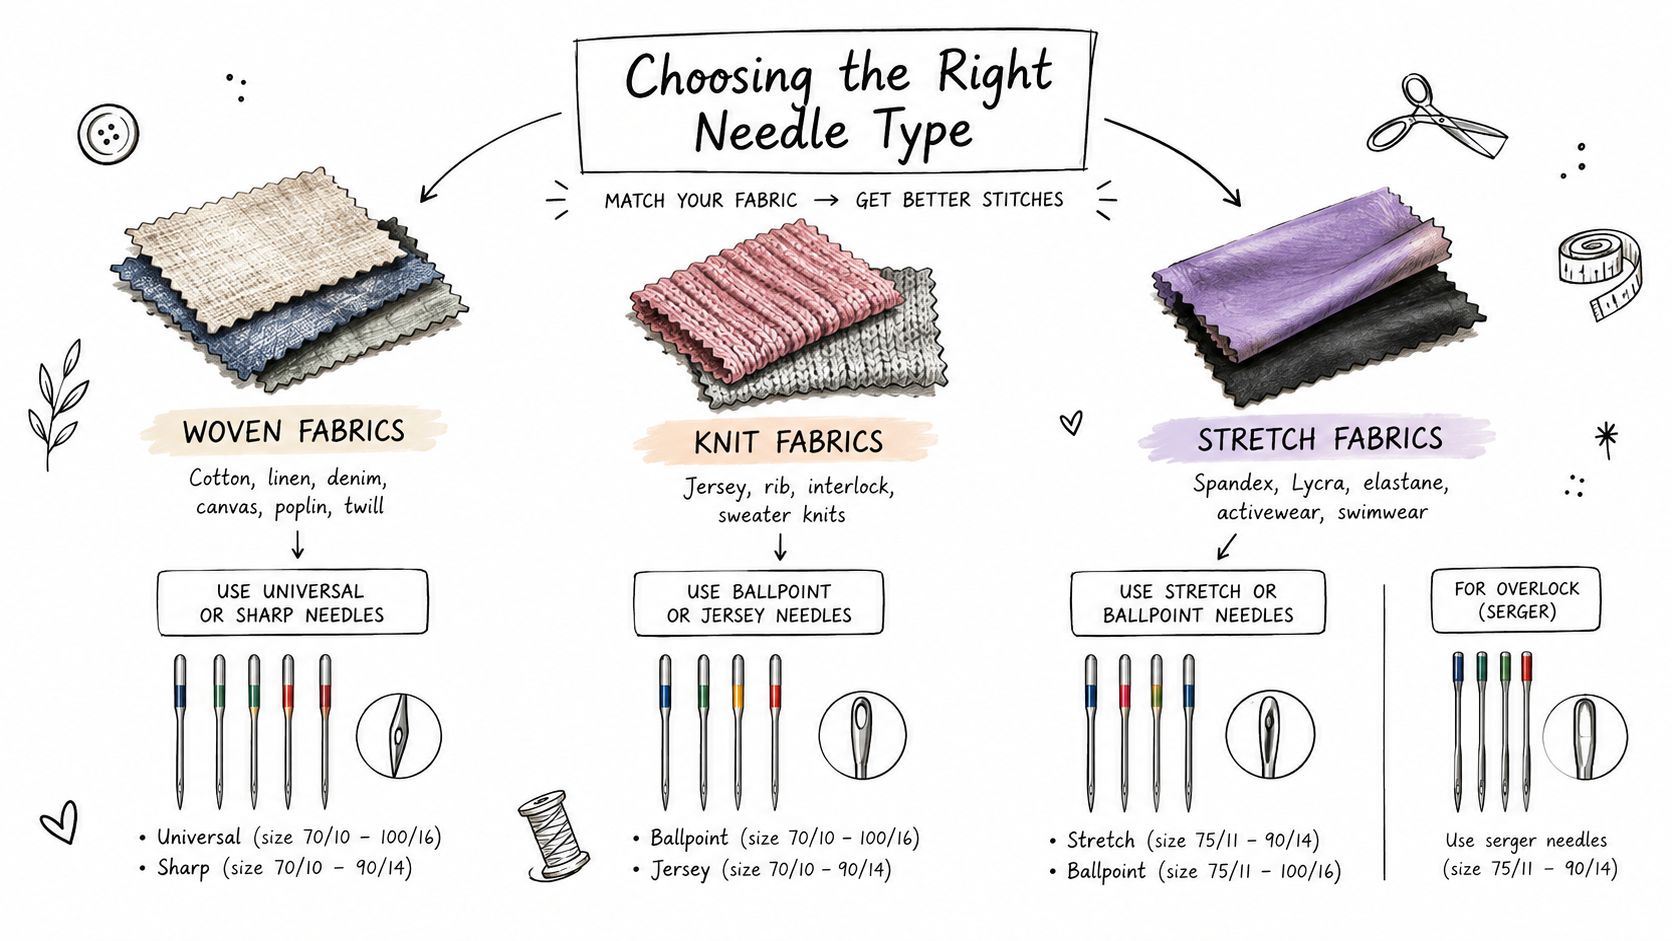
A serger can stitch a woven beautifully and skip every few stitches on stretch jersey with the same thread and settings. The needle is often the actual problem, so choose it from the fabric structure and stitch demands before changing tension.
Start with the fabric structure
If the fabric is woven, install a compatible universal or slightly rounded-point serger needle. It should enter the weave cleanly without pulling threads or leaving unnecessary holes.
If the fabric is jersey or interlock, choose a compatible ball-point needle. Its rounded tip passes between yarns rather than cutting through them, which helps limit snags, skipped stitches, and curling.
If the fabric contains spandex or has strong stretch, choose a compatible stretch needle. Do not assume an ordinary ball point handles every knit. For spandex and fleece, use a stretch needle. Reserve ball point for interlocks and stable knits.
If the seam joins woven fabric to knit fabric, start with a compatible universal needle, then let a sample decide. The materials may feed at different rates, and needle choice cannot correct every differential-feed problem.
Test before touching tension
Follow this order:
- Install a fresh needle with the correct system and a suitable size.
- Thread the machine exactly as its manual shows.
- Cut a sample from the actual fabric and sew in the same grain direction planned for the project.
- If the fabric contains elastane, has strong recovery, or feels dense like fleece, compare a ball-point needle with a stretch needle.
- Inspect skipped stitches, fabric damage, loop balance, seam stretch, and curling.
- Adjust differential feed only after confirming the needle point.
A controlled sample exposes the actual fault. Sewists often blame tension when the needle is cutting the fabric, deflecting, or failing to let the looper catch the thread. Test the needle first, then address feed and tension.
Match the needle to the stitch
The stitch changes the decision. A narrow seam on stable interlock may work well with ball point, while a stitch that must stretch through spandex needs a stretch needle and a sample that is pulled as the finished seam will be pulled. Fleece also deserves a stretch needle because its thickness and surface can challenge a standard point.
For more fabric-handling guidance, use this guide to sewing stretch fabrics. Keep the sequence clear: needle choice first, differential feed second, and tension only after both have been checked.
How to Install a Serger Needle the Right Way
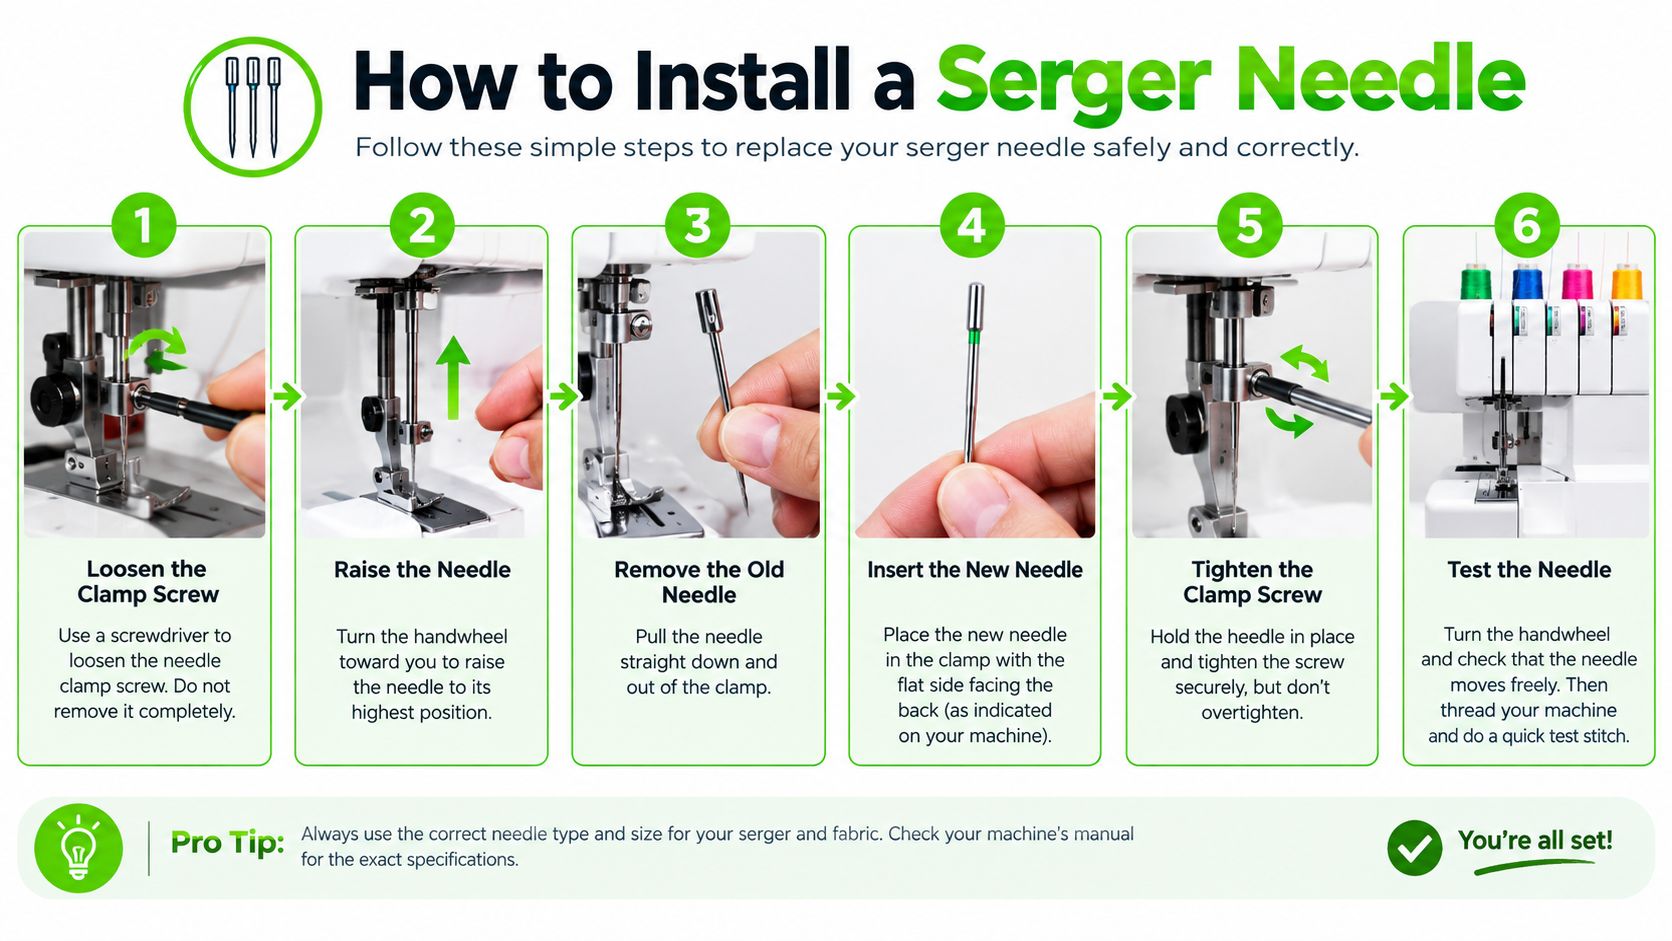
A fresh needle will still cause skipped stitches or a damaged looper if it is installed too low, turned incorrectly, or left loose. Serger needle bars allow little room for error, so use this sequence every time.
Use this replacement sequence
- Turn the machine off. Raise or remove the presser foot as directed, then clear the needle area.
- Raise the needle bar. Set the needle or needles at their highest position using the handwheel.
- Loosen the clamp screw. Hold the old needle so it cannot fall into the machine.
- Check the new needle. Confirm the correct system, size, and point. Discard any needle that is bent or damaged.
- Orient the flat shank correctly. Its flat side must face the direction specified for that machine and needle position. The manual takes priority over general advice.
- Push the needle fully upward. The shoulder must meet the stop before you tighten the screw.
- Tighten the screw securely. The needle should not shift under a gentle check. Do not force the screw.
- Check clearance by hand. Turn the handwheel slowly and watch the needle pass the plate and loopers. Stop immediately if anything touches.
For ELx705 needles, check more than the label. The second groove and scarf must sit in the orientation required by the machine. If the groove looks incorrectly positioned after insertion, do not sew a test seam. Remove the needle and verify the instructions first.
Align one or two needles deliberately
The BERNINA L 890 documentation identifies the left needle as LN and the right needle as RN. Needle position changes the stitch width and seam placement. A bernette manual documents a 6 mm overlock seam with the left needle and a 4 mm seam with only the right needle.
Install both needles at the same height when the selected stitch uses two needles. For a one-needle stitch, remove the unused needle, then turn the handwheel by hand before switching on the machine. This simple clearance check can prevent a looper strike, broken needle, and unnecessary repair bill.
When to Replace a Serger Needle and How to Extend Its Life
Replace a serger needle at the first clear warning. Continuing to sew can damage the fabric, thread, plate, or looper. Watch for these signs:
- Skipped stitches: Check for a dull or bent needle, the wrong system, or an unsuitable point before touching tension.
- Bent movement: A needle that does not travel straight can hit the plate or looper.
- Fabric pulls: The point may be too sharp for a knit, damaged, or worn.
- Impact noise: Stop immediately if a new tapping or clicking sound appears.
- Poor loop formation: Confirm needle-system compatibility before adjusting tension.
Chrome-finished ELx705 CF designs reduce heat and wear during extended overlocking. They are a practical choice for long sewing sessions, but the finish cannot correct the wrong system, size, point, or installation. If a fresh needle still produces poor stitches, stop buying replacement packs and inspect the setup.
Build a simple testing habit
Sew a scrap before starting each new fabric and thread combination. Examine the seam from both sides, stretch it if the finished garment will stretch, and check for skipped stitches, damaged thread, fabric holes, and uneven loops. This short test catches needle problems before they reach the project.
Clean lint from the needle area regularly. Replace the needle after it strikes a pin, hard seam, or other obstruction, even if it looks straight. A needle can suffer damage that is difficult to see.
If a correctly matched and installed needle does not solve the problem, rethreading alone may not help. Stop sewing when needle or looper clearance, timing, or mechanical noise remains abnormal. Arrange service before further testing turns a small needle issue into a larger repair.
Find Your Needle and Test It in Person
The right purchase starts with the exact serger model, not a generic search for “overlock needles.” B-Sew Inn carries serger needle packs, ELx705 assortments, compatible chrome-finished options, thread, and the notions needed to test a complete fabric-thread-needle combination. The store also sells and services machines from Baby Lock, Bernina, Bernette, Brother, and Janome, along with sergers and related accessories.
Readers can bring a machine, sample fabric, thread, and the current needle pack to a B-Sew Inn retail location in Tulsa OK, Oklahoma City OK, Springfield MO, Humble TX, or Fayetteville AR. Testing in person helps identify whether the problem is the system, point, size, installation, threading, feed, or machine condition, an advantage over buying blindly from an online-only seller.
A class can also help with needle changes, threading, stitch selection, and fabric matching. B-Sew Inn offers in-person classes and machine mastery sessions, plus service, repair, and trade-ins. Sewists who need to turn a fabric idea into a tangible sample may also find turn concepts into sample products useful as a planning reference.
Browse the B-Sew Inn serger needle collection, bring the machine manual when visiting a store, or contact the service department when a fresh, compatible needle doesn't restore clean stitching.
B-Sew Inn helps sewists choose compatible serger machine needles, matching thread, and the right machine for the fabric work ahead. Visit B-Sew Inn to browse needle supplies, test equipment in person, book an in-person class, or arrange service for a serger that needs more than a replacement needle.

