

The lettering looked perfect on the machine screen. Then the needle finished the last satin stitch, the hoop came out, and the fabric around the design had started to pucker. That familiar disappointment usually isn't caused by thread color or a faulty design. It often begins with the stabilizer underneath the fabric.
Quilters Select stabilizer gives sewists several ways to support quilting, appliqué, and embroidery projects. The right choice depends on the fabric, stitch density, hooping method, and the finish the project needs. Once those pieces are matched, thread tension, design clarity, and long-term durability become much easier to manage.
Table of Contents
- Why Stabilizer Choice Changes Every Quilt and Embroidery Project
- What Stabilizer Actually Does on Your Fabric
- Inside the Quilters Select Stabilizer Line
- TearAway vs Cutaway and When to Reach for Each
- How to Apply Quilters Select Stabilizer Step by Step
- Matching Stabilizer to Quilting and Embroidery Projects
- Common Stabilizer Mistakes and How to Avoid Them
- Next Steps and Frequently Asked Questions
Why Stabilizer Choice Changes Every Quilt and Embroidery Project
Stabilizer is the quiet layer that keeps fabric from moving more than the stitches can tolerate. During embroidery, the needle enters and exits the material repeatedly. Each stitch adds tension, and a dense design can pull the fabric inward, stretch the grain, or create ridges around the lettering.
That's why stabilizer selection belongs near the beginning of project planning, before decorative trim and often before thread color. A stable woven cotton and a stretchy knit may use the same design, but they don't need the same foundation. Guidance from OESD's machine embroidery stabilizer basics recommends considering fabric weight and type, design density, hooping conditions, and the desired finished result.
Start with the fabric
A quilting cotton generally holds its shape better than a jersey knit. A sheer garment may need support that stays nearly invisible, while a dense filled motif needs enough structure to keep the surface flat. The finished item matters too. A quilt label, a decorative block, and a baby garment all have different requirements for softness, permanence, and wash durability.
The useful question isn't just, “Which stabilizer is strongest?” It's, “Which stabilizer gives this fabric enough control without changing the project unnecessarily?”
Practical rule: Choose the stabilizer family first, then choose its weight based on the fabric and stitch density.
Build a complete setup
Stabilizer works as part of a system. The machine, hoop, needle, thread, fabric, and design all influence one another. A fresh needle suited to the fabric can enter the stabilized layers cleanly, while the wrong needle may create skipped stitches or unnecessary holes even when the backing is appropriate.
A practical overview of stabilizer's role appears in this guide to what stabilizer does for embroidery. It helps clarify why a project that looks simple on screen can behave very differently once it meets real fabric.
What Stabilizer Actually Does on Your Fabric
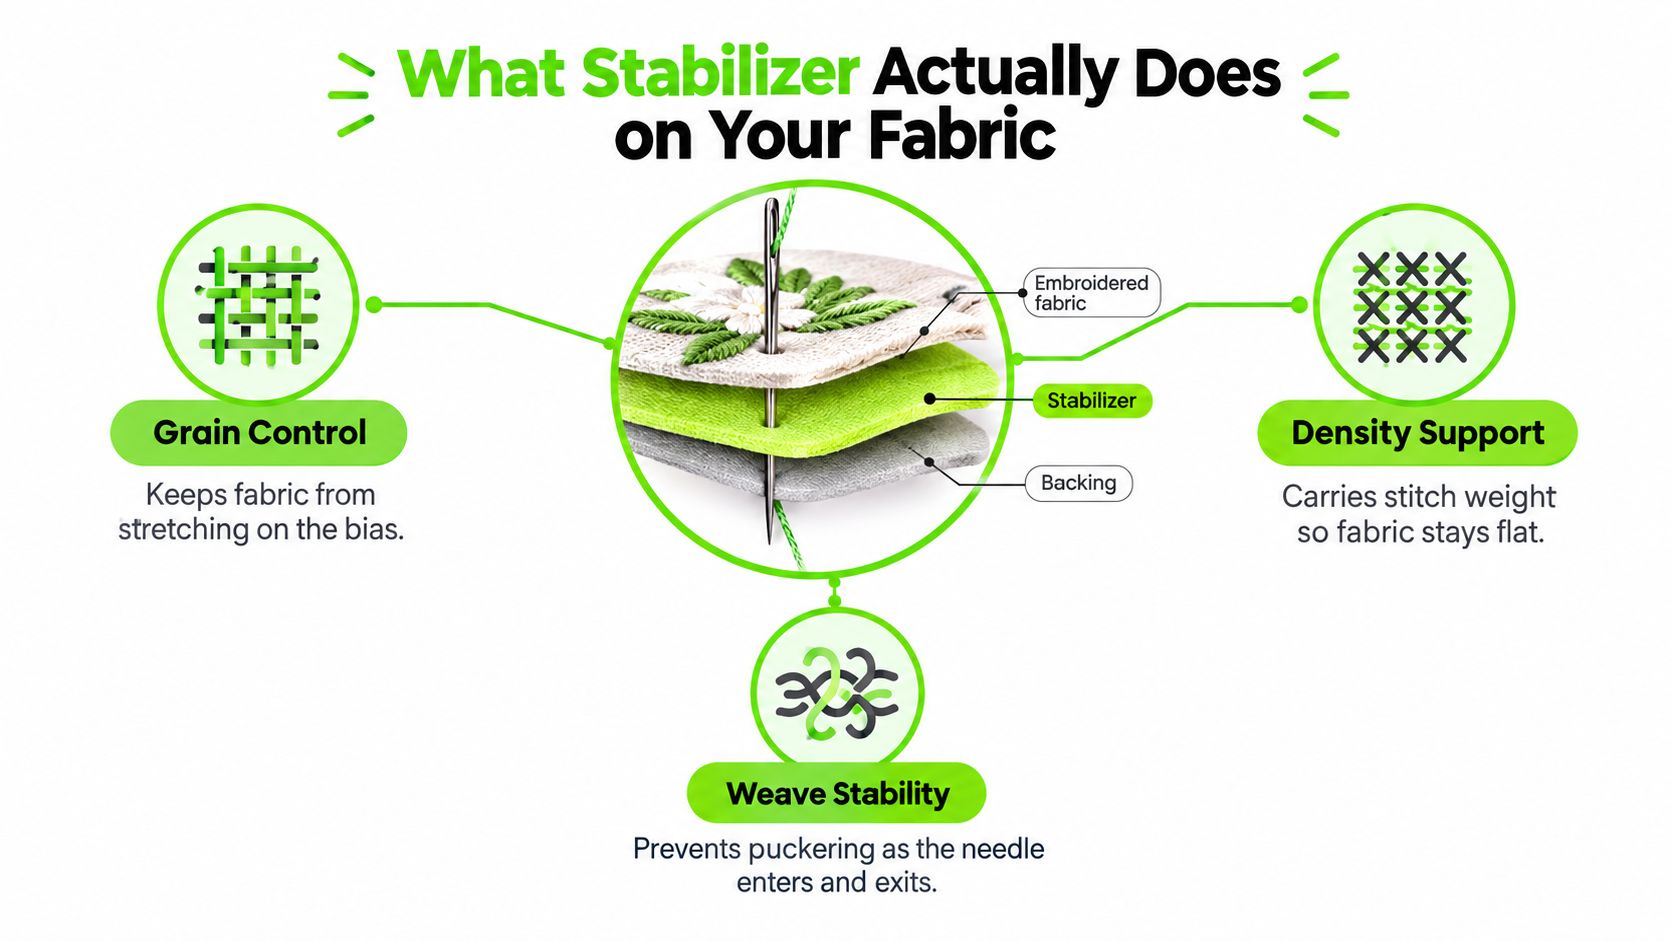
A useful way to understand stabilizer is to think of the project as a fabric sandwich. The top layer is the material being stitched, the stabilizer sits beneath or behind it, and the needle travels through the layers together. That support helps preserve the fabric's grain, density, and weave while the design is formed.
Stabilizer performs three practical jobs:
- Controls grain: It helps keep fabric from stretching or shifting, especially across the bias.
- Supports density: It carries some of the load created by closely packed stitches.
- Protects the surface: It reduces puckering, tunneling, and distortion as the needle enters and exits.
Support should match movement
A lightweight woven fabric may need only temporary support. A knit continues to stretch during stitching and after the project is finished, so a permanent cutaway foundation may be more suitable. Sheers create another challenge because excess backing can show through or change the fabric's drape.
The stabilizer sample packet from Quilters Select is listed at $11.49 originally and $8.62 currently on the brand's product page, giving sewists a concrete way to compare materials before committing to a larger roll. The packet is especially useful when a project calls for testing hand, visibility, and stitch support on scraps.
A specialty-retail product family
Quilters Select was developed around independent sewing retailers. Its home page describes a distribution model created through collaboration with Kay and intended for independent, rather than chain or mass, retailers. That channel fits a product line where fabric behavior and finished feel often need explanation at the cutting table or machine.
The brand's stabilizer category includes TearAway in 15-inch by 10-yard and 20-inch by 10-yard rolls, along with Cutaway Fusible, Print and Piece formats, and related products. Those packaging formats and product variations show a developed stabilizer family rather than one generic backing. The Quilters Select stabilizer collection provides the product-family view.
Inside the Quilters Select Stabilizer Line
Quilters Select stabilizer choices become easier once attachment and removal are kept separate. A fusible product attaches with heat. A tear-away product is removed after stitching. A cutaway remains behind the embroidery. Weight then determines how much support the material contributes.
The available product descriptions specifically identify ultra-lightweight TearAway as temporarily fusible, with the shiny side placed against the wrong side of the fabric before pressing. Cutaway is described as a soft, sheer, non-stretch stabilizer with a temporary fusible coating, available in the same 15-inch and 20-inch widths on 10-yard rolls shown on its product page.
| Stabilizer | Weight | Removal | Best For |
|---|---|---|---|
| TearAway | Ultra-lightweight | Tear away after stitching | Stable woven fabrics, light embroidery, appliqué support |
| TearAway rolls | Light to moderate support | Tear away after stitching | Quilting cotton, decorative machine stitching, stable woven projects |
| Cutaway Fusible | Soft, lasting support | Trim away, remains behind design | Knits, stretch fabrics, dense embroidery |
| Print and Piece formats | Project-dependent | Follow product instructions | Printed placement and pieced construction workflows |
| Stabilizer Sample Packet | Assorted samples | Depends on sample type | Testing hand, support, and removal before a larger purchase |
Match support to the design
A light temporary backing suits a stable fabric and a design that doesn't overpower it. A denser design or a less stable fabric asks for more control. Guidance from Nancy Zieman's stabilizer guide groups stabilizers into cutaway, tear-away, wash-away, and heat-away categories, and recommends test swatches because heavier support can affect drape and fabric integrity.
Fusible options help when fabric movement during hooping is the main problem. A temporary bond can keep layers aligned before the first stitch, particularly for appliqué placement or slippery surfaces.
Shop the whole stitching system
Stabilizer isn't an isolated notion. Needle size, thread weight, hoop tension, and machine speed affect the same stitch formation. B-Sew Inn carries embroidery and quilting machines, sergers, thread, needles, stabilizer, embroidery designs, and other notions, so a project setup can be evaluated as a complete kit rather than as a single roll of backing.
TearAway vs Cutaway and When to Reach for Each
TearAway and Cutaway solve different problems. TearAway provides temporary structure, then leaves the project once the excess is removed. Cutaway stays behind the embroidery and continues supporting the fabric after stitching, trimming, and laundering.
The TearAway embroidery backing guide is useful for understanding removal and project fit. Quilters Select describes TearAway as an ultra-lightweight stabilizer that can be temporarily fused to the project. The manufacturer's instructions place the shiny side against the wrong side of the fabric, use a medium iron setting, and tear away the excess after stitching.
Use TearAway on stable ground
TearAway is a natural starting point for quilting cottons, stable woven garments, decorative machine stitching, and some appliqué work. It can reduce pinning and fabric distortion while the design is stitched, then be removed without leaving a permanent foundation.
Light, medium, and heavy support should be viewed as different levels of control, not as a ranking. A heavier option may help a decorative or dense design, but excess backing can alter the hand of a finished piece. Testing on the actual project fabric remains the safest way to judge the result.
Use Cutaway when movement continues
Quilters Select Cutaway is marketed as a sheer, soft, non-stretch stabilizer with a temporary fusible coating. Its purpose is to create a bond that helps prevent stretching and distortion during stitching. Because the stabilizer remains behind the embroidery, it provides ongoing support for knits, stretch fabrics, and designs with substantial stitch density.
| Feature | TearAway | CutAway |
|---|---|---|
| Weight | Light, medium, or heavy options | Soft, lasting support selected for fabric and design |
| Removal method | Tear excess away after stitching | Trim excess away, leaving support behind |
| Best fabric pairing | Stable wovens and quilting cottons | Knits, stretch fabrics, and unstable materials |
| Stitch density | Light to moderate designs, with testing for denser work | Dense filled designs and satin-stitch embroidery |
| Typical project | Quilt block, label, or decorative woven panel | T-shirt, sweatshirt, baby knit, or stretch garment |
The fast rule is simple: choose TearAway for stable wovens and quilting, and Cutaway for stretch or dense designs.
How to Apply Quilters Select Stabilizer Step by Step
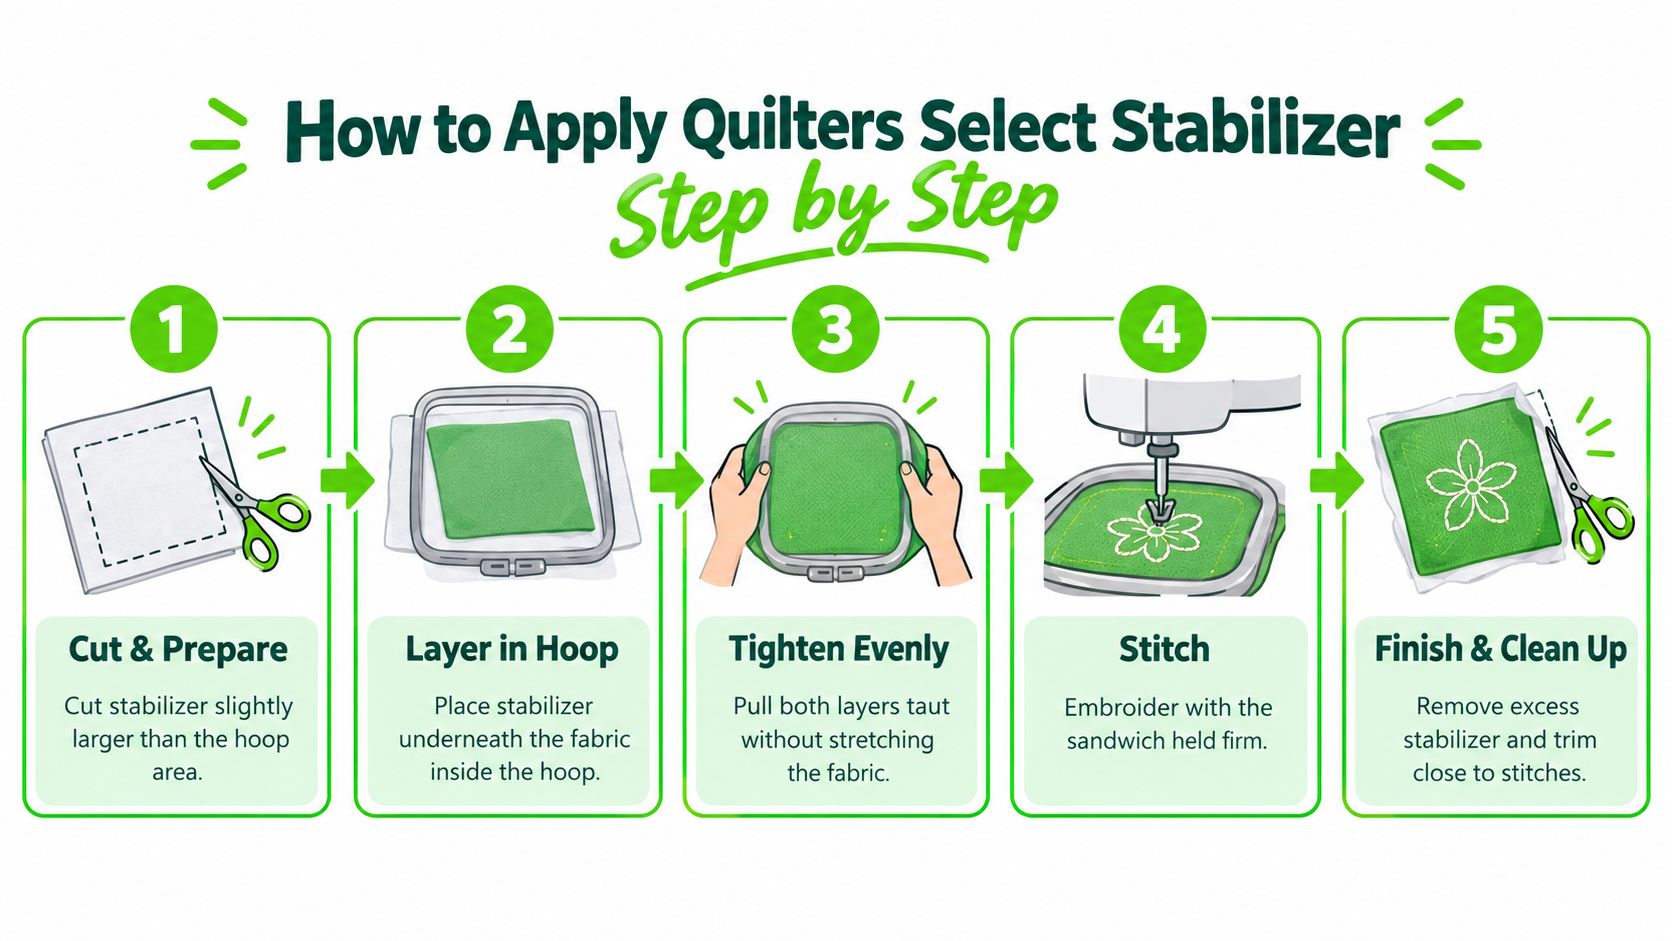
Successful stabilization starts before the hoop closes. The fabric should be pressed, the stabilizer should be cut slightly larger than the working area, and the layers should be positioned without stretching the fabric.
- Prepare the layers. Cut the stabilizer large enough to support the hoop area. Check the product instructions for which side faces the fabric.
- Place the stabilizer. For a non-fusible setup, position it beneath the fabric inside the hoop. For a fusible variety, press it to the wrong side of the fabric using the packaging guidance for heat and time.
- Hoop evenly. Pull the fabric and stabilizer taut, but don't stretch the fabric beyond its natural shape. Both layers should move together when the hoop is lifted.
- Stitch and observe. Puckering, flagging, tunneling, or looping thread can signal a mismatch between the fabric, design density, needle, and stabilizer.
- Finish carefully. TearAway should be removed gently from the perimeter and around the stitched area. Cutaway should be trimmed with sharp appliqué scissors, leaving enough support around the embroidery to protect the stitches.
Avoid the mistakes that create rework
Hooping without stabilizer lets the design pull directly against the fabric. Using the wrong weight can leave the surface puckered or the finished piece unnecessarily stiff. Fusible stabilizer that isn't fully bonded can shift under the needle, while Cutaway trimmed too close to dense stitches can allow the embroidery to distort later.
The best test is a scrap cut from the actual project. A scrap reveals whether the stabilizer shows through, whether the needle and thread behave well, and whether the finished hand still suits the item.
The workflow becomes easier to visualize with this step-by-step embroidery stabilizer guide.
Matching Stabilizer to Quilting and Embroidery Projects
A shopping plan should begin with the project, not the package label. A quilt block, a tote, and a onesie may all receive machine embroidery, but each item brings a different combination of fabric movement, stitch density, durability, and comfort.
Build the project kit
For stable quilting cotton, TearAway can support a quilt label, table runner detail, or decorative topstitching while remaining removable after stitching. A traditional pieced quilt worked on a long-arm quilting machine may also call for temporary backing support, depending on the design and the machine's setup.
For a T-shirt, fleece sweatshirt, baby knit, or stretch tote panel, Cutaway offers continuing support after the hoop is removed. Dense filled embroidery benefits from testing the design with the fabric, stabilizer, and needle together rather than relying on the design preview alone.
- Tote bundle: Cutaway or TearAway selected for the tote fabric, embroidery thread suited to the design, and a fresh needle appropriate for the material.
- Quilt-block bundle: TearAway, quilting thread or embroidery thread as appropriate, and a sharp universal needle for the woven block.
- Onesie bundle: Soft Cutaway, embroidery thread, and a ballpoint or stretch needle selected for the knit.
Thread weight changes how much stitch coverage the fabric receives. A finer 60-weight thread creates a different stitch effect from a 40-weight embroidery thread, so the stabilizer decision should account for the design's actual coverage rather than thread color alone.
Match machines to precision
B-Sew Inn stocks embroidery machines, multi-needle embroidery machines, and long-arm quilting machines, along with hoops, needles, thread, and stabilizer. Multi-needle machines make accurate hooping and consistent layer placement especially important, while long-arm quilting machines require a setup that keeps the quilt sandwich controlled without unnecessary bulk.
Sewists building foundational quilting skills can also use Tutorial AI beginner quilting for project guidance, then bring the fabric and design details to a specialty sewing retailer when choosing the supporting notions.
For a focused supply checklist, the best stabilizer for embroidery guide can help organize the fabric, machine, needle, thread, hoop, and stabilizer decisions before shopping.
Common Stabilizer Mistakes and How to Avoid Them
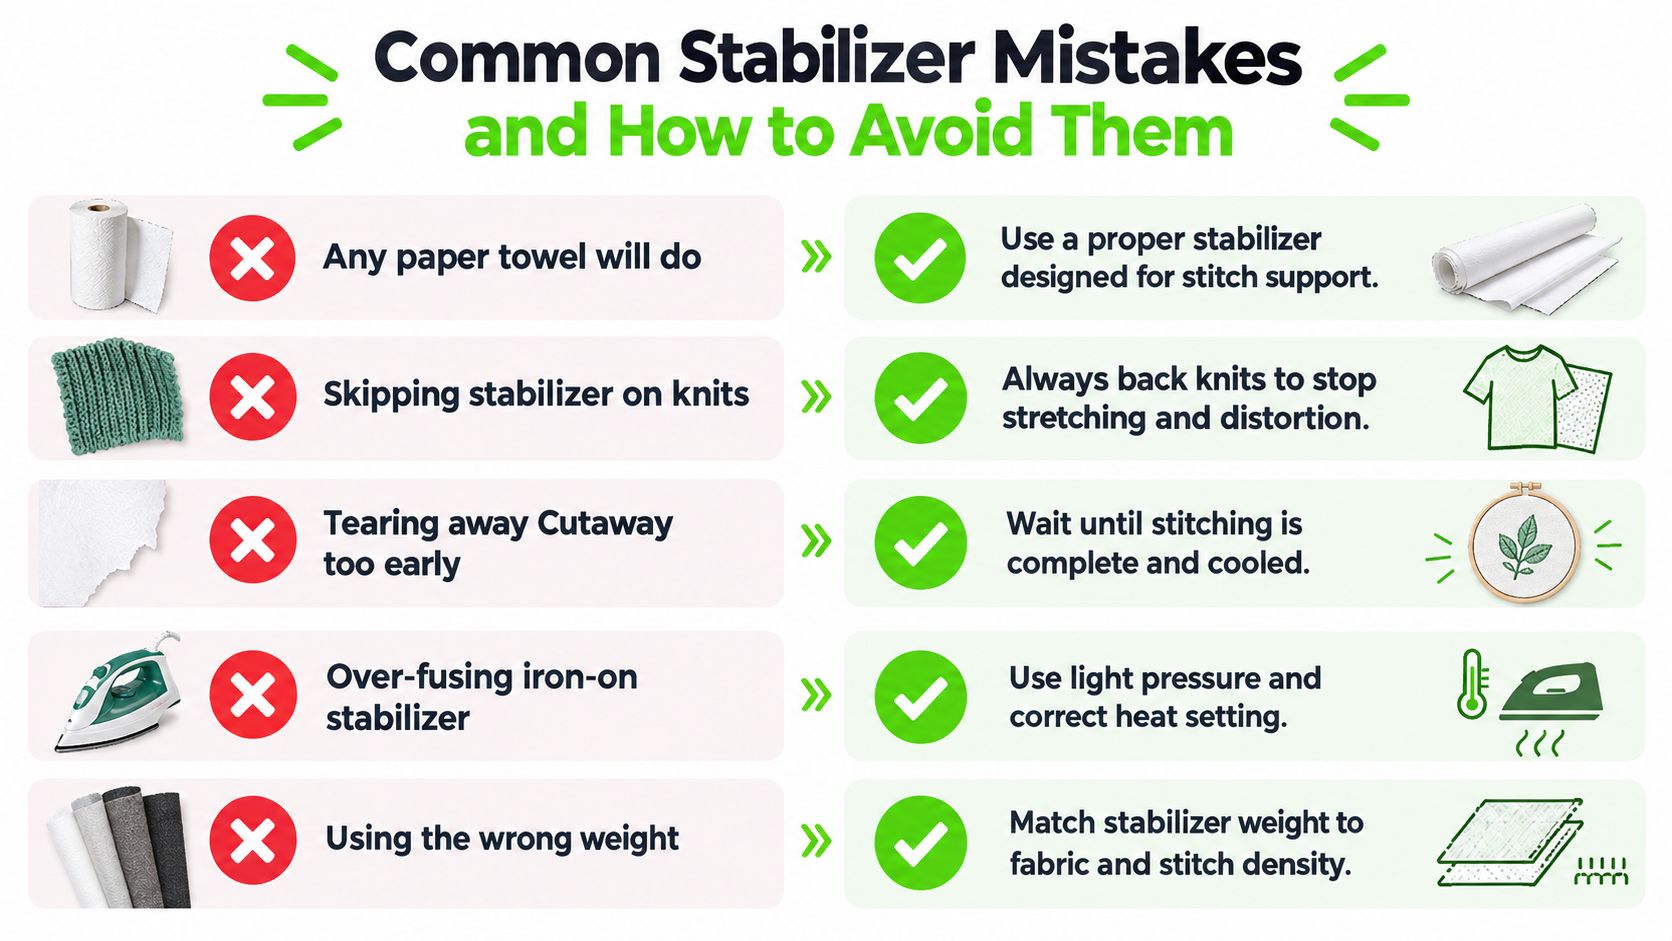
Stabilizer myths usually begin with a shortcut that seems harmless. The trouble appears later as tunneling, puckered lettering, distorted outlines, or a garment that feels too stiff.
Five assumptions worth replacing
“Any paper towel will do.” Household paper products aren't designed to carry embroidery stitch tension. Use a stabilizer made for the fabric and design instead.
“Knits can be stitched without backing.” Knits stretch as the needle moves and can continue changing shape after the garment is worn. A suitable cutaway foundation helps control that movement.
“Cutaway should be torn away as soon as the design finishes.” Cutaway isn't a tear-away product. Let the stitching finish, allow the piece to cool, then trim the excess carefully from the back.
“Iron-on stabilizer can be fused with maximum heat.” Excessive heat or pressure can damage fabric or interfere with the adhesive. Follow the product instructions and test on a scrap before pressing the project.
“Every leftover scrap is worth saving.” Small pieces are useful only when they still cover the working area securely and remain clean, flat, and appropriate for the fabric. A scrap that shifts in the hoop can create more waste than it saves.
Keep a machine-side checklist
Before stitching, check:
- Fabric type: Is it a stable woven, knit, stretch fabric, sheer, or layered quilt?
- Stitch density: Does the design have light outlines, satin stitching, or dense fills?
- Hoop size: Can the fabric and stabilizer fit without forcing or stretching?
- Stabilizer family: Is temporary TearAway or lasting Cutaway the better match?
- Removal method: Will the finished project tolerate tearing, trimming, washing away, or visible support?
The right answer may change when the design changes, even if the fabric stays the same. A simple monogram and a dense filled motif should not automatically receive identical backing.
Next Steps and Frequently Asked Questions
The most useful next step is a small, deliberate test. Select the fabric, design, hoop, needle, thread, and stabilizer that will be used for the finished project, then stitch a sample before committing to the final piece.
A visit to a B-Sew Inn retail store can make that comparison more practical. B-Sew Inn is an authorized sewing, quilting, and embroidery machine dealer with retail stores in Tulsa, Oklahoma, Oklahoma City, Oklahoma, Springfield, Missouri, Humble, Texas, and Fayetteville, Arkansas, plus an online store at bsewinn.com. The stores offer machines from Baby Lock, Bernina, Bernette, Brother, and Janome, as well as sergers, long-arm quilting machines, embroidery designs, thread, stabilizer, notions, cabinets, and cutting tables.
Frequently asked questions
Does stabilizer expire?
Most dry stabilizers don't have a short everyday shelf-life concern when stored clean, flat, and dry. Adhesive-coated products should be protected from heat, moisture, dust, and folding that can damage the coating. If a fusible layer no longer bonds evenly, a scrap test should decide whether it belongs in a finished project.
Can stabilizer layers be stacked?
Sometimes. Two lighter layers can be more effective than one heavy layer on lightweight fabric, according to the guidance from OESD's stabilizer basics. Stacking should still be tested because layers can change the project's hand, thickness, and removal process.
How should water-soluble stabilizer be removed?
Water-soluble varieties dissolve when exposed to water, but the product instructions should determine how much moisture and agitation to use. The project fabric must also tolerate the process. A sample confirms whether the stabilizer disappears completely without disturbing the stitches.
Does stabilizer matter for utility stitching?
It can. Utility stitches on a stable woven may need little or no separate backing, while a decorative stitch crossing a seam, a stretchy fabric, or a curved edge may benefit from temporary support. The same principle applies: fabric movement and stitch structure determine the need.
What if the choice still feels uncertain?
Bring a fabric scrap, the design information, and the machine or hoop details to a B-Sew Inn store. Staff can help compare stabilizer families, threads, needles, and notions, and the store also offers in-person machine mastery sessions, classes, service, repair, and trade-ins. The machine embroidery supplies guide can help organize the shopping list before a visit.
Visit B-Sew Inn to browse stabilizer, thread, needles, hoops, and embroidery supplies online, or bring a project sample to a store in Oklahoma, Missouri, Texas, or Arkansas. The team can help match Quilters Select stabilizer to the fabric, machine, and stitch density, and can also connect the project with an in-person class or machine service appointment.

