

A serger, also called an overlock machine, trims the seam allowance, encloses the raw edge with interlocking loopers, and joins or finishes fabric in one pass. That stitch uses roughly 17.10 m of thread for every 1 m of seam, against about 2.80 m for a lockstitch, so the edge can move with the fabric instead of popping.
A stretchy knit top is a familiar test of patience. The raw edge curls, the seam allowance wobbles under a standard presser foot, and a zigzag that looked fine on the scrap comes out wavy on the garment. The missing piece isn't more patience. It's a machine built for edges.
Think of a tailor who trims, wraps, and stitches in the same motion instead of setting the shears down and picking up a needle. That's the job this tool is built for. It is a speed-and-finish machine, not a stand-in for every other machine in the studio.
Table of Contents
- What a Serger Does in One Pass
- How Loopers and Needles Build the Stitch
- Core Serger Features and What They Do
- Serger Versus Sewing Machine Tasks Compared
- Projects Where a Serger Earns Its Place
- Basic Serger Care and Maintenance Tips
- Deciding If a Serger Belongs in Your Toolkit
What a Serger Does in One Pass
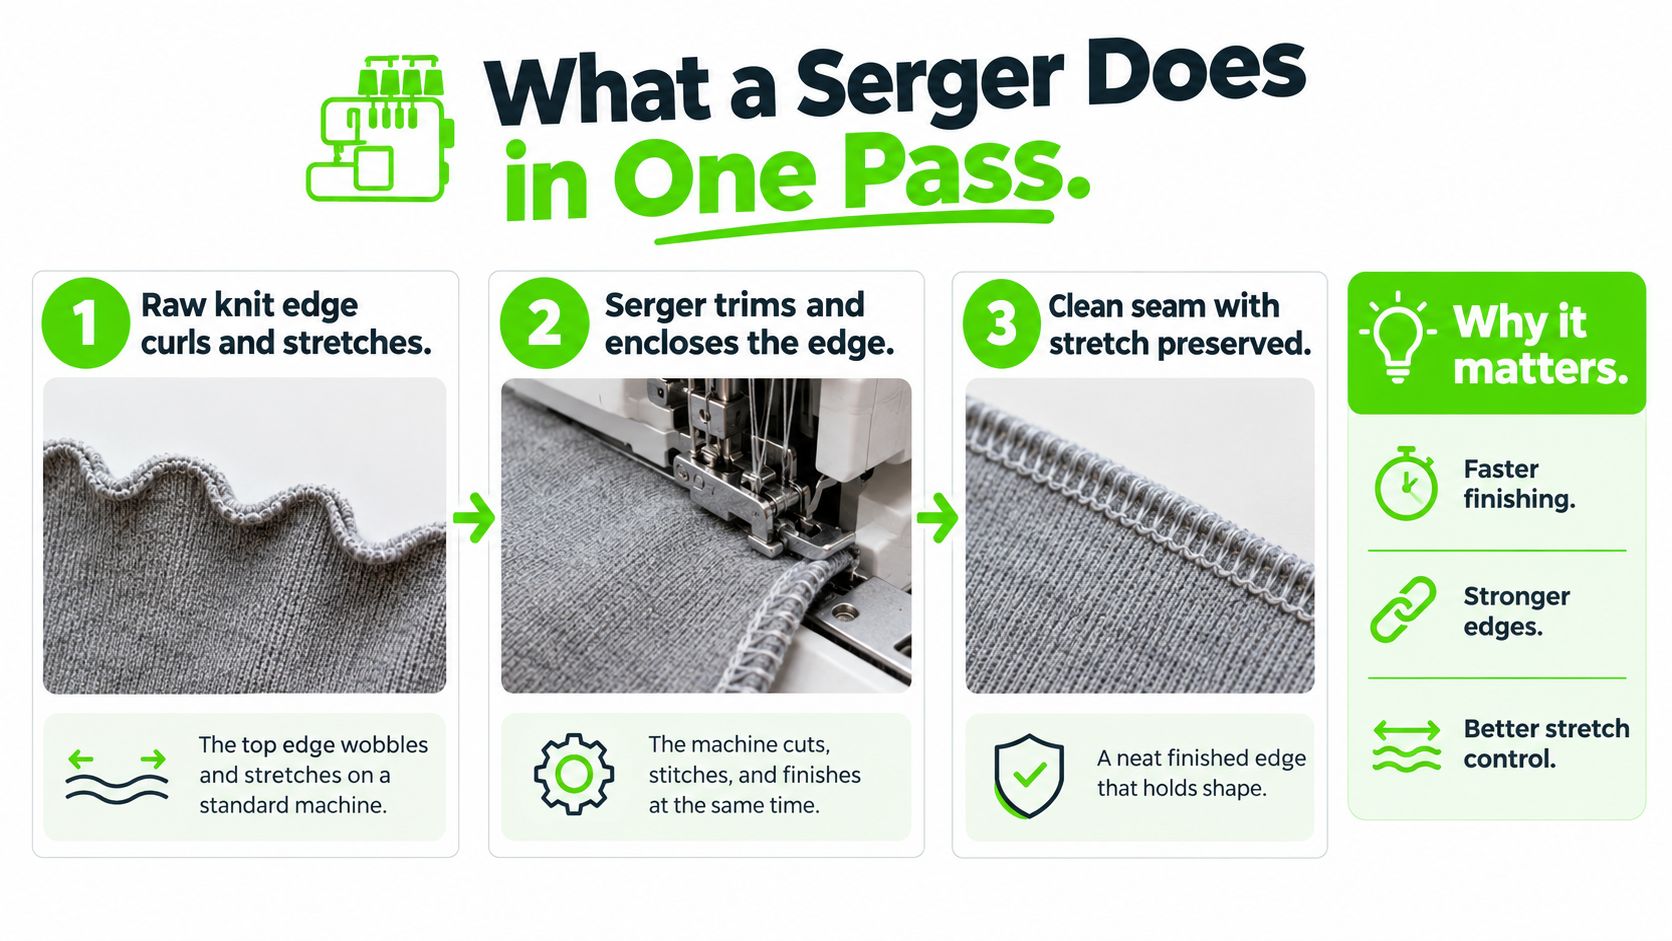
The knit tee is the clearest example. On a conventional machine, the sewist cuts the allowance, sews the seam, then finishes the edge so it won't unravel in the wash. Those are separate passes, and knit fabric fights each one. A serger machine what does it do question usually starts right there, at the curling edge.
As fabric feeds through, the knives trim the seam allowance while multiple needles and loopers form interlocking threads around the raw edge. The New World Encyclopedia sewing machine entry describes that combined action: the machine encloses the edge and either joins two layers or finishes a single edge for hemming. The cut edge never sits exposed long enough to fray.
One motion, three jobs
Trim. The blades cut a clean allowance as the fabric moves, so the sewist isn't measuring and clipping first.
Enclose. Loopers wrap thread around that fresh cut so the raw edge sits inside the seam.
Join or finish. Two layers can be seamed, or one layer can be edged for a hem.
That combination is why production-style seam finishing feels different at home. A neckline, a side seam on jersey, or the inside of a child's T-shirt can look enclosed without a separate overcast pass. Readers who want the hand-sewn version of the same idea can compare it with how to finish seams on a regular machine, then decide which steps are worth handing to a serger.
Practical rule: If the step lives on the fabric edge and the fabric moves or frays, a serger is in its element. If the step sits in the middle of the cloth, it still belongs on a standard machine.
The boundary matters early. A serger generally doesn't insert zippers, sew conventional topstitching, or build structured details. Its value is the enclosed edge and the time saved on seams that would otherwise take two or three passes.
How Loopers and Needles Build the Stitch
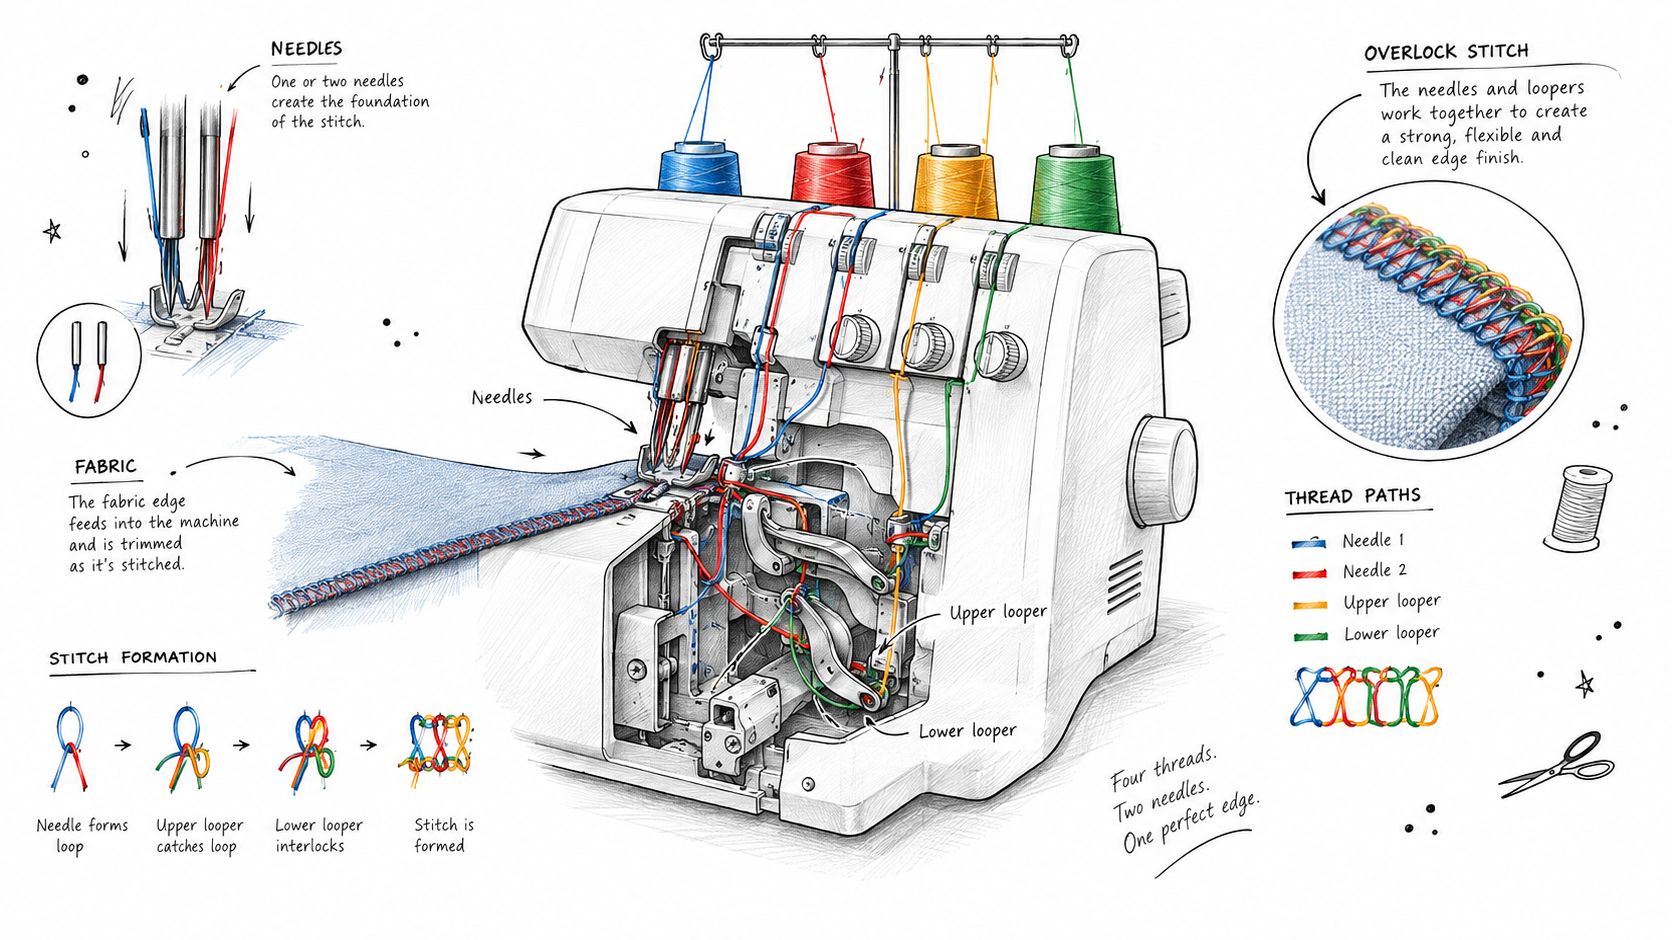
A lockstitch hides a bobbin under the needle plate. A serger doesn't. University of Kentucky Extension guidance on serger stitch formation explains the substitute: interlocking looped stitches made with one or two needles and one, two, or three loopers.
Picture two hands at the edge of a scarf. One hand holds the fabric and plants a stitch. The other hand wraps thread over and under that edge so the cut never shows. The loopers are that wrapping hand. They carry thread around the needle threads and the fabric edge. Nothing has to pass through a bobbin case, which is why the machine can run from cones and why rethreading feels like a different skill.
Three common thread setups
Three-thread overlock: one needle and two loopers. It finishes an edge or makes a narrow seam when maximum strength isn't the goal. A lightweight woven facing or a decorative edge often lives here.
Four-thread overlock: two needles and two loopers. The extra needle line adds strength for construction seams, especially on knits that will be pulled on and off.
Five-thread setup: a chain-stitch seam plus overedge threads. It is the more secure construction choice when a garment takes real wear.
The left needle usually plants the first row and the right needle the second. The upper looper shows on the top of the fabric. The lower looper helps lock the trimmed edge. Because the structure holds a large thread reserve, the seam can stretch with knit fabric more readily than a tight lockstitch. That same reserve is why tension has to be right. A loose looper looks loopy. A tight one puckers the edge or snaps when the fabric is pulled.
Threading is the step that stops most first-time owners. Color-coded paths and a calm order, needles last, keep the loops from skipping. A walk-through of how to thread a serger is worth keeping next to the machine until the path is familiar.
A machine such as the Baby Lock Celebrate 4/3/2 Thread Serger with JetAir™ Threading System is built around that 4/3/2 range and an easy manual tension system so each stitch can be balanced by hand. The point of comparing models isn't brand loyalty. It's whether the thread count and tension controls match the seams a sewist sews.
Core Serger Features and What They Do
Features only matter when they solve a fabric problem. Four of them show up on almost every buying conversation: overlocking, seam finishing, differential feed, and rolled hems.
Overlocking and seam finishing
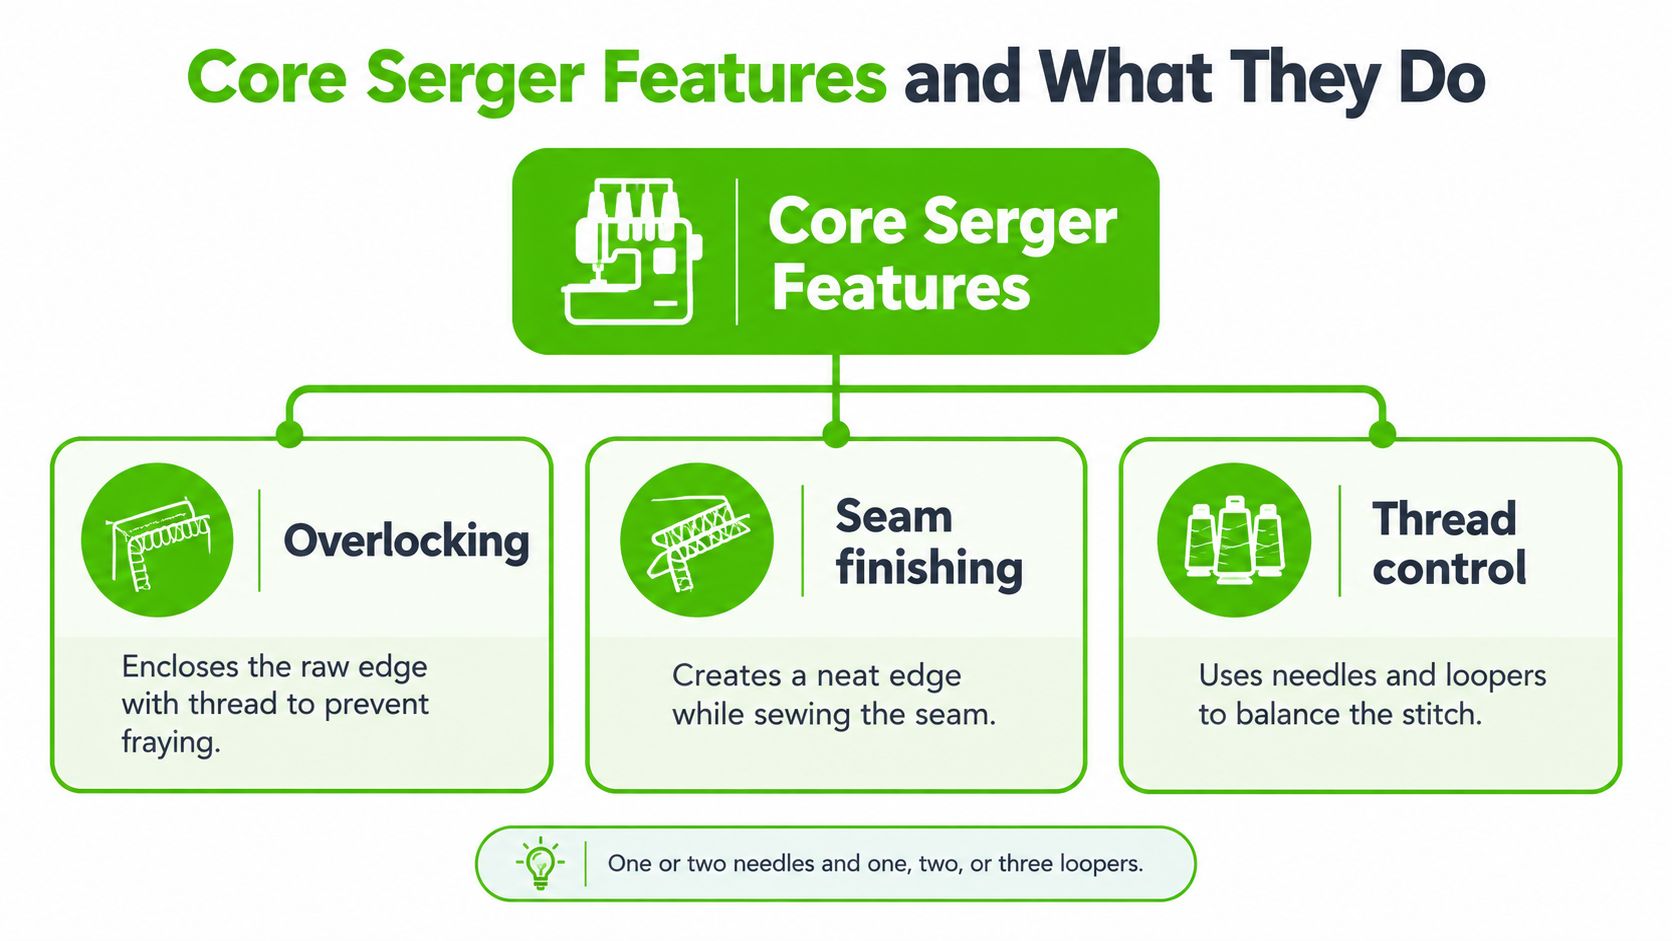
Overlocking is the basic edge-enclosing stitch. Thread wraps the raw edge so washing and wear don't turn a cut into a fringe. On a single layer, that is an edge finish. On two layers, it is also the seam.
Seam finishing is the same idea applied to allowances that would otherwise ravel inside a woven garment. A blouse side seam, a skirt panel, or the inside of a jacket lining can be cleaned in the same pass that joins the pieces. The result looks closer to ready-to-wear because the allowance is narrow, even, and fully covered.
Thread control sits under both jobs. One or two needles and one, two, or three loopers have to balance. If the upper looper pulls to the underside, or the lower looper climbs to the top, the tension isn't matched to the thread and fabric yet.
Differential feed
Differential feed is the control most tied to stretch and lightweight cloth. University of Kentucky Extension explains the mechanism in its differential feed guide: two independently driven feed-dog sections, front and rear, move fabric at different rates instead of as one fixed unit.
Start near the neutral 1:1 ratio and test on a scrap.
- Raise the ratio when a knit seam comes out stretched or wavy. The front dogs ease more fabric in so the seam doesn't elongate.
- Lower the ratio when a silky woven puckers or when extra fullness shows up. Less fabric is fed in, so the seam lies flatter.
- Push the ratio further on purpose to gather, ripple, or make a lettuce edge. The same control that fixes a mistake can also be a design choice.
Feed correction doesn't fix a dull needle, a too-heavy thread, or presser-foot pressure that's crushing the cloth. Pair it with stitch length, foot pressure, tension, and needle choice. A short video of the feed dogs in motion makes the ratio easier to trust before a real neckline goes under the foot.
Rolled hems and narrow edges
A rolled hem turns the same machine toward a clean narrow finish. Tension and which needle or looper stays in the stitch change the structure from a wide construction seam into a fine rolled edge, useful on scarf ends, knit hems, and lightweight woven edges. Buyers should compare stitch configurations and tension controls, not only how many cones the machine accepts. A model that converts cleanly between a four-thread seam and a rolled edge covers more of a real wardrobe than a machine stuck on one look.
A feature list is only useful if each item maps to a fabric already in the stash. Knits point to differential feed. Fraying wovens point to seam finishing. Scarves and hems point to a rolled edge.
Serger Versus Sewing Machine Tasks Compared
The useful question isn't "serger or sewing machine." It's which construction step gains enough from speed, stretch, and an enclosed edge to justify a second machine.
Many edge finishes and stretch seams can be approximated with a zigzag on a regular machine. The serger does that work faster and with a more even, professional edge. University of Kentucky Extension is plain about the other side of the boundary: zippers, buttonholes, topstitching, and standard pressed-open seams still need a conventional machine. A serger also struggles with repairs in the middle of a garment, because it is built to work along an edge, not through the center of a panel.
An industry review aligned with ISO 4915 and ASTM D6193 reports approximate thread use of 17.10 m per 1 m of overlock seam, compared with 2.80 m for lockstitch and 4.80 m for chainstitch, in this stitch classification review. That reserve is why overlock seams are generally more extensible. It is also why thread cost and tension matter more than they do on a lockstitch. In the same review, a four-thread overlock is described as the choice for joining plus finishing, while a three-thread setup is the more economical edge finish when maximum seam strength isn't required. Those stitches sit in the ISO 4915 Class 500 overedge family: loopers carry thread around the edge, and needle threads anchor it into the cloth.
| Task | Serger | Standard Sewing Machine |
|---|---|---|
| Knit side seams and shoulder seams | Four-thread join and finish in one pass, with differential feed to limit waves | Zigzag or stretch stitch works, slower, edge often less even |
| Woven seam allowances that fray | Three-thread finish, narrow and enclosed | Zigzag, overcast foot, or French seam, extra passes |
| Rolled hems and lettuce edges | Tension and feed settings built for the effect | Narrow hem foot, different look, more handling |
| Zippers, buttonholes, topstitching | Poor fit, the work isn't an edge finish | The right tool |
| Pressed-open seams and mid-fabric repairs | Not the machine's path | Standard construction and mending |
A coverstitch is a different machine again, aimed at hems that look like ready-to-wear on the outside. Readers sorting those roles can read what a coverstitch machine does before assuming one serger covers every knit hem.
If most projects are quilts, zippered bags, and woven garments with pressed-open seams, a standard machine still carries the workload. If knits, activewear, and unfinished allowances show up every month, the second machine starts to earn its table space.
Projects Where a Serger Earns Its Place
The machine shows its value on garments that live or die by stretch and a clean inside.
Knit garments. A jersey tee, a cardigan, or a drapey knit dress has long seams that curl the moment they're cut. Serging the shoulder, side, and sleeve seams keeps the edge inside the stitch and lets the seam give when the wearer pulls the garment on.
Activewear. Leggings and similar knits are tugged at the seam every time they're worn. A four-thread construction seam plus careful differential feed keeps the seam from becoming a rippled line after the first workout.
Lingerie and lightweight edges. Narrow three-thread finishes and rolled hems keep thin fabric from bulky allowances. The edge stays soft because there isn't a thick turned hem fighting the cloth.
Children's clothing. Kids' knits are washed hard and outgrown fast. Enclosed seams hold up, and the one-pass seam makes a small wardrobe less of a weekend project.
Production-style finishing. Anyone sewing several of the same top, for family or for a small batch, feels the time difference. Trim, join, and finish stop being three chores.
Janome's serger basics note that stitch formation isn't limited to a basic overcast. Changing thread tension and which needle or looper stays in the stitch opens rolled hems, flatlock seams, picot edges, and braid edges. A flatlock can sit flatter against the skin on activewear. A picot or braid edge can finish a napkin or a lightweight hem without looking like a construction seam.
A simple two-machine order
- Cut and stay-stitch any edge that might stretch before it reaches the serger, using the standard machine.
- Serge construction seams and raw allowances.
- Return to the standard machine for the zipper, buttonholes, and topstitching.
- Press, then check the serged edge. If it waves, adjust feed on a scrap before the next seam.
That handoff is the workflow, not a failure of either machine. A list of serger project ideas helps when the goal is to practice one stitch type on a small piece before committing a whole garment.
Thread, needles, and a few cones matched to the fabric matter as much as the stitch chart. Polyester overlock thread on cones feeds more smoothly than sewing-machine spools perched on adapters, and a fresh needle matched to knit or woven cloth prevents the skips that look like a tension mystery.
Basic Serger Care and Maintenance Tips
Knives, loopers, and tension are the parts that change how a seam looks. A dull blade feathers the edge. Lint packed around the loopers steals thread from the stitch. Tension discs full of fuzz won't hold a setting that worked last week.
A short routine after sewing
Clear the cutting area. Brush lint from the blades and looper area before it packs into the thread path. A small brush reaches places a vacuum nozzle misses.
Check the thread path. After a color or fiber change, follow each cone from the stand through the tension discs to the looper or needle. A skipped guide is a common cause of a "sudden" bad stitch.
Swap the needle. A bent or dull needle skips on knits even when tension looks correct. Change it when the fabric type changes, not only when it breaks.
Retest after any change. Differential feed and tension should be checked on a scrap of the fabric before a neckline or a long side seam. A balanced stitch looks the same on both sides of the edge, without loops hanging off or the fabric tunneling.
Oil only where the manual shows oil points. Over-oiling near thread paths stains fabric.
When home care isn't enough
Persistent skipped stitches, blades that chew instead of cut, or tension that won't hold after a full clean and a new needle are service problems, not scrap-testing problems. A technician can time knives and loopers and replace worn parts without turning the machine into a weekend project. In-person service, repair, and trade-in conversations belong with a shop that already works on the brands on the table, not with a guess from a forum thread.
Owners who keep a small kit nearby, spare needles, a brush, and the right thread cones, spend less time diagnosing and more time sewing. The machine isn't fragile. It is particular.
Deciding If a Serger Belongs in Your Toolkit
A serger pays off when the sewing already leans toward edges and stretch.
Signs it belongs. Knit garments show up often. Seam allowances on wovens get finished on every project. The sewist wants a narrower, more enclosed edge than a zigzag gives, and is willing to learn threading and tension. Small-batch sewing, children's clothes, or activewear makes the one-pass seam a weekly habit rather than a rare trick.
Signs to wait. Projects are mostly quilts, bags, and woven garments with zippers, buttonholes, and pressed-open seams. A zigzag or French seam already looks acceptable, and table space is tight. A standard machine still does that work well. Buying a serger to "finish everything" leads to frustration, because it won't replace the machine that already handles closures and topstitching.
Budget is part of the decision, and so is hands-on time. Machine buyers who expect to spend a significant amount usually want to hear the knives, watch a knit seam, and try threading before they commit. That trial is hard to get from a product photo.
Stores in Tulsa and Oklahoma City, Oklahoma, Springfield, Missouri, Humble, Texas, and Fayetteville, Arkansas, are set up for that kind of test on sergers from Baby Lock, Bernina, Bernette, Brother, and Janome, along with thread, notions, and cabinets. In-person classes and machine mastery sessions cover threading and stitch setup at those locations. They aren't online courses. Service and trade-ins sit in the same shops.
A cover-oriented option such as the Baby Lock Applaud Creative Top Cover Stitch Machine with ExtraordinAir™ Threading is a different tool from a 4/3/2 overlock, aimed at creative cover stitches and hemming rather than the basic trim-and-enclose seam. Sorting those roles before a visit keeps the test focused. A checklist of what to look for when buying a serger is a useful page to read before that appointment, so thread count, differential feed, and rolled-hem settings are already on the list.
Match the machine to the fabrics already on the cutting table. Then try the seam in person, on cloth you recognize, before the purchase.
B-Sew Inn is an authorized dealer for Baby Lock, Bernina, Bernette, Brother, and Janome sergers, with in-person classes, machine mastery sessions, and service at stores in Oklahoma, Missouri, Texas, and Arkansas. Seeing a serger trim and finish a knit edge on your own fabric is the clearest way to judge whether it belongs beside your sewing machine. Visit B-Sew Inn to browse sergers, book a class, or plan a store visit.

