

The zipper is basted into place, the fabric edges line up, and the seam still wanders when the slider reaches the foot. A sewing machine zipper foot is a specialized presser foot shaped to sew beside a raised zipper, but the foot alone won't keep slippery fabric steady or correct an unsafe needle position.
A clean installation starts with matching the foot to the zipper, confirming the machine attachment, and controlling the fabric. Buying another accessory makes sense only after those checks identify what's missing.
Table of Contents
- Zipper Foot Types and When to Use Each
- How a Zipper Foot Keeps the Needle Beside the Teeth
- Check Machine Compatibility Before You Buy a Foot
- How to Attach and Set the Zipper Foot Correctly
- Sewing Tips for Lapped, Centered and Invisible Zippers
- Fixing Skipped Stitches, Puckering and Needle Strikes
- Try the Right Zipper Foot on Your Machine in Store
Zipper Foot Types and When to Use Each
Zipper foot types and the zippers they suit
| Foot type | Zipper it suits | Needle position | Typical projects |
|---|---|---|---|
| Standard zipper foot (snap-on or screw-on) | Lapped and centered conventional zippers | Set to the notch on one side of the foot | Skirts, trousers, pillow covers |
| Adjustable zipper foot | Conventional zippers when both sides need sewing | Block slides to position the foot relative to the needle | Garments and bags with frequent side changes |
| Invisible zipper foot | Concealed coil zipper; the documented foot discussed below accepts coil widths up to 4 mm | Needle positioned close to the coil held in the groove | Dresses, skirts, tailored garments |
Start with the zipper specified in the pattern, not the garment name. A dress might use a conventional zipper beneath a fabric lap or a concealed coil zipper hidden within the seam. Those installations need different kinds of guidance.
A standard foot is the practical starting point for conventional coil or molded-tooth zippers. Its narrow shape leaves room beside the teeth, making it suitable for centered openings and lapped installations. Snap-on and screw-on describe how the accessory attaches, not different zipper techniques.
Choose guidance rather than extra adjustment
An adjustable foot offers more freedom to position its toe beside a bulky edge. Sliding the block changes the foot's relationship to the needle; it doesn't move the machine's needle mechanism. That flexibility is useful, but the adjustment must be secured before sewing.
An invisible zipper foot has grooves underneath that open and guide the concealed coil. It isn't a general replacement for a conventional zipper foot. The opening table's dimensional limit applies to the particular documented design, not every invisible foot on the market.
Buying rule: Match the zipper construction first, then match the foot to the machine model.
B-Sew Inn sells Baby Lock, Bernina, Bernette, Brother and Janome machines along with accessories. The online accessory selection is a starting point for standard, adjustable and invisible-foot enquiries; model compatibility should be confirmed before purchase. The sewing machine feet guide helps distinguish these specialized shapes from general-purpose feet.
How a Zipper Foot Keeps the Needle Beside the Teeth
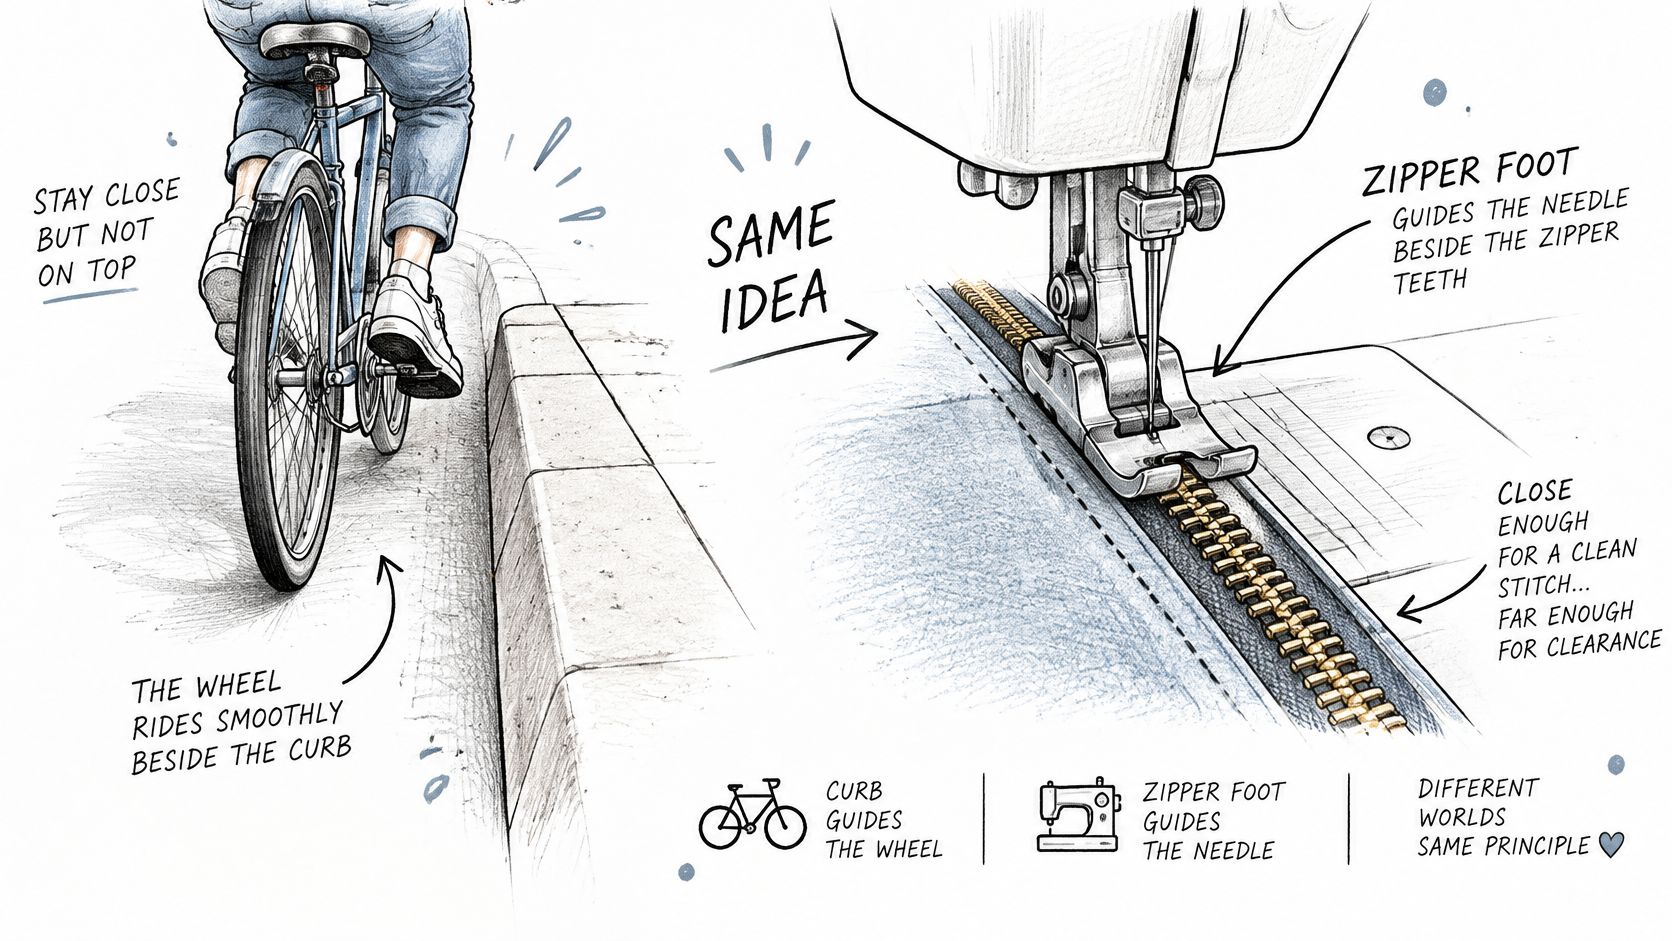
A bicycle travels smoothly beside a curb when its wheels stay on the road rather than climbing the raised edge. A conventional zipper foot works on a similar principle: its sole stays on the fabric while the zipper teeth remain beside it.
The illustration shows that relationship between the flat surface and the raised obstruction.
A broad general-purpose foot can ride onto the teeth. That changes how the foot presses on the fabric, encourages the layers to shift, and makes it harder to maintain an even distance from the zipper. Forcing the fabric sideways to compensate usually makes the seam less predictable.
A zipper foot reduces the contact area and leaves a clear needle path beside the fastening element. The fabric still needs support, though. Positioning the toe mostly over unsupported seam allowance can create feeding problems even when the needle misses the metal.
Close stitching still needs clearance
The Bernina zipper-foot technical guide specifies a typical zipper-insertion stitch length of 2–3 mm, with the foot positioned to let the needle sew beside the teeth. The correct relationship is close enough to make an even seam without letting the needle contact the zipper or foot.
A useful assessment looks at both the stitch line and the fabric. The needle should land consistently in the intended place, while the fabric remains flat beneath the sole. A seam that looks straight only while the fabric is being pulled sideways isn't a successful setup.
- Too close: The needle catches the teeth or coil, and the zipper may no longer open freely.
- Too far away: The seam may expose more zipper tape than intended or leave an uneven fold.
- Poorly supported: The fabric can lift or shift around the needle despite adequate metal clearance.
The demonstration provides another view of the foot during zipper sewing.
The important distinction is between needle clearance and fabric control. Clearance prevents a mechanical collision; fabric control determines whether the prepared layers travel evenly through the machine. A suitable foot must provide both, and neither can be judged from the accessory's name alone.
Check Machine Compatibility Before You Buy a Foot
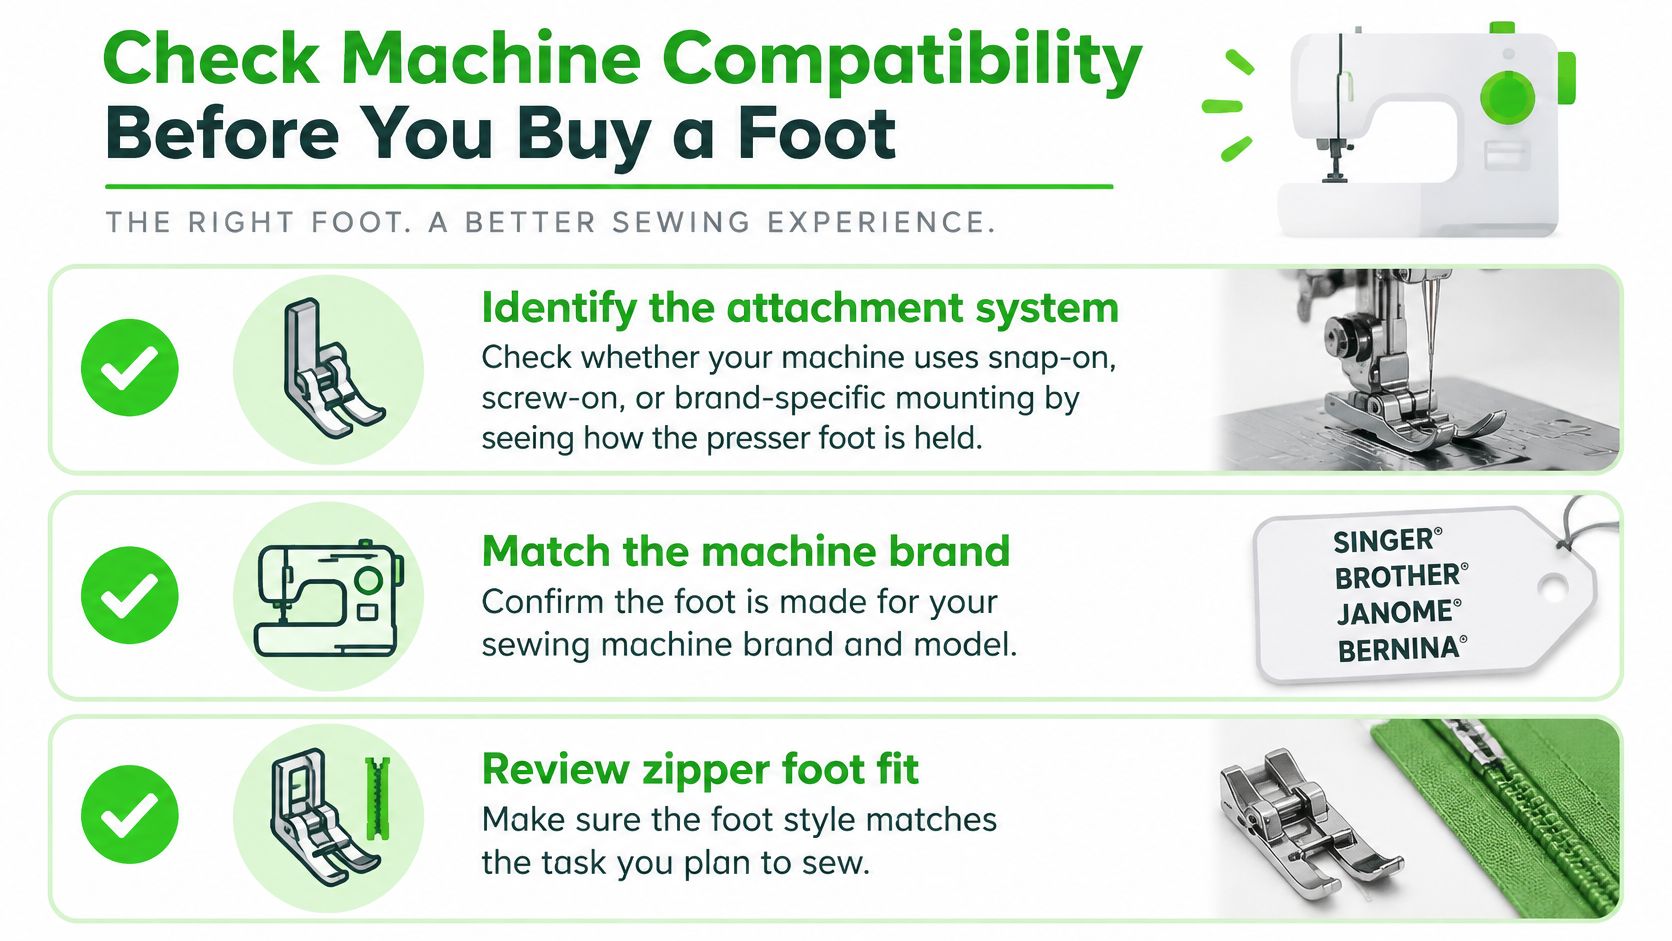
A foot that clips onto a holder isn't automatically safe to sew with. The attachment may fit while the needle opening, sole height or feed-system clearance remains wrong for the machine.
This compatibility checklist separates physical attachment from usable fit.
Check the complete mounting arrangement
- Identify the attachment system. A snap-on sole connects to a holder, while a screw-on foot may replace that holder. Some machines use brand-specific mounting arrangements, so the existing foot and holder should both be identified.
- Confirm shank compatibility. The shank is the mounting connection above the foot. Low-shank and high-shank accessories aren't interchangeable even if the screw appears similar; the manual should identify the correct arrangement.
- Check usable needle positions. The machine must place its needle safely in the intended notch on each required side. An attached foot doesn't necessarily support the machine's full stitch-width range.
- Inspect the feed-system requirements. Integrated feeding mechanisms may require a compatible foot shape or a particular operating position. Nothing should interfere with the mechanism behind the needle.
- Choose a straight stitch. Narrow zipper feet commonly lack room for zigzag or decorative needle movement. A wider stitch can send the needle directly into the metal.
- Verify older or mixed-brand combinations. An adapter can change attachment without solving every height or clearance issue. Model-specific confirmation is safer than assuming that another machine's foot will work.
A useful shopping record includes the machine's full model name and photographs of the existing holder, attachment screw and sole. A photograph of the machine badge alone won't show whether an adapter has already been fitted.
Compare machine features that matter in use
Baby Lock, Bernina, Bernette, Brother and Janome machines can use different accessory systems across their ranges. Brand matching is necessary, but model matching is the more precise check.
For a machine purchase, useful features include controllable sewing speed, convenient needle positioning and suitable accessory support. A hands-on trial should include the intended zipper foot, not just the general-purpose foot supplied for a demonstration.
The sewing machine attachments guide provides additional context for identifying accessories. When the holder or feed arrangement remains uncertain, staff should confirm the combination before an accessory order is placed.
How to Attach and Set the Zipper Foot Correctly
Setup should begin with the machine manual open and the correct accessory identified. A centered needle position is a starting reference, not permission to sew before the final notch alignment has been checked.
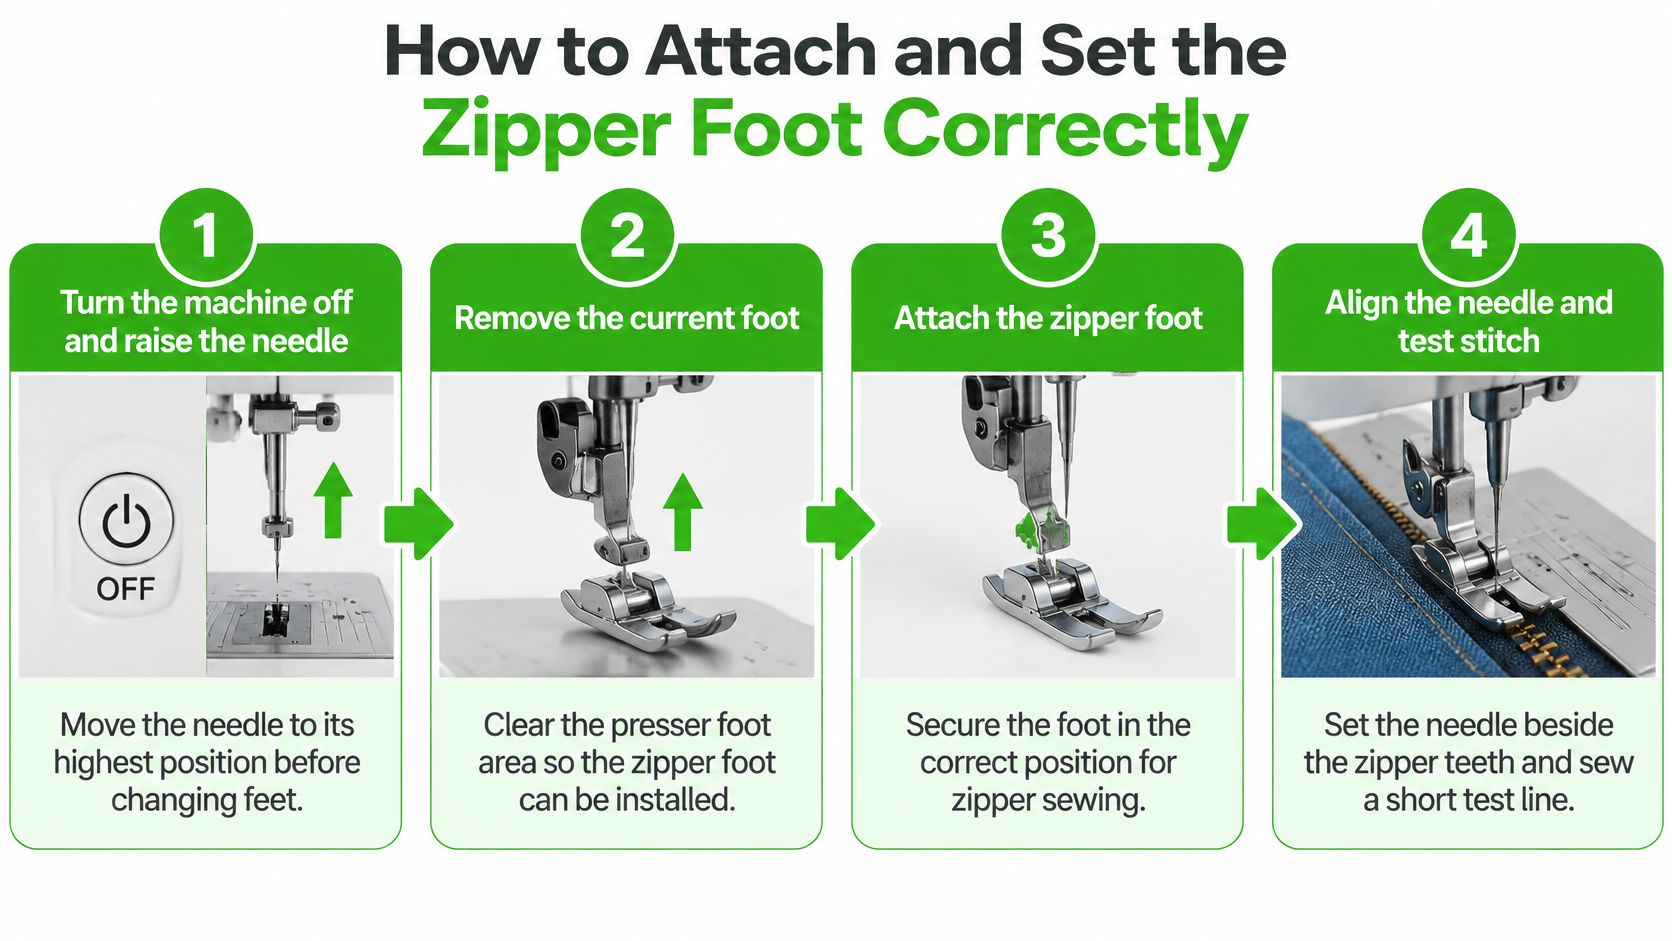
The visual summarizes the attachment sequence; the detailed steps add the necessary clearance checks.
Install first, then establish the needle path
- Switch off the machine and raise the needle fully. Raise the presser foot and remove the existing sole or complete foot assembly as the attachment system requires. A lowered needle can obstruct removal and be bent while the new foot is fitted.
- Secure the zipper foot to the correct holder or shank. A snap-on foot should engage fully; a screw-on assembly should sit correctly against its mounting surface before the screw is tightened. A loose or partly engaged attachment can change position under sewing pressure.
- Choose the mounting side for the seam being sewn. The Bernette zipper-foot instructions specify attaching on the right-hand side of the pin for the zipper's left side, and on the left-hand side for its right side. This arrangement leaves the teeth beside the foot rather than beneath its sole.
- Select a straight stitch and establish the starting settings. The Brother sewing-machine manual specifies a zipper stitch length between 2 and 3 for its setup. Begin with the needle centered and the feed dogs raised, then use the machine's permitted needle adjustment or the foot's adjustment to establish the final notch alignment.
- Lower the needle slowly toward the notch. Check that it enters without brushing the metal; if an adjustable block needs moving, reposition it and retighten its screw. The centered setting in the previous step is only the resting reference before this final alignment.
- Turn the handwheel through a complete stitch cycle. Rotate it in the direction specified by the machine manual, with the foot lowered over a test fabric sandwich. This catches interference before powered sewing, including contact that isn't obvious while the needle is raised.
Test the complete fabric sandwich
The test sample should contain the same fabric, zipper tape and seam allowances as the project. Sewing through a single scrap won't reveal how the foot behaves when it reaches the actual layer thickness.
If the layers creep despite correct alignment, consult the presser-foot pressure adjustment guide. Pressure adjustment can help feeding, but it cannot make an incompatible accessory safe.
If the needle touches metal at any point during the manual cycle, stop and reposition before powered sewing.
After a successful test, check that the zipper opens freely and that the stitches haven't caught its teeth. Appearance alone isn't enough to confirm a usable installation.
Sewing Tips for Lapped, Centered and Invisible Zippers
Consider a hypothetical cotton skirt with a 20 cm lapped zipper. The opening has been marked and pressed, and the zipper tape has been basted so it won't slide as the first seam begins.
Fit the standard foot for the first side and stitch from the bottom of the opening toward the top. Keep the prepared fold aligned without pulling it toward the needle. As the slider approaches, stop with the needle down, lift the foot, move the slider behind it, lower the foot and continue.
Reposition the foot for the opposite side, check its clearance, and sew in the same bottom-to-top direction. Follow the pattern's overlap and stitching marks rather than trying to make both sides look identical: a lapped zipper deliberately covers the fastening with a fabric flap.
Keep a centered zipper balanced
A centered zipper in a pillow cover uses a standard foot on both sides. The opening's folded edges should meet evenly over the zipper, with the needle on the zipper side of the foot during each pass.
Basting holds that relationship more reliably than steering loose layers with fingertips. Press the opening before stitching, then check the completed side before continuing. If the fold has shifted, correct it rather than hoping the opposite seam will pull everything into place.
The Zipper Foot is a standard accessory for inserting zippers, snap tape and more, with a narrow toe that provides visibility and precision. Its suitability still needs to be checked against the intended machine model.
Let an invisible foot guide the coil
For an invisible zipper in a dress, open the zipper and place a coil in the appropriate underside groove. Sew from the top toward the slider, then use the other groove for the opposite half, keeping any waist seam or other matching mark aligned.
The Bernina invisible-zipper foot manual specifies a coil width of up to 4 mm for that documented foot. A wider coil may not seat correctly, so the foot's own specifications matter more than a general invisible-foot label.
The grooves expose the coil's fold for close stitching. If needle-position adjustment is permitted, place the stitch near that fold without piercing the coil. Stitching closer isn't automatically better: a caught coil can make the zipper difficult or impossible to operate.
- Before stitching: Baste matching garment seams into alignment and keep bulky seam allowances controlled.
- At the slider: Stop before the foot is forced away from its intended path.
- After stitching: Close the zipper gently and check both alignment and free operation before finishing the remaining seam.
The zipper-sewing guide supports the installation process, while the online store's presser-foot selection provides a route to checking accessory options by machine. Make a test seam on matching scraps before sewing the garment.
Fixing Skipped Stitches, Puckering and Needle Strikes
Buying a new foot won't straighten a seam if the fabric is being stretched or the adjustment screw is loose. Diagnose the mechanical path first, the fabric handling second, and the thread setup third.
The manual clearance test should come before any powered troubleshooting. Once that passes, use a controlled sample rather than repeatedly unpicking the garment.
Match the symptom to the first useful correction
Zipper foot symptoms, causes and fixes
| Symptom | Likely cause | Fix |
|---|---|---|
| Skipped stitches | Foot sits too far from the needle | Recheck clearance by hand and reposition within the notch |
| Needle hits the foot or breaks | Adjustable foot shifted during sewing | Retighten the adjusting screw and recheck clearance by hand |
| Puckering along the seam | Fabric stretched while sewing, or pressure too high | Feed without pulling and baste; test lower presser-foot pressure on scrap |
| Bump at the end of the seam | Failed to pivot cleanly at the zipper stop | Pivot with the needle down before continuing |
| Tangled thread at the start | Upper thread not held under the foot | Hold thread tails and route the upper thread under the foot before the first stitch |
An adjustable foot can move under vibration if its locking screw isn't secure. After a needle strike, inspect the needle and foot before restarting; replacing a damaged needle is necessary even if the alignment has been corrected.
Skipped stitches also warrant checking needle condition and suitability for the fabric. A knit needs a suitable needle point, while dense layers need a needle capable of penetrating the sandwich without excessive deflection. The skipped-stitch troubleshooting guide helps separate those causes from foot-position problems.
Change one variable at a time
Puckering often begins before the needle reaches the zipper. Unpressed folds, stretched edges and unsecured slippery layers can all produce an uneven result. Baste and support the work first; changing tension immediately can introduce another problem without correcting the original one.
Satin can slip, knits can stretch, and denim can tilt the foot at bulky intersections. Coated fabrics may resist feeding, while multiple layers can creep against each other. A technically compatible accessory doesn't remove those material differences.
Controlled test: Keep the fabric, zipper, needle and thread consistent, then change only one setting or handling method before comparing seams.
For a tangled start, rethread with the presser foot raised, route the upper thread correctly beneath the foot, and hold the thread tails clear as stitching begins. Test with fabric under the foot rather than running the machine empty.
Persistent strikes, repeated needle breakage or continued skipping after these checks belong with the service department. More pressure on the pedal won't resolve a mechanical fault.
Try the Right Zipper Foot on Your Machine in Store
A store visit is the fastest route when accessory fit remains uncertain. B-Sew Inn is an authorized sewing, quilting and embroidery machine dealer with stores in Tulsa OK, Oklahoma City OK, Springfield MO, Humble TX and Fayetteville AR, plus an online store.
Bring the full machine model, the existing foot holder and a sample zipper. When practical, arrange to bring the machine so staff can confirm attachment, shank compatibility and needle clearance on the actual setup. The service department can assess interference, make necessary adjustments and handle repairs.
Try the task before choosing the equipment
Hands-on testing is especially useful before a significant machine purchase. A zipper sample reveals how comfortably the controls, needle positioning and feeding features work for garment sewing. Trade-ins are also available for owners considering a change.
B-Sew Inn sells and services Baby Lock, Bernina, Bernette, Brother and Janome machines. Its range also includes sergers, longarm quilting machines, embroidery designs, thread, stabilizer, notions, cabinets and cutting tables. It's a dealer, not a machine manufacturer, and doesn't create custom machine designs.
- Visit a store: Arrange a foot-fitting or machine trial with the intended zipper and fabric.
- Book hands-on instruction: Ask about in-person classes and machine mastery sessions at the retail locations.
- Browse accessories: Use the online store to explore presser feet, needles, thread and notions, with model compatibility confirmed before ordering.
- Contact the team: Arrange a service assessment when the needle won't clear or the machine still won't sew correctly.
B-Sew Inn offers machine-compatible accessories, in-person instruction, and service for zipper-foot fit and sewing problems. Visit B-Sew Inn to arrange a hands-on foot check, discuss a class, or find the supplies for the next zipper project.

