

A skirt zipper has dropped its slider into the hem, or a jacket closes neatly until the pull slips off at the collar. The garment still looks usable, and replacing the whole zipper feels like a lot of unpicking for such a small failure.
Zipper stop replacement can save that sewing work, but only when the missing stop is the actual problem. The useful starting point isn't a pair of pliers. It's identifying the zipper's construction, the failed end, and whether the teeth still close properly.
Table of Contents
- Match the Stop Before You Buy Parts
- Measure the Chain and Set Out Tools
- Remove Crimp and Test the Stop
- Read the Symptom Before Another Stop
- Resew the Zipper or Bring It In
Match the Stop Before You Buy Parts
A zipper stop is a terminal component, separate from the teeth that interlock along the chain. Top stops limit upward slider travel; a bottom stop keeps the slider on a closed-end zipper. The Nike zipper-repair guide distinguishes those stops from the insertion pin and retaining box used at the lower end of a separating jacket zipper.
That distinction prevents a frustrating parts purchase. A skirt zipper stays joined at its base, while a separating coat zipper must come completely apart. Adding a bottom stop across the base of the coat zipper would obstruct the very connection that allows the coat to fasten.
Which zipper stop fits which zipper
| Zipper situation | Stop to install | Leave alone | Repair limit |
|---|---|---|---|
| Closed-end metal | Top stop on each tape plus a bottom stop | Sound teeth and slider | Stop repair only if the track still closes |
| Closed-end coil | Coil-sized top stops plus a bottom stop | Tape and coil | Same limit; coil stops aren't interchangeable with metal-tooth stops |
| Molded plastic | Matching plastic top and bottom stops for a closed-end zipper | Surrounding teeth and tape; discard a crushed plastic stop, which is rarely reusable | Replace the zipper if teeth are cracked |
| Separating jacket or coat | Top stops only | Insertion pin and retaining box | Pin or box damage means a new zipper |
| Missing last bottom tooth, closed-end | Wider bottom stop covering that single gap | Straight teeth above the gap | Only an isolated missing terminal tooth; a bent track fails |
| Bent teeth, cut tape, or worn slider | None as a stop-only remedy | The assembly until the failure is assessed | Replace the zipper for structural damage; an otherwise sound zipper may accept a matching replacement slider |
The table describes the hardware arrangement, not a requirement to replace every sound stop. When a top stop is missing but the bottom stop is secure, the undamaged bottom hardware can stay in place.
The molded-plastic row also needs its location qualifier. A molded-plastic jacket zipper that separates belongs under the separating-jacket rule, not the closed-end rule.
The boundary between a stop repair and a zipper repair
A missing terminal tooth on an otherwise straight closed-end chain is a narrow exception. A wider bottom stop may enclose that isolated gap, provided the remaining chain closes and the new stopping position leaves enough usable opening. It isn't a way to cover a run of damaged teeth.
A worn slider deserves its own diagnosis, too. Replacing it can be reasonable when the tape and chain remain sound; crimping a new stop won't restore the slider's internal shape.
Practical rule: A stop controls where a working slider stops. It doesn't repair the chain the slider travels over.
Stops belong to the small hardware category explained in the guide to sewing notions. Matching that notion accurately preserves the useful zipper instead of turning a small repair into unnecessary replacement.
Measure the Chain and Set Out Tools
Stop size follows chain size, not the garment. The Sewing Machine Advice installation guide gives the common sizing rule: a #3 zipper has a closed chain approximately 3 mm wide, while a #5 zipper has a closed chain approximately 5 mm wide.
The measurement runs across the meshed teeth or coil, perpendicular to the zipper's length. Fabric tape isn't part of that measurement. A ruler or caliper should span the outside edges of the closed chain without squeezing it narrower.
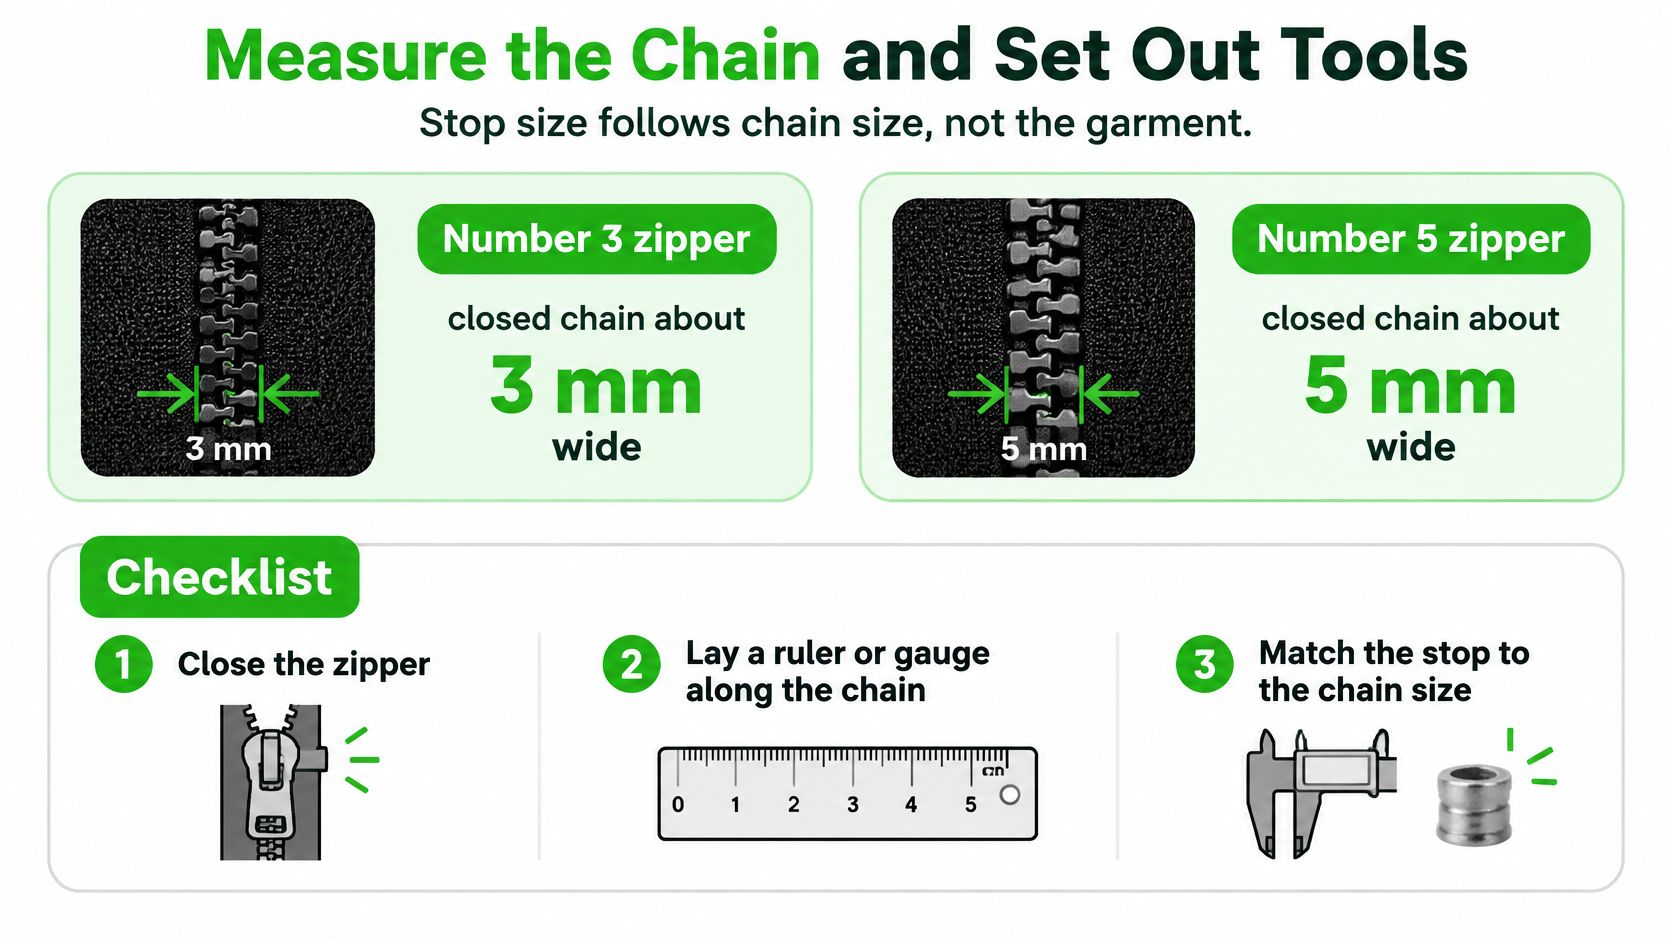
Zipper size and the stop that fits
| Zipper size | Closed chain width | Common projects | Stop fit note |
|---|---|---|---|
| #3 | About 3 mm, under the sizing rule cited above | Skirts, dresses, light pouches | A larger stop may not crimp cleanly and can jam the slider |
| #5 | About 5 mm, under the sizing rule cited above | Jeans, jackets, bags | A smaller-gauge stop won't seat or grip correctly |
| Unknown number | Measured across the closed teeth | Any garment | Stop purchase follows measurement and construction identification |
Project examples help with recognition, but they aren't specifications. A substantial bag may use a smaller zipper for an inside pocket, and a lightweight jacket may still need sturdy separating hardware.
Construction matters alongside gauge. A coil is a continuous spiral, while metal and molded-plastic chains have individual teeth. Similar measured widths don't make their stop shapes interchangeable.
A useful shopping record and tool tray
A short written record prevents guessing at a notions counter:
- Construction: Metal teeth, molded-plastic teeth, or coil.
- Chain size: Measured across the closed chain, plus any readable size marking.
- Tape width: Recorded separately to help identify the assembly and any eventual replacement zipper.
- Stop position: Upper end or closed lower end.
- Opening style: Separating or closed-end, with a photograph of the existing hardware.
The tool tray should hold fine needle-nose pliers, end nippers, a seam ripper, a hand-sewing needle, heavy thread, and the correctly matched stop. End nippers are gripping tools for this job, not permission to cut through the hardware and tape.
For a slider replacement, the REI jacket-zipper repair guide describes removing only the stop beside the slider, limiting disturbance to the assembly.
A narrow zipper foot belongs on the resewing tray, not beside the pliers for crimping. The sewing machine zipper foot guide explains the accessory's role beside the chain. A standard zipper foot or a compatible Baby Lock zipper and piping adjustable foot may suit the sewing stage, but machine fit needs confirmation before purchase.
An existing machine may be entirely adequate for closing the opened seam. For a sewist also considering a machine purchase, the Baby Lock Joy Sewing Machine has a drop-in bobbin and free arm; neither feature substitutes for matching the zipper foot to the machine.
Remove Crimp and Test the Stop
The garment should lie flat under good light, with the zipper tape supported rather than hanging from the damaged stop. Folded facings, lining, and loose seam allowances need to stay out of the plier jaws.
The repair proceeds only after the replacement hardware matches the zipper's construction and size. A stop that looks almost right can still obstruct the slider or fail to hold.
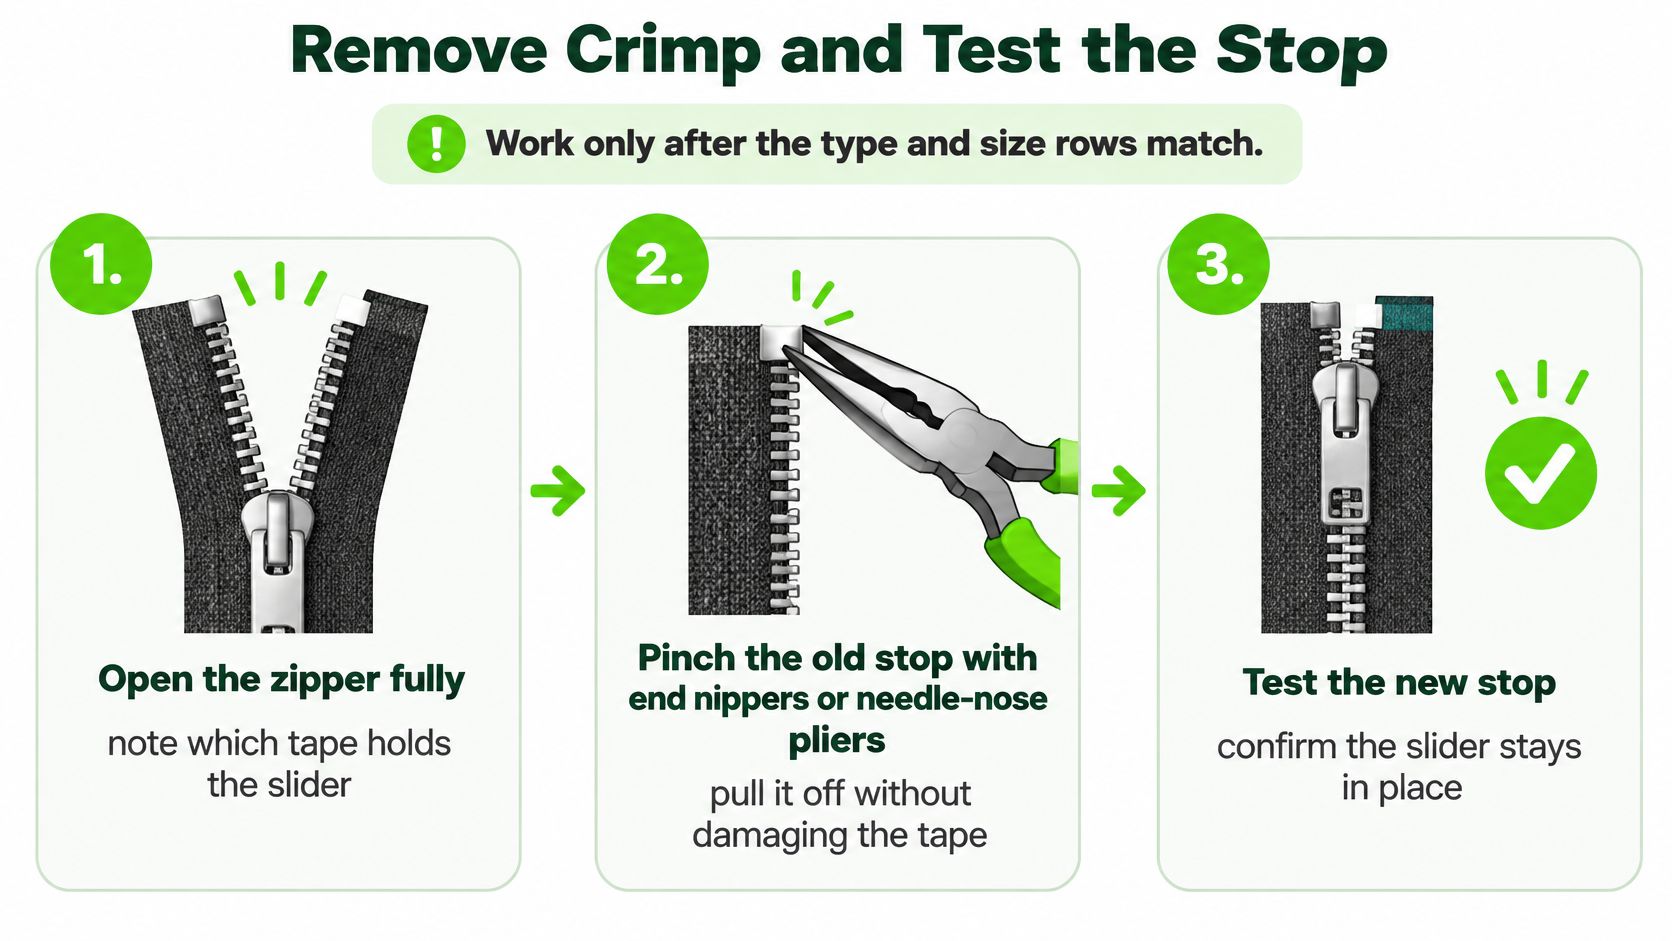
A controlled removal and fitting sequence
- The zipper opens fully, with the slider's position recorded. A photograph helps preserve the pull direction and the relationship between the slider and tape. On a closed-end zipper, fully open means down to its existing lower limit, not pulling beyond the chain. Any seam covering the stop needs only enough opening to expose the hardware clearly.
- The damaged stop comes away without cutting the tape. Fine needle-nose pliers or end nippers grip the stop itself while the other hand supports the tape. The tool pulls the stop away from the fabric with controlled movement, rather than wrenching sideways through the teeth. For a sewn fabric stop, a seam ripper lifts the stitches individually; the seam ripper guide helps distinguish that stitch-cutting job from cutting the zipper tape.
- The exposed chain receives a close inspection. Offset teeth can be eased back into alignment from the bottom upward, alternating sides so the chain doesn't advance unevenly. This is gentle repositioning, not an attempt to straighten cracked or sharply crushed teeth with force. A tooth that won't return to a usable position ends the stop-only repair.
- Any replacement slider matches the original size, construction, and orientation. For a non-separating zipper, the chain ends enter the front openings evenly, without advancing a side ahead of its partner. A separating zipper retains its insertion pin and box throughout the operation. A slider that needs force to enter is a signal to check fit and alignment, not to squeeze harder.
- The slider proves the chain before a new stop closes the exit. It travels slowly through the usable length while the operator watches for uneven engagement, snagging, or opening behind the slider. Without an installed terminal stop, fingers must keep the slider from escaping at the exposed end. Repeated smooth travel matters more than getting through a stubborn spot once.
- The new stop sits beyond the last sound tooth with working clearance. Its intended location must allow the facing to lie flat and the slider to reach the stop without snagging the garment edge. The YKK revived-top-stop documentation specifies approximately 7 mm of garment-edge clearance for that construction, not a universal spacing rule for every zipper. The same documentation describes a gentle zig-zag slider release on engineered serviceable designs; that motion shouldn't be copied on ordinary hardware or used as a reason to cut tape.
- Narrow-jaw pliers close a crimp-style stop progressively. Light squeezes at several points seat the stop without flattening the whole component in a crushing bite. The jaws should contact hardware, not teeth, and shouldn't catch the garment facing behind the tape. A sound metal stop may accept re-crimping, but a crushed plastic stop shouldn't be treated as reusable; non-crimp replacement hardware needs its specified installation method.
- A thread stop offers a fallback when appropriate hardware isn't available. The Spruce zipper-repair guide describes heavy or doubled thread worked into approximately six to eight dense stitches across the zipper end. A hand needle builds a compact barrier through sound tape, without piercing hard teeth. On a bag, cushion, or jacket top, this can provide a temporary stopping point, but it mustn't bridge the opening mechanism of a separating zipper.
- The installed stop receives a light-tension test. The slider completes repeated open-close travel while the tape is held gently apart, approximating ordinary use without yanking. The operator checks for teeth opening, the slider lifting over the barrier, or the stop moving on the tape. Any movement means the repair hasn't passed, even if the zipper closes when lying loose on the table.
- Resewing waits until the assembly passes. Only smooth travel, secure engagement, and a stationary stop justify closing the access seam. Loose thread ends and hardware fragments come away before the garment returns to the sewing machine. A final check with the facing folded into its worn position catches interference that a flat-table test can miss.
The moment the pliers should stop
A secure stop doesn't need to look flattened. It needs to stay fixed without tearing the tape or obstructing the slider.
Pliers should stop when the hardware grips securely, not when the metal can't be squeezed any flatter.
A deep impression in the tape, spreading fabric yarns, or a newly distorted tooth is a reason to pause. More pressure won't repair damage caused by the tool.
For example, a pouch slider may travel smoothly until it reaches a bulky seam allowance beside the new stop. That resistance calls for clearing the fabric and checking stop placement, not compressing the slider or crushing the stop further.
Hardware that won't seat with controlled pressure may be the wrong shape despite a plausible size marking. The sensible next step is another fit check with the original component or the complete garment at hand. Preserving intact tape keeps replacement options open.
Read the Symptom Before Another Stop
A fresh stop can make a failing zipper feel fixed during a quick tabletop test. Under the tension of a fitted skirt or a zipped coat, the underlying problem may reappear.
The location of the failure helps distinguish a missing barrier from a chain or slider fault. A slider escaping at an end and teeth opening behind a moving slider are different problems.
Zipper symptoms after a stop repair
| Symptom | Likely cause | What to do |
|---|---|---|
| Slider runs off the top | Missing or loose top stop | Install top stops after the slider tests clean |
| Slider runs off a closed-end bottom | Missing bottom stop | Add a bottom stop; never across a separating zipper's lower connection |
| Jacket halves won't start | Bent pin, split box, or a bottom stop in the way | Replace the zipper for damaged pin or box hardware; assess removal of an incorrectly added obstruction before condemning sound hardware |
| Chain splits behind a new stop | Offset or bent teeth, or a mismatched or worn slider | Realign from the bottom; replace the zipper if a tooth stays bent, or replace a faulty slider when the chain is sound |
| Stop creeps down the tape | Incomplete seating, often after a single hard squeeze | Re-crimp at several points if the stop and tape remain undamaged |
| Tape is nicked | Nippers cut the fabric | Retire the zipper and install a new one |
A creeping stop doesn't automatically need more force. An oversized stop can remain loose after repeated squeezing, while damaged tape gives even correctly sized hardware little sound material to grip. Checking fit and fabric condition prevents a cycle of tightening, slipping, and tightening again.
A jacket that won't start needs especially careful inspection. A bent insertion pin or split box warrants replacement, but an incorrectly added bottom stop may be blocking otherwise functional hardware. Removing that obstruction and checking for damage is more useful than assuming every starting failure has the same cause.
What a clean slider test establishes
The MEC zipper-repair guide places slider fitting and testing before stop installation, with the slider matched to zipper size, type, and original orientation. That order separates a working chain from a merely trapped slider.
A wrong-width slider can appear to close a short section while scraping or distorting the coil farther along. New surface damage, increasing drag, or repeated separation calls for checking the slider specification rather than adding another terminal barrier.
Replacement threshold: Sound end hardware can't compensate for damaged material along the travel path.
The garment also needs testing in a realistic position. A waistband held under tension may reveal separation that doesn't appear with the skirt lying open, while a coat facing may fold into the slider only when the coat is worn.
Once the cause is clear, the repair decision becomes smaller and more useful: hardware replacement, slider replacement, or a complete new zipper. The guide to sewing a zipper supports the sewing stage when the chain itself has reached its limit.
Resew the Zipper or Bring It In
The final stitching should restore the garment without introducing a new obstruction. Basting holds the zipper tape and seam allowance in their intended positions, leaving the machine stitching to secure them rather than pull misaligned layers together.
A standard zipper foot lets the needle sew beside the chain while its narrow toe improves visibility. A zipper and piping adjustable foot may help where piping or similar raised trim sits beside the zipper, but compatibility must be checked against the machine model and attachment system. An accessory shouldn't be purchased on the assumption that a universal label guarantees fit.
A short resewing check
- Needle: A fresh needle appropriate to the garment fabric should pass through the fabric layers without striking teeth or hardware.
- Thread: Garment-sewing thread should suit the fabric and seam, rather than automatically duplicating the heavy thread used for a hand-worked stop.
- Positioning: Basting should preserve the original opening length and keep the facing clear of the slider.
- Machine clearance: Stitching stops before the foot rides onto the new stop; hand finishing is safer around inaccessible hardware.
The basic hand-sewing stitches guide is useful for closing a small lining opening or securing a facing where machine access is awkward. The needle shouldn't be driven across metal or plastic hardware to avoid a few hand stitches.
A full replacement involves more preparation: removing the failed zipper, matching the usable length and construction, and restoring even seam allowances. Lined coats and tightly enclosed facings can make that work substantially more involved than the stop replacement itself.
Hands-on help before the next purchase
B-Sew Inn is an authorized sewing, quilting, and embroidery machine dealer selling and servicing Baby Lock, Bernina, Bernette, Brother, and Janome machines, not a machine manufacturer or custom machine designer. Its range includes sergers, longarm quilting machines, embroidery designs, thread, stabilizer, notions, cabinets, and cutting tables, with shopping also available through its online store.
For this repair, contacting a store can help establish the next useful purchase: a compatible foot, suitable sewing supplies, or equipment for broader garment work. Garment-alteration availability should be confirmed before a visit; machine service and repair appointments are a separate offering from zipper repair.
Stores in Tulsa and Oklahoma City, Oklahoma; Springfield, Missouri; Humble, Texas; and Fayetteville, Arkansas give sewists a place to see, test, and try machines in person. In-person classes and machine mastery sessions support skill building, while service, repair, and trade-ins support existing equipment. Class schedules and suitable garment-sewing opportunities can be confirmed with the chosen location.
For zipper resewing, B-Sew Inn offers sewing machines, notions, machine service, and in-person learning opportunities. A visit to B-Sew Inn is the next step to check accessory compatibility, contact a local store about a class, or arrange machine service before the next garment project.

